Ingress and load balancing
Exposing services and managing external traffic in OpenShift Container Platform
Abstract
Chapter 1. Routes
1.1. Creating basic routes
If you have unencrypted HTTP, you can create a basic route with a route object.
1.1.1. Creating an HTTP-based route
You can use the following procedure to create a simple HTTP-based route to a web application, using the hello-openshift application as an example.
You can create a route to host your application at a public URL. The route can either be secure or unsecured, depending on the network security configuration of your application. An HTTP-based route is an unsecured route that uses the basic HTTP routing protocol and exposes a service on an unsecured application port.
Prerequisites
-
You installed the OpenShift CLI (
oc). - You are logged in as an administrator.
- You have a web application that exposes a port and a TCP endpoint listening for traffic on the port.
Procedure
Create a project called
hello-openshiftby running the following command:$ oc new-project hello-openshift
Create a pod in the project by running the following command:
$ oc create -f https://raw.githubusercontent.com/openshift/origin/master/examples/hello-openshift/hello-pod.json
Create a service called
hello-openshiftby running the following command:$ oc expose pod/hello-openshift
Create an unsecured route to the
hello-openshiftapplication by running the following command:$ oc expose svc hello-openshift
Verification
To verify that the
routeresource that you created, run the following command:$ oc get routes -o yaml hello-openshift
Example YAML definition of the created unsecured route
apiVersion: route.openshift.io/v1 kind: Route metadata: name: hello-openshift spec: host: www.example.com port: targetPort: 8080 to: kind: Service name: hello-openshiftwhere:
host-
Specifies an alias DNS record that points to the service. This field can be any valid DNS name, such as
www.example.com. The DNS name must follow DNS952 subdomain conventions. If not specified, a route name is automatically generated. targetPortSpecifies the target port on pods that is selected by the service that this route points to.
NoteTo display your default ingress domain, run the following command:
$ oc get ingresses.config/cluster -o jsonpath={.spec.domain}
1.1.2. Path-based routes
To serve multiple applications by using a single hostname, configure path-based routes. This HTTP-based configuration directs traffic to specific services by comparing the URL path component, ensuring requests match the most specific route defined.
The following table shows example routes and their accessibility:
Table 1.1. Route availability
| Route | When compared to | Accessible |
|---|---|---|
| www.example.com/test | www.example.com/test | Yes |
| www.example.com | No | |
| www.example.com/test and www.example.com | www.example.com/test | Yes |
| www.example.com | Yes | |
| www.example.com | www.example.com/text | Yes (Matched by the host, not the route) |
| www.example.com | Yes |
Example of an unsecured route with a path
apiVersion: route.openshift.io/v1
kind: Route
metadata:
  name: route-unsecured
spec:
  host: www.example.com
  path: "/test"
  to:
    kind: Service
name: service-name-
spec.host: Specifies the path attribute for a path-based route.
Path-based routing is not available when using passthrough TLS, as the router does not terminate TLS in that case and cannot read the contents of the request.
1.1.3. Creating a route for Ingress Controller sharding
You can use a route to host your application at a URL. Ingress Controller sharding helps balance incoming traffic load among a set of Ingress Controllers. Ingress Controller sharding can also isolate traffic to a specific Ingress Controller. For example, company A goes to one Ingress Controller and company B to another.
The following procedure describes how to create a route for Ingress Controller sharding, using the hello-openshift application as an example.
Prerequisites
-
You installed the OpenShift CLI (
oc). - You are logged in as a project administrator.
- You have a web application that exposes a port and an HTTP or TLS endpoint listening for traffic on the port.
- You have configured the Ingress Controller for sharding.
Procedure
Create a project called
hello-openshiftby running the following command:$ oc new-project hello-openshift
Create a pod in the project by running the following command:
$ oc create -f https://raw.githubusercontent.com/openshift/origin/master/examples/hello-openshift/hello-pod.json
Create a service called
hello-openshiftby running the following command:$ oc expose pod/hello-openshift
Create a route definition called
hello-openshift-route.yaml:YAML definition of the created route for sharding
apiVersion: route.openshift.io/v1 kind: Route metadata: labels: type: sharded name: hello-openshift-edge namespace: hello-openshift spec: subdomain: hello-openshift tls: termination: edge to: kind: Service name: hello-openshiftwhere:
type-
Specifies both the label key and its corresponding label value must match the ones specified in the Ingress Controller. In this example, the Ingress Controller has the label key and value
type: sharded. subdomain-
Specifies the route gets exposed by using the value of the
subdomainfield. When you specify thesubdomainfield, you must leave the hostname unset. If you specify both thehostandsubdomainfields, then the route uses the value of thehostfield, and ignore thesubdomainfield.
Use
hello-openshift-route.yamlto create a route to thehello-openshiftapplication by running the following command:$ oc -n hello-openshift create -f hello-openshift-route.yaml
Verification
Get the status of the route with the following command:
$ oc -n hello-openshift get routes/hello-openshift-edge -o yaml
The resulting
Routeresource should look similar to the following:Example output
apiVersion: route.openshift.io/v1 kind: Route metadata: labels: type: sharded name: hello-openshift-edge namespace: hello-openshift spec: subdomain: hello-openshift tls: termination: edge to: kind: Service name: hello-openshift status: ingress: - host: hello-openshift.<apps-sharded.basedomain.example.net> routerCanonicalHostname: router-sharded.<apps-sharded.basedomain.example.net> routerName: shardedwhere:
host-
Specifies the hostname the Ingress Controller, or router, uses to expose the route. The value of the
hostfield is automatically determined by the Ingress Controller, and uses its domain. In this example, the domain of the Ingress Controller is<apps-sharded.basedomain.example.net>. <apps-sharded.basedomain.example.net>- Specifies the hostname of the Ingress Controller. If the hostname is not set, the route can use a subdomain instead. When you specify a subdomain, you automatically use the domain of the Ingress Controller that exposes the route. When a route is exposed by multiple Ingress Controllers, the route is hosted at multiple URLs.
routerName-
Specifies the name of the Ingress Controller. In this example, the Ingress Controller has the name
sharded.
1.1.4. Creating a route through an Ingress object
To integrate ecosystem components that require Ingress resources, configure an Ingress object. OpenShift Container Platform automatically manages the lifecycle of the corresponding route objects, creating and deleting them to ensure seamless connectivity.
Prerequisites
- If clients must receive a full certificate chain, you must combine the PEM-encoded leaf certificate and intermediates into a single file. Place the leaf certificate first, followed by each issuer in chain order.
-
You confirmed the private key matches the leaf certificate in the
tls.crtkey. -
You confirmed the
tls.keykey has only the private key for the leaf certificate. -
The certificate Subject Alternative Name (SAN), or the subject CN if no SAN is present, covers every hostname set in
spec.rules[].hostandspec.tls[].hosts. These values must match for the same host. - The private key is not password-encrypted. You must decrypt the key before you create the TLS secret so that OpenShift Container Platform can read the key material.
-
You created a
Secretof typekubernetes.io/tlsin the same namespace as theIngress. ThesecretNamemust match thespec.tls[].secretNamefield. If you have not created the secret, you must do so before you apply theIngressobject.
Procedure
Define an Ingress object in the OpenShift Container Platform console or by entering the
oc createcommand:YAML Definition of an Ingress
apiVersion: networking.k8s.io/v1 kind: Ingress metadata: name: frontend annotations: route.openshift.io/termination: "reencrypt" route.openshift.io/destination-ca-certificate-secret: secret-ca-cert spec: rules: - host: www.example.com http: paths: - backend: service: name: frontend port: number: 443 path: / pathType: Prefix tls: - hosts: - www.example.com secretName: example-com-tls-certificate # ...where:
route.openshift.io/termination-
Specifies the
route.openshift.io/terminationannotation. You can configure thespec.tls.terminationparameter of theRoutebecauseIngressdoes not have this parameter. The accepted values areedge,passthrough, andreencrypt. All other values are silently ignored. When the annotation value is unset,edgeis the default route. The TLS certificate details must be defined in the template file to implement the default edge route. rules.host-
Specifies an explicit hostname for the
Ingressobject. Mandatory parameter. You can use the<host_name>.<cluster_ingress_domain>syntax, for exampleapps.openshiftdemos.com, to take advantage of the*.<cluster_ingress_domain>wildcard DNS record and serving certificate for the cluster. Otherwise, you must ensure that there is a DNS record for the chosen hostname. destination-ca-certificate-secretSpecifies the
route.openshift.io/destination-ca-certificate-secretannotation. The annotation can be used on an Ingress object to define a route with a custom destination certificate (CA). The annotation references a kubernetes secret,secret-ca-certthat will be inserted into the generated route.If you specify the
passthroughvalue in theroute.openshift.io/terminationannotation, setpathto''andpathTypetoImplementationSpecificin the spec:apiVersion: networking.k8s.io/v1 kind: Ingress # ... spec: rules: - host: www.example.com http: paths: - path: '' pathType: ImplementationSpecific backend: service: name: frontend port: number: 443 # ...$ oc apply -f ingress.yaml
-
To specify a route object with a destination CA from an ingress object, you must create a
kubernetes.io/tlsorOpaquetype secret with a certificate in PEM-encoded format in thedata.tls.crtspecifier of the secret.
List your routes:
$ oc get routes
The result includes an autogenerated route whose name starts with
frontend-:NAME HOST/PORT PATH SERVICES PORT TERMINATION WILDCARD frontend-gnztq www.example.com frontend 443 reencrypt/Redirect None
YAML definition example of an autogenerated route
apiVersion: route.openshift.io/v1
kind: Route
metadata:
  name: frontend-gnztq
  ownerReferences:
  - apiVersion: networking.k8s.io/v1
    controller: true
    kind: Ingress
    name: frontend
    uid: 4e6c59cc-704d-4f44-b390-617d879033b6
spec:
  host: www.example.com
  path: /
  port:
    targetPort: https
  tls:
    certificate: |
      -----BEGIN CERTIFICATE-----
      [...]
      -----END CERTIFICATE-----
    insecureEdgeTerminationPolicy: Redirect
    key: |
      -----BEGIN RSA PRIVATE KEY-----
      [...]
      -----END RSA PRIVATE KEY-----
    termination: reencrypt
    destinationCACertificate: |
      -----BEGIN CERTIFICATE-----
      [...]
      -----END CERTIFICATE-----
  to:
    kind: Service
    name: frontend
1.1.5. About label propagation from Ingress to Route resources
You can opt-in to a feature that enables the Ingress Operator to automatically propagate labels. This allows you to add metadata that helps track or manage resources, or to control specific behaviors that depend on labels.
By default, the managed Route object does not inherit labels from the Ingress resource. When you enable the propagation feature, the Operator actively reconciles the labels on the generated Route resource to match the labels on the parent Ingress resource.
When label propagation is enabled, the Ingress Operator replaces all labels on the managed Route resource with the exact set of labels from the parent Ingress resource. Any labels that were manually added to the Route resource are removed.
The propagation behavior is controlled by the route.openshift.io/reconcile-labels annotation on the Ingress resource. The Operator’s behavior changes depending on the state of this annotation:
-
Annotation not present (default): The Operator does not sync labels from the
Ingressresource to theRouteresource. Any existing labels on theRouteare preserved. -
Annotation enabled (
route.openshift.io/reconcile-labels: "true"): The Operator enables label propagation. On the next reconciliation (triggered by theIngresscreate or update event), the Operator replaces all labels on the generatedRouteresource with the labels from theIngressresource. -
Annotation disabled (removed or value set to non-"true"): The Operator disables label propagation. The labels that currently exist on the
Routeresource are kept as-is, but the Operator no longer syncs them with theIngressresource. -
Annotation re-enabled: The Operator resumes propagation. It will again replace all labels on the
Routeresource with the current labels from theIngressresource.
1.1.6. Enabling label propagation from Ingress to Route resources
You can enable the Ingress Operator to automatically propagate labels from an Ingress resource to the Route resource it manages. To enable this, you must add the reconcile-labels annotation to an Ingress resource.
Prerequisites
- You have access to an OpenShift Container Platform cluster.
-
You have the
cluster-adminrole or permissions to create and editIngressresources in a project.
Procedure
-
Create or edit an
Ingressresource manifest. -
In the
metadata.annotationssection, addroute.openshift.io/reconcile-labels: "true". In the
metadata.labelssection, add the labels you want to propagate.Example
Ingressresource with label propagation enabled:apiVersion: networking.k8s.io/v1 kind: Ingress metadata: name: example-ingress annotations: route.openshift.io/reconcile-labels: "true" labels: app: my-app owner: dev-team spec: ingressClassName: openshift-default rules: - host: example.com http: paths: - backend: service: name: example-service port: number: 27017 path: "/" pathType: "Prefix"Apply the manifest to your cluster:
$ oc apply -f <example-ingress-manifest.yaml>
Replace
<example-ingress-manifest.yaml>with the name of your specific manifest file.Verify that the labels from the
Ingressresource have propagated to the generatedRouteresource:$ oc get route -l app=my-app --show-labels
Example output:
NAME          HOST/PORT     PATH   SERVICES          PORT    TERMINATION   WILDCARD   LABELS
example-rt    example.com   /      example-service   8080                  None       app=my-app,owner=dev-team
1.2. Securing routes
You can secure a route with HTTP strict transport security (HSTS).
1.2.1. HTTP Strict Transport Security
To enhance security and optimize website performance, use the HTTP Strict Transport Security (HSTS) policy. This mechanism signals browsers to use only HTTPS traffic on the route host, eliminating the need for HTTP redirects and speeding up user interactions.
When HSTS policy is enforced, HSTS adds a Strict Transport Security header to HTTP and HTTPS responses from the site. You can use the insecureEdgeTerminationPolicy value in a route to redirect HTTP to HTTPS. When HSTS is enforced, the client changes all requests from the HTTP URL to HTTPS before the request is sent, eliminating the need for a redirect.
Cluster administrators can configure HSTS to do the following:
- Enable HSTS per-route
- Disable HSTS per-route
- Enforce HSTS per-domain, for a set of domains, or use namespace labels in combination with domains
HSTS works only with secure routes, either edge-terminated or re-encrypt. The configuration is ineffective on HTTP or passthrough routes.
1.2.1.1. Enabling HTTP Strict Transport Security per-route
To enforce secure HTTPS connections for specific applications, enable HTTP Strict Transport Security (HSTS) on a per-route basis. Applying the haproxy.router.openshift.io/hsts_header annotation to edge and re-encrypt routes ensures that browsers reject unencrypted traffic.
Prerequisites
- You are logged in to the cluster with a user with administrator privileges for the project.
-
You installed the OpenShift CLI (
oc).
Procedure
To enable HSTS on a route, add the
haproxy.router.openshift.io/hsts_headervalue to the edge-terminated or re-encrypt route. You can use theoc annotatetool to do this by running the following command. To properly run the command, ensure that the semicolon (;) in thehaproxy.router.openshift.io/hsts_headerroute annotation is also surrounded by double quotation marks ("").Example
annotatecommand that sets the maximum age to31536000ms (approximately 8.5 hours)$ oc annotate route <route_name> -n <namespace> --overwrite=true "haproxy.router.openshift.io/hsts_header=max-age=31536000;\ includeSubDomains;preload"
Example route configured with an annotation
apiVersion: route.openshift.io/v1 kind: Route metadata: annotations: haproxy.router.openshift.io/hsts_header: max-age=31536000;includeSubDomains;preload # ... spec: host: def.abc.com tls: termination: "reencrypt" ... wildcardPolicy: "Subdomain" # ...where:
max-age-
Specifies the measurement of the length of time, in seconds, for the HSTS policy. If set to
0, it negates the policy. includeSubDomains- Specifies that all subdomains of the host must have the same HSTS policy as the host. Optional parameter.
preload-
Specifies that the site is included in the HSTS preload list when
max-ageis greater than0. For example, sites such as Google can construct a list of sites that havepreloadset. Browsers can then use these lists to determine which sites they can communicate with over HTTPS, even before they have interacted with the site. Withoutpreloadset, browsers must have interacted with the site over HTTPS, at least once, to get the header. Optional parameter.
1.2.1.2. Disabling HTTP Strict Transport Security per-route
To allow unencrypted connections or troubleshoot access issues, disable HTTP Strict Transport Security (HSTS) for a specific route. Setting the max-age route annotation to 0 instructs browsers to stop enforcing HTTPS requirements on the route host.
Prerequisites
- You are logged in to the cluster with a user with administrator privileges for the project.
-
You installed the OpenShift CLI (
oc).
Procedure
To disable HSTS, enter the following to set the
max-agevalue in the route annotation to0:$ oc annotate route <route_name> -n <namespace> --overwrite=true "haproxy.router.openshift.io/hsts_header"="max-age=0"
TipYou can alternatively apply the following YAML to create the config map for disabling HSTS per-route:
kind: Route apiVersion: route.openshift.io/v1 metadata: annotations: haproxy.router.openshift.io/hsts_header: max-age=0To disable HSTS for every route in a namespace, enter the following command:
$ oc annotate route --all -n <namespace> --overwrite=true "haproxy.router.openshift.io/hsts_header"="max-age=0"
Verification
To query the annotation for all routes, enter the following command:
$ oc get route --all-namespaces -o go-template='{{range .items}}{{if .metadata.annotations}}{{$a := index .metadata.annotations "haproxy.router.openshift.io/hsts_header"}}{{$n := .metadata.name}}{{with $a}}Name: {{$n}} HSTS: {{$a}}{{"\n"}}{{else}}{{""}}{{end}}{{end}}{{end}}'Example output
Name: routename HSTS: max-age=0
1.2.1.3. Enforcing HTTP Strict Transport Security per-domain
To enforce HTTP Strict Transport Security (HSTS) per-domain for secure routes, add a requiredHSTSPolicies record to the Ingress spec to capture the configuration of the HSTS policy.
If you configure a requiredHSTSPolicy to enforce HSTS, then any newly created route must be configured with a compliant HSTS policy annotation.
To handle upgraded clusters with non-compliant HSTS routes, you can update the manifests at the source and apply the updates.
You cannot use oc expose route or oc create route commands to add a route in a domain that enforces HSTS, because the API for these commands does not accept annotations.
HSTS cannot be applied to insecure, or non-TLS routes, even if HSTS is requested for all routes globally.
Prerequisites
- You are logged in to the cluster with a user with administrator privileges for the project.
-
You installed the OpenShift CLI (
oc).
Procedure
Edit the Ingress configuration YAML by running the following command and updating fields as needed:
$ oc edit ingresses.config.openshift.io/cluster
Example HSTS policy
apiVersion: config.openshift.io/v1
kind: Ingress
metadata:
  name: cluster
spec:
  domain: 'hello-openshift-default.apps.username.devcluster.openshift.com'
  requiredHSTSPolicies: 1
  - domainPatterns: 2
    - '*hello-openshift-default.apps.username.devcluster.openshift.com'
    - '*hello-openshift-default2.apps.username.devcluster.openshift.com'
    namespaceSelector: 3
      matchLabels:
        myPolicy: strict
    maxAge: 4
      smallestMaxAge: 1
      largestMaxAge: 31536000
    preloadPolicy: RequirePreload 5
    includeSubDomainsPolicy: RequireIncludeSubDomains 6
  - domainPatterns:
    - 'abc.example.com'
    - '*xyz.example.com'
    namespaceSelector:
      matchLabels: {}
    maxAge: {}
    preloadPolicy: NoOpinion
    includeSubDomainsPolicy: RequireNoIncludeSubDomains
- 1
- Required.
requiredHSTSPoliciesare validated in order, and the first matchingdomainPatternsapplies. - 2
- Required. You must specify at least one
domainPatternshostname. Any number of domains can be listed. You can include multiple sections of enforcing options for differentdomainPatterns. - 3
- Optional. If you include
namespaceSelector, it must match the labels of the project where the routes reside, to enforce the set HSTS policy on the routes. Routes that only match thenamespaceSelectorand not thedomainPatternsare not validated. - 4
- Required.
max-agemeasures the length of time, in seconds, that the HSTS policy is in effect. This policy setting allows for a smallest and largestmax-ageto be enforced.-
The
largestMaxAgevalue must be between0and2147483647. It can be left unspecified, which means no upper limit is enforced. -
The
smallestMaxAgevalue must be between0and2147483647. Enter0to disable HSTS for troubleshooting, otherwise enter1if you never want HSTS to be disabled. It can be left unspecified, which means no lower limit is enforced.
-
The
- 5
- Optional. Including
preloadinhaproxy.router.openshift.io/hsts_headerallows external services to include this site in their HSTS preload lists. Browsers can then use these lists to determine which sites they can communicate with over HTTPS, before they have interacted with the site. Withoutpreloadset, browsers need to interact at least once with the site to get the header.preloadcan be set with one of the following:-
RequirePreload:preloadis required by theRequiredHSTSPolicy. -
RequireNoPreload:preloadis forbidden by theRequiredHSTSPolicy. -
NoOpinion:preloaddoes not matter to theRequiredHSTSPolicy.
-
- 6
- Optional.
includeSubDomainsPolicycan be set with one of the following:-
RequireIncludeSubDomains:includeSubDomainsis required by theRequiredHSTSPolicy. -
RequireNoIncludeSubDomains:includeSubDomainsis forbidden by theRequiredHSTSPolicy. -
NoOpinion:includeSubDomainsdoes not matter to theRequiredHSTSPolicy.
-
You can apply HSTS to all routes in the cluster or in a particular namespace by entering the
oc annotate command.To apply HSTS to all routes in the cluster, enter the
oc annotate command. For example:$ oc annotate route --all --all-namespaces --overwrite=true "haproxy.router.openshift.io/hsts_header"="max-age=31536000"
To apply HSTS to all routes in a particular namespace, enter the
oc annotate command. For example:$ oc annotate route --all -n my-namespace --overwrite=true "haproxy.router.openshift.io/hsts_header"="max-age=31536000"
Verification
You can review the HSTS policy you configured. For example:
To review the
maxAgeset for required HSTS policies, enter the following command:$ oc get clusteroperator/ingress -n openshift-ingress-operator -o jsonpath='{range .spec.requiredHSTSPolicies[*]}{.spec.requiredHSTSPolicies.maxAgePolicy.largestMaxAge}{"\n"}{end}'To review the HSTS annotations on all routes, enter the following command:
$ oc get route --all-namespaces -o go-template='{{range .items}}{{if .metadata.annotations}}{{$a := index .metadata.annotations "haproxy.router.openshift.io/hsts_header"}}{{$n := .metadata.name}}{{with $a}}Name: {{$n}} HSTS: {{$a}}{{"\n"}}{{else}}{{""}}{{end}}{{end}}{{end}}'Example output
Name: <_routename_> HSTS: max-age=31536000;preload;includeSubDomains
1.3. Configuring routes
To customise route configuration for specific traffic behaviors, apply annotations, headers, and cookies. By using these mechanisms, you can define granular routing rules, extending standard capabilities to meet complex application requirements.
1.3.1. Configuring route timeouts
You can configure the default timeouts for an existing route when you have services in need of a low timeout, which is required for Service Level Availability (SLA) purposes, or a high timeout, for cases with a slow back end.
If you configured a user-managed external load balancer in front of your OpenShift Container Platform cluster, ensure that the timeout value for the user-managed external load balancer is higher than the timeout value for the route. This configuration prevents network congestion issues over the network that your cluster uses.
Prerequisites
- You deployed an Ingress Controller on a running cluster.
Procedure
Using the
oc annotatecommand, add the timeout to the route:$ oc annotate route <route_name> \ --overwrite haproxy.router.openshift.io/timeout=<timeout><time_unit><timeout>: Supported time units are microseconds (us), milliseconds (ms), seconds (s), minutes (m), hours (h), or days (d).The following example sets a timeout of two seconds on a route named
myroute:$ oc annotate route myroute --overwrite haproxy.router.openshift.io/timeout=2s
1.3.2. HTTP header configuration
To customize request and response headers for your applications, configure the Ingress Controller or apply specific route annotations. Understanding the interaction between these configuration methods ensures you effectively manage global and route-specific header policies.
You can also set certain headers by using route annotations. The various ways of configuring headers can present challenges when working together.
You can only set or delete headers within an IngressController or Route CR, you cannot append them. If an HTTP header is set with a value, that value must be complete and not require appending in the future. In situations where it makes sense to append a header, such as the X-Forwarded-For header, use the spec.httpHeaders.forwardedHeaderPolicy field, instead of spec.httpHeaders.actions.
- Order of precedence
When the same HTTP header is modified both in the Ingress Controller and in a route, HAProxy prioritizes the actions in certain ways depending on whether it is a request or response header.
- For HTTP response headers, actions specified in the Ingress Controller are executed after the actions specified in a route. This means that the actions specified in the Ingress Controller take precedence.
- For HTTP request headers, actions specified in a route are executed after the actions specified in the Ingress Controller. This means that the actions specified in the route take precedence.
For example, a cluster administrator sets the X-Frame-Options response header with the value DENY in the Ingress Controller using the following configuration:
Example IngressController spec
apiVersion: operator.openshift.io/v1
kind: IngressController
# ...
spec:
  httpHeaders:
    actions:
      response:
      - name: X-Frame-Options
        action:
          type: Set
          set:
            value: DENY
A route owner sets the same response header that the cluster administrator set in the Ingress Controller, but with the value SAMEORIGIN using the following configuration:
Example Route spec
apiVersion: route.openshift.io/v1
kind: Route
# ...
spec:
  httpHeaders:
    actions:
      response:
      - name: X-Frame-Options
        action:
          type: Set
          set:
            value: SAMEORIGIN
When both the IngressController spec and Route spec are configuring the X-Frame-Options response header, then the value set for this header at the global level in the Ingress Controller takes precedence, even if a specific route allows frames. For a request header, the Route spec value overrides the IngressController spec value.
This prioritization occurs because the haproxy.config file uses the following logic, where the Ingress Controller is considered the front end and individual routes are considered the back end. The header value DENY applied to the front end configurations overrides the same header with the value SAMEORIGIN that is set in the back end:
frontend public
  http-response set-header X-Frame-Options 'DENY'

frontend fe_sni
  http-response set-header X-Frame-Options 'DENY'

frontend fe_no_sni
  http-response set-header X-Frame-Options 'DENY'

backend be_secure:openshift-monitoring:alertmanager-main
  http-response set-header X-Frame-Options 'SAMEORIGIN'
Additionally, any actions defined in either the Ingress Controller or a route override values set using route annotations.
- Special case headers
- The following headers are either prevented entirely from being set or deleted, or allowed under specific circumstances:
Table 1.2. Special case header configuration options
| Header name | Configurable using IngressController spec | Configurable using Route spec | Reason for disallowment | Configurable using another method |
|---|---|---|---|---|
|
| No | No |
The | No |
|
| No | Yes |
When the | No |
|
| No | No |
The |
Yes: the |
|
| No | No | The cookies that HAProxy sets are used for session tracking to map client connections to particular back-end servers. Allowing these headers to be set could interfere with HAProxy’s session affinity and restrict HAProxy’s ownership of a cookie. | Yes:
|
1.3.3. Setting or deleting HTTP request and response headers in a route
You can set or delete certain HTTP request and response headers for compliance purposes or other reasons. You can set or delete these headers either for all routes served by an Ingress Controller or for specific routes.
For example, you might want to enable a web application to serve content in alternate locations for specific routes if that content is written in multiple languages, even if there is a default global location specified by the Ingress Controller serving the routes.
The following procedure creates a route that sets the Content-Location HTTP request header so that the URL associated with the application, https://app.example.com, directs to the location https://app.example.com/lang/en-us. Directing application traffic to this location means that anyone using that specific route is accessing web content written in American English.
Prerequisites
-
You have installed the OpenShift CLI (
oc). - You are logged into an OpenShift Container Platform cluster as a project administrator.
- You have a web application that exposes a port and an HTTP or TLS endpoint listening for traffic on the port.
Procedure
Create a route definition and save it in a file called
app-example-route.yaml:YAML definition of the created route with HTTP header directives
apiVersion: route.openshift.io/v1 kind: Route # ... spec: host: app.example.com tls: termination: edge to: kind: Service name: app-example httpHeaders: actions: response: - name: Content-Location action: type: Set set: value: /lang/en-us # ...where:
actions- Specifies the list of actions you want to perform on the HTTP headers.
response- Specifies the type of header you want to change. In this case, a response header.
response.name- Specifies the name of the header you want to change. For a list of available headers you can set or delete, see HTTP header configuration.
action.type-
Specifies the type of action being taken on the header. This field can have the value
SetorDelete. set.value-
When setting HTTP headers, you must provide a
value. The value can be a string from a list of available directives for that header, for exampleDENY, or it can be a dynamic value that will be interpreted using HAProxy’s dynamic value syntax. In this case, the value is set to the relative location of the content.
Create a route to your existing web application using the newly created route definition:
$ oc -n app-example create -f app-example-route.yaml
For HTTP request headers, the actions specified in the route definitions are executed after any actions performed on HTTP request headers in the Ingress Controller. This means that any values set for those request headers in a route will take precedence over the ones set in the Ingress Controller. For more information on the processing order of HTTP headers, see HTTP header configuration.
1.3.4. Using cookies to keep route statefulness
To maintain stateful application traffic during pod restarts or scaling events, configure sticky sessions by using cookies. By using this method, you ensure that all incoming traffic reaches the same endpoint, preventing state loss even if the specific endpoint pod changes.
OpenShift Container Platform can use cookies to configure session persistence. The Ingress Controller selects an endpoint to handle any user requests, and creates a cookie for the session. The cookie is passed back in the response to the request and the user sends the cookie back with the next request in the session. The cookie tells the Ingress Controller which endpoint is handling the session, ensuring that client requests use the cookie so that they are routed to the same pod.
Cookies cannot be set on passthrough routes, because the HTTP traffic cannot be seen. Instead, a number is calculated based on the source IP address, which determines the backend.
If backends change, the traffic can be directed to the wrong server, making it less sticky. If you are using a load balancer, which hides source IP, the same number is set for all connections and traffic is sent to the same pod.
1.3.4.1. Annotating a route with a cookie
To enable applications to manage session persistence and load distribution, annotate the route with a custom cookie name. Overwriting the default cookie allows the backend application to identify and delete the specific cookie, forcing endpoint re-selection when necessary.
When a server is overloaded, the server tries to remove the requests from the client and redistribute the requests to other endpoints.
Procedure
Annotate the route with the specified cookie name:
$ oc annotate route <route_name> router.openshift.io/cookie_name="<cookie_name>"
where:
<route_name>- Specifies the name of the route.
<cookie_name>Specifies the name for the cookie.
For example, to annotate the route
my_routewith the cookie namemy_cookie:$ oc annotate route my_route router.openshift.io/cookie_name="my_cookie"
Capture the route hostname in a variable:
$ ROUTE_NAME=$(oc get route <route_name> -o jsonpath='{.spec.host}')where:
<route_name>- Specifies the name of the route.
Save the cookie, and then access the route:
$ curl $ROUTE_NAME -k -c /tmp/cookie_jar
Use the cookie saved by the previous command when connecting to the route:
$ curl $ROUTE_NAME -k -b /tmp/cookie_jar
1.3.5. Route-specific annotations
The Ingress Controller can set the default options for all the routes it exposes. An individual route can override some of these defaults by providing specific configurations in its annotations. Red Hat does not support adding a route annotation to an operator-managed route.
To create an allow list with multiple source IPs or subnets, use a space-delimited list. Any other delimiter type causes the list to be ignored without a warning or error message.
Table 1.3. Route annotations
| Variable | Description |
|---|---|
|
|
Sets the load-balancing algorithm. Available options are |
|
|
Disables the use of cookies to track related connections. If set to |
|
| Specifies an optional cookie to use for this route. The name must consist of any combination of upper and lower case letters, digits, "_", and "-". The default is the hashed internal key name for the route. |
|
|
Sets the maximum number of connections that are allowed to a backing pod from a router. |
|
|
Setting |
|
|
Limits the number of concurrent TCP connections made through the same source IP address. It accepts a numeric value. |
|
|
Limits the rate at which a client with the same source IP address can make HTTP requests. It accepts a numeric value. |
|
|
Limits the rate at which a client with the same source IP address can make TCP connections. It accepts a numeric value. |
|
| Sets the interval for the back-end health checks. (TimeUnits) |
|
| Sets an allowlist for the route. The allowlist is a space-separated list of IP addresses and CIDR ranges for the approved source addresses. Requests from IP addresses that are not in the allowlist are dropped.
The maximum number of IP addresses and CIDR ranges directly visible in the |
|
| Sets a Strict-Transport-Security header for the edge terminated or re-encrypt route. |
|
| Sets the rewrite path of the request on the backend. |
|
| Sets a value to restrict cookies. The values are:
This value is applicable to re-encrypt and edge routes only. For more information, see the Content from developer.mozilla.org is not included.SameSite cookies documentation. |
|
|
Sets the policy for handling the
|
-
By default, the router reloads every 5 s which resets the balancing connection across pods from the beginning. As a result, the
roundrobinstate is not preserved across reloads. This algorithm works best when pods have nearly identical computing capabilites and storage capacity. If your application or service has continuously changing endpoints, for example, due to the use of a CI/CD pipeline, uneven balancing can result. In this case, use a different algorithm. If the number of IP addresses and CIDR ranges in an allowlist exceeds 61, they are written into a separate file that is then referenced from the
haproxy.configfile. This file is stored in the/var/lib/haproxy/router/allowlistsfolder.NoteTo ensure that the addresses are written to the allowlist, check that the full list of CIDR ranges are listed in the Ingress Controller configuration file. The etcd object size limit restricts how large a route annotation can be. Because of this, it creates a threshold for the maximum number of IP addresses and CIDR ranges that you can include in an allowlist.
A route that allows only one specific IP address
metadata:
  annotations:
haproxy.router.openshift.io/ip_allowlist: 192.168.1.10A route that sets the load-balancing algorithm to leastconn
metadata:
  annotations:
haproxy.router.openshift.io/balance: leastconn-
The default load-balancing algorithm is
random.
A route that allows several IP addresses
metadata:
  annotations:
haproxy.router.openshift.io/ip_allowlist: 192.168.1.10 192.168.1.11 192.168.1.12A route that allows an IP address CIDR network
metadata:
  annotations:
haproxy.router.openshift.io/ip_allowlist: 192.168.1.0/24A route that allows both IP an address and IP address CIDR networks
metadata:
  annotations:
haproxy.router.openshift.io/ip_allowlist: 180.5.61.153 192.168.1.0/24 10.0.0.0/8A route specifying a rewrite target
apiVersion: route.openshift.io/v1
kind: Route
metadata:
  annotations:
    haproxy.router.openshift.io/rewrite-target: / 1
...- 1
- Sets
/as rewrite path of the request on the backend.
Setting the haproxy.router.openshift.io/rewrite-target annotation on a route specifies that the Ingress Controller should rewrite paths in HTTP requests using this route before forwarding the requests to the backend application. The part of the request path that matches the path specified in spec.path is replaced with the rewrite target specified in the annotation.
The following table provides examples of the path rewriting behavior for various combinations of spec.path, request path, and rewrite target.
Table 1.4. rewrite-target examples
| Route.spec.path | Request path | Rewrite target | Forwarded request path |
|---|---|---|---|
| /foo | /foo | / | / |
| /foo | /foo/ | / | / |
| /foo | /foo/bar | / | /bar |
| /foo | /foo/bar/ | / | /bar/ |
| /foo | /foo | /bar | /bar |
| /foo | /foo/ | /bar | /bar/ |
| /foo | /foo/bar | /baz | /baz/bar |
| /foo | /foo/bar/ | /baz | /baz/bar/ |
| /foo/ | /foo | / | N/A (request path does not match route path) |
| /foo/ | /foo/ | / | / |
| /foo/ | /foo/bar | / | /bar |
Certain special characters in haproxy.router.openshift.io/rewrite-target require special handling because they must be escaped properly. Refer to the following table to understand how these characters are handled.
Table 1.5. Special character handling
| For character | Use characters | Notes |
|---|---|---|
| # | \# | Avoid # because it terminates the rewrite expression |
| % | % or %% | Avoid odd sequences such as %%% |
| ‘ | \’ | Avoid ‘ because it is ignored |
All other valid URL characters can be used without escaping.
1.3.6. Throughput issue troubleshooting methods
To diagnose and resolve network throughput issues, such as unusually high latency between specific services, apply troubleshooting methods. Identifying connectivity bottlenecks helps ensure stable application performance within OpenShift Container Platform.
If pod logs do not reveal any cause of the problem, use the following methods to analyze performance issues:
Use a packet analyzer, such as
pingortcpdumpto analyze traffic between a pod and its node.For example, run the
tcpdumptool on each pod while reproducing the behavior that led to the issue. Review the captures on both sides to compare send and receive timestamps to analyze the latency of traffic to and from a pod. Latency can occur in OpenShift Container Platform if a node interface is overloaded with traffic from other pods, storage devices, or the data plane.$ tcpdump -s 0 -i any -w /tmp/dump.pcap host <podip 1> && host <podip 2> 1where:
podipSpecifies the IP address for the pod. Run the
oc get pod <pod_name> -o widecommand to get the IP address of a pod.The
tcpdumpcommand generates a file at/tmp/dump.pcapcontaining all traffic between these two pods. You can run the analyzer shortly before the issue is reproduced and stop the analyzer shortly after the issue is finished reproducing to minimize the size of the file. You can also run a packet analyzer between the nodes with:$ tcpdump -s 0 -i any -w /tmp/dump.pcap port 4789
Use a bandwidth measuring tool, such as
iperf, to measure streaming throughput and UDP throughput. Locate any bottlenecks by running the tool from the pods first, and then running it from the nodes.-
For information on installing and using
iperf, see this Red Hat Solution.
-
For information on installing and using
- In some cases, the cluster might mark the node with the router pod as unhealthy due to latency issues. Use worker latency profiles to adjust the frequency that the cluster waits for a status update from the node before taking action.
-
If your cluster has designated lower-latency and higher-latency nodes, configure the
spec.nodePlacementfield in the Ingress Controller to control the placement of the router pod.
1.3.7. Configuring the route admission policy
Administrators and application developers can run applications in multiple namespaces with the same domain name. This is for organizations where multiple teams develop microservices that are exposed on the same hostname.
Allowing claims across namespaces should only be enabled for clusters with trust between namespaces, otherwise a malicious user could take over a hostname. For this reason, the default admission policy disallows hostname claims across namespaces.
Prerequisites
- Cluster administrator privileges.
Procedure
Edit the
.spec.routeAdmissionfield of theingresscontrollerresource variable using the following command:$ oc -n openshift-ingress-operator patch ingresscontroller/default --patch '{"spec":{"routeAdmission":{"namespaceOwnership":"InterNamespaceAllowed"}}}' --type=mergeSample Ingress Controller configuration
spec: routeAdmission: namespaceOwnership: InterNamespaceAllowed ...TipYou can alternatively apply the following YAML to configure the route admission policy:
apiVersion: operator.openshift.io/v1
kind: IngressController
metadata:
  name: default
  namespace: openshift-ingress-operator
spec:
  routeAdmission:
    namespaceOwnership: InterNamespaceAllowed
1.3.8. Configuring the OpenShift Container Platform Ingress Controller for dual-stack networking
If your OpenShift Container Platform cluster is configured for IPv4 and IPv6 dual-stack networking, your cluster is externally reachable by OpenShift Container Platform routes.
The Ingress Controller automatically serves services that have both IPv4 and IPv6 endpoints, but you can configure the Ingress Controller for single-stack or dual-stack services.
Prerequisites
- You deployed an OpenShift Container Platform cluster on bare metal.
-
You installed the OpenShift CLI (
oc).
Procedure
To have the Ingress Controller serve traffic over IPv4/IPv6 to a workload, you can create a service YAML file or modify an existing service YAML file by setting the
ipFamiliesandipFamilyPolicyfields. For example:Sample service YAML file
apiVersion: v1 kind: Service metadata: creationTimestamp: yyyy-mm-ddT00:00:00Z labels: name: <service_name> manager: kubectl-create operation: Update time: yyyy-mm-ddT00:00:00Z name: <service_name> namespace: <namespace_name> resourceVersion: "<resource_version_number>" selfLink: "/api/v1/namespaces/<namespace_name>/services/<service_name>" uid: <uid_number> spec: clusterIP: 172.30.0.0/16 clusterIPs: 1 - 172.30.0.0/16 - <second_IP_address> ipFamilies: 2 - IPv4 - IPv6 ipFamilyPolicy: RequireDualStack 3 ports: - port: 8080 protocol: TCP targetport: 8080 selector: name: <namespace_name> sessionAffinity: None type: ClusterIP status: loadbalancer: {}These resources generate corresponding
endpoints. The Ingress Controller now watchesendpointslices.To view
endpoints, enter the following command:$ oc get endpoints
To view
endpointslices, enter the following command:$ oc get endpointslices
1.4. Creating advanced routes
To secure application traffic and serve custom certificates to clients, configure routes by using edge, passthrough, or re-encrypt TLS termination. By using these methods, you can define granular encryption rules, ensuring that traffic is decrypted and re-encrypted according to your specific security requirements.
1.4.1. Creating an edge route with a custom certificate
To secure traffic by using a custom certificate, configure a route with edge TLS termination by running the oc create route command. This configuration terminates encryption at the Ingress Controller before forwarding traffic to the destination pod.
The route specifies the TLS certificate and key that the Ingress Controller uses for the route.
The procedure creates a Route resource with a custom certificate and edge TLS termination. The procedure assumes that the certificate/key pair are in the tls.crt and tls.key files in the current working directory. You may also specify a CA certificate if needed to complete the certificate chain. Substitute the actual path names for tls.crt, tls.key, and (optionally) ca.crt. Substitute the name of the service that you want to expose for frontend. Substitute the appropriate hostname for www.example.com.
Prerequisites
- You must have a certificate/key pair in PEM-encoded files, where the certificate is valid for the route host.
- You might have a separate CA certificate in a PEM-encoded file that completes the certificate chain.
- You must have a service that you want to expose.
Password protected key files are not supported. To remove a passphrase from a key file, use the following command:
$ openssl rsa -in password_protected_tls.key -out tls.key
Procedure
Create a secure
Routeresource using edge TLS termination and a custom certificate.$ oc create route edge --service=frontend --cert=tls.crt --key=tls.key --ca-cert=ca.crt --hostname=www.example.com
If you examine the resulting
Routeresource, the resource should have a configuration similar to the following example:YAML Definition of the Secure Route
apiVersion: route.openshift.io/v1 kind: Route metadata: name: frontend spec: host: www.example.com to: kind: Service name: frontend tls: termination: edge key: |- -----BEGIN PRIVATE KEY----- [...] -----END PRIVATE KEY----- certificate: |- -----BEGIN CERTIFICATE----- [...] -----END CERTIFICATE----- caCertificate: |- -----BEGIN CERTIFICATE----- [...] -----END CERTIFICATE----- # ...See
oc create route edge --helpfor more options.
1.4.2. Creating a re-encrypt route with a custom certificate
To secure traffic by using a custom certificate, configure a route with re-encrypt TLS termination by running the oc create route command. This configuration enables the Ingress Controller to decrypt traffic, and then re-encrypt traffic before forwarding the traffic to the destination pod.
The procedure creates a Route resource with a custom certificate and reencrypt TLS termination. The procedure assumes that the certificate/key pair are in the tls.crt and tls.key files in the current working directory. You must also specify a destination CA certificate to enable the Ingress Controller to trust the service’s certificate. You may also specify a CA certificate if needed to complete the certificate chain. Substitute the actual path names for tls.crt, tls.key, cacert.crt, and (optionally) ca.crt. Substitute the name of the Service resource that you want to expose for frontend. Substitute the appropriate hostname for www.example.com.
Prerequisites
- You must have a certificate/key pair in PEM-encoded files, where the certificate is valid for the route host.
- You may have a separate CA certificate in a PEM-encoded file that completes the certificate chain.
- You must have a separate destination CA certificate in a PEM-encoded file.
- You must have a service that you want to expose.
Password protected key files are not supported. To remove a passphrase from a key file, use the following command:
$ openssl rsa -in password_protected_tls.key -out tls.key
Procedure
Create a secure
Routeresource using reencrypt TLS termination and a custom certificate:$ oc create route reencrypt --service=frontend --cert=tls.crt --key=tls.key --dest-ca-cert=destca.crt --ca-cert=ca.crt --hostname=www.example.com
If you examine the resulting
Routeresource, the resource should have a configuration similar to the following example:YAML Definition of the Secure Route
apiVersion: route.openshift.io/v1 kind: Route metadata: name: frontend spec: host: www.example.com to: kind: Service name: frontend tls: termination: reencrypt key: |- -----BEGIN PRIVATE KEY----- [...] -----END PRIVATE KEY----- certificate: |- -----BEGIN CERTIFICATE----- [...] -----END CERTIFICATE----- caCertificate: |- -----BEGIN CERTIFICATE----- [...] -----END CERTIFICATE----- destinationCACertificate: |- -----BEGIN CERTIFICATE----- [...] -----END CERTIFICATE----- # ...See
oc create route reencrypt --helpfor more options.
1.4.3. Creating a passthrough route
To send encrypted traffic directly to the destination without decryption at the router, configure a route with passthrough termination by running the oc create route command. This configuration requires no key or certificate on the route, as the destination pod handles TLS termination.
Prerequisites
- You must have a service that you want to expose.
Procedure
Create a
Routeresource:$ oc create route passthrough route-passthrough-secured --service=frontend --port=8080
If you examine the resulting
Routeresource, it should look similar to the following:A Secured Route Using Passthrough Termination
apiVersion: route.openshift.io/v1 kind: Route metadata: name: route-passthrough-secured spec: host: www.example.com port: targetPort: 8080 tls: termination: passthrough insecureEdgeTerminationPolicy: None to: kind: Service name: frontendwhere:
metadata.name- Specifies the name of the object, which is limited to 63 characters.
tls.termination-
Specifies the
terminationfield is set topassthrough. This is the only requiredtlsfield. tls.insecureEdgeTerminationPolicySpecifies the type of edge termination policy. Optional parameter. The only valid values are
None,Redirect, or empty for disabled.The destination pod is responsible for serving certificates for the traffic at the endpoint. This is currently the only method that can support requiring client certificates, also known as two-way authentication.
1.4.4. Creating a route using the destination CA certificate in the Ingress annotation
To define a route with a custom destination CA certificate, apply the route.openshift.io/destination-ca-certificate-secret annotation to an Ingress object. This configuration ensures the Ingress Controller uses the specified secret to verify the identity of the destination service.
Prerequisites
- You have a certificate/key pair in PEM-encoded files, where the certificate is valid for the route host.
- You have a separate CA certificate in a PEM-encoded file that completes the certificate chain.
- You have a separate destination CA certificate in a PEM-encoded file.
- You have a service that you want to expose.
Procedure
Create a secret for the destination CA certificate by entering the following command:
$ oc create secret generic dest-ca-cert --from-file=tls.crt=<file_path>
For example:
$ oc -n test-ns create secret generic dest-ca-cert --from-file=tls.crt=tls.crt
Example output
secret/dest-ca-cert created
Add the
route.openshift.io/destination-ca-certificate-secretto the Ingress annotations:apiVersion: networking.k8s.io/v1 kind: Ingress metadata: name: frontend annotations: route.openshift.io/termination: "reencrypt" route.openshift.io/destination-ca-certificate-secret: secret-ca-cert ...where:
destination-ca-certificate-secretSpecifies the
route.openshift.io/destination-ca-certificate-secretannotation. The annotation references a Kubernetes secret.The Ingress Controller inserts a secret that is referenced in the annotation into the generated route.
Example output
apiVersion: route.openshift.io/v1
kind: Route
metadata:
  name: frontend
  annotations:
    route.openshift.io/termination: reencrypt
    route.openshift.io/destination-ca-certificate-secret: secret-ca-cert
spec:
...
  tls:
    insecureEdgeTerminationPolicy: Redirect
    termination: reencrypt
    destinationCACertificate: |
      -----BEGIN CERTIFICATE-----
      [...]
      -----END CERTIFICATE-----
...
1.4.5. Creating a route with externally managed certificates
You can configure OpenShift Container Platform routes with third-party certificate management solutions by using the .spec.tls.externalCertificate field of the route API. You can reference externally managed TLS certificates via secrets, eliminating the need for manual certificate management.
By using the externally managed certificate, you can reduce errors to ensure a smoother rollout of certificate updates and enable the OpenShift router to serve renewed certificates promptly. You can use externally managed certificates with both edge routes and re-encrypt routes.
Prerequisites
-
You must have a secret containing a valid certificate or key pair in PEM-encoded format of type
kubernetes.io/tls, which includes bothtls.keyandtls.crtkeys. Example command:$ oc create secret tls myapp-tls --cert=server.crt --key=server.key.
Procedure
Create a
roleobject in the same namespace as the secret to allow the router service account read access by running the following command:$ oc create role secret-reader --verb=get,list,watch --resource=secrets --resource-name=<secret-name> \ --namespace=<current-namespace>
-
<secret-name>: Specify the actual name of your secret. -
<current-namespace>: Specify the namespace where both your secret and route reside.
-
Create a
rolebindingobject in the same namespace as the secret and bind the router service account to the newly created role by running the following command:$ oc create rolebinding secret-reader-binding --role=secret-reader --serviceaccount=openshift-ingress:router --namespace=<current-namespace>
-
<current-namespace>: Specify the namespace where both your secret and route reside.
-
Create a YAML file that defines the
routeand specifies the secret containing your certificate using the following example.YAML definition of the secure route
apiVersion: route.openshift.io/v1 kind: Route metadata: name: myedge namespace: test spec: host: myedge-test.apps.example.com tls: externalCertificate: name: <secret-name> termination: edge [...] [...]-
<secret-name>: Specify the actual name of your secret.
-
Create a
routeresource by running the following command:$ oc apply -f <route.yaml>
<route.yaml>: Specify the generated YAML filename.If the secret exists and has a certificate/key pair, the router will serve the generated certificate if all prerequisites are met.
NoteIf
.spec.tls.externalCertificateis not provided, the router uses default generated certificates.You cannot provide the
.spec.tls.certificatefield or the.spec.tls.keyfield when using the.spec.tls.externalCertificatefield.
1.4.6. Creating a route using the default certificate through an Ingress object
To generate a secure, edge-terminated route that uses the default ingress certificate, specify an empty TLS configuration in the Ingress object. This configuration overrides the default behavior, preventing the creation of an insecure route.
Prerequisites
- You have a service that you want to expose.
-
You have access to the OpenShift CLI (
oc).
Procedure
Create a YAML file for the Ingress object. In the following example, the file is called
example-ingress.yaml:YAML definition of an Ingress object
apiVersion: networking.k8s.io/v1 kind: Ingress metadata: name: frontend ... spec: rules: ... tls: - {}where:
spec.tls- Specifies the TLS configuration. Use the exact syntax shown to specify TLS without specifying a custom certificate.
Create the Ingress object by running the following command:
$ oc create -f example-ingress.yaml
Verification
Verify that OpenShift Container Platform has created the expected route for the Ingress object by running the following command:
$ oc get routes -o yaml
Example output
apiVersion: v1 items: - apiVersion: route.openshift.io/v1 kind: Route metadata: name: frontend-j9sdd # ... spec: ... tls: insecureEdgeTerminationPolicy: Redirect termination: edge # ...where:
metadata.name- Specifies the name of the route, which includes the name of the Ingress object followed by a random suffix.
spec.tls-
To use the default certificate, the route should not specify
spec.certificate. tls.termination-
Specifies the termination policy for the route. The route should specify the
edgetermination policy.
Chapter 2. Configuring ingress cluster traffic
2.1. Configuring ingress cluster traffic overview
To enable communication between external networks and services in OpenShift Container Platform, configure ingress cluster traffic.
2.1.1. Methods for communicating from outside the cluster
To enable communication between external networks and services in OpenShift Container Platform, configure the appropriate ingress method.
OpenShift Container Platform provides the following methods for communicating from outside the cluster with services running in the cluster. Note that the methods are listed in order of preference.
- If you have HTTP/HTTPS, use an Ingress Controller.
- If you have a TLS-encrypted protocol other than HTTPS. For example, for TLS with the SNI header, use an Ingress Controller.
-
Otherwise, use a Load Balancer, an External IP, or a
NodePort.
| Method | Purpose |
|---|---|
| Use an Ingress Controller | Allows access to HTTP/HTTPS traffic and TLS-encrypted protocols other than HTTPS (for example, TLS with the SNI header). |
| Automatically assign an external IP using a load balancer service | Allows traffic to non-standard ports through an IP address assigned from a pool. Most cloud platforms offer a method to start a service with a load-balancer IP address. |
| About MetalLB and the MetalLB Operator | Allows traffic to a specific IP address or address from a pool on the machine network. For bare-metal installations or platforms that are like bare metal, MetalLB provides a way to start a service with a load-balancer IP address. |
| Manually assign an external IP to a service | Allows traffic to non-standard ports through a specific IP address. |
|
Configure a | Expose a service on all nodes in the cluster. |
2.1.2. Additional resources
2.1.3. Comparison: Fault-tolerant access to external IP addresses
To ensure continuous service availability and maintain external IP access in OpenShift Container Platform, configure fault-tolerant networking features.
For the communication methods that provide access to an external IP address, fault tolerant access to the IP address is another consideration. The following features provide fault tolerant access to an external IP address.
- IP failover
- IP failover manages a pool of virtual IP addresses for a set of nodes. IP failover gets implemented with Keepalived and Virtual Router Redundancy Protocol (VRRP). IP failover is a layer 2 mechanism only and relies on multicast. Multicast can have disadvantages for some networks.
- MetalLB
- MetalLB has a layer 2 mode, but it does not use multicast. Layer 2 mode has a disadvantage that it transfers all traffic for an external IP address through one node.
- Manually assigning external IP addresses
- You can configure your cluster with an IP address block that is used to assign external IP addresses to services. By default, this feature is disabled. This feature is flexible, but places the largest burden on the cluster or network administrator. The cluster is prepared to receive traffic that is destined for the external IP, but you must decide how to route traffic to nodes.
2.2. Configuring ExternalIPs for services
As a cluster administrator, you can select an IP address block that is external to the cluster and can send traffic to services in the cluster. This functionality is generally most useful for clusters installed on bare-metal hardware.
Before you configure ExternalIPs for services, your network infrastructure must route traffic for the external IP addresses to your cluster.
2.2.1. About ExternalIP
To load balance traffic in non-cloud environments, use the ExternalIP facility to specify external IP addresses in the spec.externalIPs[] parameter of the Service object. This configuration directs traffic to a local node, providing functionality similar to a type=NodePort service.
For cloud environments, use the load balancer services for automatic deployment of a cloud load balancer to target the endpoints of a service.
After you specify a value for the parameter, OpenShift Container Platform assigns an additional virtual IP address to the service. The IP address can exist outside of the service network that you defined for your cluster.
Because ExternalIP is disabled by default, enabling the ExternalIP functionality might introduce security risks for the service, because in-cluster traffic to an external IP address is directed to that service. This configuration means that cluster users could intercept sensitive traffic destined for external resources.
You can use either a MetalLB implementation or an IP failover deployment to attach an ExternalIP resource to a service in the following ways:
- Automatic assignment of an external IP
-
OpenShift Container Platform automatically assigns an IP address from the
autoAssignCIDRsCIDR block to thespec.externalIPs[]array when you create aServiceobject withspec.type=LoadBalancerset. For this configuration, OpenShift Container Platform implements a cloud version of the load balancer service type and assigns IP addresses to the services. Automatic assignment is disabled by default and must be configured by a cluster administrator as described in the "Configuration for ExternalIP" section. - Manual assignment of an external IP
-
OpenShift Container Platform uses the IP addresses assigned to the
spec.externalIPs[]array when you create aServiceobject. You cannot specify an IP address that is already in use by another service.
After using either the MetalLB implementation or an IP failover deployment to host external IP address blocks, you must configure your networking infrastructure to ensure that the external IP address blocks are routed to your cluster. This configuration means that the IP address is not configured in the network interfaces from nodes. To handle the traffic, you must configure the routing and access to the external IP by using a method, such as static Address Resolution Protocol (ARP) entries.
OpenShift Container Platform extends the ExternalIP functionality in Kubernetes by adding the following capabilities:
- Restrictions on the use of external IP addresses by users through a configurable policy
- Allocation of an external IP address automatically to a service upon request
2.2.2. Configuration for ExternalIP
You can set parameters in the Network.config.openshift.io custom resource (CR) to govern the use of an external IP address in OpenShift Container Platform.
The following list details these parameters:
-
spec.externalIP.autoAssignCIDRsdefines an IP address block used by the load balancer when choosing an external IP address for the service. OpenShift Container Platform supports only a single IP address block for automatic assignment. This configuration requires less steps than manually assigning ExternalIPs to services, which requires managing the port space of a limited number of shared IP addresses. If you enable automatic assignment, the Cloud Controller Manager Operator allocates an external IP address to aServiceobject withspec.type=LoadBalancerdefind in its configuration. -
spec.externalIP.policydefines the permissible IP address blocks when manually specifying an IP address. OpenShift Container Platform does not apply policy rules to IP address blocks that you defined in thespec.externalIP.autoAssignCIDRsparameter.
If routed correctly, external traffic from the configured external IP address block can reach service endpoints through any TCP or UDP port that the service exposes.
As a cluster administrator, you must configure routing to externalIPs. You must also ensure that the IP address block you assign terminates at one or more nodes in your cluster. For more information, see Content from kubernetes.io is not included.Kubernetes External IPs.
OpenShift Container Platform supports both automatic and manual IP address assignment. This support guarantees that each address gets assigned to a maximum of one service and that each service can expose its chosen ports regardless of the ports exposed by other services.
To use IP address blocks defined by autoAssignCIDRs in OpenShift Container Platform, you must configure the necessary IP address assignment and routing for your host network.
The following YAML describes a service with an external IP address configured:
Example Service object with spec.externalIPs[] set
apiVersion: v1
kind: Service
metadata:
  name: http-service
spec:
  clusterIP: 172.30.163.110
  externalIPs:
  - 192.168.132.253
  externalTrafficPolicy: Cluster
  ports:
  - name: highport
    nodePort: 31903
    port: 30102
    protocol: TCP
    targetPort: 30102
  selector:
    app: web
  sessionAffinity: None
  type: LoadBalancer
status:
  loadBalancer:
    ingress:
    - ip: 192.168.132.253
# ...
If you run a private cluster on a cloud-provider platform, you can change the publishing scope to internal for the load balancer of the Ingress Controller by running the following patch command:
$ oc -n openshift-ingress-operator patch ingresscontrollers/ingress-controller-with-nlb --type=merge --patch='{"spec":{"endpointPublishingStrategy":{"loadBalancer":{"scope":"Internal"}}}}'After you run this command, the Ingress Controller restricts access to routes for OpenShift Container Platform applications to internal networks only.
2.2.3. Applying restrictions on the assignment of an external IP address
As a cluster administrator, you can specify IP address blocks to allow and to reject IP addresses for a service. Restrictions apply only to users without cluster-admin privileges. A cluster administrator can always set the service spec.externalIPs[] field to any IP address.
When configuring policy restrictions, the following rules apply:
-
If
policyis set to{}, creating aServiceobject withspec.ExternalIPs[]results in a failed service. This setting is the default for OpenShift Container Platform. The same behavior exists forpolicy: null. If
policyis set and eitherpolicy.allowedCIDRs[]orpolicy.rejectedCIDRs[]is set, the following rules apply:-
If
allowedCIDRs[]andrejectedCIDRs[]are both set,rejectedCIDRs[]has precedence overallowedCIDRs[]. -
If
allowedCIDRs[]is set, creating aServiceobject withspec.ExternalIPs[]succeeds only if the specified IP addresses are allowed. -
If
rejectedCIDRs[]is set, creating aServiceobject withspec.ExternalIPs[]succeeds only if the specified IP addresses are not rejected.
-
If
Procedure
Configure an IP address policy by specifying Classless Inter-Domain Routing (CIDR) address blocks for the
spec.ExternalIP.policyparameter in thepolicyobject:Example in JSON form of a
policyobject and its CIDR parameters{ "policy": { "allowedCIDRs": [], "rejectedCIDRs": [] } }
2.2.4. Example policy objects
Reference the examples in the Example policy objects section to understand different spec.externalIP.policy configurations.
In the following example, the policy prevents OpenShift Container Platform from creating any service with a specified external IP address.
Example policy to reject any value specified for Service object spec.externalIPs[]
apiVersion: config.openshift.io/v1
kind: Network
metadata:
  name: cluster
spec:
  externalIP:
    policy: {}
# ...
In the following example, both the allowedCIDRs and rejectedCIDRs fields are set.
Example policy that includes both allowed and rejected CIDR blocks
apiVersion: config.openshift.io/v1
kind: Network
metadata:
  name: cluster
spec:
  externalIP:
    policy:
      allowedCIDRs:
      - 172.16.66.10/23
      rejectedCIDRs:
      - 172.16.66.10/24
# ...
In the following example, policy is set to {}. With this configuration, using the oc get networks.config.openshift.io -o yaml command to view the configuration means policy parameter does not show on the command output. The same behavior exists for policy: null.
Example policy to allow any value specified for Service object spec.externalIPs[]
apiVersion: config.openshift.io/v1
kind: Network
metadata:
  name: cluster
spec:
  clusterNetwork:
  - cidr: 10.128.0.0/14
    hostPrefix: 23
  externalIP:
    policy: {}
# ...2.2.5. ExternalIP address block configuration
To better understand ExternalIP address blocks, view the example configuration for ExternalIP address blocks that is defined by a Network custom resource (CR) named cluster. The Network CR is part of the config.openshift.io API group.
During cluster installation, the Cluster Version Operator (CVO) automatically creates a Network CR named cluster. Creating any other CR objects of this type is not supported.
The following YAML describes the ExternalIP configuration in a Network.config.openshift.io CR named cluster:
apiVersion: config.openshift.io/v1
kind: Network
metadata:
  name: cluster
spec:
  externalIP:
    autoAssignCIDRs: []
    policy:
...-
autoAssignCIDRs: Defines the IP address block in CIDR format that is available for automatic assignment of external IP addresses to a service. Only a single IP address range is allowed. -
policy: Defines restrictions on manual assignment of an IP address to a service. If no restrictions are defined, specifying thespec.externalIPfield in aServiceobject is not allowed. By default, no restrictions are defined.
The following YAML describes the fields for the policy stanza in the Network.config.openshift.io CR:
policy:
  allowedCIDRs: []
  rejectedCIDRs: []
-
allowedCIDRs: A list of allowed IP address ranges in CIDR format. -
rejectedCIDRs: A list of rejected IP address ranges in CIDR format.
The next set of example configurations show external IP address pools configurations.
The following YAML shows a spec.externalIP.autoAssignCIDRs configuration that enables automatically assigned external IP addresses:
Example configuration with spec.externalIP.autoAssignCIDRs set
apiVersion: config.openshift.io/v1
kind: Network
metadata:
  name: cluster
spec:
  ...
  externalIP:
    autoAssignCIDRs:
    - 192.168.132.254/29
The following YAML configuration includes a spec.externalIP.policy configuration that sets policy rules for the allowed and rejected CIDR ranges:
apiVersion: config.openshift.io/v1
kind: Network
metadata:
  name: cluster
spec:
  ...
  externalIP:
    policy:
      allowedCIDRs:
      - 192.168.132.0/29
      - 192.168.132.8/29
      rejectedCIDRs:
- 192.168.132.7/322.2.6. Configure external IP address blocks for your cluster
As a cluster administrator, you can configure the ExternalIP settings to provide predictable entry points for external traffic to reach your cluster.
The following list details these ExternalIP settings:
-
An ExternalIP address block used by OpenShift Container Platform to automatically populate the
spec.clusterIPfield for aServiceobject. -
A policy object to restrict what IP addresses may be manually assigned to the
spec.clusterIParray of aServiceobject.
Prerequisites
-
Install the OpenShift CLI (
oc) -
Access to the cluster as a user with the
cluster-adminrole.
Procedure
Optional: To display the current external IP configuration, enter the following command:
$ oc describe networks.config cluster
To edit the configuration, enter the following command:
$ oc edit networks.config cluster
Modify the ExternalIP configuration, as in the following example:
apiVersion: config.openshift.io/v1
kind: Network
metadata:
  name: cluster
spec:
  ...
  externalIP:
  ...
-
externalIP: Specify the configuration for theexternalIPstanza.
-
To confirm the updated ExternalIP configuration, enter the following command:
$ oc get networks.config cluster -o go-template='{{.spec.externalIP}}{{"\n"}}'
2.2.7. Additional resources
2.2.8. Next steps
2.3. Configuring ingress cluster traffic by using an Ingress Controller
You can use the Ingress Controller to control how external users communicate with services that run inside the cluster.
Before you begin any of the procedures that are listed in the Configuring ingress cluster traffic by using an Ingress Controller document, ensure that you meet the following prerequisites. A cluster administrator performs these prerequisites:
- Set up the external port to the cluster networking environment so that requests can reach the cluster.
Make sure there is at least one user with cluster admin role. To add this role to a user, run the following command:
$ oc adm policy add-cluster-role-to-user cluster-admin username
- You have an OpenShift Container Platform cluster with at least one master and at least one node and a system outside the cluster that has network access to the cluster. This procedure assumes that the external system is on the same subnet as the cluster. The additional networking required for external systems on a different subnet is out-of-scope for this topic.
2.3.1. Using Ingress Controllers and routes
You can use the Ingress Controller to allow external access to an OpenShift Container Platform cluster. The Ingress Operator manages Ingress Controllers and wildcard DNS.
An Ingress Controller is configured to accept external requests and proxy them based on the configured routes. This is limited to HTTP, HTTPS using SNI, and TLS using SNI, which is sufficient for web applications and services that work over TLS with SNI.
Work with your administrator to configure an Ingress Controller to accept external requests and proxy them based on the configured routes.
The administrator can create a wildcard DNS entry and then set up an Ingress Controller. Then, you can work with the edge Ingress Controller without having to contact the administrators.
By default, every Ingress Controller in the cluster can admit any route created in any project in the cluster. The Ingress Controller has the following characteristics:
- Has two replicas by default, which means it should be running on two compute nodes.
- Can be scaled up to have more replicas on more nodes.
2.3.2. Creating a project and service
If the project and service that you want to expose does not exist, create the project and then create the service.
If the project and service already exists, skip to the procedure on exposing the service to create a route.
Prerequisites
-
Install the OpenShift CLI (
oc) and log in as a cluster administrator.
Procedure
Create a new project for your service by running the
oc new-projectcommand:$ oc new-project <project_name>
Use the
oc new-appcommand to create your service:$ oc new-app nodejs:12~https://github.com/sclorg/nodejs-ex.git
To verify that the service was created, run the following command:
$ oc get svc -n <project_name>
Example output
NAME        TYPE        CLUSTER-IP       EXTERNAL-IP   PORT(S)    AGE
nodejs-ex   ClusterIP   172.30.197.157   <none>        8080/TCP   70s
NoteBy default, the new service does not have an external IP address.
2.3.3. Exposing the service by creating a route
To enable external access to your application that runs on OpenShift Container Platform, you can expose the service as a route by using the oc expose command.
Prerequisites
- You logged into OpenShift Container Platform.
Procedure
Log in to the project where the service you want to expose is located:
$ oc project <project_name>
Run the
oc expose servicecommand to expose the route:$ oc expose service nodejs-ex
Example output
route.route.openshift.io/nodejs-ex exposed
To verify that the service is exposed, you can use a tool, such as
curlto check that the service is accessible from outside the cluster.To find the hostname of the route, enter the following command:
$ oc get route
Example output
NAME        HOST/PORT                        PATH   SERVICES    PORT       TERMINATION   WILDCARD
nodejs-ex   nodejs-ex-myproject.example.com         nodejs-ex   8080-tcp                 None
To check that the host responds to a GET request, enter the following command:
Example
curlcommand$ curl --head nodejs-ex-myproject.example.com
Example output
HTTP/1.1 200 OK
...
2.3.4. Ingress sharding in OpenShift Container Platform
To optimise routing performance in OpenShift Container Platform, create shards so that you can load balance incoming traffic across multiple Ingress Controllers.
In OpenShift Container Platform, an Ingress Controller can serve all routes, or it can serve a subset of routes. By default, the Ingress Controller serves any route created in any namespace of the cluster. You can add additional Ingress Controllers to your cluster to optimize routing by creating shards, which are subsets of routes based on selected characteristics. To mark a route as a member of a shard, use labels in the route or namespace metadata field. The Ingress Controller uses selectors, also known as a selection expression, to select a subset of routes from the entire pool of routes to serve.
You can also use Ingress sharding when you want to isolate traffic so that the traffic can route to a specific Ingress Controller.
By default, each route uses the default domain of the cluster. However, routes can be configured to use the domain of the router instead.
2.3.5. Ingress Controller sharding
You can use Ingress sharding, also known as router sharding, to distribute a set of routes across multiple routers by adding labels to routes, namespaces, or both.
The Ingress Controller uses a corresponding set of selectors to admit only the routes that have a specified label. Each Ingress shard comprises the routes that are filtered by using a given selection expression.
As the primary mechanism for traffic to enter the cluster, the demands on the Ingress Controller can be significant. As a cluster administrator, you can shard the routes to the following components:
- Balance Ingress Controllers, or routers, with several routes to accelerate responses to changes.
- Assign certain routes to have different reliability guarantees than other routes.
- Allow certain Ingress Controllers to have different policies defined.
- Allow only specific routes to use additional features.
- Expose different routes on different addresses so that internal and external users can see different routes, for example.
- Transfer traffic from one version of an application to another during a blue-green deployment.
When Ingress Controllers are sharded, a given route is admitted to zero or more Ingress Controllers in the group. The status of a route describes whether an Ingress Controller has admitted the route. An Ingress Controller only admits a route if the route is unique to a shard.
With sharding, you can distribute subsets of routes over multiple Ingress Controllers. These subsets can be nonoverlapping, also called traditional sharding, or overlapping, otherwise known as overlapped sharding.
The following table outlines three sharding methods:
| Sharding method | Description |
|---|---|
| Namespace selector | After you add a namespace selector to the Ingress Controller, all routes in a namespace that have matching labels for the namespace selector are included in the Ingress shard. Consider this method when an Ingress Controller serves all routes created in a namespace. |
| Route selector | After you add a route selector to the Ingress Controller, all routes with labels that match the route selector are included in the Ingress shard. Consider this method when you want an Ingress Controller to serve only a subset of routes or a specific route in a namespace. |
| Namespace and route selectors | Provides your Ingress Controller scope for both namespace selector and route selector methods. Consider this method when you want the flexibility of both the namespace selector and the route selector methods. |
2.3.5.1. Traditional sharding example
To understand traditional sharding, you can review the example of a configured Ingress Controller finops-router that has the label selector spec.namespaceSelector.matchExpressions with key values set to finance and ops.
Example YAML definition for finops-router
apiVersion: operator.openshift.io/v1
kind: IngressController
metadata:
  name: finops-router
  namespace: openshift-ingress-operator
spec:
  namespaceSelector:
    matchExpressions:
    - key: name
      operator: In
      values:
      - finance
      - ops
An example of a configured Ingress Controller dev-router that has the label selector spec.namespaceSelector.matchLabels.name with the key value set to dev:
Example YAML definition for dev-router
apiVersion: operator.openshift.io/v1
kind: IngressController
metadata:
  name: dev-router
  namespace: openshift-ingress-operator
spec:
  namespaceSelector:
    matchLabels:
      name: dev
If all application routes are in separate namespaces, such as each labeled with name:finance, name:ops, and name:dev, the configuration effectively distributes your routes between the two Ingress Controllers. OpenShift Container Platform routes for console, authentication, and other purposes should not be handled.
In the previous scenario, sharding becomes a special case of partitioning, with no overlapping subsets. Routes are divided between router shards.
The default Ingress Controller continues to serve all routes unless the namespaceSelector or routeSelector fields contain routes that are meant for exclusion. See this Red Hat Knowledgebase solution and the section "Sharding the default Ingress Controller" for more information on how to exclude routes from the default Ingress Controller.
2.3.5.2. Overlapped sharding example
An example of a configured Ingress Controller devops-router that has the label selector spec.namespaceSelector.matchExpressions with key values set to dev and ops:
Example YAML definition for devops-router
apiVersion: operator.openshift.io/v1
kind: IngressController
metadata:
  name: devops-router
  namespace: openshift-ingress-operator
spec:
  namespaceSelector:
    matchExpressions:
    - key: name
      operator: In
      values:
      - dev
      - ops
The routes in the namespaces labeled name:dev and name:ops are now serviced by two different Ingress Controllers. With this configuration, you have overlapping subsets of routes.
With overlapping subsets of routes you can create more complex routing rules. For example, you can divert higher priority traffic to the dedicated finops-router while sending lower priority traffic to devops-router.
2.3.5.3. Sharding the default Ingress Controller
You can restrict an Ingress Controller from servicing routes with specific labels by using either namespace selectors or route selectors.
After creating a new Ingress shard, there might be routes that are admitted to your new Ingress shard that are also admitted by the default Ingress Controller. This is because the default Ingress Controller has no selectors and admits all routes by default.
The following procedure restricts the default Ingress Controller from servicing your newly sharded finance, ops, and dev, routes by using a namespace selector. This adds further isolation to Ingress shards.
You must keep all of OpenShift Container Platform’s administration routes on the same Ingress Controller. Therefore, avoid adding additional selectors to the default Ingress Controller that exclude these essential routes.
Prerequisites
-
You installed the OpenShift CLI (
oc). - You are logged in as a project administrator.
Procedure
Modify the default Ingress Controller by running the following command:
$ oc edit ingresscontroller -n openshift-ingress-operator default
Edit the Ingress Controller to contain a
namespaceSelectorthat excludes the routes with any of thefinance,ops, anddevlabels:apiVersion: operator.openshift.io/v1 kind: IngressController metadata: name: default namespace: openshift-ingress-operator spec: namespaceSelector: matchExpressions: - key: name operator: NotIn values: - finance - ops - devThe default Ingress Controller no longer serves the namespaces labeled with
name:finance,name:ops, andname:dev.
2.3.5.4. Ingress sharding and DNS
As a cluster administrator, ensure that you add a separate DNS entry for each router in a project. A router will not forward unknown routes to another router.
Consider the following example:
-
Router A lives on host 192.168.0.5 and has routes with
*.foo.com. -
Router B lives on host 192.168.1.9 and has routes with
*.example.com.
Separate DNS entries must resolve *.foo.com to the node hosting Router A and *.example.com to the node hosting Router B:
-
*.foo.com A IN 192.168.0.5 -
*.example.com A IN 192.168.1.9
2.3.5.5. Configuring Ingress Controller sharding by using route labels
You can use route labels to configure Ingress Controller sharding so that the Ingress Controller serves any route in any namespace that is selected by the route selector.
Figure 2.1. Ingress sharding by using route labels
Ingress Controller sharding is useful when balancing incoming traffic load among a set of Ingress Controllers and when isolating traffic to a specific Ingress Controller. For example, company A goes to one Ingress Controller and company B to another.
Procedure
Edit the
router-internal.yamlfile:apiVersion: operator.openshift.io/v1 kind: IngressController metadata: name: sharded namespace: openshift-ingress-operator spec: domain: <apps-sharded.basedomain.example.net> nodePlacement: nodeSelector: matchLabels: node-role.kubernetes.io/worker: "" routeSelector: matchLabels: type: sharded-
<apps-sharded.basedomain.example.net>: Specify a domain to be used by the Ingress Controller. This domain must be different from the default Ingress Controller domain.
-
Apply the Ingress Controller
router-internal.yamlfile:# oc apply -f router-internal.yaml
The Ingress Controller selects routes in any namespace that have the label
type: sharded.Create a new route by using the domain configured in the
router-internal.yaml:$ oc expose svc <service-name> --hostname <route-name>.apps-sharded.basedomain.example.net
2.3.5.6. Configuring Ingress Controller sharding by using namespace labels
You can use namespace labels to configure Ingress Controller sharding so that the Ingress Controller serves any route in any namespace that is selected by the namespace selector.
Figure 2.2. Ingress sharding by using namespace labels
Ingress Controller sharding is useful when balancing incoming traffic load among a set of Ingress Controllers and when isolating traffic to a specific Ingress Controller. For example, company A goes to one Ingress Controller and company B to another.
Procedure
Edit the
router-internal.yamlfile:$ cat router-internal.yaml
Example output
apiVersion: operator.openshift.io/v1 kind: IngressController metadata: name: sharded namespace: openshift-ingress-operator spec: domain: <apps-sharded.basedomain.example.net> nodePlacement: nodeSelector: matchLabels: node-role.kubernetes.io/worker: "" namespaceSelector: matchLabels: type: sharded-
<apps-sharded.basedomain.example.net>: Specify a domain to be used by the Ingress Controller. This domain must be different from the default Ingress Controller domain.
-
Apply the Ingress Controller
router-internal.yamlfile:$ oc apply -f router-internal.yaml
The Ingress Controller selects routes in any namespace that is selected by the namespace selector that have the label
type: sharded.Create a new route by using the domain configured in the
router-internal.yaml:$ oc expose svc <service-name> --hostname <route-name>.apps-sharded.basedomain.example.net
2.3.5.7. Creating a route for Ingress Controller sharding
You can use a route to host your application at a URL. Ingress Controller sharding helps balance incoming traffic load among a set of Ingress Controllers. Ingress Controller sharding can also isolate traffic to a specific Ingress Controller. For example, company A goes to one Ingress Controller and company B to another.
The following procedure describes how to create a route for Ingress Controller sharding, using the hello-openshift application as an example.
Prerequisites
-
You installed the OpenShift CLI (
oc). - You are logged in as a project administrator.
- You have a web application that exposes a port and an HTTP or TLS endpoint listening for traffic on the port.
- You have configured the Ingress Controller for sharding.
Procedure
Create a project called
hello-openshiftby running the following command:$ oc new-project hello-openshift
Create a pod in the project by running the following command:
$ oc create -f https://raw.githubusercontent.com/openshift/origin/master/examples/hello-openshift/hello-pod.json
Create a service called
hello-openshiftby running the following command:$ oc expose pod/hello-openshift
Create a route definition called
hello-openshift-route.yaml:YAML definition of the created route for sharding
apiVersion: route.openshift.io/v1 kind: Route metadata: labels: type: sharded name: hello-openshift-edge namespace: hello-openshift spec: subdomain: hello-openshift tls: termination: edge to: kind: Service name: hello-openshiftwhere:
type-
Specifies both the label key and its corresponding label value must match the ones specified in the Ingress Controller. In this example, the Ingress Controller has the label key and value
type: sharded. subdomain-
Specifies the route gets exposed by using the value of the
subdomainfield. When you specify thesubdomainfield, you must leave the hostname unset. If you specify both thehostandsubdomainfields, then the route uses the value of thehostfield, and ignore thesubdomainfield.
Use
hello-openshift-route.yamlto create a route to thehello-openshiftapplication by running the following command:$ oc -n hello-openshift create -f hello-openshift-route.yaml
Verification
Get the status of the route with the following command:
$ oc -n hello-openshift get routes/hello-openshift-edge -o yaml
The resulting
Routeresource should look similar to the following:Example output
apiVersion: route.openshift.io/v1 kind: Route metadata: labels: type: sharded name: hello-openshift-edge namespace: hello-openshift spec: subdomain: hello-openshift tls: termination: edge to: kind: Service name: hello-openshift status: ingress: - host: hello-openshift.<apps-sharded.basedomain.example.net> routerCanonicalHostname: router-sharded.<apps-sharded.basedomain.example.net> routerName: shardedwhere:
host-
Specifies the hostname the Ingress Controller, or router, uses to expose the route. The value of the
hostfield is automatically determined by the Ingress Controller, and uses its domain. In this example, the domain of the Ingress Controller is<apps-sharded.basedomain.example.net>. <apps-sharded.basedomain.example.net>- Specifies the hostname of the Ingress Controller. If the hostname is not set, the route can use a subdomain instead. When you specify a subdomain, you automatically use the domain of the Ingress Controller that exposes the route. When a route is exposed by multiple Ingress Controllers, the route is hosted at multiple URLs.
routerName-
Specifies the name of the Ingress Controller. In this example, the Ingress Controller has the name
sharded.
2.3.5.8. Additional resources
2.4. Configuring the Ingress Controller endpoint publishing strategy
To expose Ingress Controller endpoints to external systems and enable load balancer integrations in OpenShift Container Platform, configure the endpointPublishingStrategy parameter.
On Red Hat OpenStack Platform (RHOSP), the LoadBalancerService endpoint publishing strategy is supported only if a cloud provider is configured to create health monitors. For RHOSP 16.2, this strategy is possible only if you use the Amphora Octavia provider.
For more information, see the "Setting RHOSP Cloud Controller Manager options" section of the RHOSP installation documentation.
2.4.1. Ingress Controller endpoint publishing strategy
To expose Ingress Controller endpoints to external networks in OpenShift Container Platform, configure either the NodePortService endpoint publishing strategy or the HostNetwork endpoint publishing strategy.
NodePortServiceendpoint publishing strategy-
The
NodePortServiceendpoint publishing strategy publishes the Ingress Controller using a Kubernetes NodePort service.
In this configuration, the Ingress Controller deployment uses container networking. A NodePortService is created to publish the deployment. The specific node ports are dynamically allocated by OpenShift Container Platform; however, to support static port allocations, your changes to the node port field of the managed NodePortService are preserved.
Figure 2.3. Diagram of NodePortService
The preceding graphic shows the following concepts pertaining to OpenShift Container Platform Ingress NodePort endpoint publishing strategy:
- All the available nodes in the cluster have their own, externally accessible IP addresses. The service running in the cluster is bound to the unique NodePort for all the nodes.
-
When the client connects to a node that is down, for example, by connecting the
10.0.128.4IP address in the graphic, the node port directly connects the client to an available node that is running the service. In this scenario, no load balancing is required. As the image shows, the10.0.128.4address is down and another IP address must be used instead.
The Ingress Operator ignores any updates to .spec.ports[].nodePort fields of the service.
By default, ports are allocated automatically and you can access the port allocations for integrations. However, sometimes static port allocations are necessary to integrate with existing infrastructure which may not be easily reconfigured in response to dynamic ports. To achieve integrations with static node ports, you can update the managed service resource directly.
For more information, see the Content from kubernetes.io is not included.Kubernetes Services documentation on NodePort.
HostNetworkendpoint publishing strategy*-
The
HostNetworkendpoint publishing strategy publishes the Ingress Controller on node ports where the Ingress Controller is deployed.
An Ingress Controller with the HostNetwork endpoint publishing strategy can have only one pod replica per node. If you want n replicas, you must use at least n nodes where those replicas can be scheduled. Because each pod replica requests ports 80 and 443 on the node host where it is scheduled, a replica cannot be scheduled to a node if another pod on the same node is using those ports.
The HostNetwork object has a hostNetwork field with the following default values for the optional binding ports: httpPort: 80, httpsPort: 443, and statsPort: 1936. By specifying different binding ports for your network, you can deploy multiple Ingress Controllers on the same node for the HostNetwork strategy.
Example
apiVersion: operator.openshift.io/v1
kind: IngressController
metadata:
  name: internal
  namespace: openshift-ingress-operator
spec:
  domain: example.com
  endpointPublishingStrategy:
    type: HostNetwork
    hostNetwork:
      httpPort: 80
      httpsPort: 443
statsPort: 19362.4.1.1. Configuring the Ingress Controller endpoint publishing scope to Internal
As a cluster administrator, when you install a new cluster without specifying that the cluster is private, the default Ingress Controller is created with a scope set to External. You can change an External scoped Ingress Controller to Internal.
Prerequisites
-
You installed the OpenShift CLI (
oc).
Procedure
To change an
External-scoped Ingress Controller toInternal, enter the following command:$ oc -n openshift-ingress-operator patch ingresscontrollers/default --type=merge --patch='{"spec":{"endpointPublishingStrategy":{"type":"LoadBalancerService","loadBalancer":{"scope":"Internal"}}}}'
Verification
To check the status of the Ingress Controller, enter the following command:
$ oc -n openshift-ingress-operator get ingresscontrollers/default -o yaml
The
Progressingstatus condition indicates whether you must take further action. For example, the status condition can indicate that you need to delete the service by entering the following command:$ oc -n openshift-ingress delete services/router-default
If you delete the service, the Ingress Operator recreates it as
Internal.
2.4.1.2. Configuring the Ingress Controller endpoint publishing scope to External
As an installation or post-installation task, a cluster administrator can configure the Ingress Controller to Internal. Additionally, a cluster administrator can change an Internal Ingress Controller to External.
When you install a new cluster without specifying that the cluster is private, the default Ingress Controller is created with a scope set to External.
On some platforms, it is necessary to delete and recreate the service.
Changing the scope can cause disruption to Ingress traffic, potentially for several minutes. This applies to platforms where it is necessary to delete and recreate the service, because the procedure can cause OpenShift Container Platform to deprovision the existing service load balancer, provision a new one, and update DNS.
Prerequisites
-
You installed the OpenShift CLI (
oc).
Procedure
To change an
Internal-scoped Ingress Controller toExternal, enter the following command:$ oc -n openshift-ingress-operator patch ingresscontrollers/private --type=merge --patch='{"spec":{"endpointPublishingStrategy":{"type":"LoadBalancerService","loadBalancer":{"scope":"External"}}}}'
Verification
To check the status of the Ingress Controller, enter the following command:
$ oc -n openshift-ingress-operator get ingresscontrollers/default -o yaml
The
Progressingstatus condition indicates whether you must take further action. For example, the status condition can indicate that you need to delete the service by entering the following command:$ oc -n openshift-ingress delete services/router-default
If you delete the service, the Ingress Operator recreates it as
External.
2.4.1.3. Adding a single NodePort service to an Ingress Controller
To prevent port conflicts, instead of creating a NodePort-type Service for each project, create a custom Ingress Controller that can use the NodePortService endpoint publishing strategy.
Consider this configuration for your Ingress Controller when you want to apply a set of routes, through Ingress sharding, to nodes that might already have a HostNetwork Ingress Controller.
Before you set a NodePort-type Service for each project, read the following considerations:
-
You must create a wildcard DNS record for the
NodeportIngress Controller domain. A Nodeport Ingress Controller route can be reached from the address of a worker node. For more information about the required DNS records for routes, see "User-provisioned DNS requirements". -
You must expose a route for your service and specify the
--hostnameargument for your custom Ingress Controller domain. -
You must append the port that is assigned to the
NodePort-typeServicein the route so that you can access application pods.
Prerequisites
-
You installed the OpenShift CLI (
oc). -
Logged in as a user with
cluster-adminprivileges. - You created a wildcard DNS record.
Procedure
Create a custom resource (CR) file for the Ingress Controller:
Example of a CR file that defines information for the
IngressControllerobjectapiVersion: operator.openshift.io/v1 kind: IngressController metadata: name: <custom_ic_name> namespace: openshift-ingress-operator spec: replicas: 1 domain: <custom_ic_domain_name> nodePlacement: nodeSelector: matchLabels: <key>: <value> namespaceSelector: matchLabels: <key>: <value> endpointPublishingStrategy: type: NodePortService # ...where:
metadata.name-
Specifies a custom
namefor theIngressControllerCR. spec.domain-
Specifies the DNS name that the Ingress Controller services. For example, the default ingresscontroller domain is
apps.ipi-cluster.example.com, so you would specify the<custom_ic_domain_name>asnodeportsvc.ipi-cluster.example.com. nodeSelector.matchLabels.<key>- Specifies the label for the nodes that include the custom Ingress Controller.
namespaceSelector.matchLabels.<key>-
Specifies the label for a set of namespaces. Substitute
<key>:<value>with a map of key-value pairs where<key>is a unique name for the new label and<value>is its value. For example:ingresscontroller: custom-ic.
Add a label to a node by using the
oc label nodecommand:$ oc label node <node_name> <key>=<value>
-
<key>=<value>: Where<value>must match the key-value pair specified in thenodePlacementsection of yourIngressControllerCR.
-
Create the
IngressControllerobject:$ oc create -f <ingress_controller_cr>.yaml
Find the port for the service created for the
IngressControllerCR:$ oc get svc -n openshift-ingress
Example output that shows port
80:32432/TCPfor therouter-nodeport-custom-ic3serviceNAME TYPE CLUSTER-IP EXTERNAL-IP PORT(S) AGE router-internal-default ClusterIP 172.30.195.74 <none> 80/TCP,443/TCP,1936/TCP 223d router-nodeport-custom-ic3 NodePort 172.30.109.219 <none> 80:32432/TCP,443:31366/TCP,1936:30499/TCP 155m
To create a new project, enter the following command:
$ oc new-project <project_name>
To label the new namespace, enter the following command:
$ oc label namespace <project_name> <key>=<value>
-
<key>=<value>:: Where<key>=<value>must match the value in thenamespaceSelectorsection of your Ingress Controller CR.
-
Create a new application in your cluster:
$ oc new-app --image=<image_name>
-
<image_name>: An example of<image_name>isquay.io/openshifttest/hello-openshift:multiarch.
-
Create a
Routeobject for a service, so that the pod can use the service to expose the application external to the cluster.$ oc expose svc/<service_name> --hostname=<svc_name>-<project_name>.<custom_ic_domain_name>
NoteYou must specify the domain name of your custom Ingress Controller in the
--hostnameargument. If you do not do this, the Ingress Operator uses the default Ingress Controller to serve all the routes for your cluster.Check that the route has the
Admittedstatus and that it includes metadata for the custom Ingress Controller:$ oc get route/hello-openshift -o json | jq '.status.ingress'
Example output
# ... { "conditions": [ { "lastTransitionTime": "2024-05-17T18:25:41Z", "status": "True", "type": "Admitted" } ], [ { "host": "hello-openshift.nodeportsvc.ipi-cluster.example.com", "routerCanonicalHostname": "router-nodeportsvc.nodeportsvc.ipi-cluster.example.com", "routerName": "nodeportsvc", "wildcardPolicy": "None" } ], }Update the default
IngressControllerCR to prevent the default Ingress Controller from managing theNodePort-typeService. The default Ingress Controller will continue to monitor all other cluster traffic.$ oc patch --type=merge -n openshift-ingress-operator ingresscontroller/default --patch '{"spec":{"namespaceSelector":{"matchExpressions":[{"key":"<key>","operator":"NotIn","values":["<value>]}]}}}'
Verification
Verify that the DNS entry can route inside and outside of your cluster by entering the following command. The command outputs the IP address of the node that received the label from running the
oc label nodecommand earlier in the procedure.$ dig +short <svc_name>-<project_name>.<custom_ic_domain_name>
To verify that your cluster uses the IP addresses from external DNS servers for DNS resolution, check the connection of your cluster by entering the following command:
$ curl <svc_name>-<project_name>.<custom_ic_domain_name>:<port> 1<custom_ic_domain_name>:<port>: Where<port>is the node port from theNodePort-typeService. Based on example output from theoc get svc -n openshift-ingresscommand, the80:32432/TCPHTTP route means that32432is the node port.Output example
Hello OpenShift!
2.4.2. Additional resources
2.5. Configuring ingress cluster traffic using a load balancer
OpenShift Container Platform provides methods for communicating from outside the cluster with services running in the cluster. This method uses a load balancer.
Before starting the following procedures, the administrator must complete the following prerequisite tasks:
- Set up the external port to the cluster networking environment so that requests can reach the cluster.
- Have an OpenShift Container Platform cluster with at least one control plane node, at least one compute node, and a system outside the cluster that has network access to the cluster. This procedure assumes that the external system is on the same subnet as the cluster. The additional networking required for external systems on a different subnet is out-of-scope for this topic.
Make sure there is at least one user with cluster admin role. To add this role to a user, run the following command:
$ oc adm policy add-cluster-role-to-user cluster-admin username
2.5.1. Using a load balancer to get traffic into the cluster
If you do not need a specific external IP address, you can configure a load balancer service to allow external access to an OpenShift Container Platform cluster.
A load balancer service allocates a unique IP. The load balancer has a single edge router IP, which can be a virtual IP (VIP), but is still a single machine for initial load balancing.
A pool gets configured at the infrastructure level and not the cluster administrator level.
2.5.2. Creating a project and service
If the project and service that you want to expose does not exist, create the project and then create the service.
If the project and service already exists, skip to the procedure on exposing the service to create a route.
Prerequisites
-
Install the OpenShift CLI (
oc) and log in as a cluster administrator.
Procedure
Create a new project for your service by running the
oc new-projectcommand:$ oc new-project <project_name>
Use the
oc new-appcommand to create your service:$ oc new-app nodejs:12~https://github.com/sclorg/nodejs-ex.git
To verify that the service was created, run the following command:
$ oc get svc -n <project_name>
Example output
NAME        TYPE        CLUSTER-IP       EXTERNAL-IP   PORT(S)    AGE
nodejs-ex   ClusterIP   172.30.197.157   <none>        8080/TCP   70s
NoteBy default, the new service does not have an external IP address.
2.5.3. Exposing the service by creating a route
To enable external access to your application that runs on OpenShift Container Platform, you can expose the service as a route by using the oc expose command.
Prerequisites
- You logged into OpenShift Container Platform.
Procedure
Log in to the project where the service you want to expose is located:
$ oc project <project_name>
Run the
oc expose servicecommand to expose the route:$ oc expose service nodejs-ex
Example output
route.route.openshift.io/nodejs-ex exposed
To verify that the service is exposed, you can use a tool, such as
curlto check that the service is accessible from outside the cluster.To find the hostname of the route, enter the following command:
$ oc get route
Example output
NAME        HOST/PORT                        PATH   SERVICES    PORT       TERMINATION   WILDCARD
nodejs-ex   nodejs-ex-myproject.example.com         nodejs-ex   8080-tcp                 None
To check that the host responds to a GET request, enter the following command:
Example
curlcommand$ curl --head nodejs-ex-myproject.example.com
Example output
HTTP/1.1 200 OK
...
2.5.4. Creating a load balancer service
To distribute incoming traffic efficiently and ensure high availability for your applications in OpenShift Container Platform, create a load balancer service.
Prerequisites
- Make sure that the project and service you want to expose exist.
- Your cloud provider supports load balancers.
Procedure
- Log in to OpenShift Container Platform.
Load the project where the service you want to expose is located.
Example command
$ oc project project1
Open a text file on the control plane node and paste the following text into the file. Edit the file as needed.
Sample load balancer configuration file
apiVersion: v1 kind: Service metadata: name: egress-2 spec: ports: - name: db port: 3306 loadBalancerIP: loadBalancerSourceRanges: - 10.0.0.0/8 - 192.168.0.0/16 type: LoadBalancer selector: name: mysqlwhere:
metadata.name- Specifies a descriptive name for the load balancer service.
ports.port- Specifies the same port that the service you want to expose is listening on.
loadBalancerSourceRanges- Specifies a list of specific IP addresses to restrict traffic through the load balancer. The parameter is ignored if the cloud provider does not support the feature.
type-
Specifies
Loadbalanceras the type. selector.nameSpecifies the name of the service.
NoteTo restrict the traffic through the load balancer to specific IP addresses, use the
spec.endpointPublishingStrategy.loadBalancer.allowedSourceRangesIngress Controller parameter. Do not set theloadBalancerSourceRangesparameter.
- Save and exit the file.
Run the following command to create the service:
$ oc create -f <file_name>
For example:
$ oc create -f mysql-lb.yaml
Execute the following command to view the new service:
$ oc get svc
Example output
NAME       TYPE           CLUSTER-IP      EXTERNAL-IP                             PORT(S)          AGE
egress-2   LoadBalancer   172.30.22.226   ad42f5d8b303045-487804948.example.com   3306:30357/TCP   15m
The service has an external IP address automatically assigned if there is a cloud provider enabled.
On the master, use a tool, such as
curl, to make sure you can reach the service by using the public IP address:$ curl <public_ip>:<port>
For example:
$ curl 172.29.121.74:3306
The examples in this section use a MySQL service, which requires a client application. If you get a string of characters with the
Got packets out of ordermessage, you are connecting with the service:If you have a MySQL client, log in with the standard CLI command:
$ mysql -h 172.30.131.89 -u admin -p
Example output
Enter password:
Welcome to the MariaDB monitor.  Commands end with ; or \g.

MySQL [(none)]>
2.6. Configuring ingress cluster traffic on AWS
OpenShift Container Platform provides methods for communicating from outside the cluster with services running in the cluster. This method uses load balancers on Amazon Web Services (AWS), specifically a Network Load Balancer (NLB) or a Classic Load Balancer (CLB). Both types of load balancers can forward the IP address of the client to the node, but a CLB requires proxy protocol support, which OpenShift Container Platform automatically enables.
There are two ways to switch an Ingress Controller from using a CLB to using an NLB. Use only one of these approaches for a given Ingress Controller; do not combine them.
-
Force replace the Ingress Controller that is currently using a CLB. This deletes the
IngressControllerobject and an outage occurs while the new DNS records propagate and the NLB is being provisioned. -
Edit the existing
IngressControllerto setspec.endpointPublishingStrategy.loadBalancer.providerParameters.aws.typetoNLB. Starting in OpenShift Container Platform 4.22, the cloud controller does not reprovision the load balancer automatically. TheIngressControllerdisplays aProgressingcondition stating that you must delete the routerServicein theopenshift-ingressnamespace so that a new load balancer can be created. That interruption can change the load balancer hostname and IP addresses. Complete the subnets update procedure to read theProgressingcondition and delete the routerService.
You can configure these load balancers on a new or existing AWS cluster.
2.6.1. Configuring Classic Load Balancer timeouts on AWS
To prevent connection drops for long-running processes in OpenShift Container Platform, configure custom timeout periods for specific routes or Ingress Controllers.
Ensure these settings account for the Amazon Web Services Classic Load Balancer (CLB) default timeout of 60 seconds to maintain stable network traffic.
If the timeout period of the CLB is shorter than the route timeout or Ingress Controller timeout, the load balancer can prematurely terminate the connection. You can prevent this problem by increasing both the timeout period of the route and CLB.
2.6.1.1. Configuring route timeouts
You can configure the default timeouts for an existing route when you have services in need of a low timeout, which is required for Service Level Availability (SLA) purposes, or a high timeout, for cases with a slow back end.
If you configured a user-managed external load balancer in front of your OpenShift Container Platform cluster, ensure that the timeout value for the user-managed external load balancer is higher than the timeout value for the route. This configuration prevents network congestion issues over the network that your cluster uses.
Prerequisites
- You deployed an Ingress Controller on a running cluster.
Procedure
Using the
oc annotatecommand, add the timeout to the route:$ oc annotate route <route_name> \ --overwrite haproxy.router.openshift.io/timeout=<timeout><time_unit><timeout>: Supported time units are microseconds (us), milliseconds (ms), seconds (s), minutes (m), hours (h), or days (d).The following example sets a timeout of two seconds on a route named
myroute:$ oc annotate route myroute --overwrite haproxy.router.openshift.io/timeout=2s
2.6.1.2. Configuring Classic Load Balancer timeouts
You can configure the default timeouts for a Classic Load Balancer (CLB) to extend idle connections.
Prerequisites
- You must have a deployed Ingress Controller on a running cluster.
Procedure
Set an Amazon Web Services connection idle timeout of five minutes for the default
ingresscontrollerby running the following command:$ oc -n openshift-ingress-operator patch ingresscontroller/default \ --type=merge --patch='{"spec":{"endpointPublishingStrategy": \ {"type":"LoadBalancerService", "loadBalancer": \ {"scope":"External", "providerParameters":{"type":"AWS", "aws": \ {"type":"Classic", "classicLoadBalancer": \ {"connectionIdleTimeout":"5m"}}}}}}}'Optional: Restore the default value of the timeout by running the following command:
$ oc -n openshift-ingress-operator patch ingresscontroller/default \ --type=merge --patch='{"spec":{"endpointPublishingStrategy": \ {"loadBalancer":{"providerParameters":{"aws":{"classicLoadBalancer": \ {"connectionIdleTimeout":null}}}}}}}'NoteYou must specify the
scopefield when you change the connection timeout value unless the current scope is already set. When you set thescopefield, you do not need to do so again if you restore the default timeout value.
2.6.2. Configuring ingress cluster traffic on AWS using a Network Load Balancer
To enable high-performance communication between external services and your OpenShift Container Platform cluster, configure an Amazon Web Services Network Load Balancer (NLB). You can set up an NLB on a new or existing AWS cluster to manage ingress traffic with low latency.
2.6.3. Dual-stack networking for the Ingress Controller load balancer on AWS
On Amazon Web Services, an Ingress Controller must use a publishing Service type Network Load Balancer (NLB) to enable publishing over IPv4 and IPv6 when the cluster runs AWS dual-stack networking. A Classic Load Balancer (CLB) does not support the dual-stack publishing path.
Dual-stack networking for OpenShift Container Platform on Amazon Web Services is a Technology Preview feature only. Technology Preview features are not supported with Red Hat production service level agreements (SLAs) and might not be functionally complete. Red Hat does not recommend using them in production. These features provide early access to upcoming product features, enabling customers to test functionality and provide feedback during the development process.
For more information about the support scope of Red Hat Technology Preview features, see Technology Preview Features Support Scope.
If your Ingress Controller uses an NLB and the cluster-scoped Infrastructure resource named cluster contains DualStackIPv4Primary or DualStackIPv6Primary in the status.platformStatus.aws.ipFamily field, the Ingress Operator sets the Ingress Controller load balancer Service to dual-stack IP families.
The Service lists IPv4 first for DualStackIPv4Primary and IPv6 first for DualStackIPv6Primary.
If the Ingress Controller uses a CLB and the cluster runs AWS dual-stack networking, the publishing load balancer stays IPv4-only. To expose the Ingress Controller over IPv4 and IPv6, you must configure the Ingress Controller to use an NLB.
2.6.3.1. Switching the Ingress Controller from using a Classic Load Balancer to a Network Load Balancer
To improve performance and reduce latency for cluster traffic in OpenShift Container Platform on Amazon Web Services, switch an Ingress Controller using a Classic Load Balancer (CLB) to one that uses a Network Load Balancer (NLB).
Switching between these load balancers does not delete the IngressController object.
This procedure might cause an outage that can last several minutes due to new DNS records propagation, new load balancers provisioning, and other factors. IP addresses and canonical names of the Ingress Controller load balancer might change after applying this procedure.
Procedure
Modify the existing Ingress Controller that you want to switch to by using an NLB. This example assumes that your default Ingress Controller has an
Externalscope and no other customizations:Example
ingresscontroller.yamlfileapiVersion: operator.openshift.io/v1 kind: IngressController metadata: creationTimestamp: null name: default namespace: openshift-ingress-operator spec: endpointPublishingStrategy: loadBalancer: scope: External providerParameters: type: AWS aws: type: NLB type: LoadBalancerServiceNoteIf you do not specify a value for the
spec.endpointPublishingStrategy.loadBalancer.providerParameters.aws.typefield, the Ingress Controller uses thespec.loadBalancer.platform.aws.typevalue from the clusterIngressconfiguration that was set during installation.TipIf your Ingress Controller has other customizations that you want to update, such as changing the domain, consider force replacing the Ingress Controller definition file instead.
Apply the changes to the Ingress Controller YAML file by running the command:
$ oc apply -f ingresscontroller.yaml
Check that the
Progressingcondition of the Ingress Controller is set toTrueby running the following command:$ oc get ingresscontroller default -n openshift-ingress-operator -o jsonpath='{.status.conditions[?(@.type=="Progressing")]}'Delete the service associated with the Ingress Controller by running the following command:
$ oc -n openshift-ingress delete svc/router-<name>
Replace
<name>with the specific instance name of your Ingress Controller.Expect several minutes of outages while the Ingress Controller updates.
Verification
Confirm that the Ingress Controller updated successfully by running the following command:
$ oc get ingresscontroller -n openshift-ingress-operator default -o jsonpath="{.status.conditions}" | yq -PC
2.6.3.2. Switching the Ingress Controller from using a Network Load Balancer to a Classic Load Balancer
To support specific networking configurations in OpenShift Container Platform on Amazon Web Services, switch an Ingress Controller using a Network Load Balancer (NLB) to one that uses a Classic Load Balancer (CLB).
Switching between these load balancers does not delete the IngressController object.
This procedure might cause an outage that can last several minutes due to new DNS records propagation, new load balancers provisioning, and other factors. IP addresses and canonical names of the Ingress Controller load balancer might change after applying this procedure.
Procedure
Modify the existing Ingress Controller that you want to switch to using a CLB. This example assumes that your default Ingress Controller has an
Externalscope and no other customizations:Example
ingresscontroller.yamlfileapiVersion: operator.openshift.io/v1 kind: IngressController metadata: creationTimestamp: null name: default namespace: openshift-ingress-operator spec: endpointPublishingStrategy: loadBalancer: scope: External providerParameters: type: AWS aws: type: Classic type: LoadBalancerServiceNoteIf you do not specify a value for the
spec.endpointPublishingStrategy.loadBalancer.providerParameters.aws.typefield, the Ingress Controller uses thespec.loadBalancer.platform.aws.typevalue from the clusterIngressconfiguration that was set during installation.TipIf your Ingress Controller has other customizations that you want to update, such as changing the domain, consider force replacing the Ingress Controller definition file instead.
Apply the changes to the Ingress Controller YAML file by running the command:
$ oc apply -f ingresscontroller.yaml
Check that the
Progressingcondition of the Ingress Controller is set toTrueby running the following command:$ oc get ingresscontroller default -n openshift-ingress-operator -o jsonpath='{.status.conditions[?(@.type=="Progressing")]}'Delete the service associated with the Ingress Controller by running the following command:
$ oc -n openshift-ingress delete svc/router-<name>
Replace
<name>with the specific instance name of your Ingress Controller.Expect several minutes of outages while the Ingress Controller updates.
Verification
Confirm that the Ingress Controller updated successfully by running the following command:
$ oc get ingresscontroller -n openshift-ingress-operator default -o jsonpath="{.status.conditions}" | yq -PC
2.6.3.3. Replacing Ingress Controller Classic Load Balancer with Network Load Balancer
To improve performance and reduce latency for traffic in OpenShift Container Platform on Amazon Web Services, replace an Ingress Controller using a Classic Load Balancer (CLB) with one that uses a Network Load Balancer (NLB).
This procedure might cause an outage that can last several minutes due to new DNS records propagation, new load balancers provisioning, and other factors. IP addresses and canonical names of the Ingress Controller load balancer might change after applying this procedure.
Procedure
Create a file with a new default Ingress Controller. The following example assumes that your default Ingress Controller has an
Externalscope and no other customizations:Example
ingresscontroller.ymlfileapiVersion: operator.openshift.io/v1 kind: IngressController metadata: creationTimestamp: null name: default namespace: openshift-ingress-operator spec: endpointPublishingStrategy: loadBalancer: scope: External providerParameters: type: AWS aws: type: NLB type: LoadBalancerServiceIf your default Ingress Controller has other customizations, ensure that you modify the file accordingly.
TipIf your Ingress Controller has no other customizations and you are only updating the load balancer type, consider following the procedure detailed in "Switching the Ingress Controller from using a Classic Load Balancer to a Network Load Balancer".
Force replace the Ingress Controller YAML file:
$ oc replace --force --wait -f ingresscontroller.yml
Wait until the Ingress Controller is replaced. Expect several of minutes of outages.
2.6.3.4. Configuring an Ingress Controller Network Load Balancer on an existing AWS cluster
To improve performance for high-traffic workloads in OpenShift Container Platform, configure an Ingress Controller backed by an Amazon Web Services Network Load Balancer (NLB) on an existing cluster.
You can create an Ingress Controller backed by an Amazon Web Services Network Load Balancer (NLB) on an existing cluster.
Prerequisites
- You installed an AWS cluster.
PlatformStatusof the infrastructure resource must be AWS.To verify that the
PlatformStatusis AWS, run the following command:$ oc get infrastructure/cluster -o jsonpath='{.status.platformStatus.type}' AWS
Procedure
Create the Ingress Controller manifest:
$ cat ingresscontroller-aws-nlb.yaml
Example output
apiVersion: operator.openshift.io/v1 kind: IngressController metadata: name: <ingress_controller_name> namespace: openshift-ingress-operator spec: domain: <unique_ingress_domain endpointPublishingStrategy: type: LoadBalancerService loadBalancer: scope: External providerParameters: type: AWS aws: type: NLBwhere:
<ingress_controller_name>- Specifies a unique name for the Ingress Controller.
<unique_ingress_domain>-
Specifies a domain name that is unique among all Ingress Controllers in the cluster. This variable must be a subdomain of the DNS name
<clustername>.<domain>. scope-
Specifies the type of NLB, either
Externalto use an external NLB orInternalto use an internal NLB.
Create the resource in the cluster:
$ oc create -f ingresscontroller-aws-nlb.yaml
ImportantBefore you can configure an Ingress Controller NLB on a new AWS cluster, you must complete the creating the installation configuration file procedure. For more information, see "Creating the installation configuration file".
2.6.3.5. Configuring an Ingress Controller Network Load Balancer on a new AWS cluster
You can create an Ingress Controller backed by an Amazon Web Services Network Load Balancer (NLB) on a new cluster in situations where you need more transparent networking capabilities.
Prerequisites
-
Create and edit the
install-config.yamlfile. For instructions, see "Creating the installation configuration file" in the Additonal resources section.
Procedure
Change to the directory that contains the installation program and create the manifests:
$ ./openshift-install create manifests --dir <installation_directory>
-
For
<installation_directory>, specify the name of the directory that contains theinstall-config.yamlfile for your cluster.
-
For
Create a file that is named
cluster-ingress-default-ingresscontroller.yamlin the<installation_directory>/manifests/directory:$ touch <installation_directory>/manifests/cluster-ingress-default-ingresscontroller.yaml
<installation_directory>-
Specifies the directory name that contains the
manifests/directory for your cluster.
Check the several network configuration files that exist in the
manifests/directory by entering the following command:$ ls <installation_directory>/manifests/cluster-ingress-default-ingresscontroller.yaml
Example output
cluster-ingress-default-ingresscontroller.yaml
Open the
cluster-ingress-default-ingresscontroller.yamlfile in an editor and enter a custom resource (CR) that describes the Operator configuration you want:apiVersion: operator.openshift.io/v1 kind: IngressController metadata: creationTimestamp: null name: default namespace: openshift-ingress-operator spec: endpointPublishingStrategy: loadBalancer: scope: External providerParameters: type: AWS aws: type: NLB type: LoadBalancerService-
Save the
cluster-ingress-default-ingresscontroller.yamlfile and quit the text editor. -
Optional: Back up the
manifests/cluster-ingress-default-ingresscontroller.yamlfile because the installation program deletes themanifests/directory during cluster creation.
2.6.3.6. Choosing subnets while creating a LoadBalancerService Ingress Controller
To manually control network placement for Ingress Controllers in an existing cluster, specify the load balancer subnets in your configuration. This method provides precise control over your infrastructure by overriding the default automatic subnet discovery method used by Amazon Web Services.
Prerequisites
- You must have an installed AWS cluster.
-
You must know the names or IDs of the subnets to which you intend to map your
IngressController.
Procedure
Create a custom resource (CR) YAML file, such as
sample-ingress.yaml, and specifying the following content for the file:apiVersion: operator.openshift.io/v1 kind: IngressController metadata: namespace: openshift-ingress-operator name: <name> spec: domain: <domain> endpointPublishingStrategy: type: LoadBalancerService loadBalancer: scope: External dnsManagementPolicy: Managed # ...Add subnets to the CR file:
apiVersion: operator.openshift.io/v1 kind: IngressController metadata: name: <name> namespace: openshift-ingress-operator spec: domain: <domain> endpointPublishingStrategy: type: LoadBalancerService loadBalancer: scope: External providerParameters: type: AWS aws: type: Classic classicLoadBalancer: subnets: ids: - <subnet> - <subnet> - <subnet> dnsManagementPolicy: Managedwhere:
name-
Specifies a name for the
IngressController. domain-
Specifies the DNS name serviced by the
IngressController. classicLoadBalancer-
Specifies the type of load balancer, either
classicLoadBalancerif using a CLB ornetworkLoadBalancerfield if using an NLB. ids-
Specifies a subnet by name using the
namesfield instead of specifying the subnet by ID. This field is optional. <subnet>Specifies the subnet IDs (or names if you using
names).ImportantYou can specify a maximum of one subnet per availability zone. Only provide public subnets for external Ingress Controllers and private subnets for internal Ingress Controllers.
Save and apply the CR file by using the OpenShift CLI (
oc):$ oc apply -f sample-ingress.yaml
Confirm the load balancer was provisioned successfully by checking the
IngressControllerconditions.$ oc get ingresscontroller -n openshift-ingress-operator <name> -o jsonpath="{.status.conditions}" | yq -PC
2.6.3.7. Updating the subnets on an existing Ingress Controller
You can update an IngressController with manually specified load balancer subnets in OpenShift Container Platform to avoid any disruptions, to maintain the stability of your services, and to ensure that your network configuration aligns with your specific requirements.
The example in the procedure shows you how to select and apply new subnets, verify the configuration changes, and confirm successful load balancer provisioning.
This procedure may cause an outage that can last several minutes due to new DNS records propagation, new load balancers provisioning, and other factors. IP addresses and canonical names of the Ingress Controller load balancer might change after applying this procedure.
Procedure
Modify the existing IngressController by specifying the new subnets:
apiVersion: operator.openshift.io/v1 kind: IngressController metadata: name: <name> namespace: openshift-ingress-operator spec: domain: <domain> endpointPublishingStrategy: type: LoadBalancerService loadBalancer: scope: External providerParameters: type: AWS aws: type: Classic classicLoadBalancer: subnets: ids: - <updated_subnet> - <updated_subnet> - <updated_subnet> # ...where:
<name>-
Specifies a name for the
IngressController. <domain>-
Specifies the DNS name serviced by the
IngressController. type-
Specifies the updated subnet IDs (or names if you using
names). classicLoadBalancer-
You can also use the
networkLoadBalancerfield if using an NLB. ids-
Specifies the subnet by name using the
namesfield instead of specifying the subnet by ID. This parameter is optional. <updated_subnet>Specifies the updated subnet IDs (or names if you are using
names).ImportantYou can specify a maximum of one subnet per availability zone. Only provide public subnets for external Ingress Controllers and private subnets for internal Ingress Controllers.
Examine the
Progressingcondition on theIngressControllerfor instructions on how to apply the subnet updates by running the following command:$ oc get ingresscontroller -n openshift-ingress-operator subnets -o jsonpath="{.status.conditions[?(@.type==\"Progressing\")]}" | yq -PCExample output
lastTransitionTime: "2024-11-25T20:19:31Z"
message: 'One or more status conditions indicate progressing: LoadBalancerProgressing=True (OperandsProgressing: One or more managed resources are progressing: The IngressController subnets were changed from [...] to [...].  To effectuate this change, you must delete the service: `oc -n openshift-ingress delete svc/router-<name>`; the service load-balancer will then be deprovisioned and a new one created. This will most likely cause the new load-balancer to have a different host name and IP address and cause disruption. To return to the previous state, you can revert the change to the IngressController: [...]'
reason: IngressControllerProgressing
status: "True"
type: Progressing
To apply the update, delete the service associated with the Ingress controller by running the following command:
$ oc -n openshift-ingress delete svc/router-<name>
Verification
To confirm that the load balancer was provisioned successfully, check the
IngressControllerconditions by running the following command:$ oc get ingresscontroller -n openshift-ingress-operator <name> -o jsonpath="{.status.conditions}" | yq -PC
2.6.3.8. Configuring AWS Elastic IP (EIP) addresses for a Network Load Balancer (NLB)
You can specify static IPs, otherwise known as elastic IPs, for your network load balancer (NLB) in the Ingress Controller. This is useful in situations where you want to configure appropriate firewall rules for your cluster network.
Prerequisites
- You must have an installed Amazon Web Services cluster.
-
You must know the names or IDs of the subnets to which you intend to map your
IngressController.
Procedure
Create a YAML file that contains the following example content:
apiVersion: operator.openshift.io/v1 kind: IngressController metadata: namespace: openshift-ingress-operator name: <name> spec: domain: <domain> endpointPublishingStrategy: loadBalancer: scope: External type: LoadBalancerService providerParameters: type: AWS aws: type: NLB networkLoadBalancer: subnets: ids: - <subnet_ID> names: - <subnet_A> - <subnet_B> eipAllocations: - <eipalloc_A> - <eipalloc_B> - <eipalloc_C>where:
<name>- Specifies a name for the Ingress Controller.
<domain>- Specifies the DNS name serviced by the Ingress Controller.
scope-
Specifies a scope for the EIPs. The scope must be set to the value
Externaland be Internet-facing in order to allocate EIPs. - `subnets
- Specifies the IDs and names for your subnets. The total number of IDs and names must be equal to your allocated EIPs.
eipAllocationsSpecifies the EIP addresses.
ImportantYou can specify a maximum of one subnet per availability zone. Only provide public subnets for external Ingress Controllers. You can associate one EIP address per subnet.
Save and apply the CR file by entering the following command:
$ oc apply -f sample-ingress.yaml
Verification
Confirm the load balancer was provisioned successfully by checking the
IngressControllerconditions by running the following command:$ oc get ingresscontroller -n openshift-ingress-operator <name> -o jsonpath="{.status.conditions}" | yq -PC
2.6.4. Additional resources
- Converting to a dual-stack cluster network
- Enabling features using feature gates
- Creating the installation configuration file
- Infrastructure cluster configuration API
- Installing a cluster on AWS with network customizations
- Content from kubernetes.io is not included.Network Load Balancer support on AWS
- Content from docs.aws.amazon.com is not included.Configure proxy protocol support for your Classic Load Balancer
2.7. Configuring ingress cluster traffic for a service external IP
You can use either a MetalLB implementation or an IP failover deployment to attach an ExternalIP resource to a service so that the service is available to traffic outside your OpenShift Container Platform cluster.
Hosting an external IP address in this way is only applicable for a cluster installed on bare-metal hardware.
You must ensure that you correctly configure the external network infrastructure to route traffic to the service.
Before you begin the procedure, ensure that you meet the following prerequisite:
- You configured your cluster with ExternalIPs enabled. For more information, see "Configuring ExternalIPs for services" in the Additional resources section.
Do not use the same ExternalIP for the egress IP.
2.7.1. Attaching an ExternalIP to a service
You can attach an ExternalIP resource to a service. If you configured your cluster to automatically attach the resource to a service, you might not need to manually attach an ExternalIP to the service.
The examples in the procedure use a scenario that manually attaches an ExternalIP resource to a service in a cluster with an IP failover configuration.
Procedure
Confirm compatible IP address ranges for the ExternalIP resource by entering the following command in your CLI:
$ oc get networks.config cluster -o jsonpath='{.spec.externalIP}{"\n"}'NoteIf
autoAssignCIDRsis set and you did not specify a value forspec.externalIPsin the ExternalIP resource, OpenShift Container Platform automatically assigns ExternalIP to a newServiceobject.Choose one of the following options to attach an ExternalIP resource to the service:
If you are creating a new service, specify a value in the
spec.externalIPsparameter and array of one or more valid IP addresses in theallowedCIDRsparameter.Example of service YAML configuration file that supports an ExternalIP resource
apiVersion: v1 kind: Service metadata: name: svc-with-externalip spec: externalIPs: policy: allowedCIDRs: - 192.168.123.0/28 # ...If you are attaching an ExternalIP to an existing service, enter the following command. Replace
<name>with the service name. Replace<ip_address>with a valid ExternalIP address. You can provide multiple IP addresses separated by commas.$ oc patch svc <name> -p \ '{ "spec": { "externalIPs": [ "<ip_address>" ] } }'For example:
$ oc patch svc mysql-55-rhel7 -p '{"spec":{"externalIPs":["192.174.120.10"]}}'Example output
"mysql-55-rhel7" patched
To confirm that an ExternalIP address is attached to the service, enter the following command. If you specified an ExternalIP for a new service, you must create the service first.
$ oc get svc
Example output
NAME               CLUSTER-IP      EXTERNAL-IP     PORT(S)    AGE
mysql-55-rhel7     172.30.131.89   192.174.120.10  3306/TCP   13m
2.7.2. Additional resources
2.8. Configuring ingress cluster traffic by using a NodePort
To enable external access to your application for specific networking requirements, expose a service by using a NodePort.
This configuration opens a specific port on every node in the cluster, allowing external traffic to reach your workloads by using an IP address of any node.
OpenShift Container Platform provides methods for communicating from outside the cluster with services running in the cluster. This method uses a NodePort.
Before starting the following procedures, the administrator must complete the following prerequisite tasks:
- Set up the external port to the cluster networking environment so that requests can reach the cluster.
- Have an OpenShift Container Platform cluster with at least one control plane node, at least one compute node, and a system outside the cluster that has network access to the cluster. This procedure assumes that the external system is on the same subnet as the cluster. The additional networking required for external systems on a different subnet is out-of-scope for this topic.
Make sure there is at least one user with cluster admin role. To add this role to a user, run the following command:
$ oc adm policy add-cluster-role-to-user cluster-admin <user_name>
2.8.1. Using a NodePort to get traffic into the cluster
Use a NodePort-type Service resource to expose a service on a specific port on all nodes in the cluster.
The port is specified in the Service resource’s .spec.ports[*].nodePort parameter
Using a node port requires additional port resources.
A NodePort exposes the service on a static port on the IP address of a node. A NodePort spans the 30000 to 32767 IP address ranges by default, which means a NodePort is unlikely to match the intended port of a service. For example, port 8080 might be exposed as port 31020 on the node.
The administrator must ensure the external IP addresses are routed to the nodes.
A NodePort and external IPs are independent and both can be used concurrently.
2.8.2. Creating a project and service
If the project and service that you want to expose does not exist, create the project and then create the service.
If the project and service already exists, skip to the procedure on exposing the service to create a route.
Prerequisites
-
Install the OpenShift CLI (
oc) and log in as a cluster administrator.
Procedure
Create a new project for your service by running the
oc new-projectcommand:$ oc new-project <project_name>
Use the
oc new-appcommand to create your service:$ oc new-app nodejs:12~https://github.com/sclorg/nodejs-ex.git
To verify that the service was created, run the following command:
$ oc get svc -n <project_name>
Example output
NAME        TYPE        CLUSTER-IP       EXTERNAL-IP   PORT(S)    AGE
nodejs-ex   ClusterIP   172.30.197.157   <none>        8080/TCP   70s
NoteBy default, the new service does not have an external IP address.
2.8.3. Exposing the service by creating a route
To enable external access to your application that runs on OpenShift Container Platform, you can expose the service as a route by using the oc expose command.
Prerequisites
- You logged into OpenShift Container Platform.
Procedure
Log in to the project where the service you want to expose is located:
$ oc project <project_name>
To expose a node port for the application, modify the custom resource definition (CRD) of a service by entering the following command:
$ oc edit svc <service_name>
Example output
spec: ports: - name: 8443-tcp nodePort: 30327 port: 8443 protocol: TCP targetPort: 8443 sessionAffinity: None type: NodePort-
nodePort: Optional parameter. Specifies the node port range for the application. By default, OpenShift Container Platform selects an available port in the30000-32767range. -
type: Specifies the service type.
-
Optional: To confirm the service is available with a node port exposed, enter the following command:
$ oc get svc -n myproject
Example output
NAME                TYPE        CLUSTER-IP       EXTERNAL-IP   PORT(S)          AGE
nodejs-ex           ClusterIP   172.30.217.127   <none>        3306/TCP         9m44s
nodejs-ex-ingress   NodePort    172.30.107.72    <none>        3306:31345/TCP   39s
Optional: To remove the service created automatically by the
oc new-appcommand, enter the following command:$ oc delete svc nodejs-ex
Verification
To check that the service node port is updated with a port in the
30000-32767range, enter the following command:$ oc get svc
In the following example output, the updated port is
30327:Example output
NAME    TYPE       CLUSTER-IP      EXTERNAL-IP   PORT(S)          AGE
httpd   NodePort   172.xx.xx.xx    <none>        8443:30327/TCP   109s
2.8.4. Additional resources
2.9. Configuring ingress cluster traffic using load balancer allowed source ranges
You can specify a list of IP address ranges for the Ingress Controller. This action restricts access to the load balancer service when you specify the LoadBalancerService value for the endpointPublishingStrategy parameter.
2.9.1. Configuring load balancer allowed source ranges
You can enable and configure the spec.endpointPublishingStrategy.loadBalancer.allowedSourceRanges parameter. By configuring load balancer allowed source ranges, you can limit the access to the load balancer for the Ingress Controller to a specified list of IP address ranges.
The Ingress Operator reconciles the load balancer Service and sets the spec.loadBalancerSourceRanges parameter based on AllowedSourceRanges.
If you have already set the spec.loadBalancerSourceRanges parameter or the load balancer service anotation service.beta.kubernetes.io/load-balancer-source-ranges in a previous version of OpenShift Container Platform, Ingress Controller starts reporting Progressing=True after an upgrade. To fix this, set AllowedSourceRanges that overwrites the spec.loadBalancerSourceRanges parameter and clears the service.beta.kubernetes.io/load-balancer-source-ranges annotation. Ingress Controller starts reporting Progressing=False again.
Prerequisites
- You have a deployed Ingress Controller on a running cluster.
Procedure
Set the allowed source ranges API for the Ingress Controller by running the following command:
$ oc -n openshift-ingress-operator patch ingresscontroller/default \ --type=merge --patch='{"spec":{"endpointPublishingStrategy": \ {"type":"LoadBalancerService", "loadbalancer": \ {"scope":"External", "allowedSourceRanges":["0.0.0.0/0"]}}}}'where:
allowedSourceRanges-
The example value
0.0.0.0/0specifies the allowed source range.
2.9.2. Migrating to load balancer allowed source ranges
If you have already set the annotation service.beta.kubernetes.io/load-balancer-source-ranges, you can migrate to load balancer allowed source ranges. When you set the AllowedSourceRanges, the Ingress Controller sets the spec.loadBalancerSourceRanges field based on the AllowedSourceRanges value and unsets the service.beta.kubernetes.io/load-balancer-source-ranges annotation.
If you have already set the spec.loadBalancerSourceRanges parameter or the load balancer service anotation service.beta.kubernetes.io/load-balancer-source-ranges in a previous version of OpenShift Container Platform, the Ingress Controller starts reporting Progressing=True after an upgrade. To fix this, set AllowedSourceRanges that overwrites the spec.loadBalancerSourceRanges parameter and clears the service.beta.kubernetes.io/load-balancer-source-ranges annotation. The Ingress Controller starts reporting Progressing=False again.
Prerequisites
-
You have set the
service.beta.kubernetes.io/load-balancer-source-rangesannotation.
Procedure
Check that the
service.beta.kubernetes.io/load-balancer-source-rangesis set by entering the following command:$ oc get svc router-default -n openshift-ingress -o yaml
Example output
apiVersion: v1 kind: Service metadata: annotations: service.beta.kubernetes.io/load-balancer-source-ranges: 192.168.0.1/32Check that the
spec.loadBalancerSourceRangesparameter is unset by entering the following command:$ oc get svc router-default -n openshift-ingress -o yaml
Example output
...
spec:
  loadBalancerSourceRanges:
  - 0.0.0.0/0
...
- Update your cluster to OpenShift Container Platform 4.22.
Set the allowed source ranges API for the
ingresscontrollerby running the following command:$ oc -n openshift-ingress-operator patch ingresscontroller/default \ --type=merge --patch='{"spec":{"endpointPublishingStrategy": \ {"loadBalancer":{"allowedSourceRanges":["0.0.0.0/0"]}}}}'where:
allowedSourceRanges-
The example value
0.0.0.0/0specifies the allowed source range.
2.9.3. Additional resources
2.10. Patching existing ingress objects
You can update or modify the following fields of existing Ingress objects without recreating the objects or disrupting services to these objects:
- Specifications
- Host
- Path
- Backend services
- SSL/TLS settings
- Annotations
2.10.1. Patching Ingress objects to resolve an ingressWithoutClassName alert
To prevent certain routing issues, you must define define the ingressClassName field for each Ingress object.
Approximately 24 hours after you create an Ingress object, the Ingress Controller sends you an ingressWithoutClassName alert to remind you to set the ingressClassName field.
The procedure demonstrates patching the Ingress objects with a completed ingressClassName field to ensure proper routing and functionality.
Procedure
List all
IngressClassobjects:$ oc get ingressclass
List all
Ingressobjects in all namespaces:$ oc get ingress -A
Patch the
Ingressobject by running the following command. This command patches theIngressobject to include the desired ingress class name.$ oc patch ingress/<ingress_name> --type=merge --patch '{"spec":{"ingressClassName":"openshift-default"}}'-
<ingress_name>: Replace<ingress_name>with the name of theIngressobject.
-
2.11. Understanding DNS management policies
As a cluster administrator, when you create an Ingress Controller, the Operator manages the DNS records automatically. This approach has some limitations when the required DNS zone is different from the cluster DNS zone or when the DNS zone is hosted outside the cloud provider.
The following list details key aspects for a managed DNS management policy:
- The Managed DNS management policy for Ingress Controllers ensures that the lifecycle of the wildcard DNS record on the cloud provider is automatically managed by the Operator. This is the default behavior.
-
When you change an Ingress Controller from
ManagedtoUnmanagedDNS management policy, the Operator does not clean up the previous wildcard DNS record provisioned on the cloud. -
When you change an Ingress Controller from
UnmanagedtoManagedDNS management policy, the Operator attempts to create the DNS record on the cloud provider if it does not exist or updates the DNS record if it already exists.
The following list details key aspects for a unmanaged DNS management policy:
The Unmanaged DNS management policy for Ingress Controllers ensures that the lifecycle of the wildcard DNS record on the cloud provider is not automatically managed; instead, it becomes the responsibility of the cluster administrator.
NoteFor Google Cloud installations, you can use a custom DNS solution. Refer to the
DNSRecordCR for information on what you need to include in the DNS record. For more information, see Enabling a user-managed DNS and Provisioning your own DNS records.
2.11.1. Creating an Ingress Controller for manual DNS management
As a cluster administrator, you can create a new custom Ingress Controller with the Unmanaged DNS management policy.
Prerequisites
-
You have installed the OpenShift CLI (
oc). -
You are logged in as a user with
cluster-adminprivileges.
Procedure
Create an
IngressControllercustom resource (CR) file namedsample-ingress.yamlwith the following content:apiVersion: operator.openshift.io/v1 kind: IngressController metadata: namespace: openshift-ingress-operator name: <name> spec: domain: <domain> endpointPublishingStrategy: type: LoadBalancerService loadBalancer: scope: External dnsManagementPolicy: Unmanagedwhere:
metadata.name-
Specify the
<name>with a name for theIngressControllerobject. spec.domain-
Specify the
domainbased on the DNS record that was created as a prerequisite. loadBalancer.scope-
Specify the
scopeasExternalto expose the load balancer externally.loadBalancer.dnsManagementPolicy: Specifies if the Ingress Controller is managing the lifecycle of the wildcard DNS record associated with the load balancer. The valid values areManagedandUnmanaged. The default value isManaged.
Apply the manifest to create the
IngressControllerobject:$ oc apply -f sample-ingress.yaml
Verify that the Ingress Controller was created with the correct policy by running the following command:
$ oc get ingresscontroller <name> -n openshift-ingress-operator -o=jsonpath={.spec.endpointPublishingStrategy.loadBalancer}Inspect the output and confirm that
dnsManagementPolicyis set toUnmanaged.
2.11.2. Modifying an existing Ingress Controller for manual DNS management
As a cluster administrator, you can modify an existing Ingress Controller to manually manage the DNS record lifecycle.
Prerequisites
-
You have installed the OpenShift CLI (
oc). -
You are logged in as a user with
cluster-adminprivileges.
Procedure
Modify the chosen Ingress Controller to set the
dnsManagementPolicyparameter:$ SCOPE=$(oc -n openshift-ingress-operator get ingresscontroller <name> -o=jsonpath="{.status.endpointPublishingStrategy.loadBalancer.scope}")$ oc -n openshift-ingress-operator patch ingresscontrollers/default --type=merge --patch="{\"spec\":{\"endpointPublishingStrategy\":{\"type\":\"LoadBalancerService\",\"loadBalancer\":{\"dnsManagementPolicy\":\"Unmanaged\", \"scope\":\"${SCOPE}\"}}}}" ingresscontroller.operator.openshift.io/default patchedVerify that the Ingress Controller was modified correctly by running the following command:
$ oc get ingresscontroller <name> -n openshift-ingress-operator -o=jsonpath={.spec.endpointPublishingStrategy.loadBalancer}Inspect the output and confirm that
dnsManagementPolicyis set toUnmanaged.
2.11.3. Additional resources
Chapter 3. Configuring Gateway API
3.1. Understand Gateway API
To optimize network traffic management and implement routing policies in OpenShift Container Platform, use Gateway API. By adopting this community-managed Kubernetes mechanism, you can configure advanced routing at both the transport (L4) and application (L7) layers while leveraging various vendor-supported implementations to meet your specific networking requirements.
A well-designed Gateway API deployment helps you achieve a portable, role-oriented routing infrastructure. To successfully plan your Gateway API implementation, review the following concepts:
- Understand the benefits and limitations of Gateway API.
- Review OpenShift Container Platform implementation specifics to avoid unsupported features.
- Choose between shared or dedicated deployment topologies.
Gateway API does not support user-defined networks (UDN).
3.1.1. Gateway API benefits and limitations
To determine if Gateway API is the right routing solution for your cluster, review its benefits and limitations. The project is an effort to provide a standardized ecosystem by using a portable API with broad community support. Understanding these factors ensures your networking infrastructure aligns with your organizational needs and technical capabilities.
3.1.1.1. Benefits
Gateway API provides the following benefits:
-
Portability: Where OpenShift Container Platform uses HAProxy to improve Ingress performance, Gateway API does not rely on vendor-specific annotations to provide certain behavior. To get comparable performance to HAProxy, the
Gatewayobjects need to be horizontally scaled or their associated nodes need to be vertically scaled. -
Separation of concerns: Gateway API uses a role-based approach to its resources, and more neatly fits into how a large organization structures its responsibilities and teams. Platform engineers might focus on
GatewayClassresources, cluster administrators might focus on configuringGatewayresources, and application developers might focus on routing their services withHTTPRouteresources. - Extensibility: Additional functionality is developed as a standardized CRD.
3.1.1.2. Limitations
Gateway API has the following limitations:
- Version incompatibilities: The Gateway API ecosystem changes rapidly, and some implementations do not work with others because their featureset is based on differing versions of Gateway API.
- Resource overhead: While more flexible, Gateway API uses multiple resource types to achieve an outcome. For smaller applications, the simplicity of traditional Ingress might be a better fit.
- On-premise infrastructure dependencies: On-premise deployments, such as bare metal or VMware vSphere environments, do not automatically provision network load balancers or manage external DNS records. To use Gateway API on an on-premise platform, you must explicitly deploy a load balancer controller, such as MetalLB, and manually map your DNS records to the provisioned gateway address.
3.1.2. Gateway API implementation specifics
To ensure interoperability between external vendor implementations and your networking infrastructure in OpenShift Container Platform, the Ingress Operator manages the lifecycle of Gateway API custom resource definitions (CRDs). Understanding how these CRDs are managed helps you prevent disrupted workloads and security issues caused by incompatible vendor fields.
In some situations, Gateway API provides one or more fields that a vendor implementation does not support, but that implementation is otherwise compatible in schema with the rest of the fields. These "dead fields" can result in disrupted Ingress workloads, improperly provisioned applications and services, and security-related issues. Because OpenShift Container Platform uses a specific version of Gateway API CRDs, any use of third-party implementations of Gateway API must conform to the OpenShift Container Platform implementation to ensure that all fields work as expected.
Any CRDs created within an OpenShift Container Platform 4.22 cluster are compatibly versioned and maintained by the Ingress Operator. If CRDs are already present but were not previously managed by the Ingress Operator, the Ingress Operator checks whether these configurations are compatible with Gateway API version supported by OpenShift Container Platform, and creates an admin-gate that requires your acknowledgment of CRD succession.
If you are updating your cluster from a previous OpenShift Container Platform version that contains Gateway API CRDs, change those resources so that they exactly match the version supported by OpenShift Container Platform. Otherwise, you cannot update your cluster because those CRDs were not managed by OpenShift Container Platform, and could contain functionality that is unsupported by Red Hat.
3.1.2.1. Gateway API CRDs for gateway.networking.x-k8s.io
In previous versions of OpenShift Container Platform, cluster security policies blocked the deployment of the Gateway API CRD for gateway.networking.x-k8s.io. Starting in OpenShift Container Platform 4.22, this restriction is removed, and you can deploy that CRD.
Experimental Gateway API CRDs in the gateway.networking.k8s.io group remain restricted.
You can install the gateway.networking.x-k8s.io CRD and related objects on the cluster because they are no longer blocked. The built-in Gateway API implementation managed by the Ingress Operator does not reconcile those objects in OpenShift Container Platform. Use a compatible third-party Gateway implementation if you need those APIs reconciled.
3.1.3. Gateway API deployment topologies
To effectively organize and secure your routing infrastructure, you must choose an appropriate deployment topology for your cluster. Gateway API is designed to accommodate two topologies: shared gateways or dedicated gateways. You can choose a topology based on its own advantages and different security implications.
3.1.3.1. Dedicated gateway
Routes and any load balancers or proxies are served from the same namespace. The Gateway object restricts routes to a particular application namespace. This is the default topology when deploying a Gateway API resource in OpenShift Container Platform.
The following example shows a dedicated Gateway resource, fin-gateway:
Example dedicated Gateway resource
apiVersion: gateway.networking.k8s.io/v1
kind: Gateway
metadata:
  name: fin-gateway
  namespace: openshift-ingress
spec:
  gatewayClassName: openshift-default
  listeners:
  - name: http
    protocol: HTTP
    port: 80
    hostname: "example.com"
If you do not set spec.listeners[].allowedRoutes for a Gateway resource, the system implicitly sets the namespaces.from field to the value of Same.
The following example shows the associated HTTPRoute resource, sales-db, which attaches to the dedicated Gateway object:
Example HTTPRoute resource
apiVersion: gateway.networking.k8s.io/v1
kind: HTTPRoute
metadata:
  name: sales-db
  namespace: openshift-ingress
spec:
  parentRefs:
  - name: fin-gateway
  hostnames:
  - sales-db.example.com
  rules:
    - backendRefs:
        - name: sales-db
        ¦ port: 8080
The HTTPRoute resource must have the name of the Gateway object as the value for its parentRefs field to attach to the gateway. The system implicitly assumes that the route exists in the same namespace as the Gateway object.
3.2. Enable Gateway API
To route traffic using Gateway API, you must first enable the feature on your cluster. You can enable Gateway API by creating a GatewayClass custom resource, which triggers the Ingress Operator to provision the necessary controller and components.
After you successfully enable Gateway API, you can begin deploying gateways, assigning network addresses, and configuring listeners to control your network traffic flow.
3.2.1. Enable Gateway API for the Ingress Operator
To configure Gateway API for use on your cluster, you must create a GatewayClass resource. During the creation of the GatewayClass resource, the Ingress Operator installs a lightweight Istio control plane, based on Red Hat OpenShift Service Mesh, in the openshift-ingress namespace.
Prerequisites
-
You have access to the cluster as a user with the
cluster-adminrole. -
You have installed the OpenShift CLI (
oc).
Procedure
Create a
GatewayClassobject:Create a YAML file,
openshift-default.yaml, that contains the following information:Example
GatewayClassCRapiVersion: gateway.networking.k8s.io/v1 kind: GatewayClass metadata: name: openshift-default spec: controllerName: openshift.io/gateway-controller/v1
metadata.name: The name of yourGatewayClassobject. The name must consist of a maximum of 63 lowercase alphanumeric characters or hyphens (-). The name must also start and end with an alphanumeric character.ImportantThe
controllerNamevalue must be exactly as shown for the Ingress Operator to manage it. If you set this field to anything else, the Ingress Operator ignores theGatewayClassobject and all associatedGateway,GRPCRoute, andHTTPRouteobjects. The controller name is tied to the implementation of Gateway API in OpenShift Container Platform, andopenshift.io/gateway-controller/v1is the only controller name allowed.
Run the following command to create the
GatewayClassresource:$ oc create -f openshift-default.yaml
Example output
gatewayclass.gateway.networking.k8s.io/openshift-default created
Verification
Verify that the
GatewayClassCR has been accepted and the controller is successfully installed by running the following command:$ oc get gatewayclass openshift-default -o yaml
Example output
# ... status: conditions: - lastTransitionTime: "2026-05-15T10:00:00Z" message: The GatewayClass has been accepted reason: Accepted status: "True" type: Accepted - lastTransitionTime: "2026-05-15T10:00:00Z" message: Istio installed successfully reason: Installed status: "True" type: ControllerInstalled - lastTransitionTime: "2026-05-15T10:00:00Z" message: Istio CRDs are being managed by cluster-ingress-operator reason: ManagedByCIO status: "True" type: CRDsReady # ...Inspect the
status.conditionsblock in the output. A healthyGatewayClassCR reports a status ofTruefor theAccepted,ControllerInstalled, andCRDsReadyconditions.
3.3. Control incoming traffic with gateway listeners
To control network traffic flow, you can configure Gateway API listeners to define the designated port, protocol, and hostname for your gateway. By configuring listeners, you can specify secure TLS connections, dictate how traffic is terminated, and restrict which application routes are permitted to attach to the gateway.
To successfully manage your incoming traffic with gateway listeners, complete the following tasks:
- Configure listener routing and security settings to define the ports, protocols, hostnames, and TLS certificates for your incoming traffic.
- Understand listener routing conflicts by applying conflict management rules to ensure overlapping hostnames or ports are routed correctly.
- Troubleshoot listener connections by monitoring listener status conditions to identify and resolve configuration errors.
3.3.1. Configure listener routing and security settings
To ensure that your applications receive only authenticated and authorized traffic, you must specify the allowed protocols and ports for your gateway. If you are routing secure traffic, you must also configure TLS settings. You can define these parameters by configuring the spec.listeners field in your Gateway custom resource (CR).
Procedure
Create or edit a
GatewayYAML file to include your desired listener configuration.The following example demonstrates a
GatewayCR with two listeners, one for HTTP and one for HTTPS. For detailed descriptions of the listener fields, see Section 3.3.1.1, “Gateway listener configuration reference”.kind: Gateway apiVersion: gateway.networking.k8s.io/v1 metadata: name: <example_gateway> namespace: openshift-ingress spec: gatewayClassName: openshift-default listeners: - protocol: HTTP port: 80 name: http allowedRoutes: namespaces: from: Selector selector: matchLabels: env: "dev" - protocol: HTTPS port: 443 name: https hostname: "*.<example_domain.tld>" tls: mode: Terminate certificateRefs: - name: <listener_cert> kind: Secret allowedRoutes: namespaces: from: All
Apply the
GatewayCR by running the following command:$ oc apply -f <gateway_cr>.yaml
3.3.1.1. Gateway listener configuration reference
When configuring the spec.listeners field in your Gateway custom resource (CR), you can define network protocols, ports, hostnames, TLS termination, and route attachment policies.
You can customize your gateway listener configuration using the following fields:
spec.listeners- Defines the list of listeners for the gateway. You can customize this field with settings for port, protocol, TLS, hostnames, and allowed routes.
listeners.protocolandlisteners.port-
Defines the network port and protocol. For example,
protocol: HTTPaccepts HTTP traffic on port80, andprotocol: HTTPSaccepts HTTPS traffic on port443. listeners.hostname-
Defines the hostnames that the listener matches for incoming requests. For example, it can match only requests for hostnames ending in
<example_domain.tld>(such aswww.<example_domain.tld>). If no hostname is specified, the gateway routes any traffic that can attach to it. listeners.tls-
Specifies the TLS settings for secure communication, including the mode (currently, only
Terminateis supported on OpenShift Container Platform) and the Kubernetes secret containing the certificate keypair. For example, TLS is terminated at the gateway using a certificate stored in a KubernetesSecretcalled<listener_cert>. You must ensure that the specified Kubernetes secret exists before you create theGatewayCR. listeners.allowedRoutes-
Controls which
Routeresources can attach to this listener. For example, an HTTP listener might only allowHTTPRouteresources from namespaces that have theenv: "dev"label (usingSelector), while an HTTPS listener might allowHTTPRouteresources from any namespace to attach (usingAll). SettingallowedRoutes.namespaces.from: Sameis not supported; routes from the same namespace as the gateway are always allowed.
3.3.2. Understand listener routing conflicts
When you configure a Gateway custom resource (CR) with multiple listeners, you must establish clear rules for overlapping hostnames and ports to ensure your traffic does not get misrouted. To avoid ambiguity, the Gateway API uses specific conflict management rules.
If your listener configurations violate these rules, the affected listener receives a Conflicted status condition and cannot route traffic correctly.
To resolve or prevent routing conflicts, ensure that your listeners adhere to the following rules:
- Distinct ports: A gateway can have distinct listeners that use the exact same hostname, provided their network ports are distinct.
- Distinct hostnames: A gateway can have distinct listeners that use the exact same protocol and port, provided their hostnames are different.
Specificity precedence: If one listener uses a wildcard domain (for example,
*.<example_domain.tld>) and another listener uses a more specific endpoint for that exact same domain (for example,<www.example_domain.tld>), the more specific entry takes precedence.This specificity rule also applies to multiple wildcard domains. For example,
*.<example_domain.tld>takes precedence over*.<tld>. This ensures that traffic intended for a specific subdomain is accurately routed to its dedicated listener, even if a broader wildcard listener exists.NoteIn the Gateway API, wildcards match one or more complete DNS labels. For example,
*.<example.com>matches<www.example.com>and<sub.domain.example.com>, but does not match the root domain<example.com>.
3.3.3. Troubleshoot listener connections using status conditions
When a listener is not routing traffic as expected, you can review its status conditions to quickly diagnose and fix the configuration error. The listener status condition gives insight into its current state and any underlying issues preventing it from accepting traffic.
Procedure
Check the
statusconditions of yourGatewaycustom resource (CR) by running the following command:$ oc describe gateway <gateway_cr> -n <namespace>
-
<gateway_cr>: Specify the name of your gateway. <namespace>: Specify the namespace where the gateway resides.For details on how to interpret the output and resolve common errors, see Section 3.3.3.1, “Gateway listener troubleshooting reference”.
-
3.3.3.1. Gateway listener troubleshooting reference
When you troubleshoot your gateway listeners, you can review the status conditions in the Gateway custom resource (CR) output to identify configuration errors or conflicts.
The following table describes common listener conditions and how to resolve them:
Table 3.1. Gateway listener status conditions
| Condition | Description |
|---|---|
|
| Indicates that the listener is configured correctly and is actively listening for traffic. |
|
| Signifies an ambiguity or conflict in the listener’s configuration with another listener on the same gateway. If a listener is conflicted, review your listener configurations against the conflict management rules to identify and resolve the ambiguity. |
|
| Denotes that the underlying infrastructure, such as a load balancer or proxy, has successfully been programmed with the listener’s configuration. |
|
| Indicates that the gateway has accepted the listener’s configuration. This is usually an early step in the listener’s lifecycle. |
|
| Means the listener’s configuration itself contains errors or is malformed, preventing it from being processed. An invalid status indicates errors in your YAML configuration. Check your configuration for typos, incorrect syntax, or missing required fields. |
3.3.4. Additional resources
3.4. Assign network addresses to gateways
You can configure network addresses for your gateway to provide a predictable entry point for external and internal traffic. This ensures that clients can reliably resolve and route requests to your load balancers.
Gateway API uses addresses to define the specific network locations that are assigned to your Gateway resource. In OpenShift Container Platform, you rely on the gateway controller to automatically provision and bind the necessary network addresses, such as an external or internal load balancer IP, to your gateway. On on-premise environments, this automatic provisioning requires a configured load balancer controller.
To successfully assign network addresses to your gateway, complete the following tasks:
- Understand gateway address assignment and types to plan your DNS and load balancer configuration.
- Understand on-premise gateway routing requirements to ensure your infrastructure can support Gateway API.
- Configure automatic address assignment for a gateway to successfully deploy it without violating manual address constraints.
- Configure an internal load balancer to restrict your gateway traffic to your private network.
- Review cloud provider annotations to ensure your internal load balancer provisions correctly on your specific infrastructure.
- Configure DNS for on-premise gateways to ensure clients can reliably resolve your gateway.
3.4.1. Understand gateway address assignment and types
OpenShift Container Platform automatically handles address assignment by provisioning a LoadBalancer service when you create a Gateway resource. The network address assigned to your gateway corresponds to the IP address or hostname of this underlying load balancer.
Do not define the spec.addresses field. Manually requesting specific network addresses is not currently supported in OpenShift Container Platform. If you attempt to request a specific address manually, the gateway enters an error state.
The status.addresses field is populated automatically by the gateway controller. This field lists the actual, active network address assigned to your gateway by the load balancing infrastructure.
3.4.1.1. Address types
When the controller dynamically assigns an address to your gateway and populates the status.addresses field, it uses one of the following primary types to reflect the underlying load balancer:
Hostname- Represents a DNS-based ingress point. This concept is typically used for cloud load balancers where a DNS name exposes the load balancer.
IPAddress- A textual representation of a numeric IP address (IPv4 or IPv6) assigned by the load balancing infrastructure.
3.4.2. On-premise gateway routing requirements
Understand the specific routing and load balancing requirements for on-premise Gateway API deployments to ensure your gateway functions correctly.
Unlike cloud environments where load balancers are dynamically provisioned, on-premise clusters require a preconfigured load balancer controller. Red Hat tests and certifies Gateway API on on-premise platforms specifically with MetalLB.
If you attempt to use Gateway API on an on-premise cluster without a functional load balancer controller, the gateway service will remain in a "pending" state indefinitely.
Additionally, be aware of the following topology and load balancer limitations for on-premise environments:
- Third-party load balancers: Red Hat does not currently test Gateway API with third-party load balancers such as F5 or Avi Kubernetes Operator (AKO). If you use an untested load balancer, the cluster administrator is responsible for ensuring it is configured and working properly.
-
Unsupported topologies: Environments without a load balancer controller are not supported. For example, you cannot use annotations to enforce a
NodePortservice type in place of a load balancer.
3.4.3. Configure automatic address assignment for a gateway
When you create a gateway resource, you must configure it for automatic address provisioning to successfully deploy the gateway without violating OpenShift Container Platform manual address constraints. By intentionally omitting the addresses field, you allow the controller to seamlessly provision and bind the necessary external network addresses to your gateway.
Prerequisites
-
You have access to the cluster as a user with the
cluster-adminrole. -
You have installed the OpenShift CLI (
oc). -
You have an existing
GatewayClassresource, such asopenshift-default.
Procedure
Create a YAML file, such as
hello-gateway.yaml, that defines yourGatewayobject without the addresses field:apiVersion: gateway.networking.k8s.io/v1 kind: Gateway metadata: name: sample-gateway namespace: openshift-ingress spec: gatewayClassName: openshift-default listeners: - name: http hostname: "*.gwapi.<cluster_domain>" port: 80 protocol: HTTP allowedRoutes: namespaces: from: All-
metadata.name: The name of yourGatewayobject. The name must consist of a maximum of 63 lowercase alphanumeric characters or hyphens (-). The name must also start and end with an alphanumeric character. -
Replace
<cluster_domain>with your actual cluster ingress domain (for example,example.com). -
The
spec.addressesfield is omitted from this configuration to ensure automatic assignment. -
The
gatewayClassNamedictates which controller provisions the address and populates thestatus.addressesfield.
-
Apply the
Gatewayconfiguration by running the following command:$ oc apply -f hello-gateway.yaml
Verify that the controller automatically assigned an address to your gateway by running the following command:
$ oc -n openshift-ingress get gateway sample-gateway
Example output
NAME             CLASS               ADDRESS             PROGRAMMED   AGE
sample-gateway   openshift-default   <gateway_address>   True         6m16s
The
ADDRESScolumn in the output displays the dynamically provisioned network address for your gateway.
3.4.4. Configure an internal load balancer for a gateway
By default, Gateway API provisions an external load balancer. To restrict your gateway traffic to your private network, you can configure Gateway API to provision an internal load balancer by adding a cloud-specific annotation to your Gateway custom resource (CR).
Prerequisites
-
You have access to the cluster as a user with the
cluster-adminrole. -
You have installed the OpenShift CLI (
oc). -
You have configured a
GatewayClassobject.
Procedure
Create or edit your
GatewayCR to include the cloud-specific annotation underspec.infrastructure.annotations.The following example provisions an internal load balancer for an AWS cluster:
Example
GatewayCR for an AWS internal load balancerapiVersion: gateway.networking.k8s.io/v1 kind: Gateway metadata: name: mygateway namespace: openshift-ingress spec: gatewayClassName: openshift-default infrastructure: annotations: # Specifies the cloud provider annotation and value required to provision an internal load balancer: service.beta.kubernetes.io/aws-load-balancer-internal: "true" listeners: - name: https hostname: "*.example.com" port: 443 protocol: HTTPS tls: mode: Terminate certificateRefs: - name: gateway-tls-secret # ...Apply the updated
GatewayCR by running the following command:$ oc apply -f <gateway_filename>.yaml
Verification
Verify that the load balancer service is provisioned and has an internal IP address by running the following command:
$ oc -n openshift-ingress get svc
3.4.4.1. Cloud provider annotations for internal load balancers
To provision an internal load balancer for clusters deployed in private environments, you must add specific annotations to the spec.infrastructure.annotations field of your Gateway custom resource (CR).
This configuration is supported on Amazon Web Services (AWS), Microsoft Azure, Google Cloud, Red Hat OpenStack Platform (RHOSP), and IBM Cloud. The following table details the required cloud-specific annotations and their corresponding values.
Table 3.2. Internal load balancer annotations by cloud provider
| Cloud Provider | Annotation | Value |
|---|---|---|
| AWS |
|
|
| Azure |
|
|
| Google Cloud |
|
|
| RHOSP |
|
|
| IBM Cloud/ IBM Power Virtual Server |
|
|
3.4.5. Configuring DNS for on-premise gateways
Configure DNS records manually on on-premise environments to ensure clients can reliably resolve your gateway.
Although the Ingress Operator automatically creates a DNSRecord custom resource (CR) using the hostname from the listener, this record is marked as "unmanaged" on on-premise platforms because the cluster Ingress Operator does not implement on-premise DNS providers. You must manually configure DNS records to point to the IP address of your load balancer.
Prerequisites
-
You have access to the cluster as a user with the
cluster-adminrole. -
You have installed the OpenShift CLI (
oc). - You have configured a load balancer controller, such as MetalLB, for your cluster.
- Your gateway has been assigned an external network address by the load balancer.
-
Your gateway is located in the
openshift-ingressnamespace.
Procedure
Retrieve the external IP address assigned to your gateway by the load balancer by running the following command:
$ oc -n openshift-ingress get gateway <gateway_name>
Note the IP address listed in the
ADDRESScolumn.- Access your organization’s DNS provider or server.
- Create a DNS record, such as an A record or wildcard A record, that maps the listener’s hostname to the external IP address of your gateway.
3.5. Routing HTTP requests to services
When you expose your applications through a gateway, you must configure an HTTPRoute custom resource (CR) to accurately direct incoming HTTP requests from your network listener to the appropriate backend services. A Gateway API HTTPRoute CR specifies the exact routing behavior for these requests by evaluating a set of rules.
The core configuration element of an HTTPRoute CR is a rule. You can configure up to 16 rules for a single route. Within each rule, you can establish the following routing behaviors:
-
Matches: Define the conditions an HTTP request must meet based on paths, headers, query parameters, or methods. -
Filters: Apply processing directions to the request, such as header modifications, mirrors, or redirects. -
BackendRefs: Designate the backend services where matching and filtered requests are delivered, including traffic weight distribution. -
Timeouts: Establish strict time limits for the entire request or the backend hop.
To successfully configure your HTTP routing behavior, complete the following tasks:
- Configure HTTP request matching conditions
- Apply processing filters to HTTP requests
- Configure routing destinations and traffic weights
- Set timeouts for HTTP requests
-
Compare OpenShift Container Platform routes and
HTTPRouteCRs
3.5.1. Configure HTTP request matching conditions
To ensure traffic is routed to the correct application when multiple services share a gateway, you can define request matching conditions within your HTTPRoute custom resource (CR). You can match HTTP requests based on paths, headers, query parameters, or methods.
Prerequisites
-
You have access to the cluster as a user with the
cluster-adminrole. -
You have installed the OpenShift CLI (
oc).
Procedure
Create or edit an
HTTPRouteYAML file to include your desired match conditions under thespec.rules.matchesfield.The following example demonstrates a complete
HTTPRoutecustom resource (CR) configured with path-based matching to route requests for/<example_app>to a backend service. For details on configuring other match types, see Section 3.5.1.1, “Supported HTTPRoute match types”.apiVersion: gateway.networking.k8s.io/v1 kind: HTTPRoute metadata: name: <path_match_example> namespace: <example_application> spec: parentRefs: - name: <example_gateway> namespace: openshift-ingress hostnames: - "<example.com>" rules: - matches: - path: type: Exact value: /<example_app> backendRefs: - name: <example_backend> port: 8080
Apply the
HTTPRouteCR by running the following command:$ oc apply -f <filename>.yaml
3.5.1.1. Supported HTTPRoute match types
Matches define conditions used for matching the rule against incoming HTTP requests. If no match is specified, then all HTTP requests are matched, depending on the hostname. Each match is independent, i.e. this rule will be matched if any single match of the type is satisfied. A rule may have up to 64 matches, but most rules don’t need to be this complex. You may combine multiple match types (path and headers, for example), all of which must be true in order for the HTTP request to match.
You can configure the following match types:
path- Consists of type and value. Path match type indicates how to match the value and may be either “Exact” or “PathPrefix” (default). The default path value, if omitted, is “/”. On Red Hat OpenShift Service Mesh, “RegularExpression” may also be used as a type.
headers- Each consists of type, name, and value. Header match type indicates how to match the value and may be “Exact” (default) or on Red Hat OpenShift Service Mesh, “RegularExpression”. Name is the HTTP header name, which must be case-insensitive. Value is the value of the HTTP header to be matched.
queryParameters- Each consists of type, name, and value. QueryParameters match type indicates how to match the value and may be “Exact” (default) or on Red Hat OpenShift Service Mesh, “RegularExpression”. Name is the HTTP query parameter name and must match exactly. Value is the value of the HTTP query parameter to be matched.
method- A value in upper case that should match on the HTTP request method. Must be one of: GET, HEAD, POST, PUT, DELETE, CONNECT, OPTIONS, TRACE, or PATCH.
According to Gateway API conventions, the RegularExpression match type is classified as an implementation-specific feature (Support: Implementation-specific). While Red Hat OpenShift Service Mesh fully supports regular expression matching, this feature might not be available or behave identically across other Gateway API implementations.
3.5.1.1.1. Example: path match
The following example demonstrates a complete HTTPRoute custom resource (CR) configured with path-based matching to route requests for /<example_app> to a backend service:
apiVersion: gateway.networking.k8s.io/v1
kind: HTTPRoute
metadata:
  name: <path_match_example>
  namespace: <example_application>
spec:
  parentRefs:
  - name: <example_gateway>
    namespace: openshift-ingress
  hostnames:
  - "<example.com>"
  rules:
  - matches:
    - path:
        type: Exact
        value: /<example_app>
    backendRefs:
    - name: <example_backend>
      port: 8080
-
pathspecifies that the request must match a specific URL path. -
type: Exactensures the route only matches the exact string/<example_app>. -
backendRefsdefines the service where matching traffic is sent.
3.5.1.1.2. Example: headers match (AND condition)
The following snippet demonstrates how to combine multiple header matches so that a request must contain both myheader: newheader AND color: orange to successfully match:
spec:
  rules:
  - matches:
    - headers:
      - name: <my_header>
        value: <new_header_value>
      - name: <color_header>
        value: <orange_value>
    backendRefs:
    - name: <example_service>
      port: 8080
3.5.2. Apply processing filters to HTTP requests
To modify how HTTP requests are processed before they reach your backend services, you can pre-configure filters within the rules of your HTTPRoute custom resource (CR). Configuring these filters allows you to automatically redirect traffic, modify headers, or mirror requests to achieve your desired routing behavior.
Prerequisites
-
You have access to the cluster as a user with the
cluster-adminrole. -
You have installed the OpenShift CLI (
oc).
Procedure
Create or edit an
HTTPRouteYAML file to include your desired processing directives under thespec.rules.filtersfield.The following example demonstrates a complete
HTTPRoutecustom resource (CR) with arequestRedirectfilter that issues a permanent redirect (301) from HTTP to HTTPS. For details on configuring other filter types, see Section 3.5.2.1, “Supported HTTPRoute filters”.apiVersion: gateway.networking.k8s.io/v1 kind: HTTPRoute metadata: name: <http_filter_example> namespace: <example_application> spec: parentRefs: - name: <example_gateway> namespace: openshift-ingress hostnames: - "<example.com>" rules: - filters: - type: RequestRedirect requestRedirect: scheme: https statusCode: 301
Apply the
HTTPRouteCR by running the following command:$ oc apply -f <filename>.yaml
3.5.2.1. Supported HTTPRoute filters
Filters apply processing directions to the HTTP request, such as header modification or redirect to another URL. You can specify up to 16 filters in a rule. Filters may usually be combined for advanced filtering results, except for the urlRewrite and requestRedirect filters, which may not be combined.
You can apply the following filter types to a rule:
requestRedirect- Responds to an HTTP request with an HTTP 3xx code, instructing the client to retrieve another URL. Optional fields include scheme (http | https), hostname, path (type: replaceFullPath | replacePrefixMatch, string values for replaceFullPath or replacePrefixMatch), port, and statusCode (301 | 302 | 303 | 307 | 308).
requestHeaderModifier- Modifies an HTTP request’s headers. Only one modifier per header may be specified. Multiple values for a header must be comma-separated. Up to 16 header filters may be listed. Fields are one of Set, Add, Remove. Set, Add, and Remove may modify, add, and remove up to 16 header values that match a given name.
responseHeaderModifier- Available on Red Hat OpenShift Service Mesh, this extended filter modifies an HTTP response’s headers with the same constraints as requestHeaderModifier.
requestMirror- Available on Red Hat OpenShift Service Mesh, this extended filter mirrors (i.e. sends a duplicate) requests to specified destinations (backendRef). Fields include: backendRef, and the optional percent or fraction to specify the portion of requests that should be mirrored. If neither percent nor fraction are specified, then 100% of requests are mirrored.
urlRewrite- Available on Red Hat OpenShift Service Mesh, this extended filter modifies an HTTP request’s hostname, path, or both. It may not be used in combination with the requestRedirect filter. However, the path semantics for requestRedirect can also be used for urlRewrite, i.e. (type: replaceFullPath | replacePrefixMatch, string values for replaceFullPath or replacePrefixMatch).
3.5.2.1.1. Example: requestRedirect filter
The following example demonstrates a complete HTTPRoute custom resource (CR) with a requestRedirect filter that issues a permanent redirect (301) from HTTP to HTTPS:
apiVersion: gateway.networking.k8s.io/v1
kind: HTTPRoute
metadata:
  name: <http_filter_example>
  namespace: <example_application>
spec:
  parentRefs:
  - name: <example_gateway>
    namespace: openshift-ingress
  hostnames:
  - "<example.com>"
  rules:
  - filters:
    - type: RequestRedirect
      requestRedirect:
        scheme: https
        statusCode: 301
-
hostnamesdefines the domain, such as"<example.com>", that this route applies to. -
filtersspecifies the processing logic. In this example, theRequestRedirecttype is used. -
scheme: httpsinstructs the gateway to redirect the client to the secure version of the URL. -
statusCode: 301indicates a permanent redirect.
3.5.2.1.2. Example: requestHeaderModifier filter
The following snippet demonstrates how to configure a requestHeaderModifier filter that adds a new header, modifies an existing header, and removes a specific header:
spec:
  rules:
  - filters:
    - type: RequestHeaderModifier
      requestHeaderModifier:
        add:
        - name: <my_header_name>
          value: <my_header_value>
    - type: RequestHeaderModifier
      requestHeaderModifier:
        set:
        - name: <old_header>
          value: <new_header_value>
    - type: RequestHeaderModifier
      requestHeaderModifier:
        remove: ["x-request-id"]
3.5.3. Configure routing destinations and traffic weights
To route traffic to your backends, you must define service destinations and traffic weights within your HTTPRoute custom resource (CR) to distribute requests across your applications.
Prerequisites
-
You have access to the cluster as a user with the
cluster-adminrole. -
You have installed the OpenShift CLI (
oc).
Procedure
Create or edit an
HTTPRouteYAML file to include your desired service destinations under thespec.rules.backendRefsfield.The following example demonstrates a complete
HTTPRoutecustom resource (CR) with a single backend destination that routes traffic to a service named<service_v1>. For details on configuring weights and routing to multiple destinations, see Section 3.5.3.1, “HTTPRoute backendRef configuration”.apiVersion: gateway.networking.k8s.io/v1 kind: HTTPRoute metadata: name: <backend_route_example> namespace: <example_application> spec: parentRefs: - name: <example_gateway> namespace: openshift-ingress rules: - backendRefs: - name: <service_v1> port: 8080
Apply the
HTTPRouteCR by running the following command:$ oc apply -f <filename>.yaml
3.5.3.1. HTTPRoute backendRef configuration
BackendRefs are the service destinations of requests that meet your matches rules, and are composed of group, kind, name, namespace, port, and weight. Name and port are the only required fields and refer to the service name and the service port number Weight is relevant when there is more than one backendRef, and specifies the proportion of requests forwarded to that specific backendRef. Without a backendRef, the rule doesn’t do any request forwarding and may return an error.
3.5.3.1.1. Example: Single backend destination
This example shows a BackendRef where there is a single backend destination, a service named <service_v1>:
apiVersion: gateway.networking.k8s.io/v1
kind: HTTPRoute
metadata:
  name: <backend_route_example>
  namespace: <example_application>
spec:
  parentRefs:
  - name: <example_gateway>
    namespace: openshift-ingress
  rules:
  - backendRefs:
    - name: <service_v1>
      port: 8080
-
backendRefsdefines the destination services for the traffic. -
namespecifies the name of the Kubernetes service. -
portspecifies the port on which the service is listening.
3.5.3.1.2. Example: Weighted backend delivery
This example shows two backendRefs where there is weighted delivery of 15 and 25 for the backends. This means <service_v1> gets 15/40 (3/8ths) of the traffic, and <service_v2> gets 25/40 (5/8ths) of the traffic. Though not required, it is recommended to have the weights add up to 100 whenever possible for clarity.
spec:
  rules:
  - backendRefs:
    - name: <service_v1>
      port: 8080
      weight: 15
    - name: <service_v2>
      port: 8080
weight: 253.5.4. Set timeouts for HTTP requests
To prevent hanging connections and ensure your application remains responsive, you can set strict timeouts for the entire request and the backend hop within your HTTPRoute custom resource (CR).
Prerequisites
-
You have access to the cluster as a user with the
cluster-adminrole. -
You have installed the OpenShift CLI (
oc).
Procedure
Create or edit an
HTTPRouteYAML file to include your desired timeout configurations under thespec.rules.timeoutsfield.The following example demonstrates a complete
HTTPRoutecustom resource (CR) where the entire request must complete within 30 seconds. For details on timeout formatting rules and backend request timeouts, see Section 3.5.4.1, “HTTPRoute timeout configuration”.apiVersion: gateway.networking.k8s.io/v1 kind: HTTPRoute metadata: name: <timeout_example> namespace: <example_application> spec: parentRefs: - name: <example_gateway> namespace: openshift-ingress rules: - matches: - path: type: PathPrefix value: /<timeout_path> timeouts: request: 30s backendRefs: - name: <example_service> port: 8080
Apply the
HTTPRouteCR by running the following command:$ oc apply -f <filename>.yaml
3.5.4.1. HTTPRoute timeout configuration
There are two types of timeouts you can configure for an HTTPRoute custom resource (CR): request and backendRequest.
The request timeout covers the total time to send a request and then get a response back to the client. It represents the duration of the entire request-response transaction.
The backendRequest timeout covers the time for a request to travel from the gateway to the backend, and for a response to be received. Extending the timeout for a backendRequest can be helpful if the gateway needs to retry connections to a backend.
The backendRequest timeout is classified as an extended feature (Support: Extended) according to Gateway API conventions.
When configuring timeouts, you must adhere to the following formatting rules and constraints:
-
The value of a
backendRequesttimeout cannot be greater than the value of therequesttimeout. -
If specified, a timeout value must be
0or greater than or equal to1ms. -
A zero-valued timeout (
0) means there is no timeout. -
Timeouts use a string format that starts with a number and expresses hours (
h), minutes (m), seconds (s), or milliseconds (ms). -
The number can be up to five digits, such as
10000s. -
You can use multipart durations to express fractions, such as
1m30s, but you cannot use decimal dots.
3.5.4.1.1. Example: Request timeout
The following example demonstrates a complete HTTPRoute custom resource (CR) where the entire request must complete within 30 seconds:
apiVersion: gateway.networking.k8s.io/v1
kind: HTTPRoute
metadata:
  name: <timeout_example>
  namespace: <example_application>
spec:
  parentRefs:
  - name: <example_gateway>
    namespace: openshift-ingress
  rules:
  - matches:
    - path:
        type: PathPrefix
        value: /<timeout_path>
    timeouts:
      request: 30s
    backendRefs:
    - name: <example_service>
      port: 8080
-
requestspecifies the timeout for the full request-response cycle. -
PathPrefixensures the timeout applies to all requests starting with/<timeout_path>.
3.5.4.1.2. Example: Request and backendRequest timeouts
The following snippet demonstrates a configuration where the request must succeed within 5 seconds, and the gateway-to-backend hop must complete within 1 second:
spec:
  rules:
  - timeouts:
      request: 5s
      backendRequest: 1s
    backendRefs:
    - name: <example_service>
      port: 8080
3.5.5. OpenShift Container Platform routes and HTTPRoutes Comparison
When you migrate from standard networking to the Gateway API, you can compare OpenShift Container Platform routes with HTTPRoute custom resources (CRs) to understand which features are supported and how your configuration must change. While both resources handle ingress traffic, they have distinct feature sets and implementation differences.
The following features are exclusive to HTTPRoute CRs:
- Multiple hostnames
- Matching based on HTTP headers
- Matching based on query parameters
- Request header modification
- Request redirection
- Request mirroring
The following features are exclusive to OpenShift Container Platform routes:
- IP allow lists
- Rate limiting (connection-based)
- Subdomain indication
- Re-encrypt TLS termination
- Passthrough TLS termination
The following table outlines the features that are shared between both resources and how their specific implementations differ:
Table 3.3. Shared features and implementation differences
| Feature | OpenShift Container Platform route implementation | HTTPRoute implementation |
|---|---|---|
| Path matching | Supports prefix and exact matching. | Supports prefix, exact, and regular expression matching. |
| Backend references | Supports weighted traffic delivery to services. |
Supports weighted traffic delivery to services via |
| Rewrite target |
Configured using the |
Configured using the |
| Sharding | Configured using metadata labels. |
Configured using parent references ( |
3.6. Route gRPC requests to services
When you expose your gRPC APIs through a gateway, you must configure a GRPCRoute resource to accurately direct incoming gRPC requests from a Gateway listener to an API object. A GRPCRoute specifies the exact routing behavior for these requests by evaluating a set of defined rules.
Within each GRPCRoute rule, you can establish the following routing behaviors:
-
matches: Define the conditions a gRPC request must meet based on specific gRPC methods and headers. -
filters: Apply processing directions to the request, such as header modifications, before the traffic reaches the backend. -
backendRefs: Designate the backend services where matching and filtered requests are delivered, including traffic weight distribution.
While standard GRPCRoute configurations share many similarities with HTTPRoute resources, the OpenShift Container Platform implementation of GRPCRoute adheres to the standard-channel Gateway API specification, which excludes upstream experimental fields and features.
To successfully configure your gRPC routing behavior, complete the following tasks:
- Configure gRPC request matching conditions
- Apply processing filters to gRPC requests
- Configure routing destinations and traffic weights for gRPC
-
Understand
GRPCRouteimplementation details
3.6.1. Configure gRPC request matching conditions
When multiple gRPC services share a gateway, you can define request matching conditions based on gRPC methods and headers. This ensures that traffic is successfully routed to the correct backend application.
Matches define the specific conditions used for matching a rule against incoming gRPC requests. You can select gRPC requests via a method match, which can be an exact match or a regular expression, along with optional headers matches.
Each rule can specify a maximum of 64 matches. However, the total number of matches across all rules in a single GRPCRoute resource cannot exceed 128. If your routing requirements exceed this limit, you must distribute your complex matching combinations across multiple routes.
Prerequisites
-
You have access to the cluster as a user with the
cluster-adminrole. -
You have installed the OpenShift CLI (
oc). - You have installed Red Hat OpenShift Service Mesh.
Procedure
Create or edit a
GRPCRouteYAML file to include your desired match conditions under thespec.rules.matchesfield.The following example demonstrates a complete
GRPCRouteresource configured with matching conditions for a specific gRPC service, method, and header:apiVersion: gateway.networking.k8s.io/v1 kind: GRPCRoute metadata: name: grpc-match-example namespace: my-application spec: parentRefs: - name: my-gateway namespace: openshift-ingress hostnames: - "example.com" rules: - matches: - method: service: helloworld.Greeter method: SayHello headers: - name: x-version value: v1 backendRefs: - name: greeter-service port: 50051 weight: 1-
parentRefsattaches the route to themy-gatewayGateway. -
methodspecifies that the incoming request must be targeting thehelloworld.Greeterservice and specifically calling theSayHellomethod. -
headersrequires that the request must also include anx-versionheader with a value ofv1. Both the method and header conditions must be met for this rule to apply. -
backendRefsroutes the matching traffic to thegreeter-servicebackend.
-
Apply the
GRPCRouteresource by running the following command:$ oc apply -f <filename>.yaml
3.6.2. Apply processing filters to gRPC requests
When a gRPC request hits your route, you can apply processing filters to modify the request or response before the traffic reaches your backend.
You can define optional filters within your routing rules to apply processing directives, such as request and response header modifiers or traffic mirroring. You can also specify rule-scoped filters directly within your backend references.
Because the data-plane behavior is provided by Red Hat OpenShift Service Mesh, you must validate specific feature support, such as filter capabilities and header matching, against your installed Service Mesh release.
Prerequisites
-
You have access to the cluster as a user with the
cluster-adminrole. -
You have installed the OpenShift CLI (
oc). - You have installed Red Hat OpenShift Service Mesh.
Procedure
Create or edit a
GRPCRouteYAML file to include your desired processing directives under thespec.rules.filtersfield.The following example demonstrates a complete
GRPCRouteresource configured with a filter that adds a custom request header before routing to the backend service:apiVersion: gateway.networking.k8s.io/v1 kind: GRPCRoute metadata: name: grpc-filter-example namespace: my-application spec: parentRefs: - name: my-gateway namespace: openshift-ingress hostnames: - "example.com" rules: - filters: - type: RequestHeaderModifier requestHeaderModifier: add: - name: custom-grpc-header value: my-custom-value backendRefs: - name: greeter-service port: 50051-
parentRefsattaches the route to a specific Gateway. -
hostnameslimits the route to requests intended for"example.com". -
filtersspecifies the processing logic. In this example, theRequestHeaderModifieradds a custom header to the gRPC request before it reaches the backend. -
backendRefsdirects the modified traffic to thegreeter-servicebackend on port50051.
-
Apply the
GRPCRouteresource by running the following command:$ oc apply -f <filename>.yaml
3.6.3. Configure routing destinations and traffic weights for gRPC
When you route gRPC traffic, you must define backend service destinations and traffic weights to distribute requests across your APIs. BackendRefs designate the backend services where matching and filtered gRPC requests are delivered.
You can configure optional backend references for each routing rule. By defining multiple backend references and assigning a weight to each, you can control the proportion of gRPC traffic that is forwarded to specific versions of your service. The proportion of traffic sent to a specific backend is calculated by dividing its assigned weight by the sum of all weights across all backends configured in the rule.
Because Red Hat OpenShift Service Mesh handles the data-plane behavior, you must ensure that your GRPCRoute references an Istio ingress gateway in its parentRefs configuration.
Prerequisites
-
You have access to the cluster as a user with the
cluster-adminrole. -
You have installed the OpenShift CLI (
oc). - You have installed Red Hat OpenShift Service Mesh.
Procedure
Create or edit a
GRPCRouteYAML file to include your desired service destinations and traffic weights under thespec.rules.backendRefsfield.The following example demonstrates a complete
GRPCRouteresource that routes gRPC traffic between two versions of a backend service using proportional traffic weights:apiVersion: gateway.networking.k8s.io/v1 kind: GRPCRoute metadata: name: grpc-weight-example namespace: my-application spec: parentRefs: - name: my-gateway namespace: openshift-ingress hostnames: - "example.com" rules: - backendRefs: - name: greeter-service-v1 port: 50051 weight: 90 - name: greeter-service-v2 port: 50051 weight: 10-
parentRefsattaches the route to themy-gatewayGateway. -
backendRefsdefines the destination services for the traffic. -
weightdictates the traffic split. In this configuration, the total sum of the weights is 100. The route forwards 90% of the traffic togreeter-service-v1and 10% togreeter-service-v2.
-
Apply the
GRPCRouteresource by running the following command:$ oc apply -f <filename>.yaml
3.6.4. GRPCRoute implementation details
The OpenShift Container Platform Cluster Ingress Operator vendors the standard-channel Gateway API v1.4.1 custom resource definition (CRD). When you migrate upstream GRPCRoute configurations to your cluster, you must ensure your manifests rely on standard-channel features to avoid validation errors.
Additionally, the cluster-ingress-operator only installs the GRPCRoute CRD and delegates all runtime semantics to Red Hat OpenShift Service Mesh. Because the operator does not reconcile GRPCRoute instances, the data-plane behavior depends entirely on your Service Mesh implementation.
The following list outlines the specific implementation details and channel limitations that apply to GRPCRoute resources on OpenShift Container Platform.
- Experimental fields
-
Because OpenShift Container Platform uses the standard-channel CRD, upstream experimental features are not available. For example, the
sessionPersistenceblock is excluded. The CRD will reject configurations that attempt to use any experimental fields. - Rule names
-
The
spec.rules[].namefield is currently an experimental feature in the upstream Gateway API. Because OpenShift Container Platform relies on the standard channel, this field is not available. You cannot annotate or deduplicate rule identities, and conformance suites expecting this field might fail. - Match limits
-
The OpenShift Container Platform schema fully aligns with upstream standard limits. A single
GRPCRoutesupports up to 16 rules, and each rule supports up to 64 matches. However, the total number of matches across all rules in a single route cannot exceed 128.
3.7. Verify Gateway infrastructure status
To ensure your gateway infrastructure is properly configured and functioning, review the status conditions of your GatewayClass and Gateway custom resources (CRs). Checking these conditions confirms that the controller has successfully programmed your underlying data plane without routing conflicts.
To verify that your gateway infrastructure is functioning correctly, complete the following tasks:
-
Understand
GatewayClassstatus conditions to verify that the controller has claimed the class and that your installed API version is compatible. -
Review
GatewayCR and listenerstatusconditions to pinpoint data plane failures, configuration errors, or negative polarity conflicts. - Query gateway infrastructure status using the CLI to quickly validate your deployment and retrieve assigned IP addresses.
3.7.1. GatewayClass status conditions reference
To verify that your GatewayClass custom resource (CR) is valid and ready to provision gateways, review its status conditions. A healthy GatewayClass CR reports a status of True for core conditions like Accepted and SupportedVersion.
Table 3.4. GatewayClass CR status conditions
| Condition | Status | Description and common reasons |
|---|---|---|
|
|
|
The |
|
|
|
The configuration has errors or was rejected. Common reasons include |
|
|
|
The |
|
|
| The installed Gateway API version is compatible with the controller. |
|
|
|
There is a version mismatch. A common reason is |
|
|
| The Cluster Ingress Operator successfully installed the Gateway API controller. |
|
|
| The installation failed. |
|
|
| The controller has not started the installation yet. |
|
|
| The Istio CRDs are installed and actively managed by either the Cluster Ingress Operator or OLM. |
|
|
| The CRDs were installed by a third party or have mixed ownership, preventing the controller from managing them. |
|
|
| The CRDs are not installed yet. |
3.7.2. Gateway and listener status conditions reference
To verify that your gateway is configured in the data plane and ready to route traffic, review its gateway-level and listener-level status conditions. A healthy Gateway custom resource (CR) reports a status of True for its Accepted and Programmed conditions.
The Conflicted listener condition uses negative polarity. This means that a status of False indicates a healthy state, while a status of True indicates an error.
Table 3.5. Gateway-level status conditions
| Condition | Status | Description and common reasons |
|---|---|---|
|
|
| The gateway configuration is valid and working properly. |
|
|
|
The configuration has errors. Common reasons include |
|
|
| The controller has not evaluated the gateway yet. |
|
|
| The infrastructure is provisioned and the gateway is configured in the data plane, such as a load balancer or proxy. |
|
|
|
Programming failed or the data plane is not ready. Common reasons include |
|
|
| Programming is currently in progress. |
|
|
| The cloud load balancer service for the gateway is successfully provisioned. |
|
|
|
The load balancer service failed to provision or is pending. Common reasons include |
|
|
| DNS records for all listeners are functioning correctly. |
|
|
| One or more listeners have DNS provisioning issues. |
Table 3.6. Listener-level status conditions
| Condition | Status | Description and common reasons |
|---|---|---|
|
|
| The listener configuration is valid and working properly. |
|
|
| The listener configuration has errors. |
|
|
| The listener is successfully configured in the data plane. |
|
|
| The listener configuration failed in the data plane. |
|
|
| All references, such as TLS certificates, are found and valid. |
|
|
|
At least one reference is invalid. Common reasons include |
|
|
| Healthy state. There are no conflicts. |
|
|
|
The listener conflicts with another listener. Common reasons include |
|
|
| The DNS record for this listener’s hostname is successfully provisioned in all reported zones. |
|
|
|
The DNS record failed to provision. Common reasons include |
|
|
| The DNS status cannot be determined or is unmanaged. Note
Listeners without a configured hostname will not have DNS conditions added to their |
Example Gateway CR status output showing a DNS failure on one listener
# ...
status:
  # Gateway-level conditions (LoadBalancer and aggregate DNS status)
  conditions:
  - type: LoadBalancerReady
    status: "True"
    reason: LoadBalancerProvisioned
    message: "The LoadBalancer service is provisioned"
    observedGeneration: 1
    lastTransitionTime: "2025-01-12T10:00:00Z"
  - type: DNSReady
    status: "False"
    reason: SomeListenersNotReady
    message: "One or more listeners have DNS provisioning issues"
    observedGeneration: 1
    lastTransitionTime: "2025-01-12T10:00:00Z"

  # Listener-level conditions (DNS status per listener)
  listeners:
  - name: <stage_http>
    conditions:
    - type: DNSReady
      status: "True"
      reason: NoFailedZones
      message: "The record is provisioned in all reported zones."
      observedGeneration: 1
      lastTransitionTime: "2025-01-12T10:00:00Z"
  - name: <prod_https>
    conditions:
    - type: DNSReady
      status: "False"
      reason: FailedZones
      message: "The record failed to provision in some zones: [<prod.example.com>]"
      observedGeneration: 1
      lastTransitionTime: "2025-01-12T10:00:00Z"
For Google Cloud installations, you can use a custom DNS solution. You must manually create a DNS record for any gateways in Gateway API. For more information, see "Installing a cluster on Google Cloud with customizations".
3.7.3. Query Gateway infrastructure status using the CLI
To quickly check the health of your gateway infrastructure, query specific status fields using the OpenShift Container Platform CLI. You can validate your deployment, check route attachments, and retrieve IP addresses without parsing lengthy YAML manifests.
Prerequisites
-
You have access to the cluster as a user with the
cluster-adminrole. -
You have installed the OpenShift CLI (
oc). -
Your gateway is deployed in the
openshift-ingressnamespace. -
Your gateway is managed by the gateway controller (
openshift.io/gateway-controller/v1).
Procedure
Run the relevant command for the status information you need to retrieve:
To list all
GatewayClasscustom resources (CRs) in your cluster, run the following command:$ oc get gatewayclass
To check if a specific
GatewayClassCR has been accepted by the controller, run the following command:$ oc get gatewayclass <gatewayclass_name> -o jsonpath='{.status.conditions[?(@.type=="Accepted")].status}'-
<gatewayclass_name>: Specify the name of your gateway class.
-
To list all
Gatewaycustom resources (CRs) across all namespaces, run the following command:$ oc get gateway -A
To check if a specific
GatewayCR is successfully programmed in the data plane, run the following command:$ oc get gateway <gateway_name> -n openshift-ingress -o jsonpath='{.status.conditions[?(@.type=="Programmed")].status}'-
<gateway_name>: Specify the name of your gateway.
-
To retrieve the IP address assigned to a specific
GatewayCR, run the following command:$ oc get gateway <gateway_name> -n openshift-ingress -o jsonpath='{.status.addresses[0].value}'-
<gateway_name>: Specify the name of your gateway.
-
To check the total number of routes attached to a specific
GatewayCR, run the following command:$ oc get gateway <gateway_name> -n openshift-ingress -o jsonpath='{.status.listeners[*].attachedRoutes}'-
<gateway_name>: Specify the name of your gateway.
-
To watch a specific
GatewayCR for real-time status changes, run the following command:$ oc get gateway <gateway_name> -n openshift-ingress -w
-
<gateway_name>: Specify the name of your gateway.
-
3.7.4. Additional resources
Chapter 4. Load balancing on RHOSP
To distribute network traffic and communications activity evenly across your compute instances in RHOSP, configure load balancing services.
4.1. Limitations of load balancer services
OpenShift Container Platform clusters on Red Hat OpenStack Platform (RHOSP) use Octavia to handle load balancer services. As a result of this choice, such clusters might have functional limitations.
OpenShift Container Platform clusters on Red Hat OpenStack Platform (RHOSP) use Octavia to handle load balancer services. As a result, your cluster has several functional limitations.
RHOSP Octavia has two supported providers: Amphora and OVN. These providers differ in available features and implementation details. These distinctions affect load balancer services that you create on your cluster.
4.1.1. Local external traffic policies
You can set the external traffic policy (ETP) parameter, .spec.externalTrafficPolicy, on a load balancer service to preserve the source IP address of incoming traffic when it reaches service endpoint pods.
If your cluster uses the Amphora Octavia provider, the source IP of the traffic is replaced with the IP address of the Amphora VM. This behavior does not occur if your cluster uses the OVN Octavia provider.
Having the ETP option set to Local requires creating health monitors for the load balancer. Without health monitors, traffic can be routed to a node that does not have a functional endpoint, which causes the connection to drop. To force Cloud Provider OpenStack to create health monitors, you must set the value of the create-monitor option in the cloud provider configuration to true.
In RHOSP 16.2, the OVN Octavia provider does not support health monitors. Therefore, setting the ETP to Local is unsupported.
In RHOSP 16.2, the Amphora Octavia provider does not support HTTP monitors on UDP pools. As a result, UDP load balancer services have UDP-CONNECT monitors created instead. Due to implementation details, this configuration only functions properly with the OVN-Kubernetes CNI plugin.
4.2. Scaling clusters for application traffic by using Octavia
To distribute traffic across multiple virtual machines (VMs), configure your cluster that runs on Red Hat OpenStack Platform (RHOSP) to use the Octavia load balancing service. By using this feature, you can mitigate the bottleneck that single machines or addresses create.
You must create your own Octavia load balancer to use it for application network scaling.
4.2.1. Scaling clusters by using Octavia
If you want to use multiple API load balancers, create an Octavia load balancer and then configure your cluster to use it.
Prerequisites
- Octavia is available on your Red Hat OpenStack Platform (RHOSP) deployment.
Procedure
From the command-line interface (CLI), create an Octavia load balancer that uses the Amphora driver:
$ openstack loadbalancer create --name API_OCP_CLUSTER --vip-subnet-id <id_of_worker_vms_subnet>
You can use a name of your choice instead of
API_OCP_CLUSTER.After the load balancer becomes active, create listeners:
$ openstack loadbalancer listener create --name API_OCP_CLUSTER_6443 --protocol HTTPS--protocol-port 6443 API_OCP_CLUSTER
NoteTo view the status of the load balancer, enter
openstack loadbalancer list.Create a pool that uses the round-robin algorithm and has session persistence enabled:
$ openstack loadbalancer pool create --name API_OCP_CLUSTER_pool_6443 --lb-algorithm ROUND_ROBIN --session-persistence type=<source_IP_address> --listener API_OCP_CLUSTER_6443 --protocol HTTPS
To ensure that control-plane machines are available, create a health monitor:
$ openstack loadbalancer healthmonitor create --delay 5 --max-retries 4 --timeout 10 --type TCP API_OCP_CLUSTER_pool_6443
Add the control plane machines as members of the load balancer pool:
$ for SERVER in $(MASTER-0-IP MASTER-1-IP MASTER-2-IP)
do
  openstack loadbalancer member create --address $SERVER  --protocol-port 6443 API_OCP_CLUSTER_pool_6443
done
Optional: To reuse the cluster API floating IP address, unset it:
$ openstack floating ip unset $API_FIP
Add either the unset
API_FIPor a new address to the created load balancer VIP:$ openstack floating ip set --port $(openstack loadbalancer show -c <vip_port_id> -f value API_OCP_CLUSTER) $API_FIP
Your cluster now uses Octavia for load balancing.
4.3. Services for a user-managed load balancer
You can configure an OpenShift Container Platform cluster on Red Hat OpenStack Platform (RHOSP) to use a user-managed load balancer in place of the default load balancer.
Configuring a user-managed load balancer depends on your vendor’s load balancer.
The information and examples in this section are for guideline purposes only. Consult the vendor documentation for more specific information about the vendor’s load balancer.
Red Hat supports the following services for a user-managed load balancer:
- Ingress Controller
- OpenShift API
- OpenShift MachineConfig API
You can choose whether you want to configure one or all of these services for a user-managed load balancer. Configuring only the Ingress Controller service is a common configuration option. To better understand each service, view the following diagrams:
Figure 4.1. Example network workflow that shows an Ingress Controller operating in an OpenShift Container Platform environment
Figure 4.2. Example network workflow that shows an OpenShift API operating in an OpenShift Container Platform environment
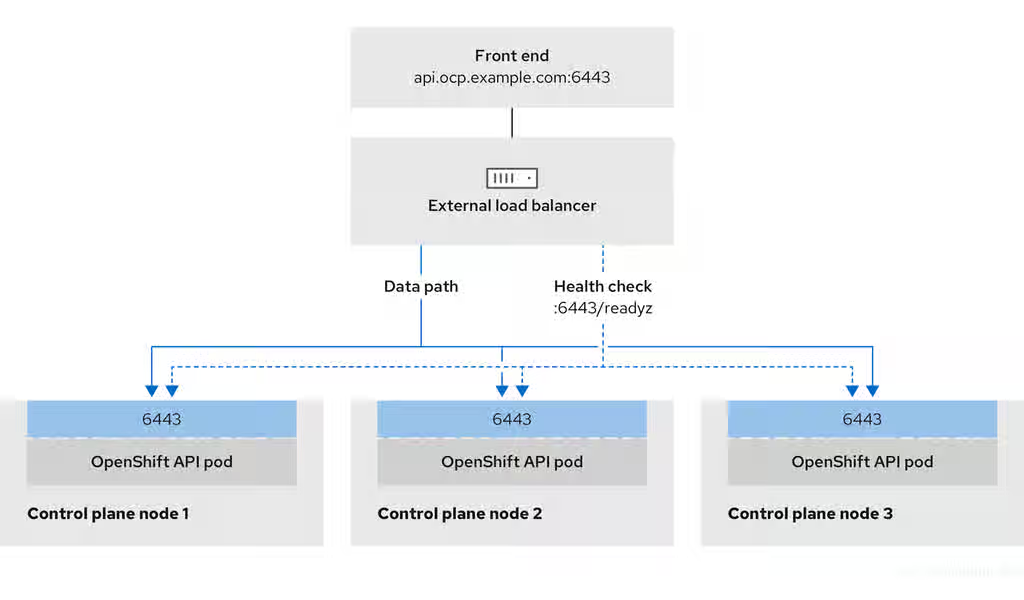
Figure 4.3. Example network workflow that shows an OpenShift MachineConfig API operating in an OpenShift Container Platform environment
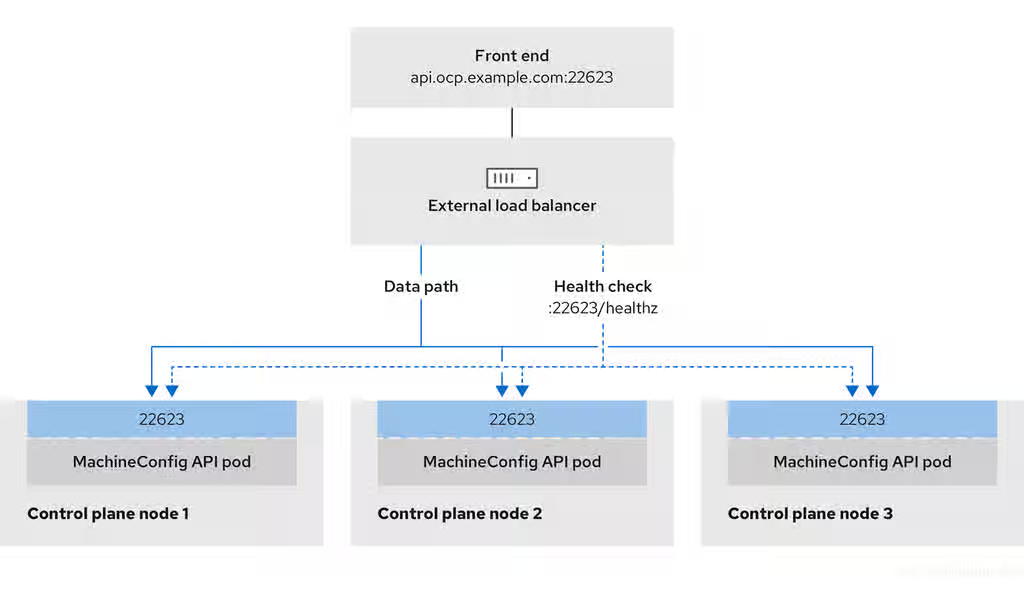
The following configuration options are supported for user-managed load balancers:
- Use a node selector to map the Ingress Controller to a specific set of nodes. You must assign a static IP address to each node in this set, or configure each node to receive the same IP address from the Dynamic Host Configuration Protocol (DHCP). Infrastructure nodes commonly receive this type of configuration.
Target all IP addresses on a subnet. This configuration can reduce maintenance overhead, because you can create and destroy nodes within those networks without reconfiguring the load balancer targets. If you deploy your ingress pods by using a machine set on a smaller network, such as a
/27or/28, you can simplify your load balancer targets.TipYou can list all IP addresses that exist in a network by checking the machine config pool’s resources.
Before you configure a user-managed load balancer for your OpenShift Container Platform cluster, consider the following information:
- For a front-end IP address, you can use the same IP address for the front-end IP address, the Ingress Controller’s load balancer, and API load balancer. Check the vendor’s documentation for this capability.
For a back-end IP address, ensure that an IP address for an OpenShift Container Platform control plane node does not change during the lifetime of the user-managed load balancer. You can achieve this by completing one of the following actions:
- Assign a static IP address to each control plane node.
- Configure each node to receive the same IP address from the DHCP every time the node requests a DHCP lease. Depending on the vendor, the DHCP lease might be in the form of an IP reservation or a static DHCP assignment.
- Manually define each node that runs the Ingress Controller in the user-managed load balancer for the Ingress Controller back-end service. For example, if the Ingress Controller moves to an undefined node, a connection outage can occur.
4.3.1. Configuring a user-managed load balancer
You can configure an OpenShift Container Platform cluster on Red Hat OpenStack Platform (RHOSP) to use a user-managed load balancer in place of the default load balancer.
Before you configure a user-managed load balancer, ensure that you read the "Services for a user-managed load balancer" section.
Read the following prerequisites that apply to the service that you want to configure for your user-managed load balancer.
MetalLB, which runs on a cluster, functions as a user-managed load balancer.
Prerequisites
The following list details OpenShift API prerequisites:
- You defined a front-end IP address.
TCP ports 6443 and 22623 are exposed on the front-end IP address of your load balancer. Check the following items:
- Port 6443 provides access to the OpenShift API service.
- Port 22623 can provide ignition startup configurations to nodes.
- The front-end IP address and port 6443 are reachable by all users of your system with a location external to your OpenShift Container Platform cluster.
- The front-end IP address and port 22623 are reachable only by OpenShift Container Platform nodes.
- The load balancer backend can communicate with OpenShift Container Platform control plane nodes on port 6443 and 22623.
The following list details Ingress Controller prerequisites:
- You defined a front-end IP address.
- TCP port 443 and port 80 are exposed on the front-end IP address of your load balancer.
- The front-end IP address, port 80 and port 443 are reachable by all users of your system with a location external to your OpenShift Container Platform cluster.
- The front-end IP address, port 80 and port 443 are reachable by all nodes that operate in your OpenShift Container Platform cluster.
- The load balancer backend can communicate with OpenShift Container Platform nodes that run the Ingress Controller on ports 80, 443, and 1936.
The following list details prerequisites for health check URL specifications:
You can configure most load balancers by setting health check URLs that determine if a service is available or unavailable. OpenShift Container Platform provides these health checks for the OpenShift API, Machine Configuration API, and Ingress Controller backend services.
The following example shows a Kubernetes API health check specification for a backend service:
Path: HTTPS:6443/readyz
Healthy threshold: 2
Unhealthy threshold: 2
Timeout: 10
Interval: 10
The following example shows a Machine Config API health check specification for a backend service:
Path: HTTPS:22623/healthz
Healthy threshold: 2
Unhealthy threshold: 2
Timeout: 10
Interval: 10
The following example shows a Ingress Controller health check specification for a backend service:
Path: HTTP:1936/healthz/ready
Healthy threshold: 2
Unhealthy threshold: 2
Timeout: 5
Interval: 10
Procedure
Configure the HAProxy Ingress Controller, so that you can enable access to the cluster from your load balancer on ports 6443, 22623, 443, and 80. Depending on your needs, you can specify the IP address of a single subnet or IP addresses from multiple subnets in your HAProxy configuration.
Example HAProxy configuration with one listed subnet
# ... listen my-cluster-api-6443 bind 192.168.1.100:6443 mode tcp balance roundrobin option httpchk http-check connect http-check send meth GET uri /readyz http-check expect status 200 server my-cluster-master-2 192.168.1.101:6443 check inter 10s rise 2 fall 2 server my-cluster-master-0 192.168.1.102:6443 check inter 10s rise 2 fall 2 server my-cluster-master-1 192.168.1.103:6443 check inter 10s rise 2 fall 2 listen my-cluster-machine-config-api-22623 bind 192.168.1.100:22623 mode tcp balance roundrobin option httpchk http-check connect http-check send meth GET uri /healthz http-check expect status 200 server my-cluster-master-2 192.168.1.101:22623 check inter 10s rise 2 fall 2 server my-cluster-master-0 192.168.1.102:22623 check inter 10s rise 2 fall 2 server my-cluster-master-1 192.168.1.103:22623 check inter 10s rise 2 fall 2 listen my-cluster-apps-443 bind 192.168.1.100:443 mode tcp balance roundrobin option httpchk http-check connect http-check send meth GET uri /healthz/ready http-check expect status 200 server my-cluster-worker-0 192.168.1.111:443 check port 1936 inter 10s rise 2 fall 2 server my-cluster-worker-1 192.168.1.112:443 check port 1936 inter 10s rise 2 fall 2 server my-cluster-worker-2 192.168.1.113:443 check port 1936 inter 10s rise 2 fall 2 listen my-cluster-apps-80 bind 192.168.1.100:80 mode tcp balance roundrobin option httpchk http-check connect http-check send meth GET uri /healthz/ready http-check expect status 200 server my-cluster-worker-0 192.168.1.111:80 check port 1936 inter 10s rise 2 fall 2 server my-cluster-worker-1 192.168.1.112:80 check port 1936 inter 10s rise 2 fall 2 server my-cluster-worker-2 192.168.1.113:80 check port 1936 inter 10s rise 2 fall 2 # ...Example HAProxy configuration with multiple listed subnets
# ... listen api-server-6443 bind *:6443 mode tcp server master-00 192.168.83.89:6443 check inter 1s server master-01 192.168.84.90:6443 check inter 1s server master-02 192.168.85.99:6443 check inter 1s server bootstrap 192.168.80.89:6443 check inter 1s listen machine-config-server-22623 bind *:22623 mode tcp server master-00 192.168.83.89:22623 check inter 1s server master-01 192.168.84.90:22623 check inter 1s server master-02 192.168.85.99:22623 check inter 1s server bootstrap 192.168.80.89:22623 check inter 1s listen ingress-router-80 bind *:80 mode tcp balance source server worker-00 192.168.83.100:80 check inter 1s server worker-01 192.168.83.101:80 check inter 1s listen ingress-router-443 bind *:443 mode tcp balance source server worker-00 192.168.83.100:443 check inter 1s server worker-01 192.168.83.101:443 check inter 1s listen ironic-api-6385 bind *:6385 mode tcp balance source server master-00 192.168.83.89:6385 check inter 1s server master-01 192.168.84.90:6385 check inter 1s server master-02 192.168.85.99:6385 check inter 1s server bootstrap 192.168.80.89:6385 check inter 1s listen inspector-api-5050 bind *:5050 mode tcp balance source server master-00 192.168.83.89:5050 check inter 1s server master-01 192.168.84.90:5050 check inter 1s server master-02 192.168.85.99:5050 check inter 1s server bootstrap 192.168.80.89:5050 check inter 1s # ...Use the
curlCLI command to verify that the user-managed load balancer and its resources are operational:Verify that the cluster machine configuration API is accessible to the Kubernetes API server resource, by running the following command and observing the response:
$ curl https://<loadbalancer_ip_address>:6443/version --insecure
If the configuration is correct, you receive a JSON object in response:
{ "major": "1", "minor": "11+", "gitVersion": "v1.11.0+ad103ed", "gitCommit": "ad103ed", "gitTreeState": "clean", "buildDate": "2019-01-09T06:44:10Z", "goVersion": "go1.10.3", "compiler": "gc", "platform": "linux/amd64" }Verify that the cluster machine configuration API is accessible to the Machine config server resource, by running the following command and observing the output:
$ curl -v https://<loadbalancer_ip_address>:22623/healthz --insecure
If the configuration is correct, the output from the command shows the following response:
HTTP/1.1 200 OK
Content-Length: 0
Verify that the controller is accessible to the Ingress Controller resource on port 80, by running the following command and observing the output:
$ curl -I -L -H "Host: console-openshift-console.apps.<cluster_name>.<base_domain>" http://<load_balancer_front_end_IP_address>
If the configuration is correct, the output from the command shows the following response:
HTTP/1.1 302 Found
content-length: 0
location: https://console-openshift-console.apps.ocp4.private.opequon.net/
cache-control: no-cache
Verify that the controller is accessible to the Ingress Controller resource on port 443, by running the following command and observing the output:
$ curl -I -L --insecure --resolve console-openshift-console.apps.<cluster_name>.<base_domain>:443:<Load Balancer Front End IP Address> https://console-openshift-console.apps.<cluster_name>.<base_domain>
If the configuration is correct, the output from the command shows the following response:
HTTP/1.1 200 OK
referrer-policy: strict-origin-when-cross-origin
set-cookie: csrf-token=UlYWOyQ62LWjw2h003xtYSKlh1a0Py2hhctw0WmV2YEdhJjFyQwWcGBsja261dGLgaYO0nxzVErhiXt6QepA7g==; Path=/; Secure; SameSite=Lax
x-content-type-options: nosniff
x-dns-prefetch-control: off
x-frame-options: DENY
x-xss-protection: 1; mode=block
date: Wed, 04 Oct 2023 16:29:38 GMT
content-type: text/html; charset=utf-8
set-cookie: 1e2670d92730b515ce3a1bb65da45062=1bf5e9573c9a2760c964ed1659cc1673; path=/; HttpOnly; Secure; SameSite=None
cache-control: private
Configure the DNS records for your cluster to target the front-end IP addresses of the user-managed load balancer. You must update records to your DNS server for the cluster API and applications over the load balancer. The following examples shows modified DNS records:
<load_balancer_ip_address>  A  api.<cluster_name>.<base_domain>
A record pointing to Load Balancer Front End
<load_balancer_ip_address>   A apps.<cluster_name>.<base_domain>
A record pointing to Load Balancer Front End
ImportantDNS propagation might take some time for each DNS record to become available. Ensure that each DNS record propagates before validating each record.
For your OpenShift Container Platform cluster to use the user-managed load balancer, you must specify the following configuration in your cluster’s
install-config.yamlfile:# ... platform: openstack: loadBalancer: type: UserManaged apiVIPs: - <api_ip> 1 ingressVIPs: - <ingress_ip> 2 # ...where:
loadBalancer.type-
Set
UserManagedfor thetypeparameter to specify a user-managed load balancer for your cluster. The parameter defaults toOpenShiftManagedDefault, which denotes the default internal load balancer. For services defined in anopenshift-kni-infranamespace, a user-managed load balancer can deploy thecorednsservice to pods in your cluster but ignoreskeepalivedandhaproxyservices. loadBalancer.<api_ip>- Specifies a user-managed load balancer. Specify the user-managed load balancer’s public IP address, so that the Kubernetes API can communicate with the user-managed load balancer. Mandatory parameter.
loadBalancer.<ingress_ip>- Specifies a user-managed load balancer. Specify the user-managed load balancer’s public IP address, so that the user-managed load balancer can manage ingress traffic for your cluster. Mandatory parameter.
Verification
Use the
curlCLI command to verify that the user-managed load balancer and DNS record configuration are operational:Verify that you can access the cluster API, by running the following command and observing the output:
$ curl https://api.<cluster_name>.<base_domain>:6443/version --insecure
If the configuration is correct, you receive a JSON object in response:
{ "major": "1", "minor": "11+", "gitVersion": "v1.11.0+ad103ed", "gitCommit": "ad103ed", "gitTreeState": "clean", "buildDate": "2019-01-09T06:44:10Z", "goVersion": "go1.10.3", "compiler": "gc", "platform": "linux/amd64" }Verify that you can access the cluster machine configuration, by running the following command and observing the output:
$ curl -v https://api.<cluster_name>.<base_domain>:22623/healthz --insecure
If the configuration is correct, the output from the command shows the following response:
HTTP/1.1 200 OK
Content-Length: 0
Verify that you can access each cluster application on port 80, by running the following command and observing the output:
$ curl http://console-openshift-console.apps.<cluster_name>.<base_domain> -I -L --insecure
If the configuration is correct, the output from the command shows the following response:
HTTP/1.1 302 Found
content-length: 0
location: https://console-openshift-console.apps.<cluster-name>.<base domain>/
cache-control: no-cacheHTTP/1.1 200 OK
referrer-policy: strict-origin-when-cross-origin
set-cookie: csrf-token=39HoZgztDnzjJkq/JuLJMeoKNXlfiVv2YgZc09c3TBOBU4NI6kDXaJH1LdicNhN1UsQWzon4Dor9GWGfopaTEQ==; Path=/; Secure
x-content-type-options: nosniff
x-dns-prefetch-control: off
x-frame-options: DENY
x-xss-protection: 1; mode=block
date: Tue, 17 Nov 2020 08:42:10 GMT
content-type: text/html; charset=utf-8
set-cookie: 1e2670d92730b515ce3a1bb65da45062=9b714eb87e93cf34853e87a92d6894be; path=/; HttpOnly; Secure; SameSite=None
cache-control: private
Verify that you can access each cluster application on port 443, by running the following command and observing the output:
$ curl https://console-openshift-console.apps.<cluster_name>.<base_domain> -I -L --insecure
If the configuration is correct, the output from the command shows the following response:
HTTP/1.1 200 OK
referrer-policy: strict-origin-when-cross-origin
set-cookie: csrf-token=UlYWOyQ62LWjw2h003xtYSKlh1a0Py2hhctw0WmV2YEdhJjFyQwWcGBsja261dGLgaYO0nxzVErhiXt6QepA7g==; Path=/; Secure; SameSite=Lax
x-content-type-options: nosniff
x-dns-prefetch-control: off
x-frame-options: DENY
x-xss-protection: 1; mode=block
date: Wed, 04 Oct 2023 16:29:38 GMT
content-type: text/html; charset=utf-8
set-cookie: 1e2670d92730b515ce3a1bb65da45062=1bf5e9573c9a2760c964ed1659cc1673; path=/; HttpOnly; Secure; SameSite=None
cache-control: private
4.4. Specifying a floating IP address in the Ingress Controller
To establish external access to your OpenShift Container Platform cluster on Red Hat OpenStack Platform (RHOSP), use the automatically assigned floating IP address. The floating IP address is associated with your Ingress port.
You might want to precreate a floating IP address before updating your DNS records and cluster deployment. In this situation, you can define a floating IP address to the Ingress Controller. You can do this regardless of whether you are using Octavia or a user-managed cluster.
Procedure
Create the Ingress Controller custom resource (CR) file with the floating IPs:
Example Ingress config
sample-ingress.yamlapiVersion: operator.openshift.io/v1 kind: IngressController metadata: namespace: openshift-ingress-operator name: <name> spec: domain: <domain> endpointPublishingStrategy: type: LoadBalancerService loadBalancer: scope: External providerParameters: type: OpenStack openstack: floatingIP: <ingress_port_IP>where:
metadata.name-
Specifies the name of your Ingress Controller. If you are using the default Ingress Controller, the value for this field is
default. spec.domain- Specifies the DNS name serviced by the Ingress Controller.
loadBalancer.scope-
You must set the scope to
Externalto use a floating IP address. openstack.floatingIP- Specifies the floating IP address associated with the port your Ingress Controller is listening on.
Apply the CR file by running the following command:
$ oc apply -f sample-ingress.yaml
Update your DNS records with the Ingress Controller endpoint:
*.apps.<name>.<domain>. IN A <ingress_port_IP>
- Continue with creating your OpenShift Container Platform cluster.
Verification
Confirm that the load balancer was successfully provisioned by checking the
IngressControllerconditions using the following command:$ oc get ingresscontroller -n openshift-ingress-operator <name> -o jsonpath="{.status.conditions}" | yq -PC
Chapter 5. Load balancing with MetalLB
5.1. Configuring MetalLB address pools
To allocate and manage the IP addresses assigned to load balancer services, configure MetalLB address pool custom resources. Defining these pools ensures that application workloads remain reachable through designated network ranges for consistent external access.
The namespaces used in the examples show metallb-system as the namespace.
For more information about how to install the MetalLB Operator, see About MetalLB and the MetalLB Operator.
5.1.1. About the IPAddressPool custom resource
To define the IP address ranges available for load balancer services, configure the properties of the MetalLB IPAddressPool custom resource (CR).
The following table details the parameters for the IPAddressPool CR:
Table 5.1. MetalLB IPAddressPool pool custom resource
| Parameter | Type | Description |
|---|---|---|
|
|
|
Specifies the name for the address pool. When you add a service, you can specify this pool name in the |
|
|
| Specifies the namespace for the address pool. Specify the same namespace that the MetalLB Operator uses. |
|
|
|
Optional: Specifies the key-value pair assigned to the |
|
|
| Specifies a list of IP addresses for the MetalLB Operator to assign to services. You can specify multiple ranges in a single pool, where these ranges all share the same settings. Specify each range in Classless Inter-Domain Routing (CIDR) notation or as starting and ending IP addresses separated with a hyphen. |
|
|
|
Optional: Specifies whether the MetalLB Operator automatically assigns IP addresses from this pool. Specify Note
For IP address pool configurations, ensure the addresses parameter specifies only IP addresses that are available and not in use by other network devices, especially gateway addresses, to prevent conflicts when |
|
|
|
Optional: When you set the parameter to enabled, the IP addresses ending |
You can assign IP addresses from an IPAddressPool to services and namespaces by configuring the spec.serviceAllocation specification.
Table 5.2. MetalLB IPAddressPool custom resource spec.serviceAllocation subfields
| Parameter | Type | Description |
|---|---|---|
|
|
| Optional: Defines the priority between IP address pools when more than one IP address pool matches a service or namespace. A lower number indicates a higher priority. |
|
|
| Optional: Specifies a list of namespaces that you can assign to IP addresses in an IP address pool. |
|
|
| Optional: Specifies namespace labels that you can assign to IP addresses from an IP address pool by using label selectors in a list format. |
|
|
| Optional: Specifies service labels that you can assign to IP addresses from an address pool by using label selectors in a list format. |
5.1.2. Configuring an address pool
To precisely manage external access to application workloads, configure MetalLB address pools for your cluster. By defining these pools, you can control the specific IP address ranges assigned to load balancer services for consistent network routing.
Prerequisites
-
Install the OpenShift CLI (
oc). -
Log in as a user with
cluster-adminprivileges.
Procedure
Create a file, such as
ipaddresspool.yaml, with content like the following example:apiVersion: metallb.io/v1beta1 kind: IPAddressPool metadata: namespace: metallb-system name: doc-example labels: zone: east spec: addresses: - 203.0.113.1-203.0.113.10 - 203.0.113.65-203.0.113.75 # ...where:
labels-
The label assigned to the
IPAddressPoolcan be referenced by theipAddressPoolSelectorsin theBGPAdvertisementCRD to associate theIPAddressPoolwith the advertisement.
Apply the configuration for the IP address pool by entering the following command:
$ oc apply -f ipaddresspool.yaml
Verification
View the address pool by entering the following command:
$ oc describe -n metallb-system IPAddressPool doc-example
Example output
Name: doc-example Namespace: metallb-system Labels: zone=east Annotations: <none> API Version: metallb.io/v1beta1 Kind: IPAddressPool Metadata: ... Spec: Addresses: 203.0.113.1-203.0.113.10 203.0.113.65-203.0.113.75 Auto Assign: true Events: <none>-
Confirm that the address pool name, such as
doc-example, and the IP address ranges exist in the output.
5.1.3. Configure MetalLB address pool for VLAN
To precisely manage external access across a specific VLAN, configure MetalLB address pools for your cluster. Defining these pools ensures that load balancer services receive authorized IP addresses from designated network ranges for secure and consistent routing.
Prerequisites
-
Install the OpenShift CLI (
oc). - Configure a separate VLAN.
-
Log in as a user with
cluster-adminprivileges.
Procedure
Create a file, such as
ipaddresspool-vlan.yaml, that is similar to the following example:apiVersion: metallb.io/v1beta1 kind: IPAddressPool metadata: namespace: metallb-system name: doc-example-vlan labels: zone: east spec: addresses: - 192.168.100.1-192.168.100.254 # ...where:
labels.zone-
This label assigned to the
IPAddressPoolcan be referenced by theipAddressPoolSelectorsin theBGPAdvertisementCRD to associate theIPAddressPoolwith the advertisement. spec.addresses- This IP range must match the subnet assigned to the VLAN on your network. To support layer 2 (L2) mode, the IP address range must be within the same subnet as the cluster nodes.
Apply the configuration for the IP address pool:
$ oc apply -f ipaddresspool-vlan.yaml
To ensure this configuration applies to the VLAN, you need to set the
specgatewayConfig.ipForwardingtoGlobal.Run the following command to edit the network configuration custom resource (CR):
$ oc edit network.operator.openshift/cluster
Update the
spec.defaultNetwork.ovnKubernetesConfigsection to include thegatewayConfig.ipForwardingset toGlobal. The following example demonstrates this configuration:apiVersion: operator.openshift.io/v1 kind: Network metadata: name: cluster spec: clusterNetwork: - cidr: 10.128.0.0/14 hostPrefix: 23 defaultNetwork: type: OVNKubernetes ovnKubernetesConfig: gatewayConfig: ipForwarding: Global # ...
5.1.4. Example address pool configurations
To precisely allocate IP address ranges for cluster services, configure MetalLB address pools by using Classless Inter-Domain Routing (CIDR) notation or hyphenated bounds. Defining these specific ranges ensures that application workloads receive valid IP assignments that align with your existing network infrastructure requirements.
- Example of IPv4 and CIDR ranges
You can specify a range of IP addresses in classless inter-domain routing (CIDR) notation. You can combine CIDR notation with the notation that uses a hyphen to separate lower and upper bounds.
apiVersion: metallb.io/v1beta1
kind: IPAddressPool
metadata:
  name: doc-example-cidr
  namespace: metallb-system
spec:
  addresses:
  - 192.168.100.0/24
  - 192.168.200.0/24
  - 192.168.255.1-192.168.255.5
# ...
- Example of assigning IP addresses
You can set the
autoAssignparameter tofalseto prevent MetalLB from automatically assigning IP addresses from the address pool. You can then assign a single IP address or multiple IP addresses from an IP address pool. To assign an IP address, append the/32CIDR notation to the target IP address in thespec.addressesparameter. This setting ensures that only the specific IP address is available for assignment, leaving non-reserved IP addresses for application use.Example
IPAddressPoolCR that assigns multiple IP addressesapiVersion: metallb.io/v1beta1 kind: IPAddressPool metadata: name: doc-example-reserved namespace: metallb-system spec: addresses: - 192.168.100.1/32 - 192.168.200.1/32 autoAssign: false # ...
NoteWhen you add a service, you can request a specific IP address from the address pool or you can specify the pool name in an annotation to request any IP address from the pool.
- Example of IPv4 and IPv6 addresses
You can add address pools that use IPv4 and IPv6. You can specify multiple ranges in the
addresseslist, just like several IPv4 examples.How the service is assigned to a single IPv4 address, a single IPv6 address, or both is determined by how you add the service. The
spec.ipFamiliesandspec.ipFamilyPolicyparameters control how IP addresses are assigned to the service.apiVersion: metallb.io/v1beta1 kind: IPAddressPool metadata: name: doc-example-combined namespace: metallb-system spec: addresses: - 10.0.100.0/28 - 2002:2:2::1-2002:2:2::100 # ...
spec.addresses: This list defines the IP ranges that MetalLB manages. This specific example is a dual-stack configuration, meaning it provides both IPv4 and IPv6 addresses.- Example of assigning IP address pools to services or namespaces
You can assign IP addresses from an
IPAddressPoolto services and namespaces that you specify.If you assign a service or namespace to more than one IP address pool, MetalLB uses an available IP address from the higher-priority IP address pool. If no IP addresses are available from the assigned IP address pools with a high priority, MetalLB uses available IP addresses from an IP address pool with lower priority or no priority.
NoteYou can use the
matchLabelslabel selector, thematchExpressionslabel selector, or both, for thenamespaceSelectorsandserviceSelectorsspecifications. This example demonstrates one label selector for each specification.apiVersion: metallb.io/v1beta1 kind: IPAddressPool metadata: name: doc-example-service-allocation namespace: metallb-system spec: addresses: - 192.168.20.0/24 serviceAllocation: priority: 50 namespaces: - namespace-a - namespace-b namespaceSelectors: - matchLabels: zone: east serviceSelectors: - matchExpressions: - key: security operator: In values: - S1 # ...where:
serviceAllocation.priority- Assign a priority to the address pool. A lower number indicates a higher priority.
serviceAllocation.namespaces- Assign one or more namespaces to the IP address pool in a list format.
serviceAllocation.namespaceSelectors- Assign one or more namespace labels to the IP address pool by using label selectors in a list format.
serviceAllocation.serviceSelectors- Assign one or more service labels to the IP address pool by using label selectors in a list format.
5.1.5. Additional resources
5.2. About advertising for the IP address pools
You can configure MetalLB so that the IP address is advertised with layer 2 protocols, the BGP protocol, or both.
With layer 2, MetalLB provides a fault-tolerant external IP address. With BGP, MetalLB provides fault-tolerance for the external IP address and load balancing.
MetalLB supports advertising by using Layer 2 and BGP for the same set of IP addresses.
MetalLB provides the flexibility to assign address pools to specific BGP peers, effectively limiting advertising to a subset of nodes on the network. This allows for more complex configurations, such as facilitating the isolation of nodes or the segmentation of the network.
5.2.1. About the BGPAdvertisement custom resource
To configure how the cluster announces IP addresses to external peers, define the properties of the BGPAdvertisement custom resource (CR). Specifying these parameters ensures that MetalLB correctly manages routing advertisements for your application services within the network.
The following table describes the parameters for the BGPAdvertisements CR:
Table 5.3. BGPAdvertisements configuration
| Parameter | Type | Description |
|---|---|---|
|
|
| Specifies the name for the BGP advertisement. |
|
|
| Specifies the namespace for the BGP advertisement. Specify the same namespace that the MetalLB Operator uses. |
|
|
|
Optional: Specifies the number of bits to include in a 32-bit CIDR mask. To aggregate the routes that the speaker advertises to BGP peers, the mask is applied to the routes for several service IP addresses and the speaker advertises the aggregated route. For example, with an aggregation length of |
|
|
|
Optional: Specifies the number of bits to include in a 128-bit CIDR mask. For example, with an aggregation length of |
|
|
| Optional: Specifies one or more BGP communities. Each community is specified as two 16-bit values separated by the colon character. Well-known communities must be specified as 16-bit values:
You can also use community objects that are created along with the strings. |
|
|
| Optional: Specifies the local preference for this advertisement. This BGP attribute applies to BGP sessions within the Autonomous System. |
|
|
|
Optional: The list of |
|
|
|
Optional: A selector for the |
|
|
|
Optional: Kubernetes label selectors that determine which |
|
|
|
Optional: By setting the |
|
|
|
Optional: Use a list to specify the |
5.2.2. Configure MetalLB with a BGP advertisement and a basic use case
Configure MetalLB so that the peer BGP routers receive one 203.0.113.200/32 route and one fc00:f853:ccd:e799::1/128 route for each load-balancer IP address that MetalLB assigns to a service.
Because the localPref and communities fields are not specified, the routes are advertised with localPref set to zero and no BGP communities.
Ensure that you can configure MetalLB so that the peer BGP routers receive one 203.0.113.200/32 route and one fc00:f853:ccd:e799::1/128 route for each load-balancer IP address that MetalLB assigns to a service. If you do not specify the localPref and communities parameters, MetalLB advertises the routes with localPref set to `0 and no BGP communities.
5.2.2.1. Advertising a basic address pool configuration with BGP
Configure MetalLB to advertise the IPAddressPool by using Border Gateway Protocol (BGP).
Prerequisites
-
Install the OpenShift CLI (
oc). -
Log in as a user with
cluster-adminprivileges.
Procedure
Create an IP address pool.
Create a file, such as
ipaddresspool.yaml, with content like the following example:apiVersion: metallb.io/v1beta1 kind: IPAddressPool metadata: namespace: metallb-system name: doc-example-bgp-basic spec: addresses: - 203.0.113.200/30 - fc00:f853:ccd:e799::/124 # ...Apply the configuration for the IP address pool:
$ oc apply -f ipaddresspool.yaml
Create a BGP advertisement.
Create a file, such as
bgpadvertisement.yaml, with content like the following example:apiVersion: metallb.io/v1beta1 kind: BGPAdvertisement metadata: name: bgpadvertisement-basic namespace: metallb-system spec: ipAddressPools: - doc-example-bgp-basic # ...
Apply the configuration:
$ oc apply -f bgpadvertisement.yaml
5.2.3. Configuring MetalLB with a BGP advertisement and an advanced use case
Configure MetalLB so that MetalLB assigns IP addresses to load-balancer services in the ranges between 203.0.113.200 and 203.0.113.203 and between fc00:f853:ccd:e799::0 and fc00:f853:ccd:e799::f.
To explain the two BGP advertisements, consider an instance when MetalLB assigns the IP address of 203.0.113.200 to a service. With that IP address as an example, the speaker advertises the following two routes to BGP peers:
-
203.0.113.200/32, withlocalPrefset to100and the community set to the numeric value of theNO_ADVERTISEcommunity. This specification indicates to the peer routers that they can use this route but they should not propagate information about this route to BGP peers. -
203.0.113.200/30, aggregates the load-balancer IP addresses assigned by MetalLB into a single route. MetalLB advertises the aggregated route to BGP peers with the community attribute set to8000:800. BGP peers propagate the203.0.113.200/30route to other BGP peers. When traffic is routed to a node with a speaker, the203.0.113.200/32route is used to forward the traffic into the cluster and to a pod that is associated with the service.
As you add more services and MetalLB assigns more load-balancer IP addresses from the pool, peer routers receive one local route, 203.0.113.20x/32, for each service, and the 203.0.113.200/30 aggregate route. Each service that you add generates the /30 route, but MetalLB deduplicates the routes to one BGP advertisement before communicating with peer routers.
5.2.3.1. Advertising an advanced address pool configuration with BGP
Configure MetalLB to advertise an advanced address pool by using BGP attributes such as BGP communities, route aggregation, and local preference.
Prerequisites
-
Install the OpenShift CLI (
oc). -
Log in as a user with
cluster-adminprivileges.
Procedure
Create an IP address pool.
Create a file, such as
ipaddresspool.yaml, with content like the following example:apiVersion: metallb.io/v1beta1 kind: IPAddressPool metadata: namespace: metallb-system name: doc-example-bgp-adv labels: zone: east spec: addresses: - 203.0.113.200/30 - fc00:f853:ccd:e799::/124 autoAssign: false # ...Apply the configuration for the IP address pool:
$ oc apply -f ipaddresspool.yaml
Create a BGP advertisement.
Create a file, such as
bgpadvertisement1.yaml, with content like the following example:apiVersion: metallb.io/v1beta1 kind: BGPAdvertisement metadata: name: bgpadvertisement-adv-1 namespace: metallb-system spec: ipAddressPools: - doc-example-bgp-adv communities: - 65535:65282 aggregationLength: 32 localPref: 100 # ...Apply the configuration:
$ oc apply -f bgpadvertisement1.yaml
Create a file, such as
bgpadvertisement2.yaml, with content like the following example:apiVersion: metallb.io/v1beta1 kind: BGPAdvertisement metadata: name: bgpadvertisement-adv-2 namespace: metallb-system spec: ipAddressPools: - doc-example-bgp-adv communities: - 8000:800 aggregationLength: 30 aggregationLengthV6: 124 # ...Apply the configuration:
$ oc apply -f bgpadvertisement2.yaml
5.2.4. Advertising an IP address pool from a subset of nodes
To advertise an IP address from an IP addresses pool, from a specific set of nodes only, use the .spec.nodeSelector specification in the BGPAdvertisement custom resource (CR). This specification associates a pool of IP addresses with a set of nodes in the cluster. This is useful when you have nodes on different subnets in a cluster and you want to advertise an IP addresses from an address pool from a specific subnet, for example a public-facing subnet only.
Prerequisites
-
Install the OpenShift CLI (
oc). -
Log in as a user with
cluster-adminprivileges.
Procedure
Create an IP address pool by using a CR:
apiVersion: metallb.io/v1beta1 kind: IPAddressPool metadata: namespace: metallb-system name: pool1 spec: addresses: - 4.4.4.100-4.4.4.200 - 2001:100:4::200-2001:100:4::400 # ...Control which cluster nodes advertise the IP address from
pool1by setting the.spec.nodeSelectorvalue in theBGPAdvertisementCR. The following example advertises the IP address frompool1only fromNodeAandNodeB.apiVersion: metallb.io/v1beta1 kind: BGPAdvertisement metadata: name: example spec: ipAddressPools: - pool1 nodeSelector: - matchLabels: kubernetes.io/hostname: NodeA - matchLabels: kubernetes.io/hostname: NodeB # ...
5.2.5. About the L2Advertisement custom resource
To configure how application services are announced over a Layer 2 network, define the properties in the L2Advertisement custom resource (CR). Establishing these parameters ensures that MetalLB correctly manages routing for your load-balancer IP addresses within the local network infrastructure.
The following table details parameters for the l2Advertisements CR:
Table 5.4. L2 advertisements configuration
| Parameter | Type | Description |
|---|---|---|
|
|
| Specifies the name for the L2 advertisement. |
|
|
| Specifies the namespace for the L2 advertisement. Specify the same namespace that the MetalLB Operator uses. |
|
|
|
Optional: The list of |
|
|
|
Optional: A selector for the |
|
|
|
Optional: Kubernetes label selectors that determine which |
|
|
|
Optional: Important Limiting the nodes to announce as next hops is a Technology Preview feature only. Technology Preview features are not supported with Red Hat production service level agreements (SLAs) and might not be functionally complete. Red Hat does not recommend using them in production. These features provide early access to upcoming product features, enabling customers to test functionality and provide feedback during the development process. For more information about the support scope of Red Hat Technology Preview features, see Technology Preview Features Support Scope. |
|
|
|
Optional: The list of |
5.2.6. Configuring MetalLB with an L2 advertisement
You can configure MetalLB so that the IPAddressPool is advertised with the L2 protocol.
Prerequisites
-
Install the OpenShift CLI (
oc). -
Log in as a user with
cluster-adminprivileges.
Procedure
Create an IP address pool.
Create a file, such as
ipaddresspool.yaml, with content like the following example:apiVersion: metallb.io/v1beta1 kind: IPAddressPool metadata: namespace: metallb-system name: doc-example-l2 spec: addresses: - 4.4.4.0/24 autoAssign: false # ...Apply the configuration for the IP address pool:
$ oc apply -f ipaddresspool.yaml
Create an L2 advertisement.
Create a file, such as
l2advertisement.yaml, with content like the following example:apiVersion: metallb.io/v1beta1 kind: L2Advertisement metadata: name: l2advertisement namespace: metallb-system spec: ipAddressPools: - doc-example-l2 # ...
Apply the configuration:
$ oc apply -f l2advertisement.yaml
5.2.7. Configuring MetalLB with an L2 advertisement and labels
You can use the ipAddressPoolSelectors field in the L2Advertisement custom resource definition to associate the IPAddressPool with the advertisement based on the label assigned to the pool instead of the pool name. The example configures MetalLB to advertise the pool over Layer 2 by using ipAddressPoolSelectors.
Prerequisites
-
Install the OpenShift CLI (
oc). -
Log in as a user with
cluster-adminprivileges.
Procedure
Create an IP address pool.
Create a file, such as
ipaddresspool.yaml, with content like the following example:apiVersion: metallb.io/v1beta1 kind: IPAddressPool metadata: namespace: metallb-system name: doc-example-l2-label labels: zone: east spec: addresses: - 172.31.249.87/32 # ...Apply the configuration for the IP address pool:
$ oc apply -f ipaddresspool.yaml
Create an L2 advertisement that advertises the IP address by using
ipAddressPoolSelectors.Create a file, such as
l2advertisement.yaml, with content like the following example:apiVersion: metallb.io/v1beta1 kind: L2Advertisement metadata: name: l2advertisement-label namespace: metallb-system spec: ipAddressPoolSelectors: - matchExpressions: - key: zone operator: In values: - east # ...Apply the configuration:
$ oc apply -f l2advertisement.yaml
5.2.9. Configuring MetalLB with an L2 advertisement for selected interfaces
By default, the IP addresses from IP address pool that has been assigned to the service, is advertised from all the network interfaces. You can use the interfaces field in the L2Advertisement custom resource definition to restrict those network interfaces that advertise the IP address pool.
The example in the procedure shows how to configure MetalLB so that the IP address pool is advertised only from the network interfaces listed in the interfaces parameter of all nodes.
Prerequisites
-
You have installed the OpenShift CLI (
oc). -
You are logged in as a user with
cluster-adminprivileges.
Procedure
Create an IP address pool.
Create a file, such as
ipaddresspool.yaml, and enter the configuration details as shown in the following example:apiVersion: metallb.io/v1beta1 kind: IPAddressPool metadata: namespace: metallb-system name: doc-example-l2 spec: addresses: - 4.4.4.0/24 autoAssign: false # ...Apply the configuration for the IP address pool as shown in the following example:
$ oc apply -f ipaddresspool.yaml
Create an L2 advertisement with the
interfacesselector to advertise the IP address.Create a YAML file, such as
l2advertisement.yaml, and enter the configuration details as shown the following example:apiVersion: metallb.io/v1beta1 kind: L2Advertisement metadata: name: l2advertisement namespace: metallb-system spec: ipAddressPools: - doc-example-l2 interfaces: - interfaceA - interfaceB # ...
Apply the configuration for the advertisement as shown in the following example:
$ oc apply -f l2advertisement.yaml
ImportantThe interface selector does not affect how MetalLB chooses the node to announce a given IP by using L2. The chosen node does not announce the service if the node does not have the selected interface.
5.2.10. Configure MetalLB with secondary networks
In environments with multiple network interfaces, you might need MetalLB to advertise load-balancer IP addresses on a secondary interface for network traffic segmentation. To route traffic using a secondary interface, you must do the following:
- Enable IP forwarding on the secondary interface so that the interface can forward packets to the pods.
- Enable local gateway mode at the cluster level so that traffic uses the host networking stack.
From OpenShift Container Platform 4.14, IP forwarding is disabled by default on cluster nodes for improved security. Clusters upgraded from 4.13 might already have IP forwarding enabled because existing node settings are preserved during upgrade.
Prerequisites
- You installed and configured MetalLB.
- You identified the secondary network interface on each node.
- You installed the Kubernetes NMState Operator.
-
You have access to the cluster as a user with the
cluster-adminrole. -
You have installed the OpenShift CLI (
oc).
Procedure
Enable local gateway mode by patching the Cluster Network Operator to set
routingViaHosttotrue:$ oc patch network.operator cluster -p '{"spec":{"defaultNetwork":{"ovnKubernetesConfig":{"gatewayConfig": {"routingViaHost": true} }}}}' --type=mergeThis setting routes traffic through the host networking stack, which is required for MetalLB to use secondary interfaces.
Create a
NodeNetworkConfigurationPolicymanifest to enable IP forwarding on the secondary interface, such aseth1:apiVersion: nmstate.io/v1 kind: NodeNetworkConfigurationPolicy metadata: name: enable-forwarding-eth1 spec: nodeSelector: node-role.kubernetes.io/worker: "" desiredState: interfaces: - name: eth1 type: ethernet state: up ipv4: enabled: true forwarding: true-
interfaces.namedefines the name of the secondary interface on which to enable IP forwarding. -
ipv4.forwardingenables IPv4 forwarding on the interface.
-
Apply the policy by running the following command:
$ oc apply -f enable-forwarding-eth1.yaml
Verification
Verify that the policy was applied by running the following command:
$ oc get nncp
Example output
NAME                      STATUS      REASON
enable-forwarding-eth1    Available   SuccessfullyConfigured
Verify that IP forwarding is enabled on a node by running the following command, replacing
<node_name>with the name of the node:$ oc debug node/<node_name> -- chroot /host sysctl net.ipv4.conf.eth1.forwarding
Example output
net.ipv4.conf.eth1.forwarding = 1
5.2.11. Additional resources
5.3. Configuring MetalLB BGP peers
As a cluster administrator, you can add, modify, and delete Border Gateway Protocol (BGP) peers. The MetalLB Operator uses the BGP peer custom resources to identify which peers that MetalLB speaker pods contact to start BGP sessions.
The peers receive the route advertisements for the load-balancer IP addresses that MetalLB assigns to services.
5.3.1. About the BGP peer custom resource
To establish network connectivity and advertise routes for load-balancer services, configure the properties of the MetalLB Border Gateway Protocol (BGP) peer custom resource (CR). Establishing these parameters ensures that your cluster authorizes specific routing peers to direct external traffic correctly to your application workloads.
The following table describes the parameters for the BGP peer CR:
Table 5.5. MetalLB BGP peer custom resource
| Parameter | Type | Description |
|---|---|---|
|
|
| Specifies the name for the BGP peer CR. |
|
|
| Specifies the namespace for the BGP peer CR. |
|
|
|
Specifies the Autonomous System Number (ASN) for the local end of the BGP session. In all BGP peer CRs that you add, specify the same value. The range is |
|
|
|
Specifies the ASN for the remote end of the BGP session. The range is |
|
|
|
Detects the ASN to use for the remote end of the session without explicitly setting it. Specify |
|
|
|
Specifies the IP address of the peer to contact for establishing the BGP session. If you use this parameter, you cannot specify a value in the |
|
|
|
Specifies the interface name to use when establishing a session. Use this parameter to configure unnumbered BGP peering. You must establish a point-to-point, layer 2 connection between the two BGP peers. You can use unnumbered BGP peering with IPv4, IPv6, or dual-stack, but you must enable IPv6 RAs (Router Advertisements). Each interface is limited to one BGP connection. If you use this parameter, you cannot specify a value in the |
|
|
| Optional: Specifies the IP address to use when establishing the BGP session. The value must be an IPv4 address. |
|
|
|
Optional: Specifies the network port of the peer to contact for establishing the BGP session. The range is |
|
|
|
Optional: Specifies the duration for the hold time to propose to the BGP peer. The minimum value is 3 seconds ( |
|
|
|
Optional: Specifies the maximum interval between sending keep-alive messages to the BGP peer. If you specify this parameter, you must also specify a value for the |
|
|
| Optional: Specifies the router ID to advertise to the BGP peer. If you specify this parameter, you must specify the same value in every BGP peer custom resource that you add. |
|
|
| Optional: Specifies the MD5 password to send to the peer for routers that enforce TCP MD5 authenticated BGP sessions. |
|
|
|
Optional: Specifies name of the authentication secret for the BGP peer. The secret must live in the |
|
|
| Optional: Specifies the name of a BFD profile. |
|
|
| Optional: Specifies a selector, using match expressions and match labels, to control which nodes can connect to the BGP peer. |
|
|
|
Optional: Specifies that the BGP peer is multiple network hops away. If the BGP peer is not directly connected to the same network, the speaker cannot establish a BGP session unless this parameter is set to |
|
|
| Specifies how long BGP waits between connection attempts to a neighbor. |
The passwordSecret parameter is mutually exclusive with the password parameter, and contains a reference to a secret containing the password to use. Setting both parameters results in a failure of the parsing.
5.3.2. Configuring a BGP peer
To exchange routing information and advertise IP addresses for load balancer services, configure MetalLB BGP peer CRs. Establishing these peers ensures that your network infrastructure can reach and correctly route traffic to cluster application workloads.
You can add a BGP peer custom resource to exchange routing information with network routers and advertise the IP addresses for services.
Prerequisites
-
Install the OpenShift CLI (
oc). -
Log in as a user with
cluster-adminprivileges. - Configure MetalLB with a BGP advertisement.
Procedure
Create a file, such as
bgppeer.yaml, with content like the following example:apiVersion: metallb.io/v1beta2 kind: BGPPeer metadata: namespace: metallb-system name: doc-example-peer spec: peerAddress: 10.0.0.1 peerASN: 64501 myASN: 64500 routerID: 10.10.10.10 # ...
Apply the BGP peer configuration by entering the following command:
$ oc apply -f bgppeer.yaml
5.3.3. Configure a specific set of BGP peers for a given address pool
To assign specific IP address pools to designated BGP peers, configure MetalLB BGP advertisements. Establishing these mappings ensures that your cluster advertises designated network ranges only to authorized routing peers for precise external traffic control.
This procedure demonstrates the following tasks:
-
Configure a set of address pools:
pool1andpool2. -
Configure a set of BGP peers:
peer1andpeer2. -
Configure BGP advertisement to assign
pool1topeer1andpool2topeer2.
Prerequisites
-
Install the OpenShift CLI (
oc). -
Log in as a user with
cluster-adminprivileges.
Procedure
Create address pool
pool1.Create a file, such as
ipaddresspool1.yaml, with content like the following example:apiVersion: metallb.io/v1beta1 kind: IPAddressPool metadata: namespace: metallb-system name: pool1 spec: addresses: - 4.4.4.100-4.4.4.200 - 2001:100:4::200-2001:100:4::400 # ...Apply the configuration for the IP address pool
pool1:$ oc apply -f ipaddresspool1.yaml
Create address pool
pool2.Create a file, such as
ipaddresspool2.yaml, with content like the following example:apiVersion: metallb.io/v1beta1 kind: IPAddressPool metadata: namespace: metallb-system name: pool2 spec: addresses: - 5.5.5.100-5.5.5.200 - 2001:100:5::200-2001:100:5::400 # ...Apply the configuration for the IP address pool
pool2:$ oc apply -f ipaddresspool2.yaml
Create BGP
peer1.Create a file, such as
bgppeer1.yaml, with content like the following example:apiVersion: metallb.io/v1beta2 kind: BGPPeer metadata: namespace: metallb-system name: peer1 spec: peerAddress: 10.0.0.1 peerASN: 64501 myASN: 64500 routerID: 10.10.10.10 # ...
Apply the configuration for the BGP
peer1:$ oc apply -f bgppeer1.yaml
Create BGP
peer2.Create a file, such as
bgppeer2.yaml, with content like the following example:apiVersion: metallb.io/v1beta2 kind: BGPPeer metadata: namespace: metallb-system name: peer2 spec: peerAddress: 10.0.0.2 peerASN: 64501 myASN: 64500 routerID: 10.10.10.10 # ...
Apply the configuration for the BGP
peer2:$ oc apply -f bgppeer2.yaml
Create BGP advertisement 1.
Create a file, such as
bgpadvertisement1.yaml, with content like the following example:apiVersion: metallb.io/v1beta1 kind: BGPAdvertisement metadata: name: bgpadvertisement-1 namespace: metallb-system spec: ipAddressPools: - pool1 peers: - peer1 communities: - 65535:65282 aggregationLength: 32 aggregationLengthV6: 128 localPref: 100 # ...Apply the configuration:
$ oc apply -f bgpadvertisement1.yaml
Create BGP advertisement 2.
Create a file, such as
bgpadvertisement2.yaml, with content like the following example:apiVersion: metallb.io/v1beta1 kind: BGPAdvertisement metadata: name: bgpadvertisement-2 namespace: metallb-system spec: ipAddressPools: - pool2 peers: - peer2 communities: - 65535:65282 aggregationLength: 32 aggregationLengthV6: 128 localPref: 100 # ...Apply the configuration:
$ oc apply -f bgpadvertisement2.yaml
5.3.4. Exposing a service through a network VRF
To isolate network traffic and manage multiple routing tables, expose a service through a virtual routing and forwarding (VRF) instance. Associating a VRF with a MetalLB BGP peer ensures that external traffic is segmented and correctly routed to the intended application workloads.
Exposing a service through a VRF on a BGP peer is a Technology Preview feature only. Technology Preview features are not supported with Red Hat production service level agreements (SLAs) and might not be functionally complete. Red Hat does not recommend using them in production. These features provide early access to upcoming product features, enabling customers to test functionality and provide feedback during the development process.
For more information about the support scope of Red Hat Technology Preview features, see Technology Preview Features Support Scope.
By using a VRF on a network interface to expose a service through a BGP peer, you can segregate traffic to the service, configure independent routing decisions, and enable multi-tenancy support on a network interface.
By establishing a BGP session through an interface belonging to a network VRF, MetalLB can advertise services through that interface and enable external traffic to reach the service through this interface. However, the network VRF routing table is different from the default VRF routing table used by OVN-Kubernetes. Therefore, the traffic cannot reach the OVN-Kubernetes network infrastructure.
To enable the traffic directed to the service to reach the OVN-Kubernetes network infrastructure, you must configure routing rules to define the next hops for network traffic. See the NodeNetworkConfigurationPolicy resource in "Managing symmetric routing with MetalLB" in the Additional resources section for more information.
The following high-level steps demonstrate how to expose a service through a network VRF with a BGP peer:
- Define a BGP peer and add a network VRF instance.
- Specify an IP address pool for MetalLB.
- Configure a BGP route advertisement for MetalLB to advertise a route by using the specified IP address pool and the BGP peer associated with the VRF instance.
- Deploy a service to test the configuration.
Prerequisites
-
You installed the OpenShift CLI (
oc). -
You logged in as a user with
cluster-adminprivileges. -
You defined a
NodeNetworkConfigurationPolicy(NNCP) to associate a Virtual Routing and Forwarding (VRF) instance with a network interface. For more information about completing this prerequisite, see the Additional resources section. - You installed MetalLB on your cluster.
Procedure
Create a
BGPPeercustom resource (CR):Create a file, such as
frrviavrf.yaml, with content like the following example:apiVersion: metallb.io/v1beta2 kind: BGPPeer metadata: name: frrviavrf namespace: metallb-system spec: myASN: 100 peerASN: 200 peerAddress: 192.168.130.1 vrf: ens4vrf # ...
spec.vrf: Specifies the network VRF instance to associate with the BGP peer. MetalLB can advertise services and make routing decisions based on the routing information in the VRF.NoteYou must configure this network VRF instance in a
NodeNetworkConfigurationPolicyCR. See the Additional resources for more information.Apply the configuration for the BGP peer by running the following command:
$ oc apply -f frrviavrf.yaml
Create an
IPAddressPoolCR:Create a file, such as
first-pool.yaml, with content like the following example:apiVersion: metallb.io/v1beta1 kind: IPAddressPool metadata: name: first-pool namespace: metallb-system spec: addresses: - 192.169.10.0/32 # ...
Apply the configuration for the IP address pool by running the following command:
$ oc apply -f first-pool.yaml
Create a
BGPAdvertisementCR:Create a file, such as
first-adv.yaml, with content like the following example:apiVersion: metallb.io/v1beta1 kind: BGPAdvertisement metadata: name: first-adv namespace: metallb-system spec: ipAddressPools: - first-pool peers: - frrviavrf # ...peers.frrviavrf: In this example, MetalLB advertises a range of IP addresses from thefirst-poolIP address pool to thefrrviavrfBGP peer.Apply the configuration for the BGP advertisement by running the following command:
$ oc apply -f first-adv.yaml
Create a
Namespace,Deployment, andServiceCR:Create a file, such as
deploy-service.yaml, with content like the following example:apiVersion: v1 kind: Namespace metadata: name: test --- apiVersion: apps/v1 kind: Deployment metadata: name: server namespace: test spec: selector: matchLabels: app: server template: metadata: labels: app: server spec: containers: - name: server image: nginx ports: - name: http containerPort: 80 --- apiVersion: v1 kind: Service metadata: name: server1 namespace: test spec: ports: - name: http port: 80 protocol: TCP targetPort: 80 selector: app: server type: LoadBalancer # ...Apply the configuration for the namespace, deployment, and service by running the following command:
$ oc apply -f deploy-service.yaml
Verification
Identify a MetalLB speaker pod by running the following command:
$ oc get -n metallb-system pods -l component=speaker
Example output
NAME            READY   STATUS    RESTARTS   AGE
speaker-c6c5f   6/6     Running   0          69m
Verify that the state of the BGP session is
Establishedin the speaker pod by running the following command, replacing the variables to match your configuration:$ oc exec -n metallb-system <speaker_pod> -c frr -- vtysh -c "show bgp vrf <vrf_name> neigh"
Example output
BGP neighbor is 192.168.30.1, remote AS 200, local AS 100, external link
  BGP version 4, remote router ID 192.168.30.1, local router ID 192.168.30.71
  BGP state = Established, up for 04:20:09

...
Verify that the service is advertised correctly by running the following command:
$ oc exec -n metallb-system <speaker_pod> -c frr -- vtysh -c "show bgp vrf <vrf_name> ipv4"
5.3.5. Additional resources
5.3.6. Example BGP peer configurations
To precisely manage network topology and improve routing resilience, configure MetalLB BGP peer settings that limit node connectivity and incorporate BFD profiles. Defining these parameters ensures that your cluster maintains secure peer relationships and rapidly detects path failures for high service availability.
- Example of limiting which nodes connect to a BGP peer
-
You can specify the
nodeSelectorsparameter to control which nodes can connect to a BGP peer.
apiVersion: metallb.io/v1beta2
kind: BGPPeer
metadata:
  name: doc-example-nodesel
  namespace: metallb-system
spec:
  peerAddress: 10.0.20.1
  peerASN: 64501
  myASN: 64500
  nodeSelectors:
  - matchExpressions:
    - key: kubernetes.io/hostname
      operator: In
      values: [compute-1.example.com, compute-2.example.com]
# ...- Example of specifying a BFD profile for a BGP peer
- You can specify a BFD profile to associate with BGP peers. BFD complements BGP by providing faster detection of communication failures between peers than BGP alone.
apiVersion: metallb.io/v1beta2
kind: BGPPeer
metadata:
  name: doc-example-peer-bfd
  namespace: metallb-system
spec:
  peerAddress: 10.0.20.1
  peerASN: 64501
  myASN: 64500
  holdTime: "10s"
  bfdProfile: doc-example-bfd-profile-full
# ...
Deleting the bidirectional forwarding detection (BFD) profile and removing the bfdProfile added to the border gateway protocol (BGP) peer resource does not disable the BFD. Instead, the BGP peer starts using the default BFD profile. To disable BFD from a BGP peer resource, delete the BGP peer configuration and recreate it without a BFD profile. For more information, see This content is not included.BZ#2050824.
- Example of specifying BGP peers for dual-stack networking
- To support dual-stack networking, add one BGP peer custom resource for IPv4 and one BGP peer custom resource for IPv6.
apiVersion: metallb.io/v1beta2
kind: BGPPeer
metadata:
  name: doc-example-dual-stack-ipv4
  namespace: metallb-system
spec:
  peerAddress: 10.0.20.1
  peerASN: 64500
  myASN: 64500
---
apiVersion: metallb.io/v1beta2
kind: BGPPeer
metadata:
  name: doc-example-dual-stack-ipv6
  namespace: metallb-system
spec:
  peerAddress: 2620:52:0:88::104
  peerASN: 64500
  myASN: 64500
# ...
- Example of specifying BGP peers for unnumbered BGP peering
-
To configure unnumbered BGP peering, specify the interface in the
spec.interfaceparameter by using the following example configuration:
apiVersion: metallb.io/v1beta2
kind: BGPPeer
metadata:
  name: peer-unnumber
  namespace: metallb-system
spec:
  myASN: 64512
  ASN: 645000
  interface: net0
# ...
To use the interface parameter, you must establish a point-to-point layer 2 connection between the two BGP peers. You can use unnumbered BGP peering with IPv4, IPv6, or dual-stack, but you must enable IPv6 Router Advertisements (RAs). Each interface is limited to one BGP connection.
If you use this parameter, you cannot specify a value in the spec.bgp.routers.neighbors.address parameter.
5.3.7. Additional resources
5.4. Configuring community alias
As a cluster administrator, you can configure a community alias and use it across different advertisements.
5.4.1. About the community custom resource
To simplify BGP configuration, define named aliases for community values by using the community custom resource. You can reference these aliases when advertising ipAddressPools with the BGPAdvertisement resource.
The fields for the community custom resource are described in the following table.
The community CRD applies only to BGPAdvertisement.
Table 5.6. MetalLB community custom resource
| Field | Type | Description |
|---|---|---|
|
|
|
Specifies the name for the |
|
|
|
Specifies the namespace for the |
|
|
|
Specifies a list of BGP community aliases that can be used in BGPAdvertisements. A community alias consists of a pair of name (alias) and value (number:number). Link the BGPAdvertisement to a community alias by referring to the alias name in its |
Table 5.7. CommunityAlias
| Field | Type | Description |
|---|---|---|
|
|
|
The name of the alias for the |
|
|
|
The BGP |
5.4.2. Configuring MetalLB with a BGP advertisement and community alias
To advertise an IPAddressPool by using the BGP protocol, configure MetalLB with a community alias. This configuration sets the alias to the numeric value of the NO_ADVERTISE community.
In the following example, the peer BGP router doc-example-peer-community receives one 203.0.113.200/32 route and one fc00:f853:ccd:e799::1/128 route for each load-balancer IP address that MetalLB assigns to a service. A community alias is configured with the NO_ADVERTISE community.
Prerequisites
-
Install the OpenShift CLI (
oc) -
Log in as a user with
cluster-adminprivileges.
Procedure
Create an IP address pool.
Create a file, such as
ipaddresspool.yaml, with content like the following example:apiVersion: metallb.io/v1beta1 kind: IPAddressPool metadata: namespace: metallb-system name: doc-example-bgp-community spec: addresses: - 203.0.113.200/30 - fc00:f853:ccd:e799::/124Apply the configuration for the IP address pool:
$ oc apply -f ipaddresspool.yaml
Create a community alias named
community1.apiVersion: metallb.io/v1beta1 kind: Community metadata: name: community1 namespace: metallb-system spec: communities: - name: NO_ADVERTISE value: '65535:65282'Create a BGP peer named
doc-example-bgp-peer.Create a file, such as
bgppeer.yaml, with content like the following example:apiVersion: metallb.io/v1beta2 kind: BGPPeer metadata: namespace: metallb-system name: doc-example-bgp-peer spec: peerAddress: 10.0.0.1 peerASN: 64501 myASN: 64500 routerID: 10.10.10.10
Apply the configuration for the BGP peer:
$ oc apply -f bgppeer.yaml
Create a BGP advertisement with the community alias.
Create a file, such as
bgpadvertisement.yaml, with content like the following example:apiVersion: metallb.io/v1beta1 kind: BGPAdvertisement metadata: name: bgp-community-sample namespace: metallb-system spec: aggregationLength: 32 aggregationLengthV6: 128 communities: - NO_ADVERTISE ipAddressPools: - doc-example-bgp-community peers: - doc-example-peerwhere:
NO_ADVERTISE: Specifies theCommunityAlias.namehere and not the community custom resource (CR) name.Apply the configuration:
$ oc apply -f bgpadvertisement.yaml
5.5. Configuring MetalLB BFD profiles
As a cluster administrator, you can add, modify, and delete Bidirectional Forwarding Detection (BFD) profiles. The MetalLB Operator uses the BFD profile custom resources to identify which BGP sessions use BFD to provide faster path failure detection than BGP alone provides.
5.5.1. About the BFD profile custom resource
As a cluster administrator, you can specify parameters in the BFD profile CR. The MetalLB Operator uses the BFD profile custom resources to identify which BGP sessions use BFD to provide faster path failure detection than BGP alone provides.
The following table describes parameters for the BFD profile CR:
Table 5.8. BFD profile custom resource
| Parameter | Type | Description |
|---|---|---|
|
|
| Specifies the name for the BFD profile custom resource. |
|
|
| Specifies the namespace for the BFD profile custom resource. |
|
|
| Specifies the detection multiplier to determine packet loss. The remote transmission interval is multiplied by this value to determine the connection loss detection timer.
For example, when the local system has the detect multiplier set to |
|
|
|
Specifies the echo transmission mode. If you are not using distributed BFD, echo transmission mode works only when the peer is also FRR. The default value is
When echo transmission mode is enabled, consider increasing the transmission interval of control packets to reduce bandwidth usage. For example, consider increasing the transmit interval to |
|
|
|
Specifies the minimum transmission interval, less jitter, that this system uses to send and receive echo packets. The range is |
|
|
| Specifies the minimum expected TTL for an incoming control packet. This field applies to multi-hop sessions only.
The purpose of setting a minimum TTL is to make the packet validation requirements more stringent and avoid receiving control packets from other sessions. The default value is |
|
|
| Specifies whether a session is marked as active or passive. A passive session does not attempt to start the connection. Instead, a passive session waits for control packets from a peer before it begins to reply.
Marking a session as passive is useful when you have a router that acts as the central node of a star network and you want to avoid sending control packets that you do not need the system to send. The default value is |
|
|
|
Specifies the minimum interval that this system is capable of receiving control packets. The range is |
|
|
|
Specifies the minimum transmission interval, less jitter, that this system uses to send control packets. The range is |
5.5.2. Configuring a BFD profile
To achieve faster path failure detection for BGP sessions, configure a MetalLB BFD profile and associate it with a BGP peer. Establishing these profiles ensures that your network routing remains highly available and responsive by identifying connectivity issues more rapidly than standard protocols.
Prerequisites
-
Install the OpenShift CLI (
oc). -
Log in as a user with
cluster-adminprivileges.
Procedure
Create a file, such as
bfdprofile.yaml, with content like the following example:apiVersion: metallb.io/v1beta1 kind: BFDProfile metadata: name: doc-example-bfd-profile-full namespace: metallb-system spec: receiveInterval: 300 transmitInterval: 300 detectMultiplier: 3 echoMode: false passiveMode: true minimumTtl: 254 # ...
Apply the configuration for the BFD profile:
$ oc apply -f bfdprofile.yaml
5.5.3. Additional resources
5.6. Configuring services to use MetalLB
To ensure predictable network endpoints, control how MetalLB assigns IP addresses to services of type LoadBalancer. Requesting specific addresses or pools ensures that your applications receive valid IP assignments that align with your specific network addressing plan.
5.6.1. Request a specific IP address
To assign a specific, static IP address to a service, configure the spec.loadBalancerIP parameter in the service specification.
MetalLB attempts to assign the requested address from the configured address pools, ensuring that your service is reachable at a designated, static network endpoint. If the requested IP address is not within any range, MetalLB reports a warning.
Example service YAML for a specific IP address
apiVersion: v1
kind: Service
metadata:
  name: <service_name>
  annotations:
    metallb.io/address-pool: <address_pool_name>
spec:
  selector:
    <label_key>: <label_value>
  ports:
    - port: 8080
      targetPort: 8080
      protocol: TCP
  type: LoadBalancer
  loadBalancerIP: <ip_address>
If MetalLB cannot assign the requested IP address, the EXTERNAL-IP for the service reports <pending> and running oc describe service <service_name> includes an event like the following example:
Example event when MetalLB cannot assign a requested IP address
  ...
Events:
  Type     Reason            Age    From                Message
  ----     ------            ----   ----                -------
  Warning  AllocationFailed  3m16s  metallb-controller  Failed to allocate IP for "default/invalid-request": "4.3.2.1" is not allowed in config
5.6.2. Request an IP address from a specific pool
To ensure predictable network endpoints, control how MetalLB assigns IP addresses to services of type LoadBalancer. Requesting specific addresses or pools ensures that your applications receive valid IP assignments that align with your specific network addressing plan.
Example service YAML for an IP address from a specific pool
apiVersion: v1
kind: Service
metadata:
  name: <service_name>
  annotations:
    metallb.io/address-pool: <address_pool_name>
spec:
  selector:
    <label_key>: <label_value>
  ports:
    - port: 8080
      targetPort: 8080
      protocol: TCP
  type: LoadBalancer
If the address pool that you specify for <address_pool_name> does not exist, MetalLB attempts to assign an IP address from any pool that permits automatic assignment.
5.6.3. Accept any IP address
To automatically allocate IP addresses to services without manual specification, configure MetalLB address pools to permit automatic assignment. MetalLB dynamically assigns available addresses from these pools, ensuring seamless service deployment and network connectivity.
Example service YAML for accepting any IP address
apiVersion: v1
kind: Service
metadata:
  name: <service_name>
spec:
  selector:
    <label_key>: <label_value>
  ports:
    - port: 8080
      targetPort: 8080
      protocol: TCP
type: LoadBalancer5.6.5. Configuring a service with MetalLB
To expose an application to external network traffic, configure a load-balancing service. MetalLB assigns an external IP address from a configured address pool, ensuring that your application is reachable from outside the cluster.
Prerequisites
-
Install the OpenShift CLI (
oc). - Install the MetalLB Operator and start MetalLB.
- Configure at least one address pool.
- Configure your network to route traffic from the clients to the host network for the cluster.
Procedure
Create a
<service_name>.yamlfile. In the file, set thespec.typeparameter toLoadBalancer.Refer to the examples for information about how to request the external IP address that MetalLB assigns to the service.
Create the service:
$ oc apply -f <service_name>.yaml
Example output
service/<service_name> created
Verification
Describe the service:
$ oc describe service <service_name>
Example output
Name:                     <service_name>
Namespace:                default
Labels:                   <none>
Annotations:              metallb.io/address-pool: doc-example
Selector:                 app=service_name
Type:                     LoadBalancer
IP Family Policy:         SingleStack
IP Families:              IPv4
IP:                       10.105.237.254
IPs:                      10.105.237.254
LoadBalancer Ingress:     192.168.100.5
Port:                     <unset>  80/TCP
TargetPort:               8080/TCP
NodePort:                 <unset>  30550/TCP
Endpoints:                10.244.0.50:8080
Session Affinity:         None
External Traffic Policy:  Cluster
Events:
  Type    Reason        Age                From             Message
  ----    ------        ----               ----             -------
  Normal  nodeAssigned  32m (x2 over 32m)  metallb-speaker  announcing from node "<node_name>"
where:
Annotations- Specifies the annotation that is present if you request an IP address from a specific pool.
Type-
Specifies the service type that must indicate
LoadBalancer. LoadBalancer Ingress- Specifies the indicates the external IP address if the service is assigned correctly.
Events- Specifies the events parameter that indicates the node name that is assigned to announce the external IP address. If you experience an error, the events parameter indicates the reason for the error.
5.7. Managing symmetric routing with MetalLB
As a cluster administrator, you can effectively manage traffic for pods behind a MetalLB load-balancer service with multiple host interfaces by implementing features from MetalLB, NMState, and OVN-Kubernetes. By combining these features in this context, you can provide symmetric routing, traffic segregation, and support clients on different networks with overlapping CIDR addresses.
To achieve this functionality, learn how to implement virtual routing and forwarding (VRF) instances with MetalLB, and configure egress services.
Configuring symmetric traffic by using a VRF instance with MetalLB and an egress service is a Technology Preview feature only. Technology Preview features are not supported with Red Hat production service level agreements (SLAs) and might not be functionally complete. Red Hat does not recommend using them in production. These features provide early access to upcoming product features, enabling customers to test functionality and provide feedback during the development process.
For more information about the support scope of Red Hat Technology Preview features, see Technology Preview Features Support Scope.
5.7.1. Challenges of managing symmetric routing with MetalLB
To resolve network isolation and asymmetric routing challenges on multiple host interfaces, implement a configuration combining MetalLB, NMState, and OVN-Kubernetes. This solution ensures symmetric routing and prevents overlapping CIDR addresses without requiring manual static route maintenance.
One option to ensure that return traffic reaches the correct client is to use static routes. However, with this solution, MetalLB cannot isolate the services and then announce each service through a different interface. Additionally, static routing requires manual configuration and requires maintenance if remote sites are added.
A further challenge of symmetric routing when implementing a MetalLB service is scenarios where external systems expect the source and destination IP address for an application to be the same. The default behavior for OpenShift Container Platform is to assign the IP address of the host network interface as the source IP address for traffic originating from pods. This is problematic with multiple host interfaces.
You can overcome these challenges by implementing a configuration that combines features from MetalLB, NMState, and OVN-Kubernetes.
5.7.2. Overview of managing symmetric routing by using VRFs with MetalLB
You can overcome the challenges of implementing symmetric routing by using NMState to configure a VRF instance on a host, associating the VRF instance with a MetalLB BGPPeer resource, and configuring an egress service for egress traffic with OVN-Kubernetes.
Figure 5.1. Network overview of managing symmetric routing by using VRFs with MetalLB
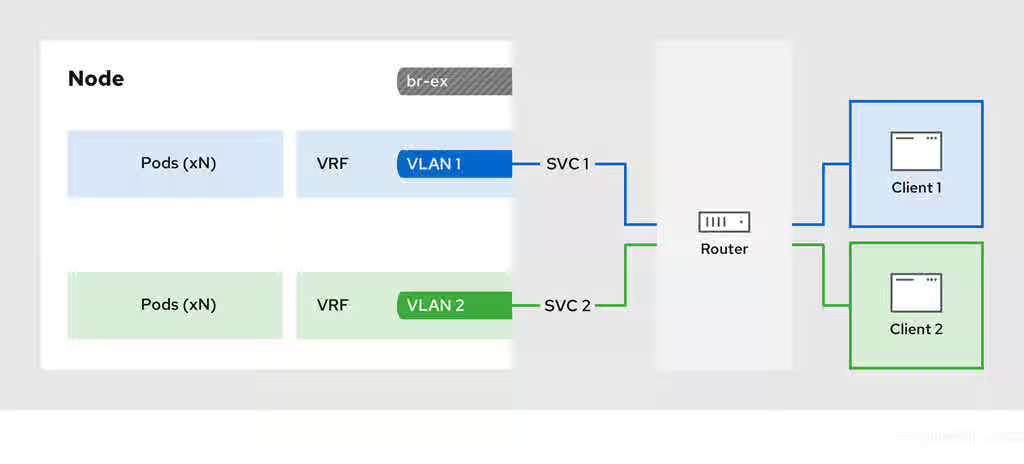
The configuration process involves three stages:
- 1: Define a VRF and routing rules
-
Configure a
NodeNetworkConfigurationPolicycustom resource (CR) to associate a VRF instance with a network interface. - Use the VRF routing table to direct ingress and egress traffic.
-
Configure a
- 2: Link the VRF to a MetalLB
BGPPeer -
Configure a MetalLB
BGPPeerresource to use the VRF instance on a network interface. -
By associating the
BGPPeerresource with the VRF instance, the designated network interface becomes the primary interface for the BGP session, and MetalLB advertises the services through this interface.
-
Configure a MetalLB
- 3: Configure an egress service
- Configure an egress service to choose the network associated with the VRF instance for egress traffic.
- Optional: Configure an egress service to use the IP address of the MetalLB load-balancer service as the source IP for egress traffic.
5.7.3. Configuring symmetric routing by using VRFs with MetalLB
To ensure that applications behind a MetalLB service use the same network path for both ingress and egress, configure symmetric routing by using Virtual Routing and Forwarding (VRF).
The example in the procedure associates a VRF routing table with MetalLB and an egress service to enable symmetric routing for ingress and egress traffic for pods behind a LoadBalancer service.
-
If you use the
sourceIPBy: "LoadBalancerIP"setting in theEgressServiceCR, you must specify theLoadBalancernode in theBGPAdvertisementcustom resource (CR). -
You can use the
sourceIPBy: "Network"setting on clusters that use OVN-Kubernetes configured with thegatewayConfig.routingViaHostspecification set totrueonly. Additionally, if you use thesourceIPBy: "Network"setting, you must schedule the application workload on nodes configured with the network VRF instance.
Prerequisites
-
Install the OpenShift CLI (
oc). -
Log in as a user with
cluster-adminprivileges. - Install the Kubernetes NMState Operator.
- Install the MetalLB Operator.
-
Create a namespace for your application workload. The examples in this procedure use a namespace called
test.
Procedure
Label the nodes that you want to participate in the VRF configuration by running the following command:
$ oc label node <node_name> vrf=true
The examples in this procedure use the label
vrf: "true".Create a
NodeNetworkConfigurationPolicyCR to define the VRF instance:Create a file, such as
node-network-vrf.yaml, with content like the following example:apiVersion: nmstate.io/v1 kind: NodeNetworkConfigurationPolicy metadata: name: vrfpolicy spec: nodeSelector: vrf: "true" maxUnavailable: 3 desiredState: interfaces: - name: ens4vrf type: vrf state: up vrf: port: - ens4 route-table-id: 2 - name: ens4 type: ethernet state: up ipv4: address: - ip: 192.168.130.130 prefix-length: 24 dhcp: false enabled: true routes: config: - destination: 0.0.0.0/0 metric: 150 next-hop-address: 192.168.130.1 next-hop-interface: ens4 table-id: 2 route-rules: config: - ip-to: 172.30.0.0/16 priority: 998 route-table: 254 - ip-to: 10.128.0.0/14 priority: 998 route-table: 254 - ip-to: 169.254.0.0/17 priority: 998 route-table: 254 # ...where:
metadata.name- Specifies the name of the policy.
nodeSelector.vrf-
Specifies the policy for all nodes with the label
vrf:true. interfaces.name.ens4vrf- Specifies the name of the interface.
interfaces.type- Specifies the type of interface. This example creates a VRF instance.
vrf.port- Specifies the node interface that the VRF attaches to.
vrf.route-table-id- Specifies the name of the route table ID for the VRF.
interfaces.name.ens4- Specifies the IPv4 address of the interface associated with the VRF.
routes-
Specifies the configuration for network routes. The
next-hop-addressfield defines the IP address of the next hop for the route. Thenext-hop-interfacefield defines the outgoing interface for the route. In this example, the VRF routing table is2, which references the ID that you define in theEgressServiceCR. route-rules-
Specifies additional route rules. The
ip-tofields must match theCluster NetworkCIDR,Service NetworkCIDR, andInternal Masqueradesubnet CIDR. You can view the values for these CIDR address specifications by running the following command:oc describe network.operator/cluster. route-rules.route-table-
Specifies the main routing table that the Linux kernel uses when calculating routes has the ID
254.
Apply the policy by running the following command:
$ oc apply -f node-network-vrf.yaml
Verify that the policy is applied by running the following command:
$ oc get nncp vrfpolicy
The output must show
Availablein theSTATUScolumn before you continue to the next step.
Create a
BGPPeercustom resource (CR):Create a file, such as
frr-via-vrf.yaml, with content like the following example:apiVersion: metallb.io/v1beta2 kind: BGPPeer metadata: name: frrviavrf namespace: metallb-system spec: myASN: 100 peerASN: 200 peerAddress: 192.168.130.1 vrf: ens4vrf # ...
where:
spec.vrf- Specifies the VRF instance to associate with the BGP peer. MetalLB can advertise services and make routing decisions based on the routing information in the VRF.
Apply the configuration for the BGP peer by running the following command:
$ oc apply -f frr-via-vrf.yaml
Create an
IPAddressPoolCR:Create a file, such as
first-pool.yaml, with content like the following example:apiVersion: metallb.io/v1beta1 kind: IPAddressPool metadata: name: first-pool namespace: metallb-system spec: addresses: - 192.169.10.0/32 # ...
Apply the configuration for the IP address pool by running the following command:
$ oc apply -f first-pool.yaml
Create a
BGPAdvertisementCR:Create a file, such as
first-adv.yaml, with content like the following example:apiVersion: metallb.io/v1beta1 kind: BGPAdvertisement metadata: name: first-adv namespace: metallb-system spec: ipAddressPools: - first-pool peers: - frrviavrf nodeSelectors: - matchLabels: egress-service.k8s.ovn.org/test-server1: "" # ...where:
peers-
In this example, MetalLB advertises a range of IP addresses from the
first-poolIP address pool to thefrrviavrfBGP peer. nodeSelectors-
In this example, the
EgressServiceCR configures the source IP address for egress traffic to use theLoadBalancerservice IP address. Therefore, you must specify theLoadBalancernode for return traffic to use the same return path for the traffic originating from the pod.
Apply the configuration for the BGP advertisement by running the following command:
$ oc apply -f first-adv.yaml
Create an
EgressServiceCR:Create a file, such as
egress-service.yaml, with content like the following example:apiVersion: k8s.ovn.org/v1 kind: EgressService metadata: name: server1 namespace: test spec: sourceIPBy: "LoadBalancerIP" nodeSelector: matchLabels: vrf: "true" network: "2" # ...where:
metadata.name-
Specifies the name for the egress service. The name of the
EgressServiceresource must match the name of theLoadBalancerservice that you want to modify. metadata.namespace-
Specifies the namespace for the egress service. The namespace for the
EgressServicemust match the namespace of theLoadBalancerservice that you want to modify. The egress service is namespace-scoped. spec.sourceIPBy-
Specifies the
LoadBalancerservice ingress IP address as the source IP address for egress traffic. matchLabels.vrf-
If you specify
LoadBalancerfor thesourceIPByspecification, a single node handles theLoadBalancerservice traffic. In this example, only a node with the labelvrf: "true"can handle the service traffic. If you do not specify a node, OVN-Kubernetes selects a worker node to handle the service traffic. When a node is selected, OVN-Kubernetes labels the node in the following format:egress-service.k8s.ovn.org/<svc_namespace>-<svc_name>: "". network-
Specifies the routing table ID for egress traffic. Ensure that the value matches the
route-table-idID defined in theNodeNetworkConfigurationPolicyresource, for example,route-table-id: 2.
Apply the configuration for the egress service by running the following command:
$ oc apply -f egress-service.yaml
Verification
Get the external IP address for the
LoadBalancerservice by running the following command:$ oc get svc <service_name> -n <namespace>
where
<service_name>is the name of yourLoadBalancerservice and<namespace>is the namespace where the service is deployed. Note theEXTERNAL-IPvalue from the output.Verify that you can access the application endpoint of the pods running behind the MetalLB service by running the following command:
$ curl <external_ip_address>:<port_number>
where
<external_ip_address>is theEXTERNAL-IPvalue from the previous step, and<port_number>is the port number of your application endpoint.-
Optional: If you assigned the
LoadBalancerservice ingress IP address as the source IP address for egress traffic, verify this configuration by using tools such astcpdumpto analyze packets received at the external client.
5.8. Configuring the integration of MetalLB and FRR-K8s
To access advanced routing services not natively provided by MetalLB, configure the FRRConfiguration custom resource (CR). Defining the CR exposes specific FRRouting (FRR) capabilities and extends the routing functionality of your cluster beyond standard MetalLB advertisements.
FRRouting (FRR) is a free, open-source internet routing protocol suite for Linux and UNIX platforms. FRR-K8s is a Kubernetes-based DaemonSet that exposes a subset of the FRR API in a Kubernetes-compliant manner. MetalLB generates the FRR-K8s configuration corresponding to the MetalLB configuration applied.
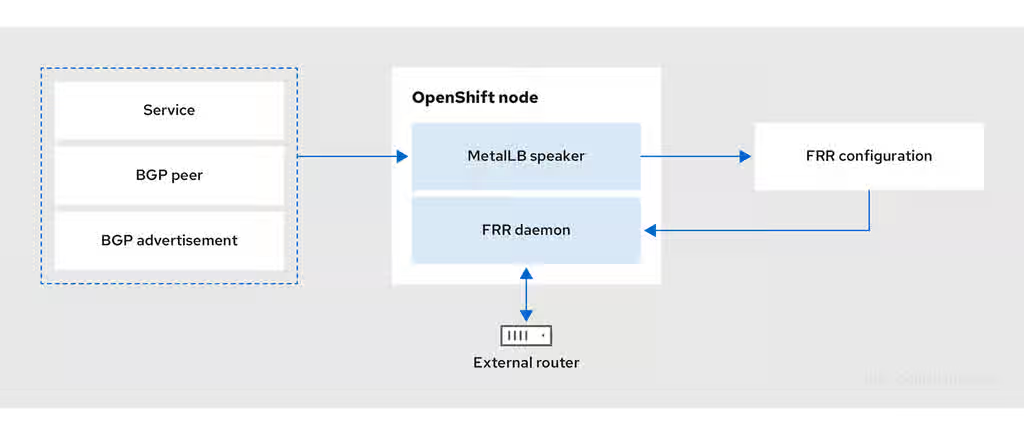
When configuring Virtual Route Forwarding (VRF), you must change the VRFs to a table ID lower than 1000 as higher than 1000 is reserved for OpenShift Container Platform.
5.8.1. FRR configurations
You can create multiple FRRConfiguration CRs to use FRR services in MetalLB.
MetalLB generates an FRRConfiguration object which FRR-K8s merges with all other configurations that all users have created. For example, you can configure FRR-K8s to receive all of the prefixes advertised by a given neighbor. The following example configures FRR-K8s to receive all of the prefixes advertised by a BGPPeer with host 172.18.0.5:
Example FRRConfiguration CR
apiVersion: frrk8s.metallb.io/v1beta1
kind: FRRConfiguration
metadata:
name: test
namespace: metallb-system
spec:
bgp:
routers:
- asn: 64512
neighbors:
- address: 172.18.0.5
asn: 64512
toReceive:
allowed:
mode: all
# ...
You can also configure FRR-K8s to always block a set of prefixes, regardless of the configuration applied. This is useful to prevent routes to pod or ClusterIPs CIDRs that might cause cluster malfunctions. For example, you might block the clusterNetwork and serviceNetwork CIDRs. Run oc describe network.config/cluster to find these values.
The following example blocks the prefix 192.168.1.0/24:
Example MetalLB CR
apiVersion: metallb.io/v1beta1
kind: MetalLB
metadata:
name: metallb
namespace: metallb-system
spec:
frrk8sConfig:
alwaysBlock:
- 192.168.1.0/24
# ...5.8.2. Configuring the FRRConfiguration CR
To customize routing behavior beyond standard MetalLB capabilities, configure the FRRConfiguration custom resource (CR).
The following reference examples demonstrate how to define specific FRRouting (FRR) parameters to enable advanced services, such as receiving routes:
- The
routersparameter You can use the
routersparameter to configure multiple routers, one for each Virtual Routing and Forwarding (VRF) resource. For each router, you must define the Autonomous System Number (ASN).You can also define a list of Border Gateway Protocol (BGP) neighbors to connect to, as in the following example:
Example FRRConfiguration CR
apiVersion: frrk8s.metallb.io/v1beta1 kind: FRRConfiguration metadata: name: test namespace: frr-k8s-system spec: bgp: routers: - asn: 64512 neighbors: - address: 172.30.0.3 asn: 4200000000 ebgpMultiHop: true port: 180 - address: 172.18.0.6 asn: 4200000000 port: 179 # ...- The
toAdvertiseparameter By default,
FRR-K8sdoes not advertise the prefixes configured as part of a router configuration. To advertise the prefixes, you use thetoAdvertiseparameter.You can advertise a subset of the prefixes, as in the following example:
Example FRRConfiguration CR
apiVersion: frrk8s.metallb.io/v1beta1 kind: FRRConfiguration metadata: name: test namespace: frr-k8s-system spec: bgp: routers: - asn: 64512 neighbors: - address: 172.30.0.3 asn: 4200000000 ebgpMultiHop: true port: 180 toAdvertise: allowed: prefixes: - 192.168.2.0/24 prefixes: - 192.168.2.0/24 - 192.169.2.0/24 # ...-
allowed.prefixes: Advertises a subset of prefixes.
The following example shows you how to advertise all of the prefixes:
Example FRRConfiguration CR
apiVersion: frrk8s.metallb.io/v1beta1 kind: FRRConfiguration metadata: name: test namespace: frr-k8s-system spec: bgp: routers: - asn: 64512 neighbors: - address: 172.30.0.3 asn: 4200000000 ebgpMultiHop: true port: 180 toAdvertise: allowed: mode: all prefixes: - 192.168.2.0/24 - 192.169.2.0/24 # ...-
allowed.mode: Advertises all prefixes.
-
- The
toReceiveparameter By default,
FRR-K8sdoes not process any prefixes advertised by a neighbor. You can use thetoReceiveparameter to process such addresses.You can configure for a subset of the prefixes, as in this example:
Example FRRConfiguration CR
apiVersion: frrk8s.metallb.io/v1beta1 kind: FRRConfiguration metadata: name: test namespace: frr-k8s-system spec: bgp: routers: - asn: 64512 neighbors: - address: 172.18.0.5 asn: 64512 port: 179 toReceive: allowed: prefixes: - prefix: 192.168.1.0/24 - prefix: 192.169.2.0/24 ge: 25 le: 28 # ...-
prefixes: The prefix is applied if the prefix length is less than or equal to theleprefix length and greater than or equal to thegeprefix length.
The following example configures FRR to handle all the prefixes announced:
Example FRRConfiguration CR
apiVersion: frrk8s.metallb.io/v1beta1 kind: FRRConfiguration metadata: name: test namespace: frr-k8s-system spec: bgp: routers: - asn: 64512 neighbors: - address: 172.18.0.5 asn: 64512 port: 179 toReceive: allowed: mode: all # ...-
- The
bgpparameter You can use the
bgpparameter to define variousBFDprofiles and associate them with a neighbor. In the following example,BFDbacks up theBGPsession andFRRcan detect link failures:Example FRRConfiguration CR
apiVersion: frrk8s.metallb.io/v1beta1 kind: FRRConfiguration metadata: name: test namespace: frr-k8s-system spec: bgp: routers: - asn: 64512 neighbors: - address: 172.30.0.3 asn: 64512 port: 180 bfdProfile: defaultprofile bfdProfiles: - name: defaultprofile # ...- The
nodeSelectorparameter By default,
FRR-K8sapplies the configuration to all nodes where the daemon is running. You can use thenodeSelectorparameter to specify the nodes to which you want to apply the configuration. For example:Example FRRConfiguration CR
apiVersion: frrk8s.metallb.io/v1beta1 kind: FRRConfiguration metadata: name: test namespace: frr-k8s-system spec: bgp: routers: - asn: 64512 nodeSelector: labelSelector: foo: "bar" # ...- The
interfaceparameter You can use the
interfaceparameter to configure unnumbered BGP peering by using the following example configuration:Example
FRRConfigurationCRapiVersion: frrk8s.metallb.io/v1beta1 kind: FRRConfiguration metadata: name: test namespace: frr-k8s-system spec: bgp: bfdProfiles: - echoMode: false name: simple passiveMode: false routers: - asn: 64512 neighbors: - asn: 64512 bfdProfile: simple disableMP: false interface: net10 port: 179 toAdvertise: allowed: mode: filtered prefixes: - 5.5.5.5/32 toReceive: allowed: mode: filtered prefixes: - 5.5.5.5/32 # ...-
neighbors.interface: Activates unnumbered BGP peering.
NoteTo use the
interfaceparameter, you must establish a point-to-point, layer 2 connection between the two BGP peers. You can use unnumbered BGP peering with IPv4, IPv6, or dual-stack, but you must enable IPv6 RAs (Router Advertisements). Each interface is limited to one BGP connection.If you use this parameter, you cannot specify a value in the
spec.bgp.routers.neighbors.addressparameter.-
The parameters for the FRRConfiguration custom resource are described in the following table:
Table 5.9. MetalLB FRRConfiguration custom resource
| Parameter | Type | Description |
|---|---|---|
|
|
| Specifies the routers that FRR is to configure (one per VRF). |
|
|
| The Autonomous System Number (ASN) to use for the local end of the session. |
|
|
|
Specifies the ID of the |
|
|
| Specifies the host VRF used to establish sessions from this router. |
|
|
| Specifies the neighbors to establish BGP sessions with. |
|
|
|
Specifies the ASN to use for the remote end of the session. If you use this parameter, you cannot specify a value in the |
|
|
|
Detects the ASN to use for the remote end of the session without explicitly setting it. Specify |
|
|
|
Specifies the IP address to establish the session with. If you use this parameter, you cannot specify a value in the |
|
|
| Specifies the interface name to use when establishing a session. Use this parameter to configure unnumbered BGP peering. There must be a point-to-point, layer 2 connection between the two BGP peers. You can use unnumbered BGP peering with IPv4, IPv6, or dual-stack, but you must enable IPv6 RAs (Router Advertisements). Each interface is limited to one BGP connection. |
|
|
|
Specifies the port to dial when establishing the session. Defaults to |
|
|
|
Specifies the password to use for establishing the BGP session. |
|
|
|
Specifies the name of the authentication secret for the neighbor. The secret must be of type "kubernetes.io/basic-auth", and in the same namespace as the FRR-K8s daemon. The key "password" stores the password in the secret. |
|
|
| Specifies the requested BGP hold time, per RFC4271. Defaults to 180s. |
|
|
|
Specifies the requested BGP keepalive time, per RFC4271. Defaults to |
|
|
| Specifies how long BGP waits between connection attempts to a neighbor. |
|
|
| Indicates if the BGPPeer is a multi-hop away. |
|
|
| Specifies the name of the BFD Profile to use for the BFD session associated with the BGP session. If not set, the BFD session is not set up. |
|
|
| Represents the list of prefixes to advertise to a neighbor, and the associated properties. |
|
|
| Specifies the list of prefixes to advertise to a neighbor. This list must match the prefixes that you define in the router. |
|
|
|
Specifies the mode to use when handling the prefixes. You can set to |
|
|
| Specifies the prefixes associated with an advertised local preference. You must specify the prefixes associated with a local preference in the prefixes allowed to be advertised. |
|
|
| Specifies the prefixes associated with the local preference. |
|
|
| Specifies the local preference associated with the prefixes. |
|
|
| Specifies the prefixes associated with an advertised BGP community. You must include the prefixes associated with a local preference in the list of prefixes that you want to advertise. |
|
|
| Specifies the prefixes associated with the community. |
|
|
| Specifies the community associated with the prefixes. |
|
|
| Specifies the prefixes to receive from a neighbor. |
|
|
| Specifies the information that you want to receive from a neighbor. |
|
|
| Specifies the prefixes allowed from a neighbor. |
|
|
|
Specifies the mode to use when handling the prefixes. When set to |
|
|
| Disables MP BGP to prevent it from separating IPv4 and IPv6 route exchanges into distinct BGP sessions. |
|
|
| Specifies all prefixes to advertise from this router instance. |
|
|
| Specifies the list of BFD profiles to use when configuring the neighbors. |
|
|
| The name of the BFD Profile to be referenced in other parts of the configuration. |
|
|
|
Specifies the minimum interval at which this system can receive control packets, in milliseconds. Defaults to |
|
|
|
Specifies the minimum transmission interval, excluding jitter, that this system wants to use to send BFD control packets, in milliseconds. Defaults to |
|
|
| Configures the detection multiplier to determine packet loss. To determine the connection loss-detection timer, multiply the remote transmission interval by this value. |
|
|
|
Configures the minimal echo receive transmission-interval that this system can handle, in milliseconds. Defaults to |
|
|
| Enables or disables the echo transmission mode. This mode is disabled by default, and not supported on multihop setups. |
|
|
| Mark session as passive. A passive session does not attempt to start the connection and waits for control packets from peers before it begins replying. |
|
|
| For multihop sessions only. Configures the minimum expected TTL for an incoming BFD control packet. |
|
|
| Limits the nodes that attempt to apply this configuration. If specified, only those nodes whose labels match the specified selectors attempt to apply the configuration. If it is not specified, all nodes attempt to apply this configuration. |
|
|
| Defines the observed state of FRRConfiguration. |
5.8.3. How FRR-K8s merges multiple configurations
FRR-K8s uses an additive merge strategy when multiple users configure the same node. By using FRR-K8s, you can extend existing configurations, such as adding neighbors or prefixes, but prevent the removal of components defined by other sources.
- Configuration conflicts
Certain configurations can cause conflicts, leading to errors, for example:
- different ASN for the same router (in the same VRF)
- different ASN for the same neighbor (with the same IP / port)
- multiple BFD profiles with the same name but different values
When the daemon finds an invalid configuration for a node, it reports the configuration as invalid and reverts to the previous valid FRR configuration.
- Merging
When merging, you can complete the following actions:
- Extend the set of IP addresses that you want to advertise to a neighbor.
- Add an extra neighbor with its set of IP addresses.
- Extend the set of IP addresses to which you want to associate a community.
- Allow incoming routes for a neighbor.
Each configuration must be self contained. This means, for example, that you cannot allow prefixes that are not defined in the router section by leveraging prefixes coming from another configuration.
If the configurations to be applied are compatible, merging works as follows:
-
FRR-K8scombines all the routers. -
FRR-K8smerges all prefixes and neighbors for each router. -
FRR-K8smerges all filters for each neighbor.
A less restrictive filter has precedence over a stricter one. For example, a filter accepting some prefixes has precedence over a filter not accepting any, and a filter accepting all prefixes has precedence over one that accepts some.
5.9. Monitoring MetalLB configuration status
As an OpenShift Container Platform system administrator, you can monitor the operational status of your MetalLB deployment by examining its custom resources (CRs). These status fields provide information about IP address allocations, BGP peer announcements, and session states, which are important for effective monitoring and troubleshooting.
5.9.1. Understanding MetalLB status custom resources
MetalLB provides a scalable framework for monitoring the health of network traffic and IP addresses. Use status fields in MetalLB custom resources to track session status and troubleshoot configuration.
MetalLB exposes status information for several key components, providing a comprehensive view of its configuration and operation.
Table 5.10. MetalLB status resources
| Resource | Description | Troubleshooting command |
|---|---|---|
|
| Shows the cluster-wide allocation and availability of IP addresses within a defined pool, including the number of assigned and available addresses for both IPv4 and IPv6. |
|
|
| Shows which service IP addresses the system announces to specific BGP peers across the network infrastructure. |
|
|
|
Shows the real-time operational state of the border gateway protocol (BGP) and bidirectional forwarding detection (BFD) sessions between a specific cluster node and a BGP peer, indicating if the channel is |
|
|
| Shows whether the MetalLB controller and speakers have successfully validated and applied the current configuration. MetalLB creates one resource for the controller and one for each speaker node. Reports errors when custom resources are incompatible. |
|
The MetalLB controller, typically deployed as metallb-system/controller, is responsible for managing IP address assignments and updating the IPAddressPool status. When a service requests a LoadBalancer IP, the controller allocates an IP from an appropriate IPAddressPool and updates the status fields to reflect the current number of assigned and available IP addresses.
5.9.2. Viewing the IPAddressPool status
Check IP address allocation from your MetalLB pools by viewing the IPAddressPool status. This status shows the number of addresses assigned to services and the number remaining available for assignment.
As a cluster administrator, you can add address pools to your cluster to control the IP addresses that MetalLB can assign to load-balancer services. This example shows how to create an IPAddressPool custom resource (CR) and view its status. The configuration sets the advertisement mode to Layer 2 (L2).
Prerequisites
- You have an OpenShift Container Platform cluster with the MetalLB Operator installed.
- You have deployed a MetalLB instance.
Procedure
Create an IP address pool.
Create a file, named for example
ipaddresspool.yaml, with content such as the following:apiVersion: metallb.io/v1beta1 kind: IPAddressPool metadata: name: doc-example-l2 namespace: metallb-system spec: addresses: - 192.168.122.200-192.168.122.220 autoAssign: true avoidBuggyIPs: false
Apply the configuration for the IP address pool:
$ oc apply -f ipaddresspool.yaml
View the status of the IP address pool by running the following command:
$ oc get ipaddresspool doc-example-l2 -n metallb-system -o yaml
The output is similar to the following:
apiVersion: metallb.io/v1beta1 kind: IPAddressPool metadata: annotations: kubectl.kubernetes.io/last-applied-configuration: | {"apiVersion":"metallb.io/v1beta1","kind":"IPAddressPool","metadata":{"annotations":{},"name":"doc-example-l2","namespace":"metallb-system"},"spec":{"addresses":["192.168.122.200-192.168.122.220"],"autoAssign":true,"avoidBuggyIPs":false}} creationTimestamp: "2025-07-17T10:13:37Z" generation: 1 name: doc-example-l2 namespace: metallb-system resourceVersion: "29080" uid: 8df1c303-03ac-4d31-8970-6dacdb173dc2 spec: addresses: - 192.168.122.200-192.168.122.220 autoAssign: true avoidBuggyIPs: false status: assignedIPv4: 0 assignedIPv6: 0 availableIPv4: 21 availableIPv6: 0-
assignedIPv4represents the total number of IPv4 addresses that MetalLB has successfully assigned from this pool toLoadBalancerservices. -
assignedIPv6represents the total number of IPv6 addresses that MetalLB has successfully assigned from this pool toLoadBalancerservices. -
availableIPv4indicates the total number of IPv4 addresses remaining and available for assignment within this pool. MetalLB calculates this value by subtractingassignedIPv4from the total theoretical IPv4 addresses in thespec.addressesranges, potentially accounting foravoidBuggyIPsif enabled. -
availableIPv6indicates the total number of IPv6 addresses remaining and available for assignment within this pool. The system calculates this value similarly toavailableIPv4, using the total theoretical IPv6 addresses in thespec.addressesranges.
-
Create an
L2AdvertisementCR for Layer 2 mode with the following sample YAML:apiVersion: metallb.io/v1beta1 kind: L2Advertisement metadata: name: l2advertisement namespace: metallb-system spec: ipAddressPools: - doc-example-l2
Apply the configuration for the L2 advertisement by running the following command:
$ oc apply -f l2advertisement.yaml
Deploy an application and expose it with a
LoadBalancerservice.Create a file, like
nginx.yaml, with the following content to deploy an Nginx application:apiVersion: apps/v1 kind: Deployment metadata: name: nginx-deployment labels: app: nginx spec: replicas: 2 selector: matchLabels: app: nginx template: metadata: labels: app: nginx spec: containers: - name: nginx image: quay.io/openshifttest/hello-openshift:multiarch ports: - containerPort: 8080Apply the configuration by running the following command:
$ oc apply -f nginx.yaml
Expose the deployment as a
LoadBalancerservice by creating a file, such asnginx-service.yaml, with content like the following:apiVersion: v1 kind: Service metadata: name: nginx-service namespace: default annotations: metallb.universe.tf/address-pool: doc-example-l2 spec: selector: app: nginx ports: - protocol: TCP port: 80 targetPort: 8080 type: LoadBalancerImportantThe service must be in the same namespace as your application deployment. The
metallb.universe.tf/address-poolannotation tells MetalLB whichIPAddressPoolto use for IP allocation.Apply the service configuration by running the following command:
$ oc apply -f nginx-service.yaml
View the updated
IPAddressPoolstatus to see the assigned and available IP addresses by running the following command:$ oc get ipaddresspool doc-example-l2 -n metallb-system -o yaml
The output is similar to the following:
apiVersion: metallb.io/v1beta1 kind: IPAddressPool metadata: annotations: kubectl.kubernetes.io/last-applied-configuration: | {"apiVersion":"metallb.io/v1beta1","kind":"IPAddressPool","metadata":{"annotations":{},"name":"doc-example-l2","namespace":"metallb-system"},"spec":{"addresses":["192.168.122.200-192.168.122.220"],"autoAssign":true,"avoidBuggyIPs":false}} creationTimestamp: "2025-07-17T10:13:37Z" generation: 1 name: doc-example-l2 namespace: metallb-system resourceVersion: "30250" uid: 8df1c303-03ac-4d31-8970-6dacdb173dc2 spec: addresses: - 192.168.122.200-192.168.122.220 autoAssign: true avoidBuggyIPs: false status: assignedIPv4: 1 assignedIPv6: 0 availableIPv4: 20 availableIPv6: 0The
assignedIPv4value of1indicates that one IPv4 address from this pool has been successfully assigned by MetalLB to yournginx-serviceLoadBalancer.
5.9.3. Viewing the ServiceBGPStatus custom resource
You can verify border gateway protocol (BGP) advertisement status for your services by viewing the ServiceBGPStatus custom resource, which shows which BGP peers receive advertisements from each node. This is essential for debugging connectivity in telco environments.
The ServiceBGPStatus CR reports the BGP peering status for a service, detailing which neighbors are receiving updates from a specific node.
ServiceBGPStatus resources are created in the metallb-system namespace, not in the namespace where your LoadBalancer service is deployed. Always query these resources with -n metallb-system.
Prerequisites
- You have an OpenShift Container Platform cluster with the MetalLB Operator installed.
- You have deployed a MetalLB instance.
This example shows how to configure MetalLB for BGP mode, deploy a service, and view the ServiceBGPStatus to verify BGP advertisements.
Procedure
Create an
IPAddressPoolCR for BGP, like the following example, and save it asipaddresspool.yaml:apiVersion: metallb.io/v1beta1 kind: IPAddressPool metadata: name: bgp-pool namespace: metallb-system spec: addresses: - 192.168.122.210-192.168.122.220 autoAssign: true
Run the following command to create the
IPAddressPoolconfiguration:$ oc apply -f ipaddresspool.yaml
To configure a BGP peer, create a file named
bgppeer.yamlwith the following content:apiVersion: metallb.io/v1beta2 kind: BGPPeer metadata: name: bgp-peer namespace: metallb-system spec: myASN: 64501 peerASN: 64500 peerAddress: 192.168.1.1
-
Set the
spec:peerAddressfield to the IP address of your BGP router.
-
Set the
Apply the BGPPeer configuration by running the following command:
$ oc apply -f bgppeer.yaml
To create a BGP advertisement to advertise the pool, create a file named
bgpadvertisement.yamlwith the following content:apiVersion: metallb.io/v1beta1 kind: BGPAdvertisement metadata: name: bgp-advertisement namespace: metallb-system spec: ipAddressPools: - bgp-pool
Apply the BGPAdvertisement configuration by running the following command:
$ oc apply -f bgpadvertisement.yaml
Deploy an application and expose it with a
LoadBalancerservice. For this example, create a simple test application named for exampletest-appby creating a file nameddeployment.yamlwith the following content:apiVersion: apps/v1 kind: Deployment metadata: name: test-app namespace: default spec: replicas: 2 selector: matchLabels: app: test-app template: metadata: labels: app: test-app spec: containers: - name: test-app image: quay.io/openshifttest/hello-openshift:multiarch ports: - containerPort: 8080Apply the deployment:
$ oc apply -f deployment.yaml
Create a
LoadBalancerservice for the application:apiVersion: v1 kind: Service metadata: name: test-service namespace: default spec: selector: app: test-app ports: - protocol: TCP port: 80 targetPort: 8080 type: LoadBalancerImportantThe system creates
ServiceBGPStatusresources automatically only when the service has at least one ready endpoint (running pod). Ensure your application pods are running before checking forServiceBGPStatusresources.Apply the service configuration by running the following command:
$ oc apply -f service.yaml
Verify the service received an external IP by running the following command:
$ oc get svc test-service -n default
The output is similar to the following:
NAME TYPE CLUSTER-IP EXTERNAL-IP PORT(S) AGE test-service LoadBalancer 172.30.116.108 192.168.122.210 80:32431/TCP 2m
View the
ServiceBGPStatusresources by running the following command:$ oc get servicebgpstatus -n metallb-system
The output is similar to the following:
NAME NODE SERVICE NAME SERVICE NAMESPACE bgp-xxxxx worker0 test-service default
NoteServiceBGPStatusresources are created with generated names. Use labels to find the status for your service:$ oc get servicebgpstatus -n metallb-system -l metallb.io/service-name=test-service
View the details of the
ServiceBGPStatusCR for your service:$ oc get servicebgpstatus bgp-xxxxx -n metallb-system -o yaml
The output is similar to the following:
apiVersion: metallb.io/v1beta1 kind: ServiceBGPStatus metadata: name: bgp-xxxxx namespace: metallb-system labels: metallb.io/node: worker0 metallb.io/service-name: test-service metallb.io/service-namespace: default status: node: worker0 peers: - bgp-peer serviceName: test-service serviceNamespace: default-
metadata.labels.metallb.io/nodeindicates the node that is advertising the service via BGP. -
metadata.labels.metallb.io/service-nameidentifies the service being advertised. -
metadata.labels.metallb.io/service-namespaceidentifies the namespace of the service being advertised. -
status.nodeconfirms the name of the node advertising the service. -
status.peerslists the names of the BGPPeer resources to which the service is being advertised. This is useful for confirming that the advertisement is reaching the intended peers. -
status.serviceNameindicates the name of the service being advertised. -
status.serviceNamespaceindicates the namespace of the service being advertised.
-
5.9.4. Verifying BGP session state
Once you configure MetalLB for border gateway protocol (BGP) mode, you can verify that the system has established BGP sessions and is advertising routes. You can examine the BGPSessionState custom resource (CR) and the FRRNodeState CR to troubleshoot BGP connectivity and confirm proper route advertisement.
The BGPSessionState CR is updated at a regular poll interval of 2 minutes. It can take up to 2 minutes for the CR to reflect the actual BGP state.
Prerequisites
- You have an OpenShift Container Platform cluster with the MetalLB Operator installed.
You have configured MetalLB for BGP mode with:
-
An
IPAddressPool -
A
BGPPeerconfiguration -
A
BGPAdvertisement
-
An
-
You have deployed at least one
LoadBalancerservice.
Procedure
Check BGP session status by running the following command:
$ oc get bgpsessionstates.frrk8s.metallb.io -A -o wide
This example output shows the BGP session status between each node and its configured BGP peers. Look for the
BGPcolumn to confirm that the session isEstablished.NAMESPACE NAME NODE PEER VRF BGP BFD openshift-frr-k8s worker-2gjfq worker 10.89.0.64 Active N/A openshift-frr-k8s worker-9gtnb worker 10.89.0.63 Established N/A openshift-frr-k8s worker2-rknga worker2 10.89.0.66 Established Up openshift-frr-k8s worker2-t7bfc worker2 172.30.0.2 Established Down
Check
FRRNodeStateto see the BGP configuration on each node by running the following command:$ oc get frrnodestate -n metallb-system
The example output lists the
FRRNodeStateresources for each node where the MetalLB speaker is running.NAME AGE worker0.example.com 5m
View the detailed BGP configuration and running state by running the following command for a specific node:
$ oc get frrnodestate worker0.example.com -n metallb-system -o yaml
The
status.runningConfigfield shows the FRR BGP configuration including configured BGP neighbors, route advertisements, and prefix lists.Verify that the system is advertising routes by checking the
FRRNodeStateresource for the relevant node with this command:$ oc get frrnodestate _<node-name>_ -n metallb-system -o jsonpath='{.status.runningConfig}' | grep "network"The output displays the network prefixes that BGP advertises. For example:
address-family ipv4 unicast network 192.168.122.210/32
This confirms that BGP is advertising the service IP.
5.9.5. Checking MetalLB configuration status
You can verify that the MetalLB controller and speakers have successfully applied the current configuration by viewing the ConfigurationState custom resource (CR). MetalLB creates a ConfigurationState resource for the controller and one for each speaker node. These resources report whether the configuration is valid and surface error details when validation fails, such as incompatible custom resources.
Prerequisites
- You have an OpenShift Container Platform cluster with the MetalLB Operator installed.
- You have deployed a MetalLB instance.
-
You have configured MetalLB resources such as
IPAddressPool,BGPPeer,BFDProfile,Community, orFRRConfiguration.
Procedure
List the
ConfigurationStateresources by running the following command:$ oc get configurationstates -n metallb-system
Example output
NAME RESULT ERRORSUMMARY AGE controller Valid 75m speaker-mysno-sno.demo.lab Valid 28m
The
controllerresource shows the status for the MetalLB controller. Eachspeaker-<node-name>resource shows the status for the speaker on that node.Verify that the controller has a valid configuration by inspecting the
ConfigurationStatedetails. Run the following command:$ oc get configurationstates controller -n metallb-system -o yaml
Example output
apiVersion: metallb.io/v1beta1 kind: ConfigurationState metadata: creationTimestamp: "2026-04-21T09:46:47Z" generation: 1 labels: metallb.io/component-type: controller name: controller namespace: metallb-system resourceVersion: "28268" uid: 23f5c492-4d5c-4893-84ea-77904c006404 status: conditions: - lastTransitionTime: "2026-04-21T09:54:00Z" message: "" reason: Reconciled status: "True" type: poolReconcilerValid result: ValidConfirm that the output has the following values:
-
result: Validindicates that all configured resources are compatible and active. If this value isInvalid, check theerrorSummaryfield for aggregated error messages that identify which part of the configuration has failed. -
message: Describes any configuration problem that occurs. Here, `""confirms that no errors were reported. reason: Reconciledwithstatus: "True"confirms that the reconciler has successfully processed the configuration. If thereasonisReconciliationFailedandstatusis"False", themessagefield contains details about the failure.NoteThe controller does not validate peer-level settings. Errors such as a missing
BFDProfile, undefinedCommunity, or missing authentication secret are reported only by the speakers. AValidcontroller with one or moreInvalidspeakers is expected in these cases. Always check both controller and speakerConfigurationStateresources.If the configuration is invalid, the output is similar to the following example:
apiVersion: metallb.io/v1beta1 kind: ConfigurationState metadata: creationTimestamp: "2026-04-21T09:51:17Z" generation: 1 labels: metallb.io/component-type: speaker metallb.io/node-name: mysno-sno.demo.lab name: speaker-mysno-sno.demo.lab namespace: metallb-system resourceVersion: "31161" uid: 339781bf-ec9a-4ba9-aaba-0a9ac8ebce78 status: conditions: - lastTransitionTime: "2026-04-21T10:09:34Z" message: 'configuration error: peer peer1 referencing non existing bfd profile my-bfd-profile' reason: ConfigurationError status: "False" type: configReconcilerValid errorSummary: 'configuration error: peer peer1 referencing non existing bfd profile my-bfd-profile' result: InvalidConfirm that the output has the following values to identify the problem:
-
result: Invalidindicates that one or more configured resources are incompatible. TheerrorSummaryfield provides an aggregated description of the problem. -
reason: ConfigurationErrorwithstatus: "False"indicates that the reconciler failed to process the configuration. Themessagefield describes the specific error. In this example, the
BGPPeerresourcepeer1references aBFDProfilenamedmy-bfd-profilethat does not exist. To resolve this error, either create the missingBFDProfileresource or update theBGPPeerto reference an existingBFDProfile.NoteThe
ConfigurationStateresource does not report errors that arise when the configuration applied by the speaker to thefrr-k8sdaemon conflicts with other external configurations within that daemon.
-
After correcting the configuration, verify that the status shows a valid configuration by running the following command:
$ oc get configurationstates -n metallb-system -o jsonpath='{range .items[*]}{.metadata.name}{"\t"}{.status.result}{"\n"}{end}'A return value of
Validfor all entries confirms that the MetalLB controller and speakers are operating with a valid configuration.
5.9.6. Additional resources
5.10. MetalLB logging, troubleshooting, and support
To diagnose and resolve MetalLB configuration issues, refer to this list of commonly used commands. By using these commands, you can verify network connectivity and inspect service states to ensure efficient error recovery.
5.10.1. Setting the MetalLB logging levels
To manage log verbosity for the FRRouting (FRR) container, configure the logLevel specification. By adjusting this setting, you can reduce log volume from the default info level or increase detail for troubleshooting MetalLB configuration issues.
Gain a deeper insight into MetalLB by setting the logLevel to debug.
Prerequisites
-
You have access to the cluster as a user with the
cluster-adminrole. -
You have installed the OpenShift CLI (
oc).
Procedure
Create a file, such as
setdebugloglevel.yaml, with content such as the following example:apiVersion: metallb.io/v1beta1 kind: MetalLB metadata: name: metallb namespace: metallb-system spec: logLevel: debug nodeSelector: node-role.kubernetes.io/worker: ""NoteWhile other fields like
speakerConfigcan be configured here, thebgpBackendfield must be omitted. It is reserved for internal use by MetalLB to manage the active BGP implementation.Apply the configuration by entering the following command:
$ oc replace -f setdebugloglevel.yaml
NoteUse the
oc replacecommand because themetallbCR was already created and you need to change only the log level.Display the names of the
speakerpods:$ oc get -n metallb-system pods -l component=speaker
Example output
NAME READY STATUS RESTARTS AGE speaker-2m9pm 4/4 Running 0 9m19s speaker-7m4qw 3/4 Running 0 19s speaker-szlmx 4/4 Running 0 9m19s
NoteSpeaker and controller pods are recreated to ensure the updated logging level is applied. The logging level is modified for all the components of MetalLB.
View the
speakerlogs:$ oc logs -n metallb-system speaker-7m4qw -c speaker
Example output
{"branch":"main","caller":"main.go:92","commit":"3d052535","goversion":"gc / go1.17.1 / amd64","level":"info","msg":"MetalLB speaker starting (commit 3d052535, branch main)","ts":"2022-05-17T09:55:05Z","version":""} {"caller":"announcer.go:110","event":"createARPResponder","interface":"ens4","level":"info","msg":"created ARP responder for interface","ts":"2022-05-17T09:55:05Z"} {"caller":"announcer.go:119","event":"createNDPResponder","interface":"ens4","level":"info","msg":"created NDP responder for interface","ts":"2022-05-17T09:55:05Z"} {"caller":"announcer.go:110","event":"createARPResponder","interface":"tun0","level":"info","msg":"created ARP responder for interface","ts":"2022-05-17T09:55:05Z"} {"caller":"announcer.go:119","event":"createNDPResponder","interface":"tun0","level":"info","msg":"created NDP responder for interface","ts":"2022-05-17T09:55:05Z"} I0517 09:55:06.515686 95 request.go:665] Waited for 1.026500832s due to client-side throttling, not priority and fairness, request: GET:https://172.30.0.1:443/apis/operators.coreos.com/v1alpha1?timeout=32s {"Starting Manager":"(MISSING)","caller":"k8s.go:389","level":"info","ts":"2022-05-17T09:55:08Z"} {"caller":"speakerlist.go:310","level":"info","msg":"node event - forcing sync","node addr":"10.0.128.4","node event":"NodeJoin","node name":"ci-ln-qb8t3mb-72292-7s7rh-worker-a-vvznj","ts":"2022-05-17T09:55:08Z"} {"caller":"service_controller.go:113","controller":"ServiceReconciler","enqueueing":"openshift-kube-controller-manager-operator/metrics","epslice":"{\"metadata\":{\"name\":\"metrics-xtsxr\",\"generateName\":\"metrics-\",\"namespace\":\"openshift-kube-controller-manager-operator\",\"uid\":\"ac6766d7-8504-492c-9d1e-4ae8897990ad\",\"resourceVersion\":\"9041\",\"generation\":4,\"creationTimestamp\":\"2022-05-17T07:16:53Z\",\"labels\":{\"app\":\"kube-controller-manager-operator\",\"endpointslice.kubernetes.io/managed-by\":\"endpointslice-controller.k8s.io\",\"kubernetes.io/service-name\":\"metrics\"},\"annotations\":{\"endpoints.kubernetes.io/last-change-trigger-time\":\"2022-05-17T07:21:34Z\"},\"ownerReferences\":[{\"apiVersion\":\"v1\",\"kind\":\"Service\",\"name\":\"metrics\",\"uid\":\"0518eed3-6152-42be-b566-0bd00a60faf8\",\"controller\":true,\"blockOwnerDeletion\":true}],\"managedFields\":[{\"manager\":\"kube-controller-manager\",\"operation\":\"Update\",\"apiVersion\":\"discovery.k8s.io/v1\",\"time\":\"2022-05-17T07:20:02Z\",\"fieldsType\":\"FieldsV1\",\"fieldsV1\":{\"f:addressType\":{},\"f:endpoints\":{},\"f:metadata\":{\"f:annotations\":{\".\":{},\"f:endpoints.kubernetes.io/last-change-trigger-time\":{}},\"f:generateName\":{},\"f:labels\":{\".\":{},\"f:app\":{},\"f:endpointslice.kubernetes.io/managed-by\":{},\"f:kubernetes.io/service-name\":{}},\"f:ownerReferences\":{\".\":{},\"k:{\\\"uid\\\":\\\"0518eed3-6152-42be-b566-0bd00a60faf8\\\"}\":{}}},\"f:ports\":{}}}]},\"addressType\":\"IPv4\",\"endpoints\":[{\"addresses\":[\"10.129.0.7\"],\"conditions\":{\"ready\":true,\"serving\":true,\"terminating\":false},\"targetRef\":{\"kind\":\"Pod\",\"namespace\":\"openshift-kube-controller-manager-operator\",\"name\":\"kube-controller-manager-operator-6b98b89ddd-8d4nf\",\"uid\":\"dd5139b8-e41c-4946-a31b-1a629314e844\",\"resourceVersion\":\"9038\"},\"nodeName\":\"ci-ln-qb8t3mb-72292-7s7rh-master-0\",\"zone\":\"us-central1-a\"}],\"ports\":[{\"name\":\"https\",\"protocol\":\"TCP\",\"port\":8443}]}","level":"debug","ts":"2022-05-17T09:55:08Z"}List the FRR-K8s pods:
$ oc get -n openshift-frr-k8s pods
Example output
NAME READY STATUS RESTARTS AGE frr-k8s-bz2dn 7/7 Running 0 4h frr-k8s-statuscleaner-59cf6f5d44-9wkfr 1/1 Running 0 4h
View the FRR logs by specifying the
frrcontainer in one of thefrr-k8spods:$ oc logs -n openshift-frr-k8s <frr_k8s_pod_name> -c frr
Example output
2026/03/02 09:53:09 WATCHFRR: [T83RR-8SM5G] watchfrr 8.5.3 starting: vty@0 2026/03/02 09:53:09 WATCHFRR: [ZCJ3S-SPH5S] zebra state -> down : initial connection attempt failed 2026/03/02 09:53:09 WATCHFRR: [ZCJ3S-SPH5S] bgpd state -> down : initial connection attempt failed 2026/03/02 09:53:09 WATCHFRR: [ZCJ3S-SPH5S] staticd state -> down : initial connection attempt failed 2026/03/02 09:53:09 WATCHFRR: [ZCJ3S-SPH5S] bfdd state -> down : initial connection attempt failed 2026/03/02 09:53:09 ZEBRA: [NNACN-54BDA][EC 4043309110] Disabling MPLS support (no kernel support) 2026/03/02 09:53:09 WATCHFRR: [VTVCM-Y2NW3] Configuration Read in Took: 00:00:00 2026/03/02 09:53:09 WATCHFRR: [QDG3Y-BY5TN] zebra state -> up : connect succeeded 2026/03/02 09:53:09 WATCHFRR: [QDG3Y-BY5TN] bgpd state -> up : connect succeeded 2026/03/02 09:53:09 WATCHFRR: [QDG3Y-BY5TN] staticd state -> up : connect succeeded 2026/03/02 09:53:09 WATCHFRR: [QDG3Y-BY5TN] bfdd state -> up : connect succeeded 2026/03/02 09:53:09 WATCHFRR: [KWE5Q-QNGFC] all daemons up, doing startup-complete notify 2026/03/02 09:53:09 ZEBRA: [VTVCM-Y2NW3] Configuration Read in Took: 00:00:00 2026/03/02 09:53:09 BGP: [VTVCM-Y2NW3] Configuration Read in Took: 00:00:00
5.10.1.1. FRRouting (FRR) log levels
To control the verbosity of network logs for troubleshooting or monitoring, refer to the FRRouting (FRR) logging levels.
The following values define the severity of recorded events, so that you can use them to filter output based on operational requirements:
Table 5.11. Log levels
| Log level | Description |
|---|---|
|
| Supplies all logging information for all logging levels. |
|
|
Information that is diagnostically helpful to people. Set to |
|
| Provides information that always should be logged but under normal circumstances does not require user intervention. This is the default logging level. |
|
|
Anything that can potentially cause inconsistent |
|
|
Any unrecoverable error in |
|
| Turn off all logging. |
5.10.2. Troubleshooting BGP issues
To diagnose and resolve BGP configuration issues, run commands directly within the FRR container. By accessing the container, you can verify routing states and identify connectivity errors.
Prerequisites
-
You have access to the cluster as a user with the
cluster-adminrole. -
You have installed the OpenShift CLI (
oc).
Procedure
In OpenShift Container Platform 4.17 and later, MetalLB uses the FRR-K8s daemon for BGP. The Cluster Network Operator (CNO) deploys the FRR-K8s daemon set in the
openshift-frr-k8snamespace, and the speaker pod no longer contains an FRR container. If the FRR-K8s daemon set is unavailable or its pods are unhealthy, troubleshoot the CNO deployment rather than the MetalLB Operator. Display the names of thefrr-k8spods by running the following command:$ oc get pods -n openshift-frr-k8s
Example output
NAME READY STATUS RESTARTS AGE frr-k8s-bz2dn 7/7 Running 0 15m frr-k8s-statuscleaner-59cf6f5d44-9wkfr 1/1 Running 0 15m
Display the running configuration for FRR by running the following command:
$ oc exec -n openshift-frr-k8s <frr-k8s-pod> -c frr -- vtysh -c "show running-config"
Example output
Building configuration... Current configuration: ! frr version 8.5.3 frr defaults traditional hostname mysno-sno.demo.lab log file /etc/frr/frr.log informational log timestamp precision 3 no ip forwarding no ipv6 forwarding service integrated-vtysh-config ! router bgp 64501 no bgp ebgp-requires-policy no bgp default ipv4-unicast bgp graceful-restart preserve-fw-state no bgp network import-check neighbor 192.168.122.12 remote-as 64500 ! address-family ipv4 unicast network 192.168.122.210/32 neighbor 192.168.122.12 activate neighbor 192.168.122.12 route-map 192.168.122.12-in in neighbor 192.168.122.12 route-map 192.168.122.12-out out exit-address-family exit ! ip prefix-list 192.168.122.12-inpl-ipv4 seq 1 deny any ip prefix-list 192.168.122.12-allowed-ipv4 seq 1 permit 192.168.122.210/32 ! ipv6 prefix-list 192.168.122.12-allowed-ipv6 seq 1 deny any ipv6 prefix-list 192.168.122.12-inpl-ipv4 seq 2 deny any ! route-map 192.168.122.12-out permit 1 match ip address prefix-list 192.168.122.12-allowed-ipv4 exit ! route-map 192.168.122.12-out permit 2 match ipv6 address prefix-list 192.168.122.12-allowed-ipv6 exit ! route-map 192.168.122.12-in permit 3 match ip address prefix-list 192.168.122.12-inpl-ipv4 exit ! route-map 192.168.122.12-in permit 4 match ipv6 address prefix-list 192.168.122.12-inpl-ipv4 exit ! ip nht resolve-via-default ! ipv6 nht resolve-via-default ! end
where:
router bgp 64501- This is the local Autonomous System Number (ASN) for your MetalLB speakers.
neighbor 192.168.122.12 remote-as 64500-
This identifies the external BGP Peer. Specifies that a
neighbor <ip-address> remote-as <peer-ASN>line exists for each BGP peer custom resource that you added. The local ASN is 64501. The remote ASN is 64500. network 192.168.122.210/32-
This is a specific LoadBalancer IP from your IPAddressPool. It is being advertised as a
/32(a single host route), which is standard for MetalLB. neighbor 192.168.122.12 activate- Enables the exchange of IPv4 routing information with that specific neighbor.
route-map … in/out- These are "filters" or "policies." They ensure that the speaker only sends the IP addresses you have authorized and does not accidentally learn and install internal routes from your physical router.
ip prefix-list … permit 192.168.122.210/32- This creates an allowlist. Only this specific IP is permitted to be advertised.
route-map 192.168.122.12-out permit 1- This tells the router: "If the IP matches the prefix-list above, permit it to be sent out to the neighbor."
ip nht resolve-via-default(Next hop tracking) This is a common setting in MetalLB/FRR to ensure that the BGP next-hop can be resolved using the default route if a more specific route isn’t available.
If BFD is enabled for the BGP peer, the output includes additional
bfdlines under the neighbor configuration and abfdsection at the end. The following example shows the relevant differences:Example output with BFD enabled
router bgp 64501 ... neighbor 192.168.122.12 remote-as 64500 neighbor 192.168.122.12 bfd neighbor 192.168.122.12 bfd profile bfd-profile ... exit ! ... ! bfd profile bfd-profile minimum-ttl 1 exit ! exit ! end
Display the BGP summary by running the following command:
$ oc exec -n openshift-frr-k8s <frr-k8s-pod> -c frr -- vtysh -c "show bgp summary"
Example output
IPv4 Unicast Summary (VRF default): BGP router identifier 192.168.122.12, local AS number 64501 vrf-id 0 BGP table version 1 RIB entries 1, using 192 bytes of memory Peers 1, using 725 KiB of memory Neighbor V AS MsgRcvd MsgSent TblVer InQ OutQ Up/Down State/PfxRcd PfxSnt Desc 192.168.122.12 4 64500 37 38 0 0 0 00:32:12 0 1 N/A Total number of neighbors 1
where:
BGP router identifier 192.168.122.12- The BGP router identifier for the node, which is typically the IP address of the primary network interface.
local AS number 64501-
This is the ASN you assigned to MetalLB in your
BGPPeerorMetalLBCR. Neighbor-
The IP
192.168.122.12of your external router (the "Peer"). AS-
The ASN of the external router (the "Peer"), which should match the
remote-asvalue in your BGP configuration. Up/Down- The shows the session has been stable for 32 minutes.
State/PfxRcd- This shows the session is established since it is a number, but you have received 0 routes from the peer. Seeing 0 prefixes received is perfectly normal for a standard MetalLB deployment.
PfxSntThis shows that you have successfully advertised one route the LoadBalancer IP to the peer. This confirms MetalLB is doing its job. It has taken one LoadBalancer service IP and successfully told the external router: "If you want to reach this IP, send the traffic to me."
In the output, the
Stateis a number0, which means the connection is successful. If the connection were broken, you would see text such asActive,Connect, orIdlehere.
Display the BGP peers that received an address pool by running the following command:
$ oc exec -n openshift-frr-k8s <frr-k8s-pod> -c frr -- vtysh -c "show bgp ipv4 unicast"
Replace
ipv4withipv6to display the BGP peers that received an IPv6 address pool.Example output
BGP table version is 1, local router ID is 192.168.122.12, vrf id 0 Default local pref 100, local AS 64501 Status codes: s suppressed, d damped, h history, * valid, > best, = multipath, i internal, r RIB-failure, S Stale, R Removed Nexthop codes: @NNN nexthop's vrf id, < announce-nh-self Origin codes: i - IGP, e - EGP, ? - incomplete RPKI validation codes: V valid, I invalid, N Not found Network Next Hop Metric LocPrf Weight Path *> 192.168.122.210/32 0.0.0.0 0 32768 i Displayed 1 routes and 1 total pathswhere:
local router ID 192.168.122.12- The unique identifier for this specific OpenShift node in the BGP topology.
local AS 64501- The Private Autonomous System Number (ASN) assigned to your MetalLB deployment.
*>(Status Codes)-
*indicates the route is valid.>indicates the route is selected as the best path for advertisement. MetalLB only sends best paths to peers. If>is missing, the peer will not receive the route. 192.168.122.210/32(Network)-
The specific IP assigned to the LoadBalancer service. The
/32mask indicates a host route, ensuring traffic for this specific IP is attracted to this node. 0.0.0.0(Next Hop)-
Indicates the route is local to the node.
0.0.0.0means the current node is the egress point for this service. 0(Metric)-
The Multi-Exit Discriminator (MED). Used to suggest a preferred path to external neighbors. Default is
0. 100(LocPrf)-
Local Preference. Used to prefer an exit point for the entire AS. Default is
100. 32768(Weight)-
An internal FRR priority value. Locally injected routes default to
32768, ensuring the node prefers its own local service path over learned routes. i(Path)The Origin code.
i(IGP) signifies the route was originated internally through the MetalLB speaker injecting theIPAddressPoolinto the FRR stack.If the table is empty, check if the Service has an IP assigned using the
oc get svccommand. Verify that aBGPAdvertisementexists and that itsnodeSelectororlabelSelectormatches the service and the node you are running the command on. If the Next Hop is not0.0.0.0, the node might be trying to forward the traffic elsewhere before it even reaches the pods, which can indicate a complex BGP peering issue or an issue with the node underlying routing table.
Verification
To confirm that BGP is functioning correctly, verify that all of the following conditions are met:
-
The
show running-configoutput contains arouter bgpsection with the correct local ASN and at least oneneighborentry with the expected peer IP and remote ASN. -
The
show bgp summaryoutput shows the BGP session asEstablished. TheState/PfxRcdcolumn displays a number, such as0, rather than a state name such asActive,Connect, orIdle. -
The
PfxSntcolumn in the BGP summary shows at least1, which confirms that MetalLB is advertising a LoadBalancer IP to the peer. -
The
show bgp ipv4 unicastoutput contains at least one route with the*>status code, which indicates that the route is valid and selected as the best path for advertisement. -
If BFD is configured, the
show running-configoutput includesneighbor <ip_address> bfdlines and abfdprofile section.
5.10.3. Troubleshooting BFD issues
To diagnose and resolve Bidirectional Forwarding Detection (BFD) issues, run commands directly within the FRRouting (FRR) container. By accessing the container, you can verify that BFD peers are correctly configured with established BGP sessions.
The BFD implementation that Red Hat supports uses FRRouting (FRR) in a container that exists in an frr-k8s pod in the openshift-frr-k8s namespace.
Prerequisites
-
You have access to the cluster as a user with the
cluster-adminrole. -
You have installed the OpenShift CLI (
oc).
Procedure
Display the names of the FRR-K8s pods by running the following command:
$ oc get pods -n openshift-frr-k8s -l app=frr-k8s
Example output
NAME READY STATUS RESTARTS AGE frr-k8s-bz2dn 7/7 Running 0 106m
Run the following command against the
frrcontainer in the FRR-K8s pod to display the BFD peers:$ oc exec -n openshift-frr-k8s <frr_k8s_pod_name> -c frr -- vtysh -c "show bfd peers brief"
Example output
Session count: 1 SessionId LocalAddress PeerAddress Status ========= ============ =========== ====== 3909139637 10.0.1.2 10.0.2.3 up
where:
up-
Specifies that the
PeerAddresscolumn includes each BFD peer. If the output does not list a BFD peer IP address that you expected the output to include, troubleshoot BGP connectivity with the peer. If the status field indicatesdown, check for connectivity on the links and equipment between the node and the peer. You can determine the node name for the FRR-K8s pod with a command such asoc get pods -n openshift-frr-k8s <frr_k8s_pod_name> -o jsonpath='{.spec.nodeName}'.
Optional: To display detailed BFD peer information, run the following command:
$ oc exec -n openshift-frr-k8s <frr_k8s_pod_name> -c frr -- vtysh -c "show bfd peers"
Example output
BFD Peers: peer 10.0.2.3 local-address 10.0.1.2 vrf default interface br-ex ID: 3909139637 Remote ID: 2819913327 Active mode Status: up Uptime: 1 hour(s), 12 minute(s), 30 second(s) Diagnostics: ok Remote diagnostics: ok Peer Type: dynamic RTT min/avg/max: 301/512/4191 usec Local timers: Detect-multiplier: 3 Receive interval: 300ms Transmission interval: 300ms Echo receive interval: 50ms Echo transmission interval: disabled Remote timers: Detect-multiplier: 3 Receive interval: 300ms Transmission interval: 300ms Echo receive interval: disabled
where:
Status-
The current state of the BFD session. A value of
upindicates that the session is established and the link is healthy. A value ofdownindicates that the session has failed. UptimeorDowntime- The duration that the session has been in its current state.
Remote ID-
The session ID assigned by the remote peer. A value of
0indicates that the remote peer has not responded. DiagnosticsandRemote diagnostics-
The diagnostic codes for the local and remote peers. A value of
okindicates no errors. Detect-multiplier-
The number of missed packets before the session is declared down. With a receive interval of
300msand a detect-multiplier of3, the session is declared down after900msof missed packets.
Verification
To confirm that BFD is functioning correctly, verify that all of the following conditions are met:
-
The
show bfd peers briefoutput lists each expected BFD peer with aStatusofup. -
The
show bfd peersdetailed output shows a nonzeroRemote ID, which confirms that the remote peer has responded. -
The
DiagnosticsandRemote diagnosticsfields both displayok. -
If a session shows
down, check theDowntimeduration andRemote diagnosticsfield for error codes, and verify network connectivity between the node and the peer.
5.10.4. MetalLB metrics for BGP and BFD
To monitor network connectivity and diagnose routing states, refer to the Prometheus metrics for MetalLB. These metrics provide visibility into the status of BGP peers and BFD profiles so that you can ensure stable external communication.
Table 5.12. MetalLB BFD metrics
| Name | Description |
|---|---|
|
| Counts the number of BFD control packets received from each BFD peer. |
|
| Counts the number of BFD control packets sent to each BFD peer. |
|
| Counts the number of BFD echo packets received from each BFD peer. |
|
| Counts the number of BFD echo packets sent to each BFD. |
|
|
Counts the number of times the BFD session with a peer entered the |
|
|
Indicates the connection state with a BFD peer. |
|
|
Counts the number of times the BFD session with a peer entered the |
|
| Counts the number of BFD Zebra notifications for each BFD peer. |
Table 5.13. MetalLB BGP metrics
| Name | Description |
|---|---|
|
| Counts the number of load balancer IP address prefixes that are advertised to BGP peers. The terms prefix and aggregated route have the same meaning. |
|
|
Indicates the connection state with a BGP peer. |
|
| Counts the number of BGP update messages sent to each BGP peer. |
|
| Counts the number of BGP open messages sent to each BGP peer. |
|
| Counts the number of BGP open messages received from each BGP peer. |
|
| Counts the number of BGP notification messages sent to each BGP peer. |
|
| Counts the number of BGP update messages received from each BGP peer. |
|
|
Counts the number of BGP |
|
|
Counts the number of BGP |
|
| Counts the number of BGP route refresh messages sent to each BGP peer. |
|
| Counts the number of total BGP messages sent to each BGP peer. |
|
| Counts the number of total BGP messages received from each BGP peer. |
|
| Counts the number of load balancer IP address prefixes received from each BGP peer. |
5.10.5. About collecting MetalLB data
To collect diagnostic data for debugging or support analysis, run the oc adm must-gather CLI command. This utility captures essential information regarding the cluster, the MetalLB configuration, and the MetalLB Operator state.
The following list details features and objects related to MetalLB and the MetalLB Operator:
- The namespace and child objects where you deploy the MetalLB Operator
- All MetalLB Operator custom resource definitions (CRDs)
The command collects the following information from FRRouting (FRR), which Red Hat uses to implement BGP and BFD:
-
/etc/frr/frr.conf -
/etc/frr/frr.log -
/etc/frr/daemonsconfiguration file -
/etc/frr/vtysh.conf
The command collects log and configuration files from the frr container that exists in each frr-k8s pod in the openshift-frr-k8s namespace. Additionally, the command collects the output from the following vtysh commands:
-
show running-config -
show bgp ipv4 -
show bgp ipv6 -
show bgp neighbor -
show bfd peer
No additional configuration is required when you run the command.