Create Quarkus applications
Abstract
Chapter 1. Create a Getting started project
The getting-started project is a simple Quarkus application that you can build to explore the framework and validate your development environment.
To create a getting-started project, use one of the following methods:
- Follow the tutorial in the "Build your first application" guide, which uses Apache Maven and the Quarkus Maven plugin.
- Generate a Quarkus Maven project from code.quarkus.redhat.com.
- Use the Quarkus command-line interface (CLI).
The Content from quarkus.io is not included.Quarkus CLI is intended for development purposes, including tasks such as creating, updating, and building Quarkus projects. However, Red Hat does not support using the Quarkus CLI in production environments.
Additional resources
Chapter 2. Create the Getting started project by using code.quarkus.redhat.com
You can use the This content is not included.code.quarkus.redhat.com application to generate a Quarkus Maven project and automatically add and configure the extensions that you want to use in your application. In addition, This content is not included.code.quarkus.redhat.com automatically manages the configuration parameters that are required to compile your project into a native executable.
You can generate a Quarkus Maven project, including the following activities:
- Specifying basic details about your application
- Choosing the extensions that you want to include in your project
- Generating a downloadable archive with your project files
- Using custom commands for compiling and starting your application
Prerequisites
- You have a web browser.
A Java 17, 21, or 25 compatible JVM installed. For example: Red Hat build of OpenJDK or an Adoptium-provided JDK, such as Eclipse Temurin.
Download your preferred JVM:
- Download Red Hat build of OpenJDK from the Red Hat Customer Portal This content is not included.Software Downloads page.
- Download an Eclipse Temurin distribution from the Content from adoptium.net is not included.Adoptium home page.
-
Set the
JAVA_HOMEenvironment variable to the Java SDK installation location.
- Apache Maven 3.9.12 installed. For information about installing Apache Maven, see the Content from maven.apache.org is not included.Apache Maven Project website.
-
The Red Hat-hosted Quarkus repository configured in the
$HOME/.m2/settings.xmlfile.
Procedure
- On your web browser, go to This content is not included.https://code.quarkus.redhat.com.
From the list of available versions, the code.quarkus.redhat.com application selects the latest release of Red Hat build of Quarkus by default.
Notecode.quarkus.redhat.com uses the latest release of Red Hat build of Quarkus, which is the preferred option. However, after generating your project, you can manually change to an earlier BOM version in the
pom.xmlfile if necessary, but the best practice is to keep the default.Specify basic details about your project:
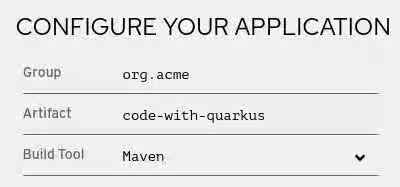
-
Enter a group name for your project. The name format follows the Java package naming convention; for example,
org.acme. -
Enter a name for the Maven artifacts generated by your project, such as
code-with-quarkus. Select the build tool you want to use to compile and start your application. The build tool that you choose determines the following setups:
- The directory structure of your generated project
- The format of configuration files that are used in your generated project
The custom build script and command for compiling and starting your application that code.quarkus.redhat.com displays for you after you generate your project
NoteRed Hat provides support for using code.quarkus.redhat.com to create Quarkus Maven projects only.
-
Enter a group name for your project. The name format follows the Java package naming convention; for example,
Specify additional details about your application project:
To display the fields that contain further application details, select More options.

-
Enter a version you want to use for artifacts generated by your project. The default value of this field is
1.0.0-SNAPSHOT. Using Content from semver.org is not included.semantic versioning is preferred; however, you can choose to specify a different versioning type. - Select whether you want code.quarkus.redhat.com to add starter code to your project. When you add extensions that are marked with "STARTER-CODE" to your project, you can enable this option to automatically create example class and resource files for those extensions when you generate your project. However, this option does not affect your generated project if you do not add any extensions that provide example code.
Select the extensions that you want to use. The Quarkus application includes the extensions you select as dependencies. The Quarkus platform also ensures these extensions are compatible with future versions.
ImportantDo not use the
quarkus-restand thequarkus-resteasyextensions in the same project. Both provide similar capabilities, but they differ significantly in implementation and behavior. Usequarkus-restinstead.The quark icon (
 ) next to an extension indicates that the extension is part of the Red Hat build of Quarkus platform release. Red Hat prefers using extensions from the same platform because they are tested and verified together, making them easier to use and upgrade.
For extensions marked with "STARTER-CODE", you can enable the option to generate starter code automatically.

To confirm your choices, select Generate your application. After generation, a dialog box displays the following items:
- A link to download the archive that contains your generated project
- A command that you can use to compile and start your application
- To save the archive with the generated project files to your machine, select Download the ZIP.
- Extract the contents of the archive.
Verification
-
Check the extracted structure and verify the
pom.xmlfile is present in the root directory of your generated project. Start the application in dev mode. Use either Apache Maven or the Maven wrapper:
mvn quarkus:dev
or
./mvnw quarkus:dev
The following extract shows an example of the expected output:
INFO  [io.quarkus] (Quarkus Main Thread) Profile dev activated. Live Coding activated.
INFO  [io.quarkus] (Quarkus Main Thread) Installed features: [cdi, rest, smallrye-context-propagation, vertx]
Chapter 3. Create the Getting started project by using the quarkus CLI
You can create your getting-started project by using the Quarkus command-line interface (CLI).
With the Quarkus CLI, you can create projects, manage extensions, and run build and development commands.
The Content from quarkus.io is not included.Quarkus CLI is intended for development purposes, including tasks such as creating, updating, and building Quarkus projects. However, Red Hat does not support using the Quarkus CLI in production environments.
Prerequisites
- You have the Quarkus CLI installed. For installation instructions, see Content from quarkus.io is not included.CLI tooling.
- You have configured your Quarkus developer tools to access extensions in the extension registry. For more information, see Configuring Red Hat build of Quarkus extension registry client.
Procedure
To generate the project, in a command terminal, enter the following command:
quarkus create && cd code-with-quarkus
NoteYou can also specify the 'app' subcommand, for example,
quarkus create app. However, it is not mandatory to do so because the 'app' subcommand is implied if it is not specified.With this command, you create the Quarkus project in a folder called
code-with-quarkusin your current working directory.By default, the
groupId,artifactId, andversionattributes are specified with the following default values:- groupId='org.acme'
- artifactId='code-with-quarkus'
version='1.0.0-SNAPSHOT'
To change the values of the
groupId,artifactId, andversionattributes, issue thequarkus createcommand and specify the following syntax on the CLI:groupId:artifactId:versionFor example,
quarkus create app mygroupId:myartifactid:version
NoteTo view information about all the available Quarkus commands, specify the
helpparameter:quarkus --help
Review the
src/main/java/org/acme/GreetingResource.javafile in a text editor:package org.acme; import jakarta.ws.rs.GET; import jakarta.ws.rs.Path; import jakarta.ws.rs.Produces; import jakarta.ws.rs.core.MediaType; @Path("/hello") public class GreetingResource { @GET @Produces(MediaType.TEXT_PLAIN) public String hello() { return "Hello from Quarkus REST"; } }This file contains a simple REST endpoint that returns
Hello from Quarkus RESTas a response to a request that you send to the/helloendpoint.
Verification
Run the application in a command terminal.
quarkus dev
In a new terminal, call the endpoint:
curl -w "\n" http://localhost:8080/hello
The response is:
Hello from Quarkus REST
-
Make a live code change to confirm the dev-mode feedback loop. For example, change the returned string to something else (for example,
"Hello, world!") and save the file. Then re-run thecurlcommand.
Chapter 4. Reconfigure your Maven project from community Quarkus to Red Hat build of Quarkus
You can migrate a Quarkus community project to Red Hat build of Quarkus by changing the Maven configuration in your project POM file.
Prerequisites
-
You have a Quarkus project built with Maven that depends on Content from quarkus.io is not included.Quarkus community artifacts in the
pom.xmlfile.
Procedure
Change the following values in the
<properties>section of thepom.xmlfile of your project:-
Change the value of the
<quarkus.platform.group-id>property tocom.redhat.quarkus.platform. Change the value of the
<quarkus.platform.version>property to3.33.1.redhat-00006.pom.xml
<project>
  ...
  <properties>
     ...
     <quarkus.platform.group-id>com.redhat.quarkus.platform</quarkus.platform.group-id>
     <quarkus.platform.artifact-id>quarkus-bom</quarkus.platform.artifact-id>
     <quarkus.platform.version>3.33.1.redhat-00006</quarkus.platform.version>
     ...
  </properties>
  ...
</project>
-
Change the value of the
Chapter 5. Support levels for Red Hat build of Quarkus extensions
Red Hat provides different levels of support for extensions that are available on code.quarkus.redhat.com that you can add to your Quarkus project. Labels next to the name of each extension indicate the support level.
Red Hat does not support unlabeled extensions for use in production environments.

Red Hat provides the following levels of support for Red Hat build of Quarkus extensions:
Table 5.1. Support levels provided by Red Hat for Red Hat build of Quarkus extensions
| Support level | Description |
|---|---|
| SUPPORTED | Red Hat fully supports extensions for use in enterprise applications in production environments. |
| TECH-PREVIEW | Red Hat offers limited support to extensions in production environments under the Technology Preview scope of support scope of support. |
| DEPRECATED | Red Hat plans to replace extensions with more recent technology or implementation that provides the same functionality. |
| DEV-SUPPORT | Red Hat does not support extensions for use in production environments, but Red Hat developers support the core functionality that they provide for use in developing new applications. |
| SUPPORTED-IN-JVM | Red Hat supports extensions that are tested and verified for use in Java Virtual Machine (JVM) environments. |
| DEV-PREVIEW | Red Hat does not support extensions for use in production environments. They are provided only as a Developer Preview as defined by the This content is not included.Developer preview - scope of support. |
| EXPERIMENTAL | Red Hat does not support extensions for use in production environments. Early feedback is requested to further mature the extension proposal. No guarantee of stability or long term inclusion on the platform. |
| PREVIEW | Red Hat does not support extensions for use in production environments. Extensions are available in the Quarkus community version only. |
By clicking the arrow icon (⌄) beside each of the extensions, you can expand the overflow menu to access further actions for that extension. For example:
- Add the extension to an existing project by using the Quarkus Maven plugin on the command line
-
Copy an XML snippet to add the extension to a project’s
pom.xmlfile -
Obtain the
groupId,artifactId, andversionof each extension - Open the extension guide