Administration guide
Configure and operate OpenShift Dev Spaces for your development teams
Abstract
Preface
Configure and manage Red Hat OpenShift Dev Spaces on OpenShift clusters.
Chapter 1. Customize the central configuration
Control OpenShift Dev Spaces behavior by editing the CheCluster Custom Resource (CR), the single configuration object that defines how your instance runs.
The CheCluster CR is the central configuration object for OpenShift Dev Spaces. You can set fields during installation with dsc flags or modify them at any time afterward with oc.
1.1. How the central configuration works
A default deployment of OpenShift Dev Spaces consists of a CheCluster Custom Resource parameterized by the Red Hat OpenShift Dev Spaces Operator. Understand its structure to customize OpenShift Dev Spaces components for your environment.
The CheCluster Custom Resource is a Kubernetes object. You can configure it by editing the CheCluster Custom Resource YAML file. This file contains sections to configure each component: devWorkspace, cheServer, pluginRegistry, devfileRegistry, dashboard and imagePuller.
The Red Hat OpenShift Dev Spaces Operator translates the CheCluster Custom Resource into a config map usable by each component of the OpenShift Dev Spaces installation.
The OpenShift platform applies the configuration to each component, and creates the necessary Pods. When OpenShift detects changes in the configuration of a component, it restarts the Pods accordingly.
When an administrator modifies the CheCluster Custom Resource, the configuration flows through the system as follows:
-
The administrator applies the
CheClusterCustom Resource YAML file with modifications in thecheServercomponent section. -
The Operator generates the
cheConfigMap. -
OpenShift detects changes in the
ConfigMapand triggers a restart of the OpenShift Dev Spaces Pod.
Additional resources
1.2. Edit the central configuration from the command line
Edit the CheCluster Custom Resource YAML file to customize the behavior of a running OpenShift Dev Spaces instance for your environment.
Prerequisites
- You have an instance of OpenShift Dev Spaces on OpenShift. :_mod-docs-content-type: SNIPPET
-
You have an active
ocsession with administrative permissions to the OpenShift cluster. See This page is not included, but the link has been rewritten to point to the nearest parent document.Getting started with the CLI.
Procedure
Edit the CheCluster Custom Resource on the cluster:
$ oc edit checluster/devspaces -n openshift-devspaces
- Save and close the file to apply the changes.
Verification
Verify the value of the configured property:
$ oc get configmap che -o jsonpath='{.data.<configured_property>}' \
-n openshift-devspaces
1.3. CheCluster Custom Resource fields reference
Customize the CheCluster Custom Resource by configuring its specification fields to control OpenShift Dev Spaces server, dashboard, gateway, and workspace components.
Example 1.1. A minimal CheCluster Custom Resource example.
apiVersion: org.eclipse.che/v2
kind: CheCluster
metadata:
  name: devspaces
  namespace: openshift-devspaces
spec:
  components: {}
  devEnvironments: {}
networking: {}Table 1.1. Development environment configuration options.
| Property | Description | Default |
|---|---|---|
| allowedSources | AllowedSources defines the allowed sources on which workspaces can be started. | |
| containerBuildConfiguration | Container build configuration. | |
| containerResourceCaps | ContainerResourceCaps defines the maximum resource requirements enforced for workspace containers. If a container specifies limits or requests that exceed these values, they will be capped at the maximum. Note: Caps only apply when resources are already specified on a container. For containers without resource specifications, use DefaultContainerResources instead. These resource caps do not apply to initContainers or the projectClone container. | |
| containerRunConfiguration | Container run configuration. | |
| defaultComponents | Default components applied to DevWorkspaces. These default components are meant to be used when a Devfile, that does not contain any components. | |
| defaultContainerResources | DefaultContainerResources defines the resource requirements (memory/cpu limit/request) used for container components that do not define limits or requests. | |
| defaultEditor |
The default editor to workspace create with. It could be a plugin ID or a URI. The plugin ID must have | |
| defaultNamespace | User’s default namespace. | { "autoProvision": true, "template": "<username>-che"} |
| defaultPlugins | Default plug-ins applied to DevWorkspaces. | |
| deploymentStrategy |
DeploymentStrategy defines the deployment strategy to use to replace existing workspace pods with new ones. The available deployment stragies are | |
| disableContainerBuildCapabilities |
Disables the container build capabilities. When set to | |
| disableContainerRunCapabilities |
Disables container run capabilities. Can be enabled on OpenShift version 4.20 or later. When set to | true |
| editorsDownloadUrls |
EditorsDownloadUrls provides a list of custom download URLs for JetBrains editors in a local-to-remote flow. It is particularly useful in disconnected or air-gapped environments, where editors cannot be downloaded from the public internet. Each entry contains an editor identifier in the | |
| gatewayContainer | GatewayContainer configuration. | |
| ignoredUnrecoverableEvents | IgnoredUnrecoverableEvents defines a list of Kubernetes event names that should be ignored when deciding to fail a workspace that is starting. This option should be used if a transient cluster issue is triggering false-positives (for example, if the cluster occasionally encounters FailedScheduling events). Events listed here will not trigger workspace failures. | [ "FailedScheduling"] |
| imagePullPolicy | ImagePullPolicy defines the imagePullPolicy used for containers in a DevWorkspace. | |
| maxNumberOfRunningWorkspacesPerCluster | The maximum number of concurrently running workspaces across the entire Kubernetes cluster. This applies to all users in the system. If the value is set to -1, it means there is no limit on the number of running workspaces. | |
| maxNumberOfRunningWorkspacesPerUser | The maximum number of running workspaces per user. The value, -1, allows users to run an unlimited number of workspaces. | |
| maxNumberOfWorkspacesPerUser | Total number of workspaces, both stopped and running, that a user can keep. The value, -1, allows users to keep an unlimited number of workspaces. | -1 |
| networking | Configuration settings related to the workspaces networking. | |
| nodeSelector | The node selector limits the nodes that can run the workspace pods. | |
| persistUserHome | PersistUserHome defines configuration options for persisting the user home directory in workspaces. | |
| podSchedulerName | Pod scheduler for the workspace pods. If not specified, the pod scheduler is set to the default scheduler on the cluster. | |
| projectCloneContainer | Project clone container configuration. | |
| runtimeClassName | RuntimeClassName specifies the spec.runtimeClassName for workspace pods. | |
| secondsOfInactivityBeforeIdling | Idle timeout for workspaces in seconds. This timeout is the duration after which a workspace will be idled if there is no activity. To disable workspace idling due to inactivity, set this value to -1. | 1800 |
| secondsOfRunBeforeIdling | Run timeout for workspaces in seconds. This timeout is the maximum duration a workspace runs. To disable workspace run timeout, set this value to -1. | -1 |
| security | Workspace security configuration. | |
| serviceAccount | ServiceAccount to use by the DevWorkspace operator when starting the workspaces. | |
| serviceAccountTokens | List of ServiceAccount tokens that will be mounted into workspace pods as projected volumes. | |
| startTimeoutSeconds | StartTimeoutSeconds determines the maximum duration (in seconds) that a workspace can take to start before it is automatically failed. If not specified, the default value of 300 seconds (5 minutes) is used. | 300 |
| storage | Workspaces persistent storage. | { "pvcStrategy": "per-user"} |
| tolerations | The pod tolerations of the workspace pods limit where the workspace pods can run. | |
| trustedCerts | Trusted certificate settings. | |
| user | User configuration. | |
| workspacesPodAnnotations | WorkspacesPodAnnotations defines additional annotations for workspace pods. |
Table 1.2. allowedSources options.
| Property | Description | Default |
|---|---|---|
| urls |
The list of approved URLs for starting Cloud Development Environments (CDEs). CDEs can only be initiated from these URLs. Wildcards |
Table 1.3. defaultNamespace options.
| Property | Description | Default |
|---|---|---|
| autoProvision | Indicates if is allowed to automatically create a user namespace. If it set to false, then user namespace must be pre-created by a cluster administrator. | true |
| template |
If you do not create the user namespaces in advance, this field defines the Kubernetes namespace created when you start your first workspace. You can use | "<username>-che" |
Table 1.4. defaultPlugins options.
| Property | Description | Default |
|---|---|---|
| editor |
The editor ID to specify default plug-ins for. The plugin ID must have | |
| plugins | Default plug-in URIs for the specified editor. |
Table 1.5. editorsDownloadUrls options.
| Property | Description | Default |
|---|---|---|
| editor |
The editor ID must have | |
| url | ul |
Table 1.6. gatewayContainer options.
| Property | Description | Default |
|---|---|---|
| env | List of environment variables to set in the container. | |
| image | Container image. Omit it or leave it empty to use the default container image provided by the Operator. | |
| imagePullPolicy |
Image pull policy. Default value is | |
| name | Container name. | |
| resources | Compute resources required by this container. |
Table 1.7. networking options.
| Property | Description | Default |
|---|---|---|
| externalTLSConfig | External TLS configuration. |
Table 1.8. externalTLSConfig options.
| Property | Description | Default |
|---|---|---|
| annotations | Annotations to be applied to ingress/route objects when external TLS is enabled. | |
| enabled | Enabled determines whether external TLS configuration is used. If set to true, the operator will not set TLS config for ingress/route objects. Instead, it ensures that any custom TLS configuration will not be reverted on synchronization. | |
| labels | Labels to be applied to ingress/route objects when external TLS is enabled. |
Table 1.9. persistUserHome options.
| Property | Description | Default |
|---|---|---|
| disableInitContainer |
Determines whether the init container that initializes the persistent home directory should be disabled. When the | |
| enabled | Determines whether the user home directory in workspaces should persist between workspace shutdown and startup. Must be used with the 'per-user' or 'per-workspace' PVC strategy to take effect. Disabled by default. |
Table 1.10. projectCloneContainer options.
| Property | Description | Default |
|---|---|---|
| env | List of environment variables to set in the container. | |
| image | Container image. Omit it or leave it empty to use the default container image provided by the Operator. | |
| imagePullPolicy |
Image pull policy. Default value is | |
| name | Container name. | |
| resources | Compute resources required by this container. |
Table 1.11. security options.
| Property | Description | Default |
|---|---|---|
| containerSecurityContext |
Defines the SecurityContext applied to all workspace-related containers. When set, the specified values are merged with the default SecurityContext configuration. This setting takes effect only if both | |
| podSecurityContext | PodSecurityContext used by all workspace-related pods. If set, defined values are merged into the default PodSecurityContext configuration. |
Table 1.12. storage options.
| Property | Description | Default |
|---|---|---|
| perUserStrategyPvcConfig |
PVC settings when using the | |
| perWorkspaceStrategyPvcConfig |
PVC settings when using the | |
| pvcStrategy |
Persistent volume claim strategy for the OpenShift Dev Spaces server. The supported strategies are: | "per-user" |
Table 1.13. per-user PVC strategy options.
| Property | Description | Default |
|---|---|---|
| claimSize | Persistent Volume Claim size. To update the claim size, the storage class that provisions it must support resizing. | |
| storageAccessMode | StorageAccessMode are the desired access modes the volume should have. It is used to specify PersistentVolume access mode type to RWO/RWX when using per-user strategy, allowing user to re-use volume across multiple workspaces. It defaults to ReadWriteOnce if not specified | |
| storageClass | Storage class for the Persistent Volume Claim. When omitted or left blank, a default storage class is used. |
Table 1.14. per-workspace PVC strategy options.
| Property | Description | Default |
|---|---|---|
| claimSize | Persistent Volume Claim size. To update the claim size, the storage class that provisions it must support resizing. | |
| storageAccessMode | StorageAccessMode are the desired access modes the volume should have. It is used to specify PersistentVolume access mode type to RWO/RWX when using per-user strategy, allowing user to re-use volume across multiple workspaces. It defaults to ReadWriteOnce if not specified | |
| storageClass | Storage class for the Persistent Volume Claim. When omitted or left blank, a default storage class is used. |
Table 1.15. trustedCerts options.
| Property | Description | Default |
|---|---|---|
| disableWorkspaceCaBundleMount | By default, the Operator creates and mounts the 'ca-certs-merged' ConfigMap containing the CA certificate bundle in users' workspaces at two locations: '/public-certs' and '/etc/pki/ca-trust/extracted/pem'. The '/etc/pki/ca-trust/extracted/pem' directory is where the system stores extracted CA certificates for trusted certificate authorities on Red Hat (e.g., CentOS, Fedora). This option disables mounting the CA bundle to the '/etc/pki/ca-trust/extracted/pem' directory while still mounting it to '/public-certs'. | |
| gitTrustedCertsConfigMapName |
The ConfigMap contains certificates to propagate to the OpenShift Dev Spaces components and to provide a particular configuration for Git. See the following page: Content from www.eclipse.org is not included.https://www.eclipse.org/che/docs/stable/administration-guide/deploying-che-with-support-for-git-repositories-with-self-signed-certificates/ The ConfigMap must have a |
Table 1.16. user options.
| Property | Description | Default |
|---|---|---|
| clusterRoles |
Additional ClusterRoles assigned to the user. The role must have |
Table 1.17. containerBuildConfiguration options.
| Property | Description | Default |
|---|---|---|
| openShiftSecurityContextConstraint | OpenShift security context constraint to build containers. | "container-build" |
Table 1.18. containerRunConfiguration options.
| Property | Description | Default |
|---|---|---|
| containerSecurityContext |
SecurityContext applied to all workspace containers when run capabilities are enabled. The default | { "allowPrivilegeEscalation": true, "capabilities": { "add": [ "SETGID", "SETUID" ] }, "procMount": "Unmasked"} |
| openShiftSecurityContextConstraint | Specifies the OpenShift SecurityContextConstraint used to run containers. | "container-run" |
| workspacesPodAnnotations |
Extra annotations applied to all workspace pods, in addition to those defined in | { "io.kubernetes.cri-o.Devices": "/dev/fuse,/dev/net/tun"} |
Table 1.19. OpenShift Dev Spaces components configuration.
| Property | Description | Default |
|---|---|---|
| cheServer | General configuration settings related to the OpenShift Dev Spaces server. | { "debug": false, "logLevel": "INFO"} |
| dashboard | Configuration settings related to the dashboard used by the OpenShift Dev Spaces installation. | |
| devWorkspace | DevWorkspace Operator configuration. | |
| devfileRegistry | Configuration settings related to the devfile registry used by the OpenShift Dev Spaces installation. | |
| imagePuller | Kubernetes Image Puller configuration. | |
| metrics | OpenShift Dev Spaces server metrics configuration. | { "enable": true} |
| pluginRegistry | Configuration settings related to the plug-in registry used by the OpenShift Dev Spaces installation. |
Table 1.20. General configuration settings related to the OpenShift Dev Spaces server component.
| Property | Description | Default |
|---|---|---|
| clusterRoles |
Additional ClusterRoles assigned to OpenShift Dev Spaces ServiceAccount. Each role must have a | |
| debug | Enables the debug mode for OpenShift Dev Spaces server. | false |
| deployment | Deployment override options. | |
| extraProperties |
A map of additional environment variables applied in the generated | |
| logLevel |
The log level for the OpenShift Dev Spaces server: | "INFO" |
| proxy | Proxy server settings for Kubernetes cluster. No additional configuration is required for OpenShift cluster. By specifying these settings for the OpenShift cluster, you override the OpenShift proxy configuration. |
Table 1.21. proxy options.
| Property | Description | Default |
|---|---|---|
| credentialsSecretName |
The secret name that contains | |
| nonProxyHosts |
A list of hosts that can be reached directly, bypassing the proxy. Specify wild card domain use the following form | |
| port | Proxy server port. | |
| url |
URL (protocol+hostname) of the proxy server. Use only when a proxy configuration is required. The Operator respects OpenShift cluster-wide proxy configuration, defining |
Table 1.22. Configuration settings related to the Plug-in registry component used by the OpenShift Dev Spaces installation.
| Property | Description | Default |
|---|---|---|
| deployment | Deployment override options. | |
| disableInternalRegistry | Disables internal plug-in registry. | |
| externalPluginRegistries | External plugin registries. | |
| openVSXURL | Open VSX registry URL. If omitted an embedded instance will be used. |
Table 1.23. externalPluginRegistries options.
| Property | Description | Default |
|---|---|---|
| url | Public URL of the plug-in registry. |
Table 1.24. Configuration settings related to the Devfile registry component used by the OpenShift Dev Spaces installation.
| Property | Description | Default |
|---|---|---|
| deployment | Deprecated deployment override options. | |
| disableInternalRegistry | Disables internal devfile registry. | |
| externalDevfileRegistries | External devfile registries serving sample ready-to-use devfiles. |
Table 1.25. externalDevfileRegistries options.
| Property | Description | Default |
|---|---|---|
| url | The public URL of the devfile registry that serves sample ready-to-use devfiles. |
Table 1.26. Configuration settings related to the Dashboard component used by the OpenShift Dev Spaces installation.
| Property | Description | Default |
|---|---|---|
| branding | Dashboard branding resources. | |
| deployment | Deployment override options. | |
| headerMessage | Dashboard header message. | |
| logLevel | The log level for the Dashboard. | "ERROR" |
Table 1.27. headerMessage options.
| Property | Description | Default |
|---|---|---|
| show | Instructs dashboard to show the message. | |
| text | Warning message displayed on the user dashboard. |
Table 1.28. branding options.
| Property | Description | Default |
|---|---|---|
| logo | Dashboard logo. |
Table 1.29. Kubernetes Image Puller component configuration.
| Property | Description | Default |
|---|---|---|
| enable |
Install and configure the community supported Kubernetes Image Puller Operator. When you set the value to | |
| spec | A Kubernetes Image Puller spec to configure the image puller in the CheCluster. |
Table 1.30. OpenShift Dev Spaces server metrics component configuration.
| Property | Description | Default |
|---|---|---|
| enable |
Enables | true |
Table 1.31. Configuration settings that allows users to work with remote Git repositories.
| Property | Description | Default |
|---|---|---|
| azure | Enables users to work with repositories hosted on Azure DevOps Service (dev.azure.com). | |
| bitbucket | Enables users to work with repositories hosted on Bitbucket (bitbucket.org or self-hosted). | |
| github | Enables users to work with repositories hosted on GitHub (github.com or GitHub Enterprise). | |
| gitlab | Enables users to work with repositories hosted on GitLab (gitlab.com or self-hosted). |
Table 1.32. github options.
| Property | Description | Default |
|---|---|---|
| disableSubdomainIsolation |
Disables subdomain isolation. Deprecated in favor of | |
| endpoint |
GitHub server endpoint URL. Deprecated in favor of | |
| secretName | Kubernetes secret, that contains Base64-encoded GitHub OAuth Client id and GitHub OAuth Client secret. See the following page for details: Content from www.eclipse.org is not included.https://www.eclipse.org/che/docs/stable/administration-guide/configuring-oauth-2-for-github/. |
Table 1.33. gitlab options.
| Property | Description | Default |
|---|---|---|
| endpoint |
GitLab server endpoint URL. Deprecated in favor of | |
| secretName | Kubernetes secret, that contains Base64-encoded GitHub Application id and GitLab Application Client secret. See the following page: Content from www.eclipse.org is not included.https://www.eclipse.org/che/docs/stable/administration-guide/configuring-oauth-2-for-gitlab/. |
Table 1.34. bitbucket options.
| Property | Description | Default |
|---|---|---|
| endpoint |
Bitbucket server endpoint URL. Deprecated in favor of | |
| secretName | Kubernetes secret, that contains Base64-encoded Bitbucket OAuth 1.0 or OAuth 2.0 data. See the following pages for details: Content from www.eclipse.org is not included.https://www.eclipse.org/che/docs/stable/administration-guide/configuring-oauth-1-for-a-bitbucket-server/ and Content from www.eclipse.org is not included.https://www.eclipse.org/che/docs/stable/administration-guide/configuring-oauth-2-for-the-bitbucket-cloud/. |
Table 1.35. azure options.
| Property | Description | Default |
|---|---|---|
| secretName | Kubernetes secret, that contains Base64-encoded Azure DevOps Service Application ID and Client Secret. See the following page: Content from www.eclipse.org is not included.https://www.eclipse.org/che/docs/stable/administration-guide/configuring-oauth-2-for-microsoft-azure-devops-services |
Table 1.36. Networking, OpenShift Dev Spaces authentication and TLS configuration.
| Property | Description | Default |
|---|---|---|
| annotations | Defines annotations which will be set for an Ingress (a route for OpenShift platform). The defaults for kubernetes platforms are: kubernetes.io/ingress.class: "nginx" nginx.ingress.kubernetes.io/proxy-read-timeout: "3600", nginx.ingress.kubernetes.io/proxy-connect-timeout: "3600", nginx.ingress.kubernetes.io/ssl-redirect: "true" | |
| auth | Authentication settings. | { "gateway": { "configLabels": { "app": "che", "component": "che-gateway-config" } }} |
| domain | For an OpenShift cluster, the Operator uses the domain to generate a hostname for the route. The generated hostname follows this pattern: che-<devspaces-namespace>.<domain>. The <devspaces-namespace> is the namespace where the CheCluster CRD is created. In conjunction with labels, it creates a route served by a non-default Ingress controller. For a Kubernetes cluster, it contains a global ingress domain. There are no default values: you must specify them. | |
| hostname | The public hostname of the installed OpenShift Dev Spaces server. | |
| ingressClassName |
IngressClassName is the name of an IngressClass cluster resource. If a class name is defined in both the | |
| labels | Defines labels which will be set for an Ingress (a route for OpenShift platform). | |
| tlsSecretName |
The name of the secret used to set up Ingress TLS termination. If the field is an empty string, the default cluster certificate is used. The secret must have a |
Table 1.37. auth options.
| Property | Description | Default |
|---|---|---|
| advancedAuthorization |
Advance authorization settings. Determines which users and groups are allowed to access Che. User is allowed to access OpenShift Dev Spaces if he/she is either in the | |
| gateway | Gateway settings. | { "configLabels": { "app": "che", "component": "che-gateway-config" }} |
| identityProviderURL | Public URL of the Identity Provider server. | |
| identityToken |
Identity token to be passed to upstream. There are two types of tokens supported: | |
| oAuthAccessTokenInactivityTimeoutSeconds |
Inactivity timeout for tokens to set in the OpenShift | |
| oAuthAccessTokenMaxAgeSeconds |
Access token max age for tokens to set in the OpenShift | |
| oAuthClientName |
Name of the OpenShift | |
| oAuthScope | Access Token Scope. This field is specific to OpenShift Dev Spaces installations made for Kubernetes only and ignored for OpenShift. | |
| oAuthSecret |
Name of the secret set in the OpenShift |
Table 1.38. gateway options.
| Property | Description | Default |
|---|---|---|
| configLabels | Gateway configuration labels. | { "app": "che", "component": "che-gateway-config"} |
| deployment |
Deployment override options. Since gateway deployment consists of several containers, they must be distinguished in the configuration by their names: - | |
| kubeRbacProxy | Configuration for kube-rbac-proxy within the OpenShift Dev Spaces gateway pod. | |
| oAuthProxy | Configuration for oauth-proxy within the OpenShift Dev Spaces gateway pod. | |
| traefik | Configuration for Traefik within the OpenShift Dev Spaces gateway pod. |
Table 1.39. advancedAuthorization options.
| Property | Description | Default |
|---|---|---|
| allowGroups | List of groups allowed to access OpenShift Dev Spaces (currently supported in OpenShift only). | |
| allowUsers | List of users allowed to access Che. | |
| denyGroups | List of groups denied to access OpenShift Dev Spaces (currently supported in OpenShift only). | |
| denyUsers | List of users denied to access Che. |
Table 1.40. Configuration of an alternative registry that stores OpenShift Dev Spaces images.
| Property | Description | Default |
|---|---|---|
| hostname | An optional hostname or URL of an alternative container registry to pull images from. This value overrides the container registry hostname defined in all the default container images involved in an OpenShift Dev Spaces deployment. This is particularly useful for installing OpenShift Dev Spaces in a restricted environment. | |
| organization | An optional repository name of an alternative registry to pull images from. This value overrides the container registry organization defined in all the default container images involved in an OpenShift Dev Spaces deployment. This is particularly useful for installing OpenShift Dev Spaces in a restricted environment. |
Table 1.41. deployment options.
| Property | Description | Default |
|---|---|---|
| containers | List of containers belonging to the pod. | |
| nodeSelector | The node selector limits the nodes that can run the pod. | |
| securityContext | Security options the pod should run with. | |
| tolerations | The pod tolerations of the component pod limit where the pod can run. |
Table 1.42. containers options.
| Property | Description | Default |
|---|---|---|
| env | List of environment variables to set in the container. | |
| image | Container image. Omit it or leave it empty to use the default container image provided by the Operator. | |
| imagePullPolicy |
Image pull policy. Default value is | |
| name | Container name. | |
| resources | Compute resources required by this container. |
Table 1.43. resources options.
| Property | Description | Default |
|---|---|---|
| limits | Describes the maximum amount of compute resources allowed. | |
| request | Describes the minimum amount of compute resources required. |
Table 1.44. request options.
| Property | Description | Default |
|---|---|---|
| cpu |
CPU, in cores. (500m = .5 cores) If the value is not specified, then the default value is set depending on the component. If value is | |
| memory |
Memory, in bytes. (500Gi = 500GiB = 500 * 1024 * 1024 * 1024) If the value is not specified, then the default value is set depending on the component. If value is |
Table 1.45. limits options.
| Property | Description | Default |
|---|---|---|
| cpu |
CPU, in cores. (500m = .5 cores) If the value is not specified, then the default value is set depending on the component. If value is | |
| memory |
Memory, in bytes. (500Gi = 500GiB = 500 * 1024 * 1024 * 1024) If the value is not specified, then the default value is set depending on the component. If value is |
Table 1.46. securityContext options.
| Property | Description | Default |
|---|---|---|
| fsGroup |
A special supplemental group that applies to all containers in a pod. The default value is | |
| runAsUser |
The UID to run the entrypoint of the container process. The default value is |
Table 1.47. CheCluster Custom Resource status defines the observed state of OpenShift Dev Spaces installation
| Property | Description | Default |
|---|---|---|
| chePhase | Specifies the current phase of the OpenShift Dev Spaces deployment. | |
| cheURL | Public URL of the OpenShift Dev Spaces server. | |
| cheVersion | Currently installed OpenShift Dev Spaces version. | |
| devfileRegistryURL | Deprecated the public URL of the internal devfile registry. | |
| gatewayPhase | Specifies the current phase of the gateway deployment. | |
| message | A human readable message indicating details about why the OpenShift Dev Spaces deployment is in the current phase. | |
| pluginRegistryURL | The public URL of the internal plug-in registry. | |
| reason | A brief CamelCase message indicating details about why the OpenShift Dev Spaces deployment is in the current phase. | |
| workspaceBaseDomain | The resolved workspace base domain. This is either the copy of the explicitly defined property of the same name in the spec or, if it is undefined in the spec and we’re running on OpenShift, the automatically resolved basedomain for routes. |
1.4. Dev Workspace Operator custom resources
Configure the Dev Workspace Operator through its custom resources to control workspace behavior, endpoint routing, and operator deployment settings.
1.4.1. Dev Workspace
The Dev Workspace custom resource contains details about an OpenShift Dev Spaces workspace. Notably, it contains devfile details and a reference to the editor definition.
1.4.2. DevWorkspaceTemplate
In OpenShift Dev Spaces the DevWorkspaceTemplate custom resource is typically used to define an editor (such as Visual Studio Code - Open Source) for OpenShift Dev Spaces workspaces. You can use this custom resource to define reusable spec.template content that is reused by multiple Dev Workspaces.
1.4.3. DevWorkspaceOperatorConfig
The DevWorkspaceOperatorConfig (DWOC) custom resource defines configuration options for the DWO. There are two different types of DWOC:
- global configuration
- non-global configuration
The global configuration is a DWOC custom resource named devworkspace-operator-config and is usually located in the DWO installation namespace. By default, the global configuration is not created upon installation. Configuration fields set in the global configuration apply to the DWO and all Dev Workspaces. However, the DWOC configuration can be overridden by a non-global configuration.
Any other DWOC custom resource than devworkspace-operator-config is considered to be non-global configuration. A non-global configuration does not apply to any Dev Workspaces unless the Dev Workspace contains a reference to the DWOC. If the global configuration and non-global configuration have the same fields, the non-global configuration field takes precedence.
Table 1.48. Global DWOC and OpenShift Dev Spaces-owned DWOC comparison
| Global DWOC | OpenShift Dev Spaces-owned DWOC | |
|---|---|---|
| Resource name |
|
|
| Namespace | DWO installation namespace | OpenShift Dev Spaces installation namespace |
| Default creation | Not created by default upon DWO installation | Created by default on OpenShift Dev Spaces installation |
| Scope | Applies to the DWO itself and all Dev Workspaces managed by DWO | Applies to Dev Workspaces created by OpenShift Dev Spaces |
| Precedence | Overridden by fields set in OpenShift Dev Spaces-owned config | Takes precedence over global config if both define the same field |
| Primary use case | Used to define default, broad settings that apply to DWO in general. | Used to define specific configuration for Dev Workspaces created by OpenShift Dev Spaces |
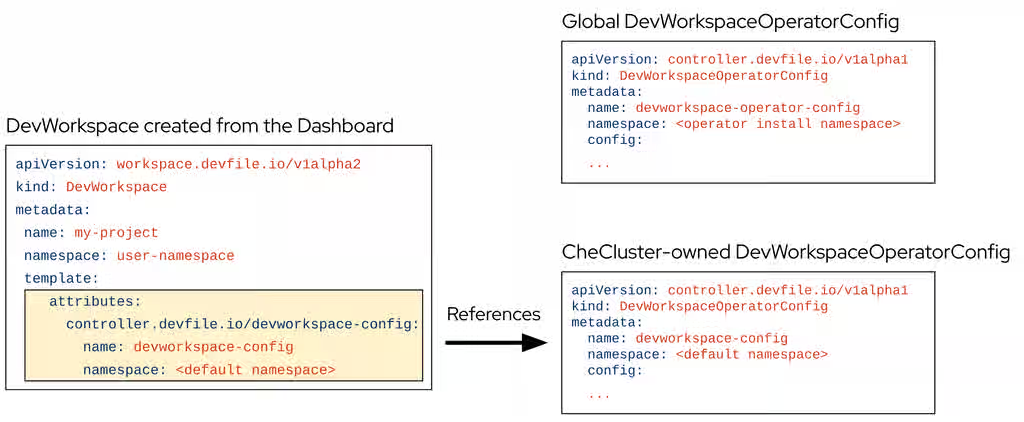
For example, by default OpenShift Dev Spaces creates and manages a non-global DWOC in the OpenShift Dev Spaces namespace named devworkspace-config. This DWOC contains configuration specific to OpenShift Dev Spaces workspaces, and is maintained by OpenShift Dev Spaces depending on how you configure the CheCluster CR. When OpenShift Dev Spaces creates a workspace, OpenShift Dev Spaces adds a reference to the OpenShift Dev Spaces-owned DWOC with the controller.devfile.io/devworkspace-config attribute.
Figure 1.1. Example of Dev Workspace configuration attribute
1.4.4. DevWorkspaceRouting
The DevWorkspaceRouting custom resource defines details about the endpoints of a Dev Workspace. Every Dev Workspace has its corresponding DevWorkspaceRouting object that specifies the workspace’s container endpoints. Endpoints defined from the devfile, as well as endpoints defined by the editor definition appear in the DevWorkspaceRouting custom resource.
apiVersion: controller.devfile.io/v1alpha1
kind: DevWorkspaceRouting
metadata:
  annotations:
    controller.devfile.io/devworkspace-started: 'false'
  name: routing-workspaceb14aa33254674065
  labels:
    controller.devfile.io/devworkspace_id: workspaceb14aa33254674065
spec:
  devworkspaceId: workspaceb14aa33254674065
  endpoints:
    universal-developer-image:
      - attributes:
          cookiesAuthEnabled: true
          discoverable: false
          type: main
          urlRewriteSupported: true
        exposure: public
        name: che-code
        protocol: https
        secure: true
        targetPort: 3100
  podSelector:
    controller.devfile.io/devworkspace_id: workspaceb14aa33254674065
  routingClass: che
status:
  exposedEndpoints:
...1.4.5. Dev Workspace Operator operands
The Dev Workspace Operator has two operands:
- controller deployment
- webhook deployment.
$ oc get pods -l 'app.kubernetes.io/part-of=devworkspace-operator' -o custom-columns=NAME:.metadata.name -n openshift-operators
NAME
devworkspace-controller-manager-66c6f674f5-l7rhj
devworkspace-webhook-server-d4958d9cd-gh7vr
devworkspace-webhook-server-d4958d9cd-rfvj6
where:
devworkspace-controller-manager-*- The Dev Workspace controller pod, which is responsible for reconciling custom resources.
devworkspace-webhook-server-*- The Dev Workspace operator webhook server pods.
1.4.6. Configure the controller-manager deployment
You can configure the devworkspace-controller-manager pod in the Dev Workspace Operator Subscription object:
apiVersion: operators.coreos.com/v1alpha1
kind: Subscription
metadata:
  name: devworkspace-operator
  namespace: openshift-operators
spec:
  config:
    affinity:
      nodeAffinity: ...
      podAffinity: ...
    resources:
      limits:
        memory: ...
        cpu: ...
      requests:
        memory: ...
cpu: ...1.4.7. Configure the webhook-server deployment
You can configure the devworkspace-webhook-server deployment in the global DWOC:
apiVersion: controller.devfile.io/v1alpha1
kind: DevWorkspaceOperatorConfig
metadata:
  name: devworkspace-operator-config
  namespace: <DWO install namespace>
config:
  webhooks:
    nodeSelector: <map[string]string>
    replicas: <int>
tolerations: <[]corev1.Toleration>Chapter 2. Organize workspace namespaces
Control how OpenShift Dev Spaces creates and manages projects for workspaces so that you can enforce naming conventions, pre-provision resources, and synchronize configurations across teams.
2.1. How workspace namespaces are organized
OpenShift Dev Spaces isolates workspaces for each user in a project, identified by labels and annotations. If the project does not exist, OpenShift Dev Spaces creates it from a template.
You can modify OpenShift Dev Spaces behavior by configuring the project name, provisioning projects in advance, or configuring a user project.
2.2. Set the workspace namespace naming convention
Configure the project name template that OpenShift Dev Spaces uses when creating workspace projects to enforce naming conventions and organizational compliance.
A valid project name template follows these conventions:
-
The
<username>or<userid>placeholder is mandatory. -
Usernames and IDs cannot contain invalid characters. If a username or ID is incompatible with OpenShift naming conventions, OpenShift Dev Spaces replaces incompatible characters with the
-symbol. -
OpenShift Dev Spaces evaluates the
<userid>placeholder into a 14 character long string, and adds a random six character long suffix to prevent IDs from colliding. The result is stored in the user preferences for reuse. - Kubernetes limits the length of a project name to 63 characters.
- OpenShift limits the length further to 49 characters.
Prerequisites
-
You have an active
ocsession with administrative permissions to the OpenShift cluster. See This page is not included, but the link has been rewritten to point to the nearest parent document.Getting started with the CLI.
Procedure
include::snippets/snip_edit-checluster-cr.adoc[]
spec: components: devEnvironments: defaultNamespace: template: <workspace_namespace_template>where:
<workspace_namespace_template>The project name template. Must include the
<username>or<userid>placeholder.Table 2.1. User workspaces project name template examples
User workspaces project name template Resulting project example <username>-devspaces(default)user1-devspaces
<userid>-namespacecge1egvsb2nhba-namespace-ul1411<userid>-aka-<username>-namespacecgezegvsb2nhba-aka-user1-namespace-6m2w2b
Verification
Start a workspace and verify that the workspace project name matches the configured template:
{orch-cli} get devworkspaces -A -o jsonpath='\{range .items[*]}\{.metadata.namespace}\{"\n"}{end}'
2.3. Provision projects in advance
Provision workspace projects in advance, rather than relying on automatic provisioning, to control namespace naming and apply custom resource quotas. Repeat the procedure for each user.
Prerequisites
-
You have an active
ocsession with administrative permissions to the OpenShift cluster. See This page is not included, but the link has been rewritten to point to the nearest parent document.Getting started with the CLI.
Procedure
Disable automatic namespace provisioning on the
CheClusterlevel:devEnvironments: defaultNamespace: autoProvision: falseCreate the <project_name> project for <username> user with the following labels and annotations:
kind: Namespace
apiVersion: v1
metadata:
  name: <project_name>
  labels:
    app.kubernetes.io/part-of: che.eclipse.org
    app.kubernetes.io/component: workspaces-namespace
  annotations:
    che.eclipse.org/username: <username>
where:
<project_name>- A project name of your choosing.
<username>- The username of the OpenShift Dev Spaces user.
Verification
Verify that the project was created with the correct labels:
$ oc get namespace <project_name> --show-labels
2.4. Synchronize resources across user namespaces
Synchronize ConfigMaps, Secrets, PersistentVolumeClaims, and other Kubernetes objects from the openshift-devspaces namespace to user-specific namespaces to provide consistent workspace configurations.
If you make changes to a Kubernetes resource in the openshift-devspaces namespace, OpenShift Dev Spaces immediately synchronizes the changes across all user namespaces. In reverse, if a Kubernetes resource is modified in a user namespace, OpenShift Dev Spaces immediately reverts the changes.
Prerequisites
-
You have an active
ocsession with administrative permissions to the OpenShift cluster. See This page is not included, but the link has been rewritten to point to the nearest parent document.Getting started with the CLI.
Applying or modifying a Secret or ConfigMap with the controller.devfile.io/mount-to-devworkspace: 'true' label restarts all running workspaces in the project.
To mount the Secret or ConfigMap only at workspace start and prevent automatic restarts, add the controller.devfile.io/mount-on-start: 'true' annotation.
Procedure
Create the following
ConfigMapto mount it into every workspace:kind: ConfigMap apiVersion: v1 metadata: name: devspaces-user-configmap namespace: openshift-devspaces labels: app.kubernetes.io/part-of: che.eclipse.org app.kubernetes.io/component: workspaces-config data: ...Optional: Use annotations to configure how the ConfigMap is mounted.
Table 2.2. Optional annotations
Annotation Description che.eclipse.org/sync-retain-on-delete:When set to
"true", the ConfigMap is retained in a user namespace after being deleted fromopenshift-devspacesnamespace.controller.devfile.io/mount-on-start:When set to
"true", the ConfigMap is mounted only at workspace start. This prevents workspace restarts when the ConfigMap is created.controller.devfile.io/mount-to-devworkspace-include:Specifies a comma-separated list of
Dev Workspacename patterns. When set, the ConfigMap is mounted only to workspaces whose names match at least one pattern. Patterns support exact match, prefix (name*), suffix (*name), contains (*name*).controller.devfile.io/mount-to-devworkspace-exclude:Specifies a comma-separated list of
Dev Workspacename patterns. When set, the ConfigMap is mounted to all workspaces except those whose names match a pattern. Patterns support exact match, prefix (name*), suffix (*name), contains (*name*).NoteWhen both annotations
controller.devfile.io/mount-to-devworkspace-includeandcontroller.devfile.io/mount-to-devworkspace-excludeare set, the resource is mounted only to workspaces that match the include pattern and do not match the exclude pattern.For other labels and annotations, see the Content from github.com is not included.mounting volumes, configmaps, and secrets.
For example, to mount a default SSH configuration into every workspace, create a ConfigMap:
kind: ConfigMap apiVersion: v1 metadata: name: ssh-config-configmap namespace: openshift-devspaces labels: app.kubernetes.io/component: workspaces-config app.kubernetes.io/part-of: che.eclipse.org annotations: controller.devfile.io/mount-as: subpath controller.devfile.io/mount-path: /etc/ssh/ssh_config.d/ data: ssh.conf: <ssh_config_content>The ConfigMap propagates the SSH configuration as an extension by using
Include /etc/ssh/ssh_config.d/*.conf. For details, see Content from man.openbsd.org is not included.Include definition.Create the following
Secretto mount it into every workspace:kind: Secret apiVersion: v1 metadata: name: devspaces-user-secret namespace: openshift-devspaces labels: app.kubernetes.io/part-of: che.eclipse.org app.kubernetes.io/component: workspaces-config stringData: ...Optional: Use annotations to configure how the Secret is mounted.
Table 2.3. Optional annotations
Annotation Description che.eclipse.org/sync-retain-on-delete:When set to
"true", the Secret is retained in a user namespace after being deleted fromopenshift-devspacesnamespace.controller.devfile.io/mount-on-start:When set to
"true", the Secret is mounted only at workspace start. This prevents workspace restarts when the Secret is created.controller.devfile.io/mount-to-devworkspace-include:Specifies a comma-separated list of
Dev Workspacename patterns. When set, the Secret is mounted only to workspaces whose names match at least one pattern. Patterns support exact match, prefix (name*), suffix (*name), contains (*name*).controller.devfile.io/mount-to-devworkspace-exclude:Specifies a comma-separated list of
Dev Workspacename patterns. When set, the Secret is mounted to all workspaces except those whose names match a pattern. Patterns support exact match, prefix (name*), suffix (*name), contains (*name*).NoteWhen both annotations
controller.devfile.io/mount-to-devworkspace-includeandcontroller.devfile.io/mount-to-devworkspace-excludeare set, the resource is mounted only to workspaces that match the include pattern and do not match the exclude pattern.For other labels and annotations, see the Content from github.com is not included.mounting volumes, configmaps, and secrets.
Create the following
PersistentVolumeClaimfor every user project:apiVersion: v1 kind: PersistentVolumeClaim metadata: name: devspaces-user-pvc namespace: openshift-devspaces labels: app.kubernetes.io/part-of: che.eclipse.org app.kubernetes.io/component: workspaces-config spec: ...Optional: Use annotations to configure how the
PersistentVolumeClaimis mounted.NoteThe
PersistentVolumeClaimis not deleted in a user namespace by default if the one fromopenshift-devspacesis deleted.Table 2.4. Optional annotations
Annotation Description che.eclipse.org/sync-retain-on-delete:When set to
"false", thePersistentVolumeClaimis deleted in a user namespace when it is deleted fromopenshift-devspacesnamespace.controller.devfile.io/mount-on-start:When set to
"true", thePersistentVolumeClaimis mounted only at workspace start. This prevents workspace restarts when thePersistentVolumeClaimis created.controller.devfile.io/mount-to-devworkspace-include:Specifies a comma-separated list of
Dev Workspacename patterns. When set, thePersistentVolumeClaimis mounted only to workspaces whose names match at least one pattern. Patterns support exact match, prefix (name*), suffix (*name), contains (*name*).controller.devfile.io/mount-to-devworkspace-exclude:Specifies a comma-separated list of
Dev Workspacename patterns. When set, thePersistentVolumeClaimis mounted to all workspaces except those whose names match a pattern. Patterns support exact match, prefix (name*), suffix (*name), contains (*name*).NoteWhen both annotations
controller.devfile.io/mount-to-devworkspace-includeandcontroller.devfile.io/mount-to-devworkspace-excludeare set, the resource is mounted only to workspaces that match the include pattern and do not match the exclude pattern.For other labels and annotations, see the Content from github.com is not included.mounting volumes, configmaps, and secrets.
Optional: To use the OpenShift Kubernetes Engine, create a
Templateobject to replicate all resources defined within the template across each user project.Aside from the previously mentioned
ConfigMap,Secret, andPersistentVolumeClaim,Templateobjects can include:-
LimitRange -
NetworkPolicy -
ResourceQuota -
Role RoleBindingapiVersion: template.openshift.io/v1 kind: Template metadata: name: devspaces-user-namespace-configurator namespace: openshift-devspaces labels: app.kubernetes.io/part-of: che.eclipse.org app.kubernetes.io/component: workspaces-config objects: ... parameters: - name: PROJECT_NAME - name: PROJECT_ADMIN_USERThe
parametersare optional and define which parameters can be used. Currently, onlyPROJECT_NAMEandPROJECT_ADMIN_USERare supported.PROJECT_NAMEis the name of the OpenShift Dev Spaces namespace, whilePROJECT_ADMIN_USERis the OpenShift Dev Spaces user of the namespace.The namespace name in objects is replaced with the user’s namespace name during synchronization.
For example, a Template that replicates
ResourceQuota,LimitRange,Role, andRoleBindingobjects:apiVersion: template.openshift.io/v1 kind: Template metadata: name: devspaces-user-namespace-configurator namespace: openshift-devspaces labels: app.kubernetes.io/part-of: che.eclipse.org app.kubernetes.io/component: workspaces-config objects: - apiVersion: v1 kind: ResourceQuota metadata: name: devspaces-user-resource-quota spec: ... - apiVersion: v1 kind: LimitRange metadata: name: devspaces-user-resource-constraint spec: ... - apiVersion: rbac.authorization.k8s.io/v1 kind: Role metadata: name: devspaces-user-roles rules: ... - apiVersion: rbac.authorization.k8s.io/v1 kind: RoleBinding metadata: name: devspaces-user-rolebinding roleRef: apiGroup: rbac.authorization.k8s.io kind: Role name: devspaces-user-roles subjects: - kind: User apiGroup: rbac.authorization.k8s.io name: ${PROJECT_ADMIN_USER} parameters: - name: PROJECT_ADMIN_USERNoteCreating Template Kubernetes resources is supported only on OpenShift.
-
Verification
Verify that the Kubernetes objects are synchronized to a user project:
$ oc get configmaps,secrets -n <user_namespace> -l app.kubernetes.io/part-of=che.eclipse.org
2.5. Use Kubernetes namespaces instead of OpenShift projects
Configure OpenShift Dev Spaces to create standard Kubernetes namespaces directly on OpenShift Container Platform instead of using the ProjectRequest API to bypass cluster-specific Project Templates.
By default, on OpenShift Container Platform clusters, OpenShift Dev Spaces uses the ProjectRequest API to create projects. This triggers cluster-specific Project Templates, which can apply additional resources or policies.
On OpenShift Container Platform, you can bypass Project Templates and create standard Kubernetes namespaces directly. For example, this is useful when Project Templates introduce unwanted side effects.
Prerequisites
-
You have an active
ocsession with administrative permissions to the destination OpenShift cluster.
Procedure
Set the
createKubernetesNamespacesfield totrue:oc patch checluster devspaces \ --namespace openshift-devspaces \ --type merge \ --patch '{ "spec": { "devEnvironments": { "defaultNamespace": { "createKubernetesNamespaces": true } } } }'NoteThis setting applies only to OpenShift Container Platform clusters. On Kubernetes clusters, namespaces are always created directly regardless of this setting.
Verification
Verify the configuration:
oc get checluster devspaces \ --namespace openshift-devspaces \ --output jsonpath='{.spec.devEnvironments.defaultNamespace.createKubernetesNamespaces}'The command returns
true.
Chapter 3. Inject configuration into server components
Mount OpenShift Secrets and ConfigMaps into OpenShift Dev Spaces containers so that you can provide configuration files, credentials, and environment variables without modifying container images.
You can mount Secrets and ConfigMaps as files, as subpath volumes, or as environment variables. Each method requires specific annotations and labels on the OpenShift resource.
3.1. Inject files from Secrets and ConfigMaps into containers
Mount an OpenShift Secret or a ConfigMap as a file into an OpenShift Dev Spaces container to provide configuration files, certificates, or credentials without embedding them in the container image.
Prerequisites
- You have a running instance of Red Hat OpenShift Dev Spaces.
Procedure
Create a new OpenShift Secret or a ConfigMap in the OpenShift project where OpenShift Dev Spaces is deployed with the required labels:
apiVersion: v1 kind: Secret metadata: name: custom-settings labels: app.kubernetes.io/part-of: che.eclipse.org app.kubernetes.io/component: <DEPLOYMENT_NAME>-<OBJECT_KIND> ...where:
kind-
Secretfor a Secret orConfigMapfor a ConfigMap. <DEPLOYMENT_NAME>-
Target deployment:
devspaces,devspaces-dashboard,devfile-registry, orplugin-registry. <OBJECT_KIND>-
secretfor a Secret orconfigmapfor a ConfigMap.
Configure the annotation values. Annotations must indicate that the given object is mounted as a file:
-
che.eclipse.org/mount-as: file- Mounts an object as a file. che.eclipse.org/mount-path: <TARGET_PATH>- To provide a required mount path.For a Secret:
apiVersion: v1 kind: Secret metadata: name: custom-data annotations: che.eclipse.org/mount-as: file che.eclipse.org/mount-path: /data labels: app.kubernetes.io/part-of: che.eclipse.org app.kubernetes.io/component: devspaces-secret ...For a ConfigMap:
apiVersion: v1
kind: ConfigMap
metadata:
  name: custom-data
  annotations:
    che.eclipse.org/mount-as: file
    che.eclipse.org/mount-path: /data
  labels:
    app.kubernetes.io/part-of: che.eclipse.org
    app.kubernetes.io/component: devspaces-configmap
...
-
Add data items to the object. Each item name must match the desired file name mounted into the container.
For a Secret:
apiVersion: v1 kind: Secret metadata: name: custom-data labels: app.kubernetes.io/part-of: che.eclipse.org app.kubernetes.io/component: devspaces-secret annotations: che.eclipse.org/mount-as: file che.eclipse.org/mount-path: /data data: ca.crt: <base64 encoded data content here>For a ConfigMap:
apiVersion: v1
kind: ConfigMap
metadata:
  name: custom-data
  labels:
    app.kubernetes.io/part-of: che.eclipse.org
    app.kubernetes.io/component: devspaces-configmap
  annotations:
    che.eclipse.org/mount-as: file
    che.eclipse.org/mount-path: /data
data:
  ca.crt: <data content here>
Verification
Verify that the file is mounted in the target container:
oc exec -n openshift-devspaces deploy/<DEPLOYMENT_NAME> -- ls <TARGET_PATH>/<FILE_NAME>
Each data item name in the object corresponds to a file name at the mount path. For example, a data item named
ca.crtwith a mount path of/dataresults in a file at/data/ca.crt.ImportantIf you update the Secret or ConfigMap data, re-create the object entirely to make the changes visible in the OpenShift Dev Spaces container.
3.2. Add individual files without replacing directories
Mount an OpenShift Secret or a ConfigMap as a subPath to add individual files to a target directory without replacing existing contents. Use a subPath mount when the target directory already contains files that must be preserved.
Prerequisites
- You have a running instance of Red Hat OpenShift Dev Spaces.
Procedure
Create a new OpenShift Secret or a ConfigMap in the OpenShift project where OpenShift Dev Spaces is deployed with the required labels:
apiVersion: v1 kind: Secret metadata: name: custom-settings labels: app.kubernetes.io/part-of: che.eclipse.org app.kubernetes.io/component: <DEPLOYMENT_NAME>-<OBJECT_KIND> ...where:
kind-
Secretfor a Secret orConfigMapfor a ConfigMap. <DEPLOYMENT_NAME>-
Target deployment:
devspaces,devspaces-dashboard,devfile-registry, orplugin-registry. <OBJECT_KIND>-
secretfor a Secret orconfigmapfor a ConfigMap.
Configure the annotation values. Annotations must indicate that the given object is mounted as a subPath:
-
che.eclipse.org/mount-as: subpath- Mounts an object as a subPath. che.eclipse.org/mount-path: <TARGET_PATH>- To provide a required mount path.For a Secret:
apiVersion: v1 kind: Secret metadata: name: custom-data annotations: che.eclipse.org/mount-as: subpath che.eclipse.org/mount-path: /data labels: app.kubernetes.io/part-of: che.eclipse.org app.kubernetes.io/component: devspaces-secret ...For a ConfigMap:
apiVersion: v1
kind: ConfigMap
metadata:
  name: custom-data
  annotations:
    che.eclipse.org/mount-as: subpath
    che.eclipse.org/mount-path: /data
  labels:
    app.kubernetes.io/part-of: che.eclipse.org
    app.kubernetes.io/component: devspaces-configmap
...
-
Add data items to the object. Each item name must match the file name mounted into the container.
For a Secret:
apiVersion: v1 kind: Secret metadata: name: custom-data labels: app.kubernetes.io/part-of: che.eclipse.org app.kubernetes.io/component: devspaces-secret annotations: che.eclipse.org/mount-as: subpath che.eclipse.org/mount-path: /data data: ca.crt: <base64 encoded data content here>For a ConfigMap:
apiVersion: v1
kind: ConfigMap
metadata:
  name: custom-data
  labels:
    app.kubernetes.io/part-of: che.eclipse.org
    app.kubernetes.io/component: devspaces-configmap
  annotations:
    che.eclipse.org/mount-as: subpath
    che.eclipse.org/mount-path: /data
data:
  ca.crt: <data content here>
Verification
Verify that the file is mounted in the target container:
oc exec -n openshift-devspaces deploy/<DEPLOYMENT_NAME> -- ls <TARGET_PATH>/<FILE_NAME>
Each data item name in the object corresponds to a file name at the mount path. For example, a data item named
ca.crtwith a mount path of/dataresults in a file at/data/ca.crt.ImportantIf you update the Secret or ConfigMap data, re-create the object entirely to make the changes visible in the OpenShift Dev Spaces container.
3.3. Inject environment variables from Secrets and ConfigMaps
Mount an OpenShift Secret or a ConfigMap as an environment variable in an OpenShift Dev Spaces container. This injects configuration values such as credentials, API keys, or feature flags without modifying the container image.
Prerequisites
- You have a running instance of Red Hat OpenShift Dev Spaces.
Procedure
Create a new OpenShift Secret or a ConfigMap in the OpenShift project where OpenShift Dev Spaces is deployed with the required labels:
apiVersion: v1 kind: Secret metadata: name: custom-settings labels: app.kubernetes.io/part-of: che.eclipse.org app.kubernetes.io/component: <DEPLOYMENT_NAME>-<OBJECT_KIND> ...where:
kind-
Secretfor a Secret orConfigMapfor a ConfigMap. <DEPLOYMENT_NAME>-
Target deployment:
devspaces,devspaces-dashboard,devfile-registry, orplugin-registry. <OBJECT_KIND>-
secretfor a Secret orconfigmapfor a ConfigMap.
Configure the annotation values. Annotations must indicate that the given object is mounted as an environment variable:
-
che.eclipse.org/mount-as: env- Mounts an object as an environment variable. che.eclipse.org/env-name: <FOO_ENV>- Provides the environment variable name, which is required to mount an object key value.For a Secret:
apiVersion: v1 kind: Secret metadata: name: custom-settings annotations: che.eclipse.org/env-name: FOO_ENV che.eclipse.org/mount-as: env labels: app.kubernetes.io/part-of: che.eclipse.org app.kubernetes.io/component: devspaces-secret stringData: mykey: myvalueFor a ConfigMap:
apiVersion: v1
kind: ConfigMap
metadata:
  name: custom-settings
  annotations:
    che.eclipse.org/env-name: FOO_ENV
    che.eclipse.org/mount-as: env
  labels:
    app.kubernetes.io/part-of: che.eclipse.org
    app.kubernetes.io/component: devspaces-configmap
data:
  mykey: myvalue
-
If the object provides more than one data item, provide the environment variable name for each data key by using the
che.eclipse.org/<key>_env-nameannotation format.For a Secret:
apiVersion: v1 kind: Secret metadata: name: custom-settings annotations: che.eclipse.org/mount-as: env che.eclipse.org/mykey_env-name: FOO_ENV che.eclipse.org/otherkey_env-name: OTHER_ENV labels: app.kubernetes.io/part-of: che.eclipse.org app.kubernetes.io/component: devspaces-secret stringData: mykey: <data_content_here> otherkey: <data_content_here>For a ConfigMap:
apiVersion: v1 kind: ConfigMap metadata: name: custom-settings annotations: che.eclipse.org/mount-as: env che.eclipse.org/mykey_env-name: FOO_ENV che.eclipse.org/otherkey_env-name: OTHER_ENV labels: app.kubernetes.io/part-of: che.eclipse.org app.kubernetes.io/component: devspaces-configmap data: mykey: <data content here> otherkey: <data content here>The maximum length of annotation names in an OpenShift object is 63 characters, where 9 characters are reserved for a prefix that ends with
/. This restricts the maximum length of the key that can be used for the object.
Verification
Verify that the environment variable is set in the target container:
oc exec -n openshift-devspaces deploy/<DEPLOYMENT_NAME> -- env | grep <ENV_NAME>
For a single-key object, both the
env-namevalue and the data key name become environment variables. For a multi-key object, only the per-keyenv-namevalues are provisioned.ImportantIf you update the Secret or ConfigMap data, re-create the object entirely to make the changes visible in the OpenShift Dev Spaces container.
3.4. Fine-tune the OpenShift Dev Spaces server
Advanced configuration of the OpenShift Dev Spaces server allows you to set environment variables or override properties that are not exposed through the standard CheCluster Custom Resource fields.
Advanced configuration is necessary to:
-
Add environment variables not automatically generated by the Operator from the standard
CheClusterCustom Resource fields. -
Override the properties automatically generated by the Operator from the standard
CheClusterCustom Resource fields.
The customCheProperties field, part of the CheCluster Custom Resource server settings, contains a map of additional environment variables to apply to the OpenShift Dev Spaces server component.
3.4.1. Override the default memory limit for workspaces
Configure the
CheClusterCustom Resource.apiVersion: org.eclipse.che/v2 kind: CheCluster spec: components: cheServer: extraProperties: CHE_LOGS_APPENDERS_IMPL: json
Previous versions of the OpenShift Dev Spaces Operator had a ConfigMap named custom to fulfill this role. If the OpenShift Dev Spaces Operator finds a configMap with the name custom, it adds the data into the customCheProperties field. The Operator then redeploys OpenShift Dev Spaces and deletes the custom configMap.
Chapter 4. Set workspace policies for all users
Define workspace limits, Git certificate trust, node scheduling, allowed URLs, and container capabilities that apply to every developer on the platform.
4.1. Limit the number of workspaces that a user can keep
Limit the number of workspaces a user can keep in the dashboard to reduce demand on the cluster. By default, users can keep an unlimited number of workspaces.
Prerequisites
-
You have an active
ocsession with administrative permissions to the OpenShift cluster. See This page is not included, but the link has been rewritten to point to the nearest parent document.Getting started with the CLI.
Procedure
Get the name of the OpenShift Dev Spaces namespace. The default is
openshift-devspaces.$ oc get checluster --all-namespaces \ -o=jsonpath="{.items[*].metadata.namespace}"Configure the
maxNumberOfWorkspacesPerUserin theCheClusterCustom Resource:spec: devEnvironments: maxNumberOfWorkspacesPerUser: <kept_workspaces_limit>where:
<kept_workspaces_limit>-
The maximum number of workspaces per user. The default value,
-1, allows users to keep an unlimited number of workspaces. Use a positive integer to set the maximum number of workspaces per user.
Apply the change:
$ oc patch checluster/devspaces -n openshift-devspaces \ --type='merge' -p \ '{"spec":{"devEnvironments":{"maxNumberOfWorkspacesPerUser": <kept_workspaces_limit>}}}'where:
-n- The OpenShift Dev Spaces namespace that you got in step 1.
Verification
Verify the
maxNumberOfWorkspacesPerUservalue in theCheClusterCustom Resource:$ oc get checluster devspaces -n openshift-devspaces -o jsonpath='{.spec.devEnvironments.maxNumberOfWorkspacesPerUser}'
Additional resources
4.2. Limit the number of workspaces that all users can run simultaneously
Limit the number of concurrently running workspaces across the cluster to manage resource consumption. By default, all users can run an unlimited number of workspaces.
Prerequisites
-
You have an active
ocsession with administrative permissions to the OpenShift cluster. See This page is not included, but the link has been rewritten to point to the nearest parent document.Getting started with the CLI.
Procedure
Configure the
maxNumberOfRunningWorkspacesPerClusterin theCheClusterCustom Resource:spec: devEnvironments: maxNumberOfRunningWorkspacesPerCluster: <running_workspaces_limit>where:
<running_workspaces_limit>-
The maximum number of concurrently running workspaces across the entire Kubernetes cluster. This applies to all users in the system. The
-1value means there is no limit on the number of running workspaces.
Apply the change:
$ oc patch checluster/devspaces -n openshift-devspaces \
--type='merge' -p \
'{"spec":{"devEnvironments":{"maxNumberOfRunningWorkspacesPerCluster": <running_workspaces_limit>}}}'
Verification
Verify the
maxNumberOfRunningWorkspacesPerClustervalue in theCheClusterCustom Resource:$ oc get checluster devspaces -n openshift-devspaces -o jsonpath='{.spec.devEnvironments.maxNumberOfRunningWorkspacesPerCluster}'
Additional resources
4.3. Enable users to run multiple workspaces simultaneously
Enable users to run multiple workspaces simultaneously so that they can work on several projects without stopping active sessions. By default, a user can run only one workspace at a time.
If using the default storage method, users might experience problems when concurrently running workspaces if pods are distributed across nodes in a multi-node cluster. Switching from the per-user common storage strategy to the per-workspace storage strategy or using the ephemeral storage type can avoid or solve those problems.
Prerequisites
-
You have an active
ocsession with administrative permissions to the OpenShift cluster. See This page is not included, but the link has been rewritten to point to the nearest parent document.Getting started with the CLI.
Procedure
Get the name of the OpenShift Dev Spaces namespace. The default is
openshift-devspaces.$ oc get checluster --all-namespaces \ -o=jsonpath="{.items[*].metadata.namespace}"Configure the
maxNumberOfRunningWorkspacesPerUserin theCheClusterCustom Resource:spec: devEnvironments: maxNumberOfRunningWorkspacesPerUser: <running_workspaces_limit>where:
<running_workspaces_limit>-
The maximum number of simultaneously running workspaces per user. The
-1value enables users to run an unlimited number of workspaces. The default value is1.
Apply the change:
$ oc patch checluster/devspaces -n openshift-devspaces \ --type='merge' -p \ '{"spec":{"devEnvironments":{"maxNumberOfRunningWorkspacesPerUser": <running_workspaces_limit>}}}'where:
-n- The OpenShift Dev Spaces namespace that you got in step 1.
Verification
Verify the
maxNumberOfRunningWorkspacesPerUservalue in theCheClusterCustom Resource:oc get checluster devspaces -n openshift-devspaces -o jsonpath='{.spec.devEnvironments.maxNumberOfRunningWorkspacesPerUser}'
4.4. Trust self-signed Git server certificates
Configure OpenShift Dev Spaces to support operations on Git providers that use self-signed certificates so that workspaces can clone and push to repositories secured by internal certificate authorities.
Prerequisites
-
You have an active
ocsession with administrative permissions to the OpenShift cluster. See This page is not included, but the link has been rewritten to point to the nearest parent document.Getting started with the OpenShift CLI. - You have Git version 2 or later installed.
Procedure
Create a new ConfigMap with details about the Git server:
$ oc create configmap che-git-self-signed-cert \
  --from-file=ca.crt=<path_to_certificate> \
  --from-literal=githost=<git_server_url> -n openshift-devspaces
where:
--from-file- Path to the self-signed certificate.
--from-literalOptional parameter to specify the Git server URL for example
Content from git.example.com is not included.https://git.example.com:8443. When omitted, the self-signed certificate is used for all repositories over HTTPS.Note-
Certificate files are typically stored as Base64 ASCII files, such as.
.pem,.crt,.ca-bundle. AllConfigMapsthat hold certificate files should use the Base64 ASCII certificate rather than the binary data certificate. -
A certificate chain of trust is required. If the
ca.crtis signed by a certificate authority (CA), the CA certificate must be included in theca.crtfile.
-
Certificate files are typically stored as Base64 ASCII files, such as.
Add the required labels to the ConfigMap:
$ oc label configmap che-git-self-signed-cert \
  app.kubernetes.io/part-of=che.eclipse.org -n openshift-devspaces
include::snippets/snip_edit-checluster-cr.adoc[]
spec:
  devEnvironments:
    trustedCerts:
      gitTrustedCertsConfigMapName: che-git-self-signed-cert
Verification
Create and start a new workspace. Every container used by the workspace mounts a special volume that contains a file with the self-signed certificate. The container’s
/etc/gitconfigfile contains information about the Git server host (its URL) and the path to the certificate in thehttpsection (see Git documentation about Content from git-scm.com is not included.git-config).For example:
[http "https://10.33.177.118:3000"]
sslCAInfo = /etc/config/che-git-tls-creds/certificate
4.5. Control which nodes run workspaces
Configure nodeSelector and tolerations for OpenShift Dev Spaces workspace Pods to control which nodes run workspaces for compliance, hardware affinity, or zone isolation.
Prerequisites
-
You have an active
ocsession with administrative permissions to the OpenShift cluster. See This page is not included, but the link has been rewritten to point to the nearest parent document.Getting started with the CLI.
Procedure
Set
nodeSelectorin theCheClusterCustom Resource to schedule workspace Pods on specific nodes:spec: devEnvironments: nodeSelector: <key>: <value>This section must contain a set of
key=valuepairs for each node label to form thenodeSelectorrule.Set
tolerationsin theCheClusterCustom Resource to allow workspace Pods to be scheduled on tainted nodes. Tolerations work in the opposite way tonodeSelector. Instead of specifying which nodes the Pod is scheduled on, you specify which nodes the Pod cannot be scheduled on.spec: devEnvironments: tolerations: - effect: NoSchedule key: <key> value: <value> operator: EqualImportantnodeSelectormust be configured during OpenShift Dev Spaces installation. This prevents existing workspaces from failing to run due to volumes affinity conflict caused by existing workspace PVC and Pod being scheduled in different zones.On large, multizone clusters, Pods and PVCs can be scheduled in different zones. To avoid this, create an additional
StorageClassobject (pay attention to theallowedTopologiesfield) to coordinate the PVC creation process.Pass the name of this newly created
StorageClassto OpenShift Dev Spaces through theCheClusterCustom Resource. For more information, see: Use a custom storage provisioner.
Verification
Verify the
nodeSelectorortolerationsconfiguration in theCheClusterCustom Resource:oc get checluster devspaces -n openshift-devspaces -o jsonpath='{.spec.devEnvironments.nodeSelector}'
Additional resources
- Content from kubernetes.io is not included.Assigning Pods to Nodes
- Content from kubernetes.io is not included.Built-in node labels
- Content from kubernetes.io is not included.Taints and Tolerations
- Content from kubernetes.io is not included.Storage Classes
- This content is not included.Configuring the CheCluster Custom Resource during installation
- Edit the central configuration from the command line
4.6. Restrict which URLs can create workspaces
Configure allowed URLs to restrict Cloud Development Environment (CDE) initiation to authorized sources, protecting your infrastructure from untrusted deployments.
Prerequisites
-
You have an active
ocsession with administrative permissions to the OpenShift cluster. See This page is not included, but the link has been rewritten to point to the nearest parent document.Getting started with the CLI.
Procedure
Patch the
CheClusterCustom Resource to configure the allowed source URLs:oc patch checluster/devspaces \ --namespace openshift-devspaces \ --type='merge' \ -p \ '{ "spec": { "devEnvironments": { "allowedSources": { "urls": ["<url_1>", "<url_2>"] } } } }'where:
urls-
The array of approved URLs for starting CDEs. Wildcards
*are supported. For example,Content from example.com is not included.https://example.com/\*allows CDEs from any path withinexample.com.
Verification
- In the OpenShift Dev Spaces Dashboard, start a workspace from an allowed URL and verify that it starts successfully.
- Attempt to start a workspace from a URL that is not in the allowed list and verify that it is rejected.
Additional resources
4.7. Enable container run capabilities
Enable container run capabilities in OpenShift Dev Spaces workspaces to allow running nested containers using tools like Podman. This feature uses Linux kernel user namespaces for isolation, so that users can build and run container images within their workspaces.
Previously created workspaces cannot be started after enabling this feature. Users must create new workspaces.
- This feature is available on OpenShift 4.20 and later versions.
Prerequisites
-
You have an active
ocsession with administrative permissions to the OpenShift cluster. See This page is not included, but the link has been rewritten to point to the nearest parent document.Getting started with the CLI. - You have an instance of OpenShift Dev Spaces running in OpenShift.
Procedure
Configure the
CheClustercustom resource to enable container run capabilities:oc patch checluster/devspaces -n openshift-devspaces \ --type='merge' -p \ '{"spec":{"devEnvironments":{"disableContainerRunCapabilities":false}}}'
Verification
Create a new workspace and verify that Podman is available:
podman run --rm hello-world
Additional resources
Chapter 5. Configure observability
Configure logging, monitoring, and telemetry for OpenShift Dev Spaces to gain visibility into workspace health, operator performance, and usage patterns.
5.1. Configure the Woopra telemetry plugin
The Content from github.com is not included.Woopra Telemetry Plugin sends telemetry from a Red Hat OpenShift Dev Spaces installation to Segment and Woopra. Any Red Hat OpenShift Dev Spaces deployment can use this plugin with a valid Woopra domain and Segment Write key.
The devfile v2 for the plugin, Content from raw.githubusercontent.com is not included.plugin.yaml, has four environment variables that can be passed to the plugin:
-
WOOPRA_DOMAIN- The Woopra domain to send events to. -
SEGMENT_WRITE_KEY- The write key to send events to Segment and Woopra. -
WOOPRA_DOMAIN_ENDPOINT- If you prefer not to pass in the Woopra domain directly, the plugin gets it from a supplied HTTP endpoint that returns the Woopra Domain. -
SEGMENT_WRITE_KEY_ENDPOINT- If you prefer not to pass in the Segment write key directly, the plugin gets it from a supplied HTTP endpoint that returns the Segment write key.
To enable the Woopra plugin on the Red Hat OpenShift Dev Spaces installation:
Procedure
-
Deploy the
plugin.yamldevfile v2 file to an HTTP server with the environment variables set correctly. include::snippets/snip_edit-checluster-cr.adoc[]
spec: devEnvironments: defaultPlugins: - editor: eclipse/che-theia/next plugins: - '<your_plugin_url>'where:
editor-
The
editorIdto set the telemetry plugin for. plugins-
The URL to the telemetry plugin’s devfile v2 definition, for example,
Content from your-web-server is not included.https://your-web-server/plugin.yaml.
5.2. Telemetry plugin overview
Create a telemetry plugin for OpenShift Dev Spaces to collect workspace usage data and send it to your analytics backend. The plugin extends the AbstractAnalyticsManager class with methods for event handling, activity tracking, and shutdown.
The AbstractAnalyticsManager class requires the following method implementations:
-
isEnabled()- determines whether the telemetry backend is functioning correctly. This can mean always returningtrue, or have more complex checks, for example, returningfalsewhen a connection property is missing. -
destroy()- cleanup method that is run before shutting down the telemetry backend. This method sends theWORKSPACE_STOPPEDevent. -
onActivity()- notifies that some activity is still happening for a given user. This is mainly used to sendWORKSPACE_INACTIVEevents. -
onEvent()- submits telemetry events to the telemetry server, such asWORKSPACE_USEDorWORKSPACE_STARTED. -
increaseDuration()- increases the duration of a current event rather than sending many events in a small frame of time.
A finished example of the telemetry backend is available in the devworkspace-telemetry-example-plugin repository.
Additional resources
- Section 5.2.1, “Create a telemetry server”
- Section 5.2.2, “Create a telemetry backend”
- Section 5.2.3, “Implement and test telemetry backend event handlers”
- Section 5.2.4, “Deploy a telemetry plugin”
- Section 5.2.5, “Configure workspaces to load a telemetry plugin”
- Content from github.com is not included.devworkspace-telemetry-example-plugin
5.2.1. Create a telemetry server
Create a server that receives telemetry events from the OpenShift Dev Spaces telemetry plugin and writes them to standard output. For production, consider integrating with a third-party telemetry system such as Segment or Woopra.
Prerequisites
- You have a running instance of Red Hat OpenShift Dev Spaces.
Procedure
Create a
main.gofile for a Go application that starts a server on port8080and writes events to standard output:package main import ( "io/ioutil" "net/http" "go.uber.org/zap" ) var logger *zap.SugaredLogger func event(w http.ResponseWriter, req *http.Request) { switch req.Method { case "GET": logger.Info("GET /event") case "POST": logger.Info("POST /event") } body, err := req.GetBody() if err != nil { logger.With("err", err).Info("error getting body") return } responseBody, err := ioutil.ReadAll(body) if err != nil { logger.With("error", err).Info("error reading response body") return } logger.With("body", string(responseBody)).Info("got event") } func activity(w http.ResponseWriter, req *http.Request) { switch req.Method { case "GET": logger.Info("GET /activity, doing nothing") case "POST": logger.Info("POST /activity") body, err := req.GetBody() if err != nil { logger.With("error", err).Info("error getting body") return } responseBody, err := ioutil.ReadAll(body) if err != nil { logger.With("error", err).Info("error reading response body") return } logger.With("body", string(responseBody)).Info("got activity") } } func main() { log, _ := zap.NewProduction() logger = log.Sugar() http.HandleFunc("/event", event) http.HandleFunc("/activity", activity) logger.Info("Added Handlers") logger.Info("Starting to serve") http.ListenAndServe(":8080", nil) }The code for the example telemetry server is available in the
telemetry-server-examplerepository.Create a container image based on this code and expose it as a deployment in OpenShift in the
openshift-devspacesproject. Clone the repository and build the container:$ git clone https://github.com/che-incubator/telemetry-server-example $ cd telemetry-server-example $ podman build -t registry/organization/telemetry-server-example:latest . $ podman push registry/organization/telemetry-server-example:latest
Deploy the telemetry server to OpenShift.
Both
manifest_with_ingress.yamlandmanifest_with_routecontain definitions for a Deployment and Service. The former also defines a Kubernetes Ingress, while the latter defines an OpenShift Route.In the manifest file, replace the
imageandhostfields to match the image you pushed, and the public hostname of your OpenShift cluster. Then run:$ oc apply -f manifest_with_[ingress|route].yaml -n openshift-devspaces
Verification
Verify that the telemetry server pod is running:
oc get pods -n openshift-devspaces -l app=telemetry-server-example
5.2.2. Create a telemetry backend
Create a Quarkus-based telemetry backend that extends the OpenShift Dev Spaces telemetry client and implements custom event handling logic.
For fast feedback when developing, develop inside a Dev Workspace. This way, you can run the application in a cluster and receive events from the front-end telemetry plugin.
Prerequisites
- You have a running instance of Red Hat OpenShift Dev Spaces.
- You have a telemetry server deployed to receive events. See Section 5.2.1, “Create a telemetry server”.
Procedure
Create a Maven Quarkus project:
mvn io.quarkus:quarkus-maven-plugin:2.7.1.Final:create \ -DprojectGroupId=mygroup -DprojectArtifactId=devworkspace-telemetry-example-plugin \ -DprojectVersion=1.0.0-SNAPSHOT-
Remove the files under
src/main/java/mygroupandsrc/test/java/mygroup. Consult the Content from github.com is not included.GitHub packages for the latest version of
backend-baseand add the following dependencies to yourpom.xml:<!-- Required --> <dependency> <groupId>org.eclipse.che.incubator.workspace-telemetry</groupId> <artifactId>backend-base</artifactId> <version><latest_version></version> </dependency> <!-- Used to make http requests to the telemetry server --> <dependency> <groupId>io.quarkus</groupId> <artifactId>quarkus-rest-client</artifactId> </dependency> <dependency> <groupId>io.quarkus</groupId> <artifactId>quarkus-rest-client-jackson</artifactId> </dependency>Create a personal access token with
read:packagespermissions from Content from docs.github.com is not included.GitHub packages and add your GitHub username, the token, andche-incubatorrepository details in your~/.m2/settings.xmlfile:<settings xmlns="http://maven.apache.org/SETTINGS/1.0.0" xmlns:xsi="http://www.w3.org/2001/XMLSchema-instance" xsi:schemaLocation="http://maven.apache.org/SETTINGS/1.0.0 http://maven.apache.org/xsd/settings-1.0.0.xsd"> <servers> <server> <id>che-incubator</id> <username><github_username></username> <password><github_token></password> </server> </servers> <profiles> <profile> <id>github</id> <activation> <activeByDefault>true</activeByDefault> </activation> <repositories> <repository> <id>central</id> <url>https://repo1.maven.org/maven2</url> <releases><enabled>true</enabled></releases> <snapshots><enabled>false</enabled></snapshots> </repository> <repository> <id>che-incubator</id> <url>https://maven.pkg.github.com/che-incubator/che-workspace-telemetry-client</url> </repository> </repositories> </profile> </profiles> </settings>Create
MainConfiguration.javaundersrc/main/java/mygroup. This file contains configuration provided toAnalyticsManager:package org.my.group; import java.util.Optional; import javax.enterprise.context.Dependent; import javax.enterprise.inject.Alternative; import org.eclipse.che.incubator.workspace.telemetry.base.BaseConfiguration; import org.eclipse.microprofile.config.inject.ConfigProperty; @Dependent @Alternative public class MainConfiguration extends BaseConfiguration { @ConfigProperty(name = "welcome.message") Optional<String> welcomeMessage; }where:
@ConfigProperty(name = "welcome.message")-
A MicroProfile configuration annotation that injects the
welcome.messageconfiguration. For more details on how to set configuration properties specific to your backend, see the Quarkus Configuration Reference Guide.
Create
AnalyticsManager.javaundersrc/main/java/mygroup. This file contains logic specific to the telemetry system:package org.my.group; import java.util.HashMap; import java.util.Map; import javax.enterprise.context.Dependent; import javax.enterprise.inject.Alternative; import javax.inject.Inject; import org.eclipse.che.incubator.workspace.telemetry.base.AbstractAnalyticsManager; import org.eclipse.che.incubator.workspace.telemetry.base.AnalyticsEvent; import org.eclipse.che.incubator.workspace.telemetry.finder.DevWorkspaceFinder; import org.eclipse.che.incubator.workspace.telemetry.finder.UsernameFinder; import org.eclipse.microprofile.rest.client.inject.RestClient; import org.slf4j.Logger; import static org.slf4j.LoggerFactory.getLogger; @Dependent @Alternative public class AnalyticsManager extends AbstractAnalyticsManager { private static final Logger LOG = getLogger(AbstractAnalyticsManager.class); public AnalyticsManager(MainConfiguration mainConfiguration, DevWorkspaceFinder devworkspaceFinder, UsernameFinder usernameFinder) { super(mainConfiguration, devworkspaceFinder, usernameFinder); mainConfiguration.welcomeMessage.ifPresentOrElse( (str) -> LOG.info("The welcome message is: {}", str), () -> LOG.info("No welcome message provided") ); } @Override public boolean isEnabled() { return true; } @Override public void destroy() {} @Override public void onEvent(AnalyticsEvent event, String ownerId, String ip, String userAgent, String resolution, Map<String, Object> properties) { LOG.info("The received event is: {}", event); } @Override public void increaseDuration(AnalyticsEvent event, Map<String, Object> properties) { } @Override public void onActivity() {} }where:
ifPresentOrElse()- Log the welcome message if it was provided.
LOG.info("The received event is: {}", event)- Log the event received from the front-end plugin.
Add the
quarkus.arc.selected-alternativesproperty tosrc/main/resources/application.propertiesto specify the alternative beansorg.my.group.AnalyticsManagerandorg.my.group.MainConfiguration:quarkus.arc.selected-alternatives=MainConfiguration,AnalyticsManager
Verification
Run the Quarkus application and verify that it starts without errors:
mvn quarkus:dev
5.2.3. Implement and test telemetry backend event handlers
Implement the AnalyticsManager event handling methods in your telemetry backend and test the backend in a running Dev Workspace to verify that events are received from the front-end plugin.
Prerequisites
- You have a running instance of Red Hat OpenShift Dev Spaces.
- You have a telemetry backend project created. See Section 5.2.2, “Create a telemetry backend”.
Procedure
Set the
DEVWORKSPACE_TELEMETRY_BACKEND_PORTenvironment variable in the Dev Workspace. Here, the value is set to4167.spec: template: attributes: workspaceEnv: - name: DEVWORKSPACE_TELEMETRY_BACKEND_PORT value: '4167'- Restart the Dev Workspace from the Red Hat OpenShift Dev Spaces dashboard.
Run the following command within a Dev Workspace’s terminal window to start the application. Use the
--settingsflag to specify the path to thesettings.xmlfile that contains the GitHub access token.$ mvn --settings=settings.xml quarkus:dev -Dquarkus.http.port=${DEVWORKSPACE_TELEMETRY_BACKEND_PORT}The application now receives telemetry events through port
4167from the front-end plugin. Verify that the following output is logged:INFO [org.ecl.che.inc.AnalyticsManager] (Quarkus Main Thread) No welcome message provided INFO [io.quarkus] (Quarkus Main Thread) devworkspace-telemetry-example-plugin 1.0.0-SNAPSHOT on JVM (powered by Quarkus 2.7.2.Final) started in 0.323s. Listening on: http://localhost:4167 INFO [io.quarkus] (Quarkus Main Thread) Profile dev activated. Live Coding activated. INFO [io.quarkus] (Quarkus Main Thread) Installed features: [cdi, kubernetes-client, rest-client, rest-client-jackson, resteasy, resteasy-jsonb, smallrye-context-propagation, smallrye-openapi, swagger-ui, vertx]
Customize
isEnabled()inAnalyticsManager.java. For this example, the method always returnstrue:@Override public boolean isEnabled() { return true; }The Content from github.com is not included.hosted OpenShift Dev Spaces Woopra backend demonstrates a more advanced
isEnabled()implementation that checks for a configuration property before enabling the backend.Implement
onEvent()to send events to the telemetry server. For the example application, it sends an HTTP POST payload to the/eventendpoint.Configure the RESTEasy REST Client by creating a
TelemetryService.javainterface:package org.my.group; import java.util.Map; import javax.ws.rs.Consumes; import javax.ws.rs.POST; import javax.ws.rs.Path; import javax.ws.rs.core.MediaType; import javax.ws.rs.core.Response; import org.eclipse.microprofile.rest.client.inject.RegisterRestClient; @RegisterRestClient public interface TelemetryService { @POST @Path("/event") @Consumes(MediaType.APPLICATION_JSON) Response sendEvent(Map<String, Object> payload); }where:
@Path("/event")-
The endpoint to make the
POSTrequest to.
Specify the base URL for
TelemetryServiceinsrc/main/resources/application.properties:org.my.group.TelemetryService/mp-rest/url=http://little-telemetry-server-che.apps-crc.testing
Inject
TelemetryServiceintoAnalyticsManager.javaand send aPOSTrequest inonEvent():@Dependent @Alternative public class AnalyticsManager extends AbstractAnalyticsManager { @Inject @RestClient TelemetryService telemetryService; ... @Override public void onEvent(AnalyticsEvent event, String ownerId, String ip, String userAgent, String resolution, Map<String, Object> properties) { Map<String, Object> payload = new HashMap<String, Object>(properties); payload.put("event", event); telemetryService.sendEvent(payload); }This sends an HTTP request to the telemetry server and automatically delays identical events for a small period of time. The default duration is 1500 milliseconds.
Implement
increaseDuration()inAnalyticsManager.java. Many telemetry systems recognize event duration. TheAbstractAnalyticsManagermerges similar events that happen in the same frame of time into one event. This implementation is a no-op:@Override public void increaseDuration(AnalyticsEvent event, Map<String, Object> properties) {}Implement
onActivity()inAnalyticsManager.java. Set an inactive timeout limit and send aWORKSPACE_INACTIVEevent if the last event time exceeds the timeout:public class AnalyticsManager extends AbstractAnalyticsManager { ... private long inactiveTimeLimit = 60000 * 3; ... @Override public void onActivity() { if (System.currentTimeMillis() - lastEventTime >= inactiveTimeLimit) { onEvent(WORKSPACE_INACTIVE, lastOwnerId, lastIp, lastUserAgent, lastResolution, commonProperties); } }Implement
destroy()inAnalyticsManager.java. When called, send aWORKSPACE_STOPPEDevent and shut down any resources such as connection pools:@Override public void destroy() { onEvent(WORKSPACE_STOPPED, lastOwnerId, lastIp, lastUserAgent, lastResolution, commonProperties); }
Verification
To verify that the
onEvent()method receives events from the front-end plugin, press the l key to disable Quarkus live coding and edit any file within the IDE. The following output should be logged:INFO [io.qua.dep.dev.RuntimeUpdatesProcessor] (Aesh InputStream Reader) Live reload disabled INFO [org.ecl.che.inc.AnalyticsManager] (executor-thread-2) The received event is: Edit Workspace File in Che
-
Stop the application with Ctrl+C and verify that a
WORKSPACE_STOPPEDevent is sent to the server.
5.2.4. Deploy a telemetry plugin
Package the telemetry backend as a container image, create a devfile v2 plugin, and host the plugin on a web server so that Dev Workspaces can load it.
This guide demonstrates hosting the plugin on an Apache web server on OpenShift. In production, deploy the plugin file to a corporate web server.
Prerequisites
- You have a running instance of Red Hat OpenShift Dev Spaces.
- You have a telemetry backend created and tested. See Section 5.2.2, “Create a telemetry backend”.
Procedure
Package the Quarkus application as a container image and push it to a container registry by using one of the following options. See Content from quarkus.io is not included.the Quarkus documentation for details.
- Option A: JVM image
Create a
Dockerfile.jvm:FROM registry.access.redhat.com/ubi8/openjdk-11:1.11 ENV LANG='en_US.UTF-8' LANGUAGE='en_US:en' COPY --chown=185 target/quarkus-app/lib/ /deployments/lib/ COPY --chown=185 target/quarkus-app/*.jar /deployments/ COPY --chown=185 target/quarkus-app/app/ /deployments/app/ COPY --chown=185 target/quarkus-app/quarkus/ /deployments/quarkus/ EXPOSE 8080 USER 185 ENTRYPOINT ["java", "-Dquarkus.http.host=0.0.0.0", "-Djava.util.logging.manager=org.jboss.logmanager.LogManager", "-Dquarkus.http.port=${DEVWORKSPACE_TELEMETRY_BACKEND_PORT}", "-jar", "/deployments/quarkus-run.jar"]Build and push the image:
mvn package && \
podman build -f src/main/docker/Dockerfile.jvm -t image:tag .
- Option B: Native image
Create a
Dockerfile.native:FROM registry.access.redhat.com/ubi8/ubi-minimal:8.5 WORKDIR /work/ RUN chown 1001 /work \ && chmod "g+rwX" /work \ && chown 1001:root /work COPY --chown=1001:root target/*-runner /work/application EXPOSE 8080 USER 1001 CMD ["./application", "-Dquarkus.http.host=0.0.0.0", "-Dquarkus.http.port=${DEVWORKSPACE_TELEMETRY_BACKEND_PORT}"]Build and push the image:
mvn package -Pnative -Dquarkus.native.container-build=true && \
podman build -f src/main/docker/Dockerfile.native -t image:tag .
Create a
plugin.yamldevfile v2 file representing a Dev Workspace plugin that runs your custom backend in a Dev Workspace Pod. For more information about devfile v2, see Content from devfile.io is not included.Devfile v2 documentation.schemaVersion: 2.1.0 metadata: name: devworkspace-telemetry-backend-plugin version: 0.0.1 description: A Demo telemetry backend displayName: Devworkspace Telemetry Backend components: - name: devworkspace-telemetry-backend-plugin attributes: workspaceEnv: - name: DEVWORKSPACE_TELEMETRY_BACKEND_PORT value: '4167' container: image: <your_image> env: - name: WELCOME_MESSAGE value: 'hello world!'where:
<your_image>- The container image built in the previous step.
WELCOME_MESSAGE-
Set the value for the
welcome.messageoptional configuration property.
Create a
ConfigMapobject that references theplugin.yamlfile:$ oc create configmap --from-file=plugin.yaml -n openshift-devspaces telemetry-plugin-yaml
Create a
manifest.yamlfile with a Deployment, a Service, and a Route to expose the Apache web server. The Deployment references thisConfigMapobject and places theplugin.yamlin the/var/www/htmldirectory.kind: Deployment apiVersion: apps/v1 metadata: name: apache spec: replicas: 1 selector: matchLabels: app: apache template: metadata: labels: app: apache spec: volumes: - name: plugin-yaml configMap: name: telemetry-plugin-yaml defaultMode: 420 containers: - name: apache image: 'registry.redhat.io/rhscl/httpd-24-rhel7:latest' ports: - containerPort: 8080 protocol: TCP resources: {} volumeMounts: - name: plugin-yaml mountPath: /var/www/html strategy: type: RollingUpdate rollingUpdate: maxUnavailable: 25% maxSurge: 25% revisionHistoryLimit: 10 progressDeadlineSeconds: 600 --- kind: Service apiVersion: v1 metadata: name: apache spec: ports: - protocol: TCP port: 8080 targetPort: 8080 selector: app: apache type: ClusterIP --- kind: Route apiVersion: route.openshift.io/v1 metadata: name: apache spec: host: apache-che.apps-crc.testing to: kind: Service name: apache weight: 100 port: targetPort: 8080 wildcardPolicy: NoneApply the manifest:
$ oc apply -f manifest.yaml
Verification
After the deployment has started, confirm that
plugin.yamlis available in the web server:$ curl apache-che.apps-crc.testing/plugin.yaml
5.2.5. Configure workspaces to load a telemetry plugin
Add the telemetry plugin to Dev Workspaces so that workspace activity events are sent to your telemetry backend for collection and analysis.
Prerequisites
- You have a running instance of Red Hat OpenShift Dev Spaces.
- You have a telemetry plugin deployed and hosted on a web server. See Section 5.2.4, “Deploy a telemetry plugin”.
Procedure
Add the telemetry plugin to the
componentsfield of an existing Dev Workspace:components: ... - name: telemetry-plugin plugin: uri: <telemetry_plugin_url>- Start the Dev Workspace from the OpenShift Dev Spaces dashboard.
Optional: Configure the
CheClusterCustom Resource to apply the telemetry plugin as a default for all Dev Workspaces. Default plugins are applied on Dev Workspace startup for new and existing Dev Workspaces.spec: devEnvironments: defaultPlugins: - editor: eclipse/che-theia/next plugins: - '<telemetry_plugin_url>'where:
editor- The editor identification to set the default plugins for.
plugins- List of URLs to devfile v2 plugins.
Verification
Verify that the telemetry plugin container is running in the Dev Workspace pod by checking the Workspace view within the editor.
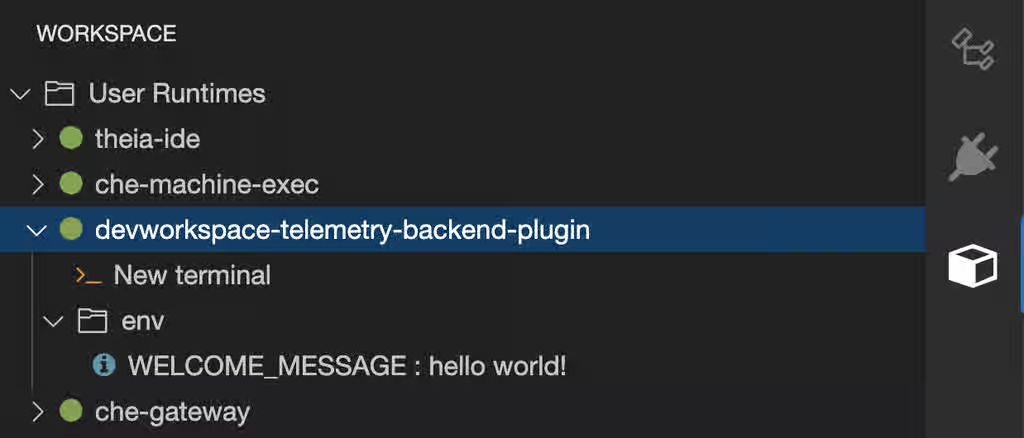
- Edit files within the editor and observe their events in the example telemetry server’s logs.
5.3. Server logging
Fine-tune the log levels of individual loggers available in the OpenShift Dev Spaces server to control output verbosity and isolate issues during troubleshooting.
The log level of the whole OpenShift Dev Spaces server is configured globally using the cheLogLevel configuration property of the Operator. To set the global log level in installations not managed by the Operator, specify the CHE_LOG_LEVEL environment variable in the che ConfigMap.
It is possible to configure the log levels of the individual loggers in the OpenShift Dev Spaces server using the CHE_LOGGER_CONFIG environment variable.
The names of the loggers follow the class names of the internal server classes that use those loggers.
Additional resources
5.3.1. Configure log levels
Configure the log levels of individual loggers in the OpenShift Dev Spaces server using the CHE_LOGGER_CONFIG environment variable to control log verbosity and simplify troubleshooting.
Prerequisites
-
You have an active
ocsession with administrative permissions to the OpenShift cluster. See This page is not included, but the link has been rewritten to point to the nearest parent document.Getting started with the CLI.
Procedure
include::snippets/snip_edit-checluster-cr.adoc[]
spec: components: cheServer: extraProperties: CHE_LOGGER_CONFIG: "<key1=value1,key2=value2>"where:
<key1=value1,key2=value2>Comma-separated list of key-value pairs, where keys are the names of the loggers as seen in the OpenShift Dev Spaces server log output and values are the required log levels.
For example, to configure debug mode for the
WorkspaceManager:spec: components: cheServer: extraProperties: CHE_LOGGER_CONFIG: "org.eclipse.che.api.workspace.server.WorkspaceManager=DEBUG"
Verification
Verify that the log level is applied by checking the OpenShift Dev Spaces server logs:
$ oc logs deployment/devspaces -n openshift-devspaces | grep -i "log level"
5.3.2. Log HTTP traffic
Log the HTTP traffic between the OpenShift Dev Spaces server and the API server of the Kubernetes or OpenShift cluster to troubleshoot communication issues and debug API errors.
Prerequisites
-
You have an active
ocsession with administrative permissions to the OpenShift cluster. See This page is not included, but the link has been rewritten to point to the nearest parent document.Getting started with the CLI.
Procedure
Configure the
CheClusterCustom Resource:spec: components: cheServer: extraProperties: CHE_LOGGER_CONFIG: "che.infra.request-logging=TRACE"
Verification
Verify that HTTP traffic is logged in the OpenShift Dev Spaces server logs:
$ oc logs deploy/devspaces -n openshift-devspaces | grep "request-logging"
5.4. Log collection with dsc
The dsc management tool provides commands to collect OpenShift Dev Spaces logs for troubleshooting and diagnostics. These commands automate log collection from the multiple containers that comprise a Red Hat OpenShift Dev Spaces installation in the OpenShift cluster.
dsc server:logsCollects existing Red Hat OpenShift Dev Spaces server logs and stores them in a directory on the local machine. By default, logs are downloaded to a temporary directory on the machine. However, this can be overwritten by specifying the
-dparameter. For example, to download OpenShift Dev Spaces logs to the/home/user/che-logs/directory, use the commanddsc server:logs -d /home/user/che-logs/
When run,
dsc server:logsprints a message in the console specifying the directory that stores the log files:Red Hat OpenShift Dev Spaces logs will be available in '/tmp/chectl-logs/1648575098344'
If Red Hat OpenShift Dev Spaces is installed in a non-default project,
dsc server:logsrequires the-n <NAMESPACE>parameter.<NAMESPACE>is the project in which Red Hat OpenShift Dev Spaces was installed. For example, to get logs from OpenShift Dev Spaces in themy-namespaceproject, use the commanddsc server:logs -n my-namespace
dsc server:deploy-
Logs are automatically collected during the OpenShift Dev Spaces installation when installed using
dsc. As withdsc server:logs, the directory logs are stored in can be specified using the-dparameter.
Additional resources
5.5. Dev Workspace Operator metrics
The Dev Workspace Operator exposes workspace startup, failure, and performance metrics on port 8443 on the /metrics endpoint of the devworkspace-controller-metrics Service. The OpenShift in-cluster monitoring stack can scrape these metrics to help administrators track workspace health and diagnose startup failures.
5.5.1. Dev Workspace-specific metrics
The following tables describe the Dev Workspace-specific metrics exposed by the devworkspace-controller-metrics Service.
Table 5.1. Metrics
| Name | Type | Description | Labels |
|---|---|---|---|
|
| Counter | Number of Dev Workspace starting events. |
|
|
| Counter |
Number of Dev Workspaces successfully entering the |
|
|
| Counter | Number of failed Dev Workspaces. |
|
|
| Histogram | Total time taken to start a Dev Workspace, in seconds. |
|
Table 5.2. Labels
| Name | Description | Values |
|---|---|---|
|
|
The |
|
|
|
The |
|
|
| The workspace startup failure reason. |
|
Table 5.3. Startup failure reasons
| Name | Description |
|---|---|
|
| Startup failure due to an invalid devfile used to create a Dev Workspace. |
|
|
Startup failure due to the following errors: |
|
| Unknown failure reason. |
5.5.2. Dev Workspace Operator dashboard panels
The OpenShift web console custom dashboard is based on Grafana 6.x and displays the following metrics from the Dev Workspace Operator.
Not all features for Grafana 6.x dashboards are supported as an OpenShift web console dashboard.
The Dev Workspace Metrics panel displays Dev Workspace-specific metrics.
Figure 5.1. The Dev Workspace Metrics panel
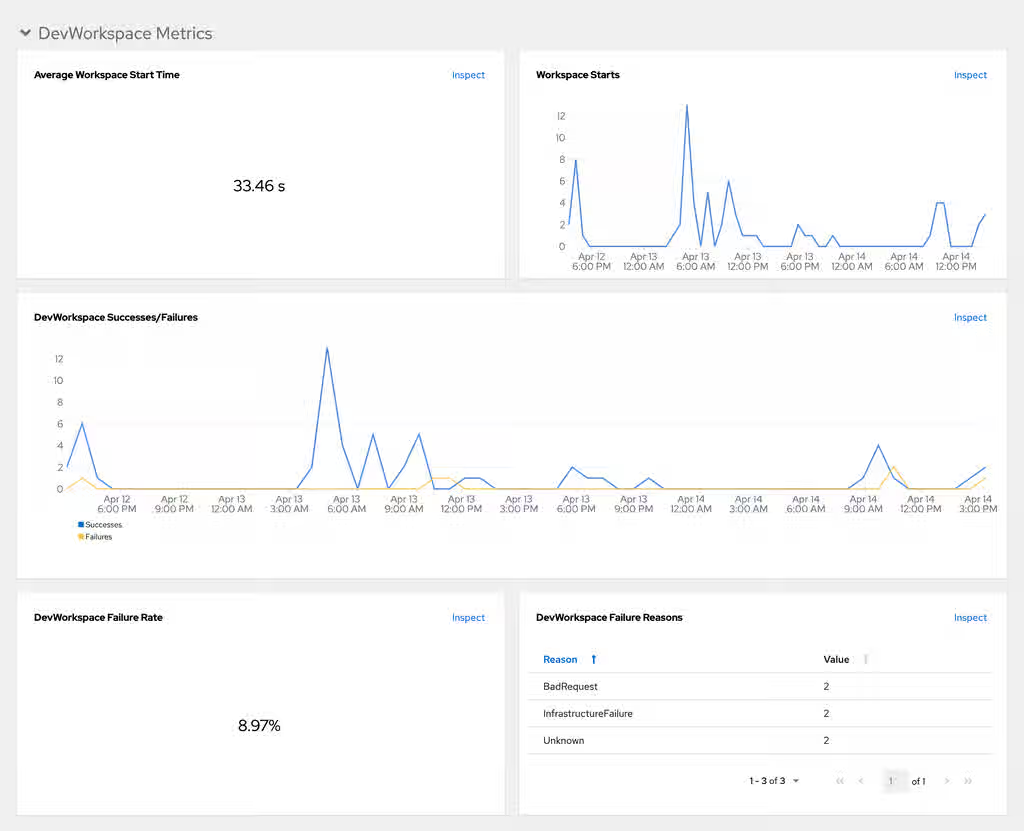
- Average workspace start time
- The average workspace startup duration.
- Workspace starts
- The number of successful and failed workspace startups.
- Dev Workspace successes and failures
- A comparison between successful and failed Dev Workspace startups.
- Dev Workspace failure rate
- The ratio between the number of failed workspace startups and the number of total workspace startups.
- Dev Workspace startup failure reasons
A pie chart that displays the distribution of workspace startup failures:
-
BadRequest -
InfrastructureFailure -
Unknown
-
The Operator Metrics panel displays Operator-specific metrics.
Figure 5.2. The Operator Metrics panel
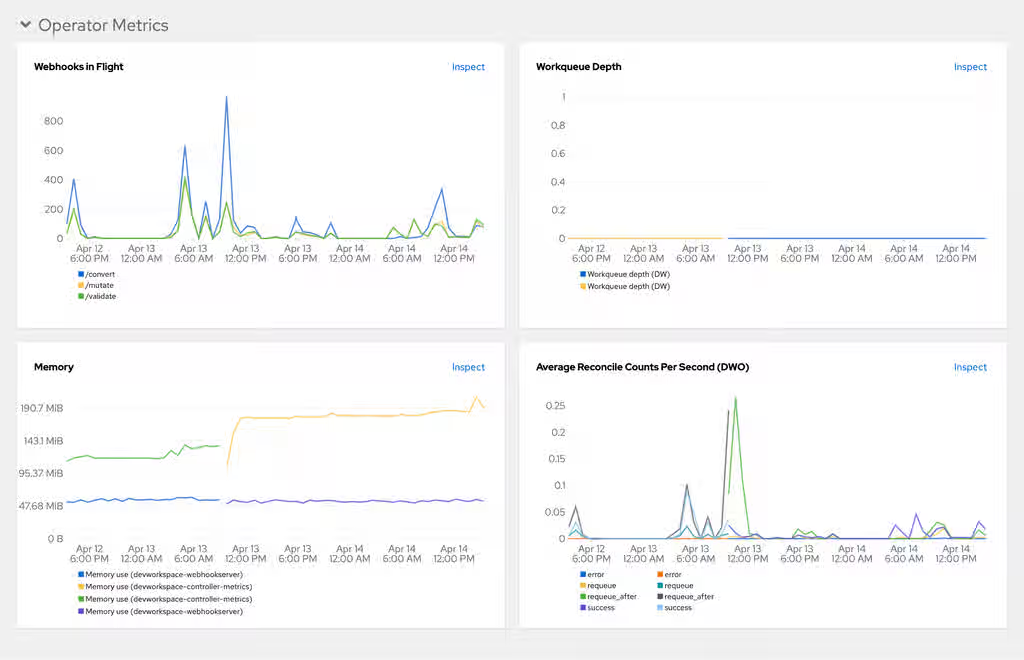
- Webhooks in flight
- A comparison between the number of different webhook requests.
- Work queue depth
- The number of reconcile requests that are in the work queue.
- Memory
- Memory usage for the Dev Workspace controller and the Dev Workspace webhook server.
- Average reconcile counts per second (DWO)
- The average per-second number of reconcile counts for the Dev Workspace controller.
Additional resources
- Section 5.6, “Verify Dev Workspace Operator metrics collection with Prometheus”
- Section 5.7, “View Dev Workspace Operator metrics from an OpenShift web console dashboard”
- This page is not included, but the link has been rewritten to point to the nearest parent document.OpenShift Documentation: Managing metrics
5.6. Verify Dev Workspace Operator metrics collection with Prometheus
Verify that Dev Workspace Operator metrics are available in Prometheus. The OpenShift Dev Spaces Operator automatically creates and reconciles the required Prometheus resources (ServiceMonitor, Role, and RoleBinding) and configures namespace labeling.
Prerequisites
- OpenShift Dev Spaces is installed and running on the OpenShift cluster.
- At least one workspace has been started to generate metrics.
Procedure
- For a fresh installation of OpenShift Dev Spaces, generate metrics by creating a OpenShift Dev Spaces workspace from the Dashboard.
- In the Administrator view of the OpenShift web console, go to Observe → Metrics.
-
Run a PromQL query to confirm that the metrics are available. For example, enter
devworkspace_started_totaland click Run queries.
Verification
- The query returns data points from the Dev Workspace Operator.
Troubleshooting
If the query returns no data, view the Prometheus container logs for possible RBAC-related errors:
Get the name of the Prometheus pod:
$ oc get pods -l app.kubernetes.io/name=prometheus -n openshift-monitoring -o=jsonpath='{.items[*].metadata.name}'Print the last 20 lines of the Prometheus container logs from the Prometheus pod from the previous step:
$ oc logs --tail=20 <prometheus_pod_name> -c prometheus -n openshift-monitoring
5.7. View Dev Workspace Operator metrics from an OpenShift web console dashboard
View Dev Workspace Operator metrics on a custom dashboard in the Administrator perspective of the OpenShift web console. This dashboard helps you monitor operator health and detect workspace provisioning issues.
Prerequisites
- You have an instance of OpenShift Dev Spaces installed and running in OpenShift.
-
You have an active
ocsession with administrative permissions to the destination OpenShift cluster. See This page is not included, but the link has been rewritten to point to the nearest parent document.Getting started with the CLI. - The in-cluster Prometheus instance is collecting metrics. See Section 5.6, “Verify Dev Workspace Operator metrics collection with Prometheus”.
Procedure
Create a ConfigMap for the dashboard definition in the
openshift-config-managedproject and apply the necessary label.$ oc create configmap grafana-dashboard-dwo \ --from-literal=dwo-dashboard.json="$(curl https://raw.githubusercontent.com/devfile/devworkspace-operator/main/docs/grafana/openshift-console-dashboard.json)" \ -n openshift-config-managed
NoteThe previous command contains a link to material from the upstream community. This material represents the very latest available content and the most recent best practices. These tips have not yet been vetted by Red Hat’s QE department, and they have not yet been proven by a wide user group. Please, use this information cautiously.
$ oc label configmap grafana-dashboard-dwo console.openshift.io/dashboard=true -n openshift-config-managed
NoteThe dashboard definition is based on Grafana 6.x dashboards. Not all Grafana 6.x dashboard features are supported in the OpenShift web console.
Verification
- In the Administrator view of the OpenShift web console, go to Observe → Dashboards.
- Go to Dashboard → Dev Workspace Operator and verify that the dashboard panels contain data.
5.8. OpenShift Dev Spaces server monitoring
The OpenShift Dev Spaces server exposes JVM metrics such as memory usage and class loading on port 8087 on the /metrics endpoint. Monitoring these metrics helps administrators identify performance bottlenecks and plan server capacity.
5.9. Enable and expose OpenShift Dev Spaces Server metrics
OpenShift Dev Spaces exposes the JVM metrics on port 8087 of the che-host Service. Configure this behavior to support performance monitoring and capacity planning.
Prerequisites
-
You have an active
ocsession with administrative permissions to the OpenShift cluster. See This page is not included, but the link has been rewritten to point to the nearest parent document.Getting started with the CLI.
Procedure
include::snippets/snip_edit-checluster-cr.adoc[]
spec: components: metrics: enable: <boolean>where:
<boolean>-
trueto enable,falseto disable.
Verification
Verify the metrics endpoint is accessible:
oc get service che-host -n openshift-devspaces -o jsonpath='{.spec.ports[?(@.port==8087)]}'
5.10. Verify OpenShift Dev Spaces Server metrics collection with Prometheus
Verify that OpenShift Dev Spaces Server JVM metrics are available in Prometheus. The OpenShift Dev Spaces Operator automatically creates and reconciles the required Prometheus resources (ServiceMonitor, Role, and RoleBinding) and configures namespace labeling.
Prerequisites
- OpenShift Dev Spaces is installed and running on the OpenShift cluster.
Procedure
- In the Administrator view of the OpenShift web console, go to Observe → Metrics.
-
Run a PromQL query to confirm that the metrics are available. For example, enter
process_uptime_seconds{job="che-host"}and click Run queries.
Verification
- The query returns data points from the OpenShift Dev Spaces Server JVM.
Troubleshooting
If the query returns no data, view the Prometheus container logs for possible RBAC-related errors:
Get the name of the Prometheus pod:
$ oc get pods -l app.kubernetes.io/name=prometheus -n openshift-monitoring -o=jsonpath='{.items[*].metadata.name}'Print the last 20 lines of the Prometheus container logs from the Prometheus pod from the previous step:
$ oc logs --tail=20 <prometheus_pod_name> -c prometheus -n openshift-monitoring
5.11. View OpenShift Dev Spaces Server from an OpenShift web console dashboard
View OpenShift Dev Spaces Server JVM metrics on a custom dashboard in the Administrator perspective of the OpenShift web console. This dashboard helps you identify performance bottlenecks and monitor server health.
Prerequisites
- You have an instance of OpenShift Dev Spaces installed and running in OpenShift.
-
You have an active
ocsession with administrative permissions to the destination OpenShift cluster. See This page is not included, but the link has been rewritten to point to the nearest parent document.Getting started with the CLI. - The in-cluster Prometheus instance is collecting metrics. See Section 5.10, “Verify OpenShift Dev Spaces Server metrics collection with Prometheus”.
Procedure
Create a ConfigMap for the dashboard definition in the
openshift-config-managedproject and apply the necessary label.$ oc create configmap grafana-dashboard-devspaces-server \ --from-literal=devspaces-server-dashboard.json="$(curl https://raw.githubusercontent.com/eclipse-che/che-server/main/docs/grafana/openshift-console-dashboard.json)" \ -n openshift-config-managed
NoteThe previous command contains a link to material from the upstream community. This material represents the very latest available content and the most recent best practices. These tips have not yet been vetted by Red Hat’s QE department, and they have not yet been proven by a wide user group. Please, use this information cautiously.
$ oc label configmap grafana-dashboard-devspaces-server console.openshift.io/dashboard=true -n openshift-config-managed
NoteThe dashboard definition is based on Grafana 6.x dashboards. Not all Grafana 6.x dashboard features are supported in the OpenShift web console.
Verification
- In the Administrator view of the OpenShift web console, go to Observe → Dashboards.
Go to Dashboard → Che Server JVM and verify that the dashboard panels contain data.
Figure 5.3. Quick Facts
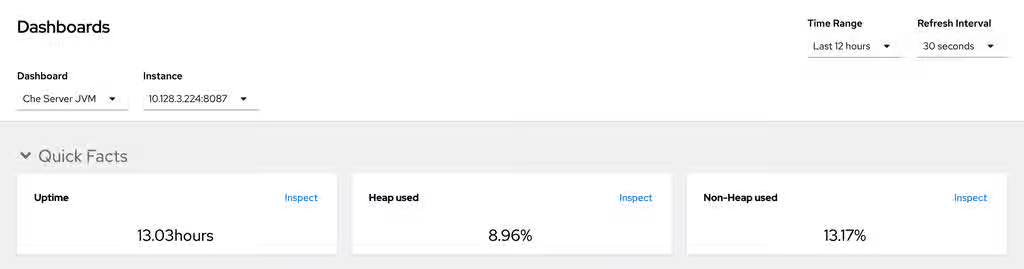
Figure 5.4. JVM Memory
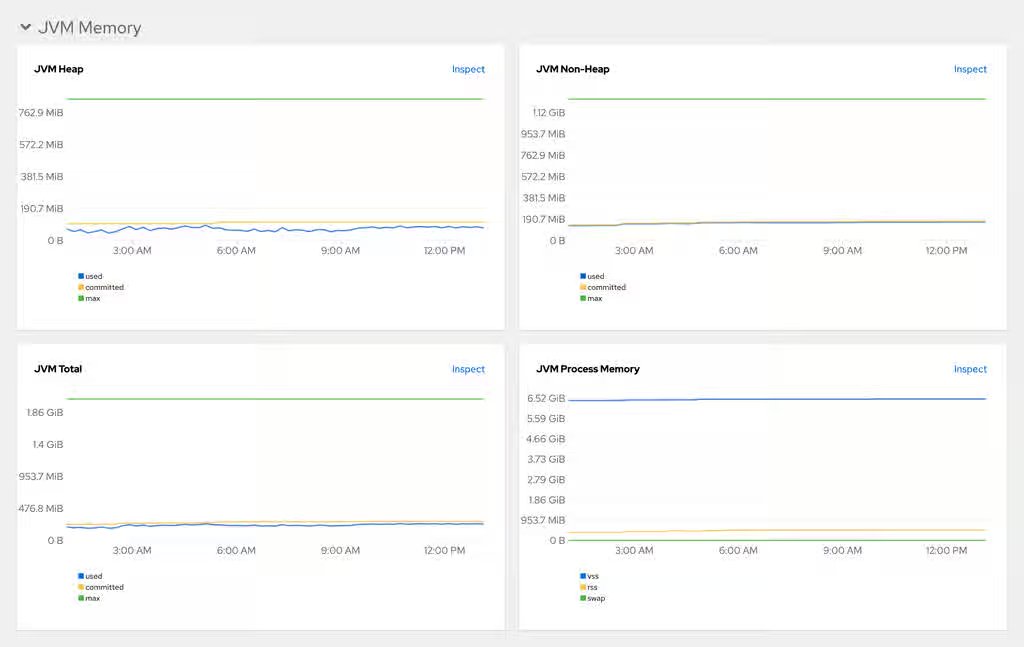
Figure 5.5. JVM Misc
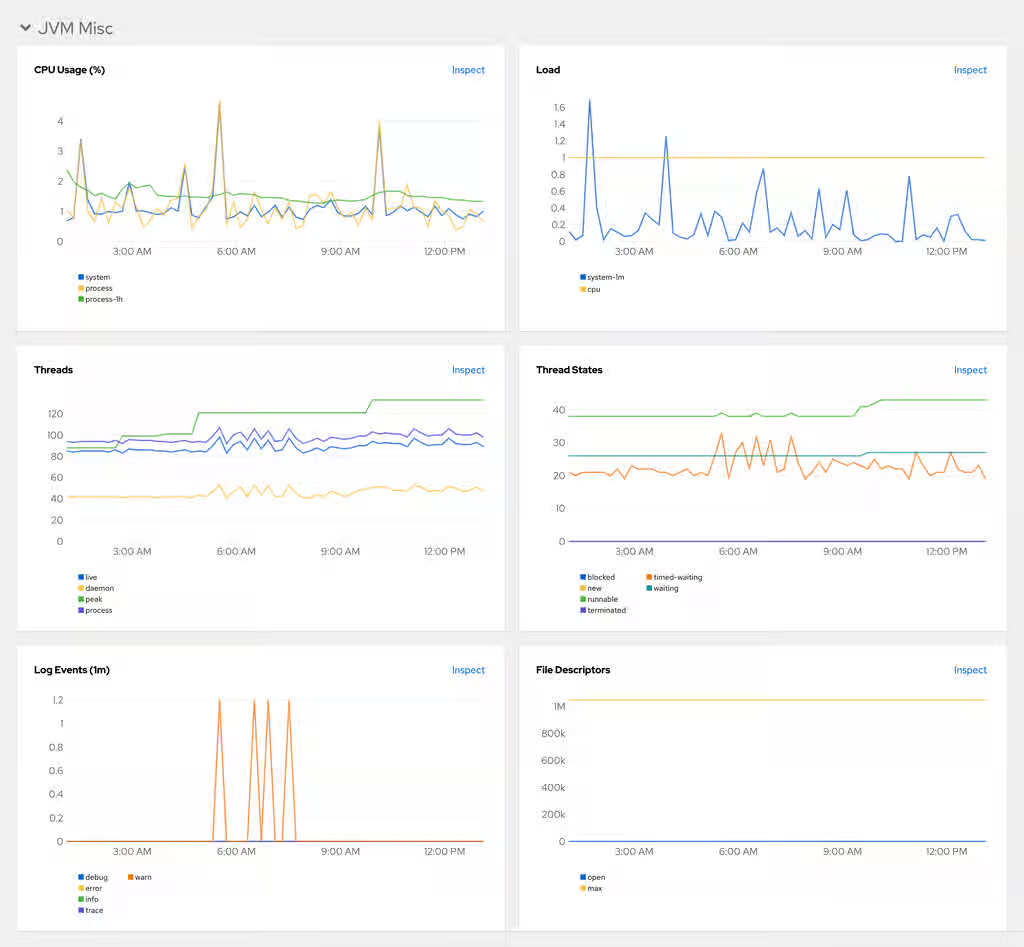
Figure 5.6. JVM Memory Pools (heap)
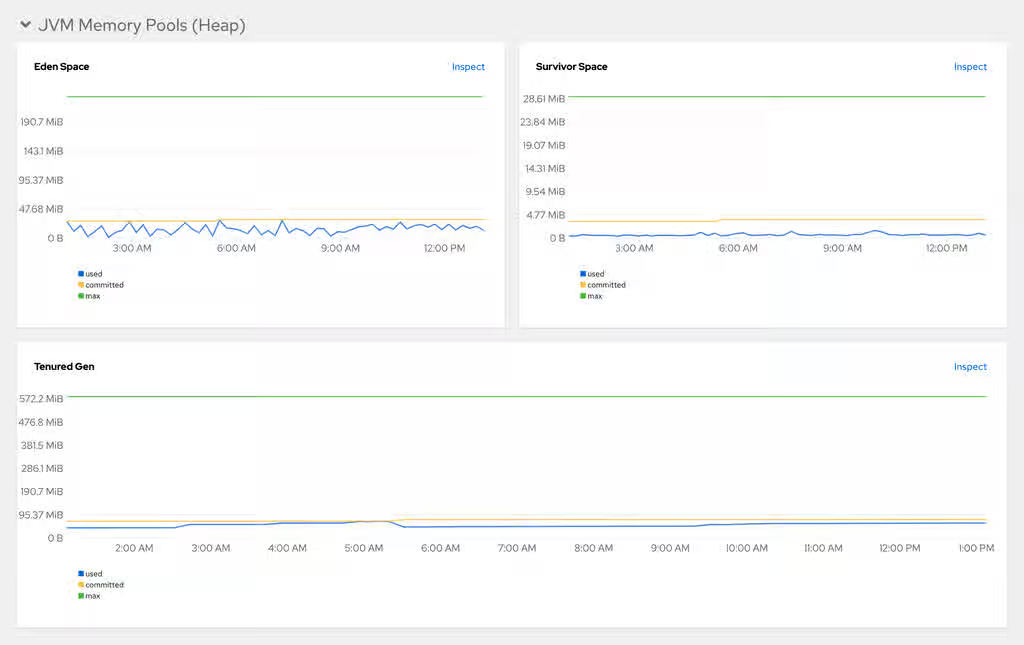
Figure 5.7. JVM Memory Pools (Non-Heap)
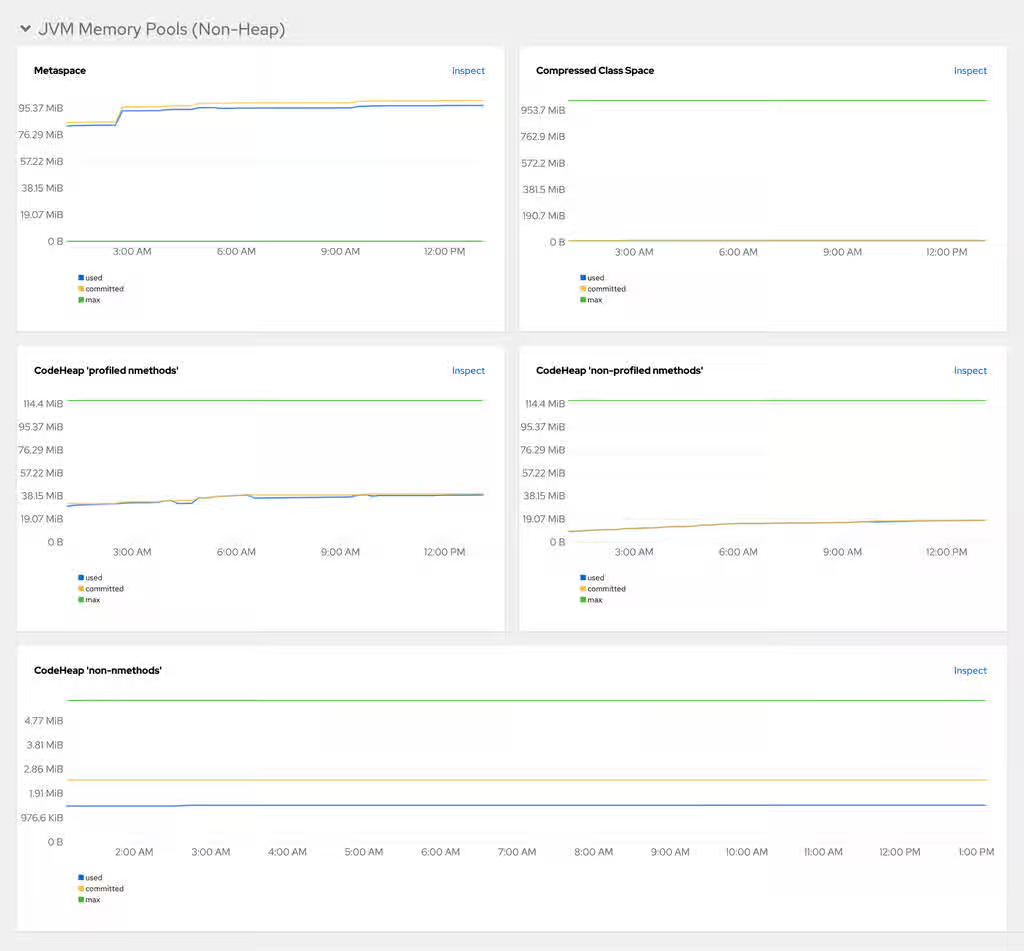
Figure 5.8. Garbage Collection
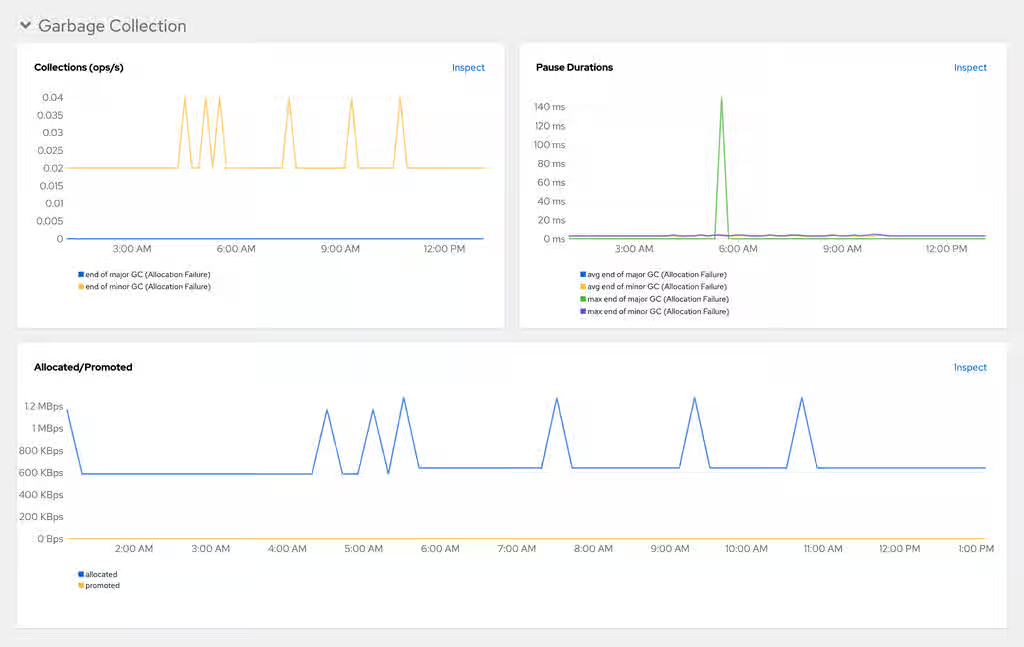
Figure 5.9. Class loading
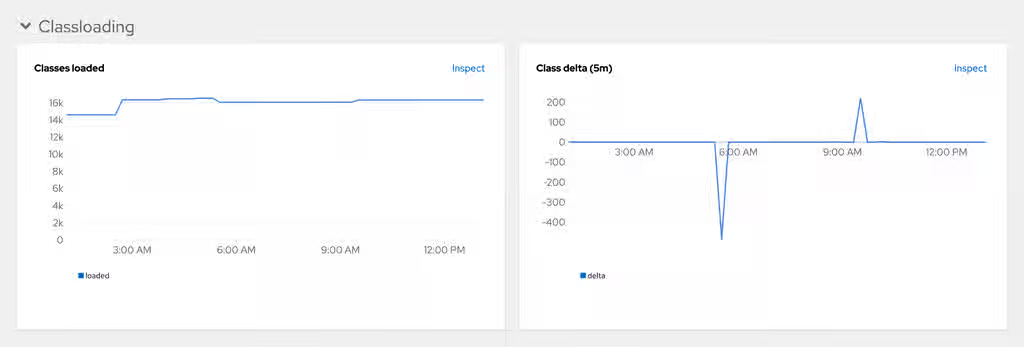
Figure 5.10. Buffer Pools
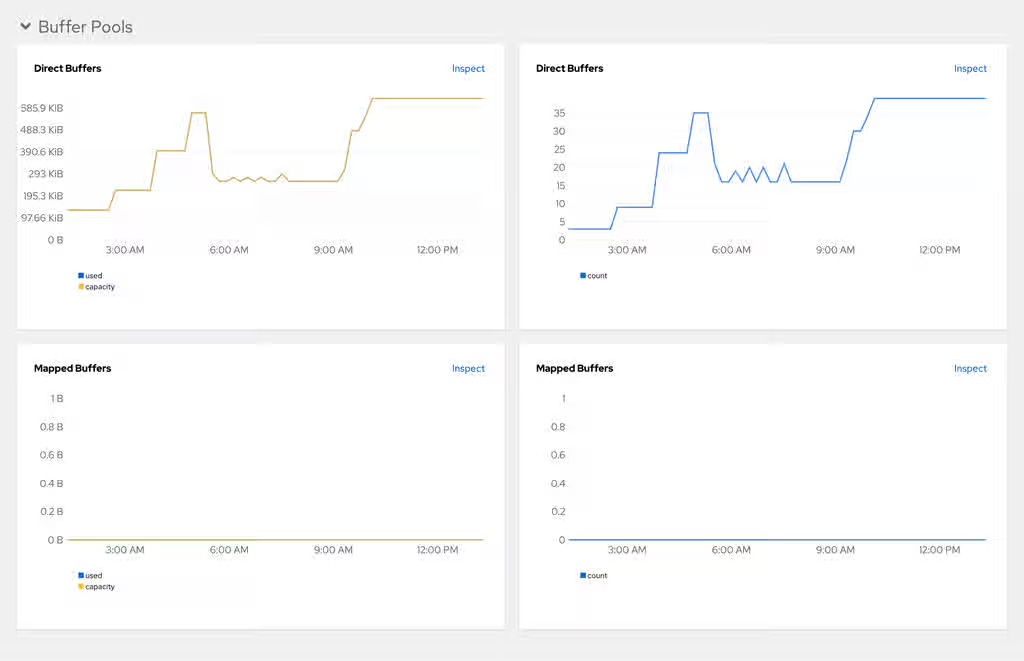
Additional resources
Chapter 6. Give developers credential-free Git access
Connect OpenShift Dev Spaces to your organization’s Git providers with OAuth so that developers can clone repositories and push code from workspaces without manually configuring credentials.
For each provider, you complete two steps: create an OAuth application on the provider’s website, then apply the credentials as a OpenShift Secret on your OpenShift Dev Spaces cluster. Configure only the providers your team uses:
- GitHub — OAuth App or GitHub App (finer-grained permissions)
- GitLab — Authorized application (OAuth 2.0)
- Bitbucket Server — Application link (OAuth 2.0 or OAuth 1.0)
- Bitbucket Cloud — OAuth consumer
- Microsoft Azure DevOps — Microsoft Entra ID application
Microsoft Entra ID replaces the deprecated Azure DevOps OAuth 2.0 application, which no longer accepts new registrations. If you have an existing Azure DevOps OAuth app, migrate to Microsoft Entra ID.
6.1. Create a GitHub OAuth application for OpenShift Dev Spaces
Create an OAuth 2.0 application on GitHub so that OpenShift Dev Spaces can authenticate your developers and provide credential-free access to GitHub repositories.
Prerequisites
- You are logged in to GitHub.
Procedure
- Go to Content from github.com is not included.the GitHub OAuth application registration page.
Enter the following values:
-
Application name:
<application name> -
Homepage URL:
https://<openshift_dev_spaces_fqdn>/ -
Authorization callback URL:
https://<openshift_dev_spaces_fqdn>/api/oauth/callback
-
Application name:
- Click Register application.
- Click Generate new client secret.
- Copy and save the GitHub OAuth Client ID for use when applying the GitHub OAuth App Secret.
- Copy and save the GitHub OAuth Client Secret for use when applying the GitHub OAuth App Secret.
Additional resources
6.2. Create a GitHub App for OpenShift Dev Spaces
Create a GitHub App as an alternative to an OAuth App so that OpenShift Dev Spaces can authenticate your developers with finer-grained repository permissions.
Prerequisites
- You are logged in to GitHub.
Procedure
- Register a GitHub App. See Content from docs.github.com is not included.Registering a GitHub App.
Enter the following values:
-
GitHub App name:
<application_name> -
Homepage URL:
https://<openshift_dev_spaces_fqdn>/ -
Callback URL:
https://<openshift_dev_spaces_fqdn>/api/oauth/callback - Deselect the Active check box in the Webhook section.
- Under Permissions & events, set the Contents repository permission to Read and Write.
-
GitHub App name:
- Click Create GitHub App.
- Click Generate a new client secret.
- Copy and save the GitHub App Client Secret for use when applying the GitHub App Secret.
- Copy and save the GitHub App Client ID for use when applying the GitHub App Secret.
- Install the GitHub App. See Content from docs.github.com is not included.Installing your own GitHub App.
Verification
- Verify that the GitHub App appears in your GitHub account under Settings → Developer settings → GitHub Apps.
6.3. Connect OpenShift Dev Spaces to your GitHub OAuth application
Connect OpenShift Dev Spaces to your GitHub OAuth application so that developers can access GitHub repositories from workspaces without re-entering credentials.
Prerequisites
- You have configured the GitHub OAuth App.
You have the following values, which were generated when configuring the GitHub OAuth App:
- GitHub OAuth Client ID
- GitHub OAuth Client Secret
-
You have an active
ocsession with administrative permissions to the OpenShift cluster. See This page is not included, but the link has been rewritten to point to the nearest parent document.Getting started with the CLI.
Procedure
Prepare the Secret:
kind: Secret apiVersion: v1 metadata: name: github-oauth-config namespace: openshift-devspaces labels: app.kubernetes.io/part-of: che.eclipse.org app.kubernetes.io/component: oauth-scm-configuration annotations: che.eclipse.org/oauth-scm-server: github che.eclipse.org/scm-server-endpoint: <github_server_url> che.eclipse.org/scm-github-disable-subdomain-isolation: 'false' type: Opaque stringData: id: <GitHub_OAuth_Client_ID> secret: <GitHub_OAuth_Client_Secret>where:
- namespace
-
The OpenShift Dev Spaces namespace. The default is
openshift-devspaces. - che.eclipse.org/scm-server-endpoint
-
This depends on the GitHub product your organization is using. When hosting repositories on GitHub.com or GitHub Enterprise Cloud, omit this line or enter the default
Content from github.com is not included.https://github.com. When hosting repositories on GitHub Enterprise Server, enter the GitHub Enterprise Server URL. - che.eclipse.org/scm-github-disable-subdomain-isolation
-
If you are using GitHub Enterprise Server with a disabled Content from docs.github.com is not included.subdomain isolation option, you must set the annotation to
true. Otherwise, you can either omit the annotation or set it tofalse. - id
- The GitHub OAuth Client ID.
- secret
- The GitHub OAuth Client Secret.
Apply the Secret:
$ oc apply -f - <<EOF <Secret_prepared_in_the_previous_step> EOF- Optional: To configure OAuth 2.0 for another GitHub provider, repeat the previous steps and create a second GitHub OAuth Secret with a different name.
Verification
-
Verify that the output displays
secret/github-oauth-config created.
6.4. Create a GitLab OAuth application for OpenShift Dev Spaces
Create an OAuth 2.0 authorized application on your GitLab instance so that OpenShift Dev Spaces can authenticate your developers and provide credential-free access to GitLab repositories.
Prerequisites
- You are logged in to GitLab.
Procedure
- Click your avatar and go to → .
- Enter OpenShift Dev Spaces as the Name.
-
Enter
https://<openshift_dev_spaces_fqdn>/api/oauth/callbackas the Redirect URI. - Check the Confidential and Expire access tokens checkboxes.
-
Under Scopes, check the
api,write_repository, andopenidcheckboxes. - Click Save application.
- Copy and save the GitLab Application ID for use when applying the GitLab-authorized application Secret.
- Copy and save the GitLab Client Secret for use when applying the GitLab-authorized application Secret.
Additional resources
6.5. Connect OpenShift Dev Spaces to your GitLab OAuth application
Connect OpenShift Dev Spaces to your GitLab OAuth application so that developers can access GitLab repositories from workspaces without re-entering credentials.
Prerequisites
- You have configured the GitLab authorized application.
You have the following values, which were generated when configuring the GitLab authorized application:
- GitLab Application ID
- GitLab Client Secret
-
You have an active
ocsession with administrative permissions to the OpenShift cluster. See This page is not included, but the link has been rewritten to point to the nearest parent document.Getting started with the CLI.
Procedure
Prepare the Secret:
kind: Secret apiVersion: v1 metadata: name: gitlab-oauth-config namespace: openshift-devspaces labels: app.kubernetes.io/part-of: che.eclipse.org app.kubernetes.io/component: oauth-scm-configuration annotations: che.eclipse.org/oauth-scm-server: gitlab che.eclipse.org/scm-server-endpoint: <gitlab_server_url> type: Opaque stringData: id: <GitLab_Application_ID> secret: <GitLab_Client_Secret>where:
- namespace
-
The OpenShift Dev Spaces namespace. The default is
openshift-devspaces. - che.eclipse.org/scm-server-endpoint
-
The GitLab server URL. Use
Content from gitlab.com is not included.https://gitlab.comfor theSAASversion. - id
- The GitLab Application ID.
- secret
- The GitLab Client Secret.
Apply the Secret:
$ oc apply -f - <<EOF <Secret_prepared_in_the_previous_step> EOF- Optional: To configure OAuth 2.0 for another GitLab provider, repeat the previous steps and create a second GitLab OAuth Secret with a different name.
Verification
-
Verify that the output displays
secret/gitlab-oauth-config created.
6.6. Create a Bitbucket Server OAuth 2.0 application for OpenShift Dev Spaces
Create an OAuth 2.0 application link on your Bitbucket Server so that OpenShift Dev Spaces can authenticate your developers and provide credential-free access to Bitbucket Server repositories.
Prerequisites
- You are logged in to the Bitbucket Server.
Procedure
- Go to Administration > Applications > Application links.
- Select Create link.
- Select External application and Incoming.
-
Enter
https://<openshift_dev_spaces_fqdn>/api/oauth/callbackto the Redirect URL field. - Select the Admin - Write checkbox in Application permissions.
- Click Save.
- Copy and save the Client ID for use when applying the Bitbucket application link Secret.
- Copy and save the Client secret for use when applying the Bitbucket application link Secret.
6.7. Connect OpenShift Dev Spaces to your Bitbucket Server OAuth 2.0 application
Connect OpenShift Dev Spaces to your Bitbucket Server OAuth 2.0 application so that developers can access Bitbucket Server repositories from workspaces without re-entering credentials.
Prerequisites
- You have configured the OAuth 2.0 application link on the Bitbucket Server.
You have the following values, which were generated when configuring the Bitbucket application link:
- Bitbucket Client ID
- Bitbucket Client secret
-
You have an active
ocsession with administrative permissions to the OpenShift cluster. See This page is not included, but the link has been rewritten to point to the nearest parent document.Getting started with the CLI.
Procedure
Prepare the Secret:
kind: Secret apiVersion: v1 metadata: name: bitbucket-oauth-config namespace: openshift-devspaces labels: app.kubernetes.io/part-of: che.eclipse.org app.kubernetes.io/component: oauth-scm-configuration annotations: che.eclipse.org/oauth-scm-server: bitbucket che.eclipse.org/scm-server-endpoint: <bitbucket_server_url> type: Opaque stringData: id: <Bitbucket_Client_ID> secret: <Bitbucket_Client_Secret>where:
- namespace
-
The OpenShift Dev Spaces namespace. The default is
openshift-devspaces. - che.eclipse.org/scm-server-endpoint
- The URL of the Bitbucket Server.
- id
- The Bitbucket Client ID.
- secret
- The Bitbucket Client secret.
Apply the Secret:
$ oc apply -f - <<EOF
<Secret_prepared_in_the_previous_step>
EOF
Verification
-
Verify that the output displays
secret/bitbucket-oauth-config created.
6.8. Create a Bitbucket Cloud OAuth consumer for OpenShift Dev Spaces
Create an OAuth consumer on Bitbucket Cloud so that OpenShift Dev Spaces can authenticate your developers and provide credential-free access to Bitbucket Cloud repositories.
Prerequisites
- You are logged in to the Bitbucket Cloud.
Procedure
- Click your avatar and go to the All workspaces page.
- Select a workspace and click it.
- Go to → → .
- Enter OpenShift Dev Spaces as the Name.
-
Enter
https://<openshift_dev_spaces_fqdn>/api/oauth/callbackas the Callback URL. - Under Permissions, check all of the Account and Repositories checkboxes, and click Save.
- Expand the added consumer and then copy and save the Key value for use when applying the Bitbucket OAuth consumer Secret.
- Copy and save the Secret value for use when applying the Bitbucket OAuth consumer Secret.
6.9. Connect OpenShift Dev Spaces to your Bitbucket Cloud OAuth consumer
Connect OpenShift Dev Spaces to your Bitbucket Cloud OAuth consumer so that developers can access Bitbucket Cloud repositories from workspaces without re-entering credentials.
Prerequisites
- You have configured the OAuth consumer in the Bitbucket Cloud.
You have the following values, which were generated when configuring the Bitbucket OAuth consumer:
- Bitbucket OAuth consumer Key
- Bitbucket OAuth consumer Secret
-
You have an active
ocsession with administrative permissions to the OpenShift cluster. See This page is not included, but the link has been rewritten to point to the nearest parent document.Getting started with the CLI.
Procedure
Prepare the Secret:
kind: Secret apiVersion: v1 metadata: name: bitbucket-oauth-config namespace: openshift-devspaces labels: app.kubernetes.io/part-of: che.eclipse.org app.kubernetes.io/component: oauth-scm-configuration annotations: che.eclipse.org/oauth-scm-server: bitbucket type: Opaque stringData: id: <Bitbucket_Oauth_Consumer_Key> secret: <Bitbucket_Oauth_Consumer_Secret>where:
- namespace
-
The OpenShift Dev Spaces namespace. The default is
openshift-devspaces. - id
- The Bitbucket OAuth consumer Key.
- secret
- The Bitbucket OAuth consumer Secret.
Apply the Secret:
$ oc apply -f - <<EOF
<Secret_prepared_in_the_previous_step>
EOF
Verification
-
Verify that the output displays
secret/bitbucket-oauth-config created.
6.10. Create a Bitbucket Server OAuth 1.0 application for OpenShift Dev Spaces
Create an OAuth 1.0 application link on your Bitbucket Server so that OpenShift Dev Spaces can authenticate your developers and provide access to Bitbucket Server repositories.
Prerequisites
- You are logged in to the Bitbucket Server.
-
Content from www.openssl.org is not included.
opensslis installed in the operating system you are using.
Procedure
On a command line, run the commands to create the necessary files for the next steps and for use when applying the application link Secret:
$ openssl genrsa -out private.pem 2048 && \
openssl pkcs8 -topk8 -inform pem -outform pem -nocrypt -in private.pem -out privatepkcs8.pem && \
cat privatepkcs8.pem | sed 's/-----BEGIN PRIVATE KEY-----//g' | sed 's/-----END PRIVATE KEY-----//g' | tr -d '\n' > privatepkcs8-stripped.pem && \
openssl rsa -in private.pem -pubout > public.pub && \
cat public.pub | sed 's/-----BEGIN PUBLIC KEY-----//g' | sed 's/-----END PUBLIC KEY-----//g' | tr -d '\n' > public-stripped.pub && \
openssl rand -base64 24 > bitbucket-consumer-key && \
openssl rand -base64 24 > bitbucket-shared-secret
-
Go to → , enter
https://<openshift_dev_spaces_fqdn>/into the URL field, and click Create new link. - Under The supplied Application URL has redirected once, check the Use this URL checkbox and click Continue.
Configure the application link with the following values:
- Enter OpenShift Dev Spaces as the Application Name.
- Select Generic Application as the Application Type.
- Enter OpenShift Dev Spaces as the Service Provider Name.
-
Paste the content of the
bitbucket-consumer-keyfile as the Consumer key. -
Paste the content of the
bitbucket-shared-secretfile as the Shared secret. -
Enter
<bitbucket_server_url>/plugins/servlet/oauth/request-tokenas the Request Token URL. -
Enter
<bitbucket_server_url>/plugins/servlet/oauth/access-tokenas the Access token URL. -
Enter
<bitbucket_server_url>/plugins/servlet/oauth/authorizeas the Authorize URL. - Check the Create incoming link checkbox and click Continue.
Configure the incoming link with the following values:
-
Paste the content of the
bitbucket-consumer-keyfile as the Consumer Key. - Enter OpenShift Dev Spaces as the Consumer name.
-
Paste the content of the
public-stripped.pubfile as the Public Key and click Continue.
-
Paste the content of the
6.11. Connect OpenShift Dev Spaces to your Bitbucket Server OAuth 1.0 application
Connect OpenShift Dev Spaces to your Bitbucket Server OAuth 1.0 application so that developers can access Bitbucket Server repositories from workspaces without re-entering credentials.
Prerequisites
- You have configured the application link on the Bitbucket Server.
You have the following files, which were created when configuring the application link:
-
privatepkcs8-stripped.pem -
bitbucket-consumer-key -
bitbucket-shared-secret
-
-
You have an active
ocsession with administrative permissions to the OpenShift cluster. See This page is not included, but the link has been rewritten to point to the nearest parent document.Getting started with the CLI.
Procedure
Prepare the Secret:
kind: Secret apiVersion: v1 metadata: name: bitbucket-oauth-config namespace: openshift-devspaces labels: app.kubernetes.io/component: oauth-scm-configuration app.kubernetes.io/part-of: che.eclipse.org annotations: che.eclipse.org/oauth-scm-server: bitbucket che.eclipse.org/scm-server-endpoint: <bitbucket_server_url> type: Opaque stringData: private.key: <Content_of_privatepkcs8-stripped.pem> consumer.key: <Content_of_bitbucket-consumer-key> shared_secret: <Content_of_bitbucket-shared-secret>where:
- namespace
-
The OpenShift Dev Spaces namespace. The default is
openshift-devspaces. - che.eclipse.org/scm-server-endpoint
- The URL of the Bitbucket Server.
- private.key
-
The content of the
privatepkcs8-stripped.pemfile. - consumer.key
-
The content of the
bitbucket-consumer-keyfile. - shared_secret
-
The content of the
bitbucket-shared-secretfile.
Apply the Secret:
$ oc apply -f - <<EOF
<Secret_prepared_in_the_previous_step>
EOF
Verification
-
Verify that the output displays
secret/bitbucket-oauth-config created.
6.12. Create a Microsoft Entra ID application for OpenShift Dev Spaces
Create a Microsoft Entra ID OAuth application so that OpenShift Dev Spaces can authenticate your developers and provide credential-free access to Azure DevOps repositories.
Prerequisites
- You are logged in to Content from azure.microsoft.com is not included.Microsoft Azure DevOps Services.
Procedure
- Register an application in Microsoft Entra ID. See Content from learn.microsoft.com is not included.Register an application.
-
Add the Authorization callback URL
https://<openshift_dev_spaces_fqdn>/api/oauth/callbackto your application. See Content from learn.microsoft.com is not included.Add a redirect URI. - Add a client secret to your application. See Content from learn.microsoft.com is not included.Add credentials.
-
Add the Azure DevOps
vso.code_writepermission to the client application. See Content from learn.microsoft.com is not included.Add permissions to access your web API. - Connect your Azure DevOps organization to Microsoft Entra ID. See Content from learn.microsoft.com is not included.Connect your organization to Microsoft Entra ID.
6.13. Connect OpenShift Dev Spaces to your Microsoft Entra ID application
Connect OpenShift Dev Spaces to your Microsoft Entra ID application so that developers can access Azure DevOps repositories from workspaces without re-entering credentials.
Prerequisites
- You have configured the Microsoft Entra ID OAuth App.
You have the following values, which were generated when configuring the Microsoft Entra ID OAuth App:
- Application (client) ID
- Directory (tenant) ID
- Client Secret
-
You have an active
ocsession with administrative permissions to the OpenShift cluster. See This page is not included, but the link has been rewritten to point to the nearest parent document.Getting started with the CLI.
Procedure
Prepare the Secret:
kind: Secret apiVersion: v1 metadata: name: azure-devops-oauth-config namespace: openshift-devspaces labels: app.kubernetes.io/part-of: che.eclipse.org app.kubernetes.io/component: oauth-scm-configuration annotations: che.eclipse.org/oauth-scm-server: azure-devops type: Opaque stringData: tenant-id: <Microsoft_Entra_ID_Tenant_ID> id: <Microsoft_Entra_ID_App_ID> secret: <Microsoft_Entra_ID_Client_Secret>where:
namespace-
The OpenShift Dev Spaces namespace. The default is
openshift-devspaces. tenant-id- The Microsoft Entra ID Directory (tenant) ID.
id- The Microsoft Entra ID Application (client) ID.
secret- The Microsoft Entra ID Client Secret.
Apply the Secret:
$ oc apply -f - <<EOF
<Secret_prepared_in_the_previous_step>
EOF
Verification
-
Verify that the output displays
secret/azure-devops-oauth-config created. Verify that the rollout of the OpenShift Dev Spaces server components is complete:
$ oc rollout status deployment/devspaces -n openshift-devspaces
6.14. Refresh an expired access token automatically
Enable automatic token refresh on workspace startup so that developers do not encounter authentication failures caused by expired personal access tokens.
This is an experimental feature.
Prerequisites
-
You have an active
ocsession with administrative permissions to the OpenShift cluster. See This page is not included, but the link has been rewritten to point to the nearest parent document.Getting started with the CLI.
Procedure
Modify the
CheClusterCustom Resource to enable forced token refresh:spec: components: cheServer: extraProperties: CHE_FORCE_REFRESH_PERSONAL_ACCESS_TOKEN: "true"
Verification
- Start a new workspace and verify that the personal access token is refreshed by checking the OpenShift Dev Spaces server logs.
Additional resources
Additional resources
Chapter 7. Set up network access for workspaces
Configure network policies, TLS certificates, custom hostnames, and proxy settings so that OpenShift Dev Spaces workspaces communicate securely within your network environment.
7.1. Restrict network traffic between workspaces
Configure network policies to restrict traffic between workspace Pods in different user projects to improve security through multitenant isolation. By default, all Pods in an OpenShift cluster can communicate across namespaces.
With multitenant isolation, NetworkPolicy objects restrict all incoming traffic to Pods in a user project. However, Pods in the OpenShift Dev Spaces project must still communicate with Pods in user projects.
Prerequisites
- You have an OpenShift cluster with network restrictions such as multitenant isolation.
Procedure
Create an
allow-from-openshift-devspaces.yamlfile. Theallow-from-openshift-devspacesNetworkPolicy allows incoming traffic from the OpenShift Dev Spaces namespace to all Pods in the user project.apiVersion: networking.k8s.io/v1 kind: NetworkPolicy metadata: name: allow-from-openshift-devspaces spec: ingress: - from: - namespaceSelector: matchLabels: kubernetes.io/metadata.name: openshift-devspaces podSelector: {} policyTypes: - Ingresswhere:
kubernetes.io/metadata.name: openshift-devspaces-
Selects traffic from the OpenShift Dev Spaces namespace. The default namespace is
openshift-devspaces. podSelector: {}-
The empty
podSelectorselects all Pods in the project.
Apply the
allow-from-openshift-devspacesNetworkPolicy to each user project:oc apply -f allow-from-openshift-devspaces.yaml -n <user_namespace>Optional: If you configured multitenant isolation with network policy, create and apply the
allow-from-openshift-apiserverandallow-from-workspaces-namespacesNetworkPolicies toopenshift-devspaces. Theallow-from-openshift-apiserverNetworkPolicy allows incoming traffic from theopenshift-apiservernamespace to thedevworkspace-webhook-server, enabling webhooks. Theallow-from-workspaces-namespacesNetworkPolicy allows incoming traffic from each user project to theche-gatewaypod.Create an
allow-from-openshift-apiserver.yamlfile:apiVersion: networking.k8s.io/v1 kind: NetworkPolicy metadata: name: allow-from-openshift-apiserver namespace: openshift-devspaces spec: podSelector: matchLabels: app.kubernetes.io/name: devworkspace-webhook-server ingress: - from: - podSelector: {} namespaceSelector: matchLabels: kubernetes.io/metadata.name: openshift-apiserver policyTypes: - Ingresswhere:
namespace: openshift-devspaces-
The OpenShift Dev Spaces namespace. The default is
openshift-devspaces. app.kubernetes.io/name: devworkspace-webhook-server-
The
podSelectoronly selects devworkspace-webhook-server pods.
Create an
allow-from-workspaces-namespaces.yamlfile:apiVersion: networking.k8s.io/v1 kind: NetworkPolicy metadata: name: allow-from-workspaces-namespaces namespace: openshift-devspaces spec: podSelector: {} ingress: - from: - podSelector: {} namespaceSelector: matchLabels: app.kubernetes.io/component: workspaces-namespace policyTypes: - Ingresswhere:
namespace: openshift-devspaces-
The OpenShift Dev Spaces namespace. The default is
openshift-devspaces. podSelector: {}-
The empty
podSelectorselects all pods in the OpenShift Dev Spaces namespace.
Apply both NetworkPolicies:
oc apply -f allow-from-openshift-apiserver.yaml -n openshift-devspaces
oc apply -f allow-from-workspaces-namespaces.yaml -n openshift-devspaces
Verification
Verify that the NetworkPolicy is applied in the user namespace:
oc get networkpolicy -n <user_namespace>- Start a workspace and verify that the workspace can communicate with the OpenShift Dev Spaces server.
7.2. Use a custom hostname for the dashboard
Configure OpenShift Dev Spaces to use a custom hostname instead of the default cluster-assigned URL to align with corporate DNS standards and branding requirements.
Prerequisites
-
You have an active
ocsession with administrative permissions to the OpenShift cluster. See This page is not included, but the link has been rewritten to point to the nearest parent document.Getting started with the CLI. - You have the certificate and the private key files generated by the same certification authority (CA) used for other OpenShift Dev Spaces hosts.
- You have the custom hostname configured to point to the cluster ingress with your DNS provider.
Procedure
Pre-create a project for OpenShift Dev Spaces:
$ oc create project openshift-devspaces
Create a TLS secret:
$ oc create secret tls <tls_secret_name> \
--key <key_file> \
--cert <cert_file> \
-n openshift-devspaces
where:
<tls_secret_name>- The TLS secret name.
--key- A file with the private key.
--cert- A file with the certificate.
Add the required labels to the secret:
$ oc label secret <tls_secret_name> \ app.kubernetes.io/part-of=che.eclipse.org -n openshift-devspaceswhere:
<tls_secret_name>- The TLS secret name.
Configure the
CheClusterCustom Resource:spec: networking: hostname: <hostname> tlsSecretName: <secret>where:
<hostname>- Custom Red Hat OpenShift Dev Spaces server hostname.
<secret>- The TLS secret name.
- If OpenShift Dev Spaces is already deployed, wait for the rollout of all OpenShift Dev Spaces components to complete.
Verification
- Verify that the OpenShift Dev Spaces Dashboard is accessible at the custom hostname.
7.3. Trust custom TLS certificates for external services
Import TLS certificate authority (CA) chains for external services into OpenShift Dev Spaces. This enables the server, dashboard, and workspaces to establish trusted encrypted connections to proxies, identity providers, and Git servers.
OpenShift Dev Spaces uses labeled ConfigMaps in OpenShift Dev Spaces project as sources for TLS certificates. The ConfigMaps can have an arbitrary amount of keys with an arbitrary amount of certificates each. All certificates are mounted into:
-
/public-certslocation of OpenShift Dev Spaces server and dashboard pods -
/etc/pki/ca-trust/extracted/pemlocations of workspaces pods
Configure the CheCluster Custom Resource to disable CA bundle mounting at /etc/pki/ca-trust/extracted/pem. The certificates are instead mounted at /public-certs to keep the behavior from the previous version.
Configure the CheCluster Custom Resource to disable the mounting of the CA bundle under the path /etc/pki/ca-trust/extracted/pem. Certificates are mounted under the path /public-certs in this case.
spec:
  devEnvironments:
    trustedCerts:
disableWorkspaceCaBundleMount: trueOn an OpenShift cluster, OpenShift Dev Spaces operator automatically adds Red Hat Enterprise Linux CoreOS (RHCOS) trust bundle into mounted certificates.
Prerequisites
-
You have an active
ocsession with administrative permissions to the destination OpenShift cluster. See This page is not included, but the link has been rewritten to point to the nearest parent document.Getting started with the CLI. -
You have the
openshift-devspacesproject created. -
You have the root CA and intermediate certificates for each CA chain to import, in Content from wiki.openssl.org is not included.PEM format, in a
ca-cert-for-devspaces-<count>.pemfile.
Procedure
Concatenate all CA chains PEM files to import, into the
custom-ca-certificates.pemfile, and remove the return character that is incompatible with the Java truststore.$ cat ca-cert-for-devspaces-*.pem | tr -d '\r' > custom-ca-certificates.pem
Create the
custom-ca-certificatesConfigMap with the required TLS certificates:$ oc create configmap custom-ca-certificates \ --from-file=custom-ca-certificates.pem \ --namespace=openshift-devspacesLabel the
custom-ca-certificatesConfigMap:$ oc label configmap custom-ca-certificates \ app.kubernetes.io/component=ca-bundle \ app.kubernetes.io/part-of=che.eclipse.org \ --namespace=openshift-devspaces- Deploy OpenShift Dev Spaces if it has not been deployed before. Otherwise, wait until the rollout of OpenShift Dev Spaces components finishes.
- Restart running workspaces for the changes to take effect.
Verification
Verify that the ConfigMap contains your custom CA certificates. This command returns CA bundle certificates in PEM format:
oc get configmap \ --namespace=openshift-devspaces \ --output='jsonpath={.items[0:].data.custom-ca-certificates\.pem}' \ --selector=app.kubernetes.io/component=ca-bundle,app.kubernetes.io/part-of=che.eclipse.orgVerify in the OpenShift Dev Spaces server logs that the imported certificates count is not null:
oc logs deploy/devspaces --namespace=openshift-devspaces \ | grep tls-ca-bundle.pem- Start a workspace, get the project name in which it has been created: <workspace_namespace>, and wait for the workspace to be started.
Verify that the
ca-certs-mergedConfigMap contains your custom CA certificates. This command returns OpenShift Dev Spaces CA bundle certificates in PEM format:oc get configmap ca-certs-merged \ --namespace=<workspace_namespace> \ --output='jsonpath={.data.tls-ca-bundle\.pem}'Verify that the workspace pod mounts the
ca-certs-mergedConfigMap:oc get pod \ --namespace=<workspace_namespace> \ --selector='controller.devfile.io/devworkspace_name=<workspace_name>' \ --output='jsonpath={.items[0:].spec.volumes[0:].configMap.name}' \ | grep ca-certs-mergedGet the workspace pod name <workspace_pod_name>:
oc get pod \ --namespace=<workspace_namespace> \ --selector='controller.devfile.io/devworkspace_name=<workspace_name>' \ --output='jsonpath={.items[0:].metadata.name}'Verify that the workspace container has your custom CA certificates. This command returns OpenShift Dev Spaces CA bundle certificates in PEM format:
oc exec <workspace_pod_name> \
    --namespace=<workspace_namespace> \
    -- cat /etc/pki/ca-trust/extracted/pem/tls-ca-bundle.pem
Or if
disableWorkspaceCaBundleMountset totrue:oc exec <workspace_pod_name> \ --namespace=<workspace_namespace> \ -- cat /public-certs/tls-ca-bundle.pem
Additional resources
7.4. Route workspace traffic through a shared ingress controller
Configure labels, annotations, and domains for OpenShift Route to direct OpenShift Dev Spaces traffic to the correct ingress controller when using Router Sharding on an OpenShift cluster.
Prerequisites
-
You have an active
ocsession with administrative permissions to the OpenShift cluster. See This page is not included, but the link has been rewritten to point to the nearest parent document.Getting started with the OpenShift CLI. -
You have the
dscmanagement tool installed. See This content is not included.Installing the dsc management tool.
Procedure
include::snippets/snip_edit-checluster-cr.adoc[]
spec: networking: labels: <labels> domain: <domain> annotations: <annotations>where:
<labels>- An unstructured key value map of labels that the target ingress controller uses to filter the set of Routes to service.
<domain>- The DNS name serviced by the target ingress controller.
<annotations>- An unstructured key value map stored with a resource.
Verification
Verify that OpenShift Dev Spaces routes have the configured labels and annotations:
oc get routes -n openshift-devspaces -o yaml
7.5. Set a custom domain for workspace URLs
Configure a custom base domain for workspace endpoints to align URLs with your organization’s DNS naming conventions. By default, the OpenShift Dev Spaces Operator detects the base domain automatically.
Prerequisites
-
You have an active
ocsession with administrative permissions to the OpenShift cluster. See This page is not included, but the link has been rewritten to point to the nearest parent document.Getting started with the CLI.
Procedure
Set the
CHE_INFRA_OPENSHIFT_ROUTE_HOST_DOMAIN__SUFFIXfield in theCheClusterCustom Resource:spec: components: cheServer: extraProperties: CHE_INFRA_OPENSHIFT_ROUTE_HOST_DOMAIN__SUFFIX: "<base_domain>"where:
<base_domain>-
The workspace endpoints base domain, for example,
my-devspaces.example.com.
Apply the change:
oc patch checluster/devspaces \
    --namespace openshift-devspaces \
    --type='merge' -p \
'{"spec":
    {"components":
        {"cheServer":
            {"extraProperties":
                {"CHE_INFRA_OPENSHIFT_ROUTE_HOST_DOMAIN__SUFFIX": "my-devspaces.example.com"}}}}}'
Verification
Verify the
CHE_INFRA_OPENSHIFT_ROUTE_HOST_DOMAIN__SUFFIXvalue in theCheClusterCustom Resource:oc get checluster devspaces -n openshift-devspaces -o jsonpath='{.spec.components.cheServer.extraProperties.CHE_INFRA_OPENSHIFT_ROUTE_HOST_DOMAIN__SUFFIX}'
Additional resources
7.6. Route traffic through a proxy
Configure a proxy for Red Hat OpenShift Dev Spaces by creating a Kubernetes Secret for proxy credentials and configuring the necessary proxy settings in the CheCluster custom resource. The proxy settings are propagated to the operands and workspaces through environment variables.
On an OpenShift cluster, you do not need to configure proxy settings. OpenShift Dev Spaces Operator automatically uses the OpenShift cluster-wide proxy configuration. However, you can override the proxy settings by specifying them in the CheCluster custom resource.
Prerequisites
-
You have an active
ocsession with administrative permissions to the OpenShift cluster. See This page is not included, but the link has been rewritten to point to the nearest parent document.Getting started with the CLI.
Procedure
Optional: Create a Secret in the openshift-devspaces namespace that contains a user and password for a proxy server. The secret must have the
app.kubernetes.io/part-of=che.eclipse.orglabel. Skip this step if the proxy server does not require authentication.oc apply -f - <<EOF kind: Secret apiVersion: v1 metadata: name: devspaces-proxy-credentials namespace: openshift-devspaces labels: app.kubernetes.io/part-of: che.eclipse.org type: Opaque stringData: user: <user> password: <password> EOFwhere:
<user>- The username for the proxy server.
<password>- The password for the proxy server.
Configure the proxy or override the cluster-wide proxy configuration for an OpenShift cluster by setting the following properties in the CheCluster custom resource:
oc patch checluster/devspaces \ --namespace openshift-devspaces \ --type='merge' -p \ '{"spec": {"components": {"cheServer": {"proxy": {"credentialsSecretName" : "<secretName>", "nonProxyHosts" : ["<host_1>"], "port" : "<port>", "url" : "<protocol>://<domain>"}}}}}'where:
<secretName>- The credentials secret name created in the previous step.
<host_1>-
The list of hosts that can be reached directly, without using the proxy. Use the following form
.<DOMAIN>to specify a wildcard domain. OpenShift Dev Spaces Operator automatically adds .svc and Kubernetes service host to the list of non-proxy hosts. In OpenShift, OpenShift Dev Spaces Operator combines the non-proxy host list from the cluster-wide proxy configuration with the custom resource. In some proxy configurations,localhostmay not translate to127.0.0.1. Bothlocalhostand127.0.0.1should be specified in this situation. <port>- The port of the proxy server.
<protocol>://<domain>- Protocol and domain of the proxy server.
Verification
- Start a workspace.
-
Verify that the workspace pod contains
HTTP_PROXY,HTTPS_PROXY,http_proxy, andhttps_proxyenvironment variables, each set to<protocol>://<user>:<password>@<domain>:<port>. -
Verify that the workspace pod contains
NO_PROXYandno_proxyenvironment variables, each set to a comma-separated list of non-proxy hosts.
Additional resources
Chapter 8. Control where workspace data is stored
Choose storage classes, strategies, and volume sizes so that workspace data persists reliably and meets your organization’s capacity and performance requirements.
8.1. What storage your workspaces need
OpenShift Dev Spaces workspaces store project files in a hierarchical directory structure and require specific storage capabilities depending on the selected strategy.
All workspace storage must use volumeMode: FileSystem.
The per-user storage strategy shares a single Persistent Volume Claim (PVC) across all of a user’s workspaces. This requires ReadWriteMany (RWX) access mode so that multiple workspace pods can mount the same volume simultaneously.
8.1.1. Choosing a storage backend for the Per-User strategy
Generic NFS provisioning supports RWX access but has two operational limitations:
- Quota enforcement: Kubernetes PVCs cannot reliably enforce storage quotas on generic NFS volumes. A single workspace can exceed its allocation and consume the entire shared volume, causing instability for all users on that node.
- Data integrity: Generic NFS implementations often lack the locking and cache coherency required when multiple cluster nodes access the same volume concurrently.
To avoid these issues, use a certified clustered or managed storage solution with a CSI driver that enforces quota limits and provides high-performance RWX file access. Most cloud providers offer suitable CSI drivers, and community-supported distributed storage projects are also available.
8.2. Use a custom storage provisioner
Configure OpenShift Dev Spaces to use storage classes for binding persistent volumes provided by a non-default provisioner.
OpenShift Dev Spaces has one component that requires persistent volumes to store data:
-
A OpenShift Dev Spaces workspace. OpenShift Dev Spaces workspaces store source code using volumes, for example
/projectsvolume.
OpenShift Dev Spaces workspaces source code is stored in the persistent volume only if a workspace is not ephemeral.
Persistent volume claims facts:
- OpenShift Dev Spaces does not create persistent volumes in the infrastructure.
- OpenShift Dev Spaces uses persistent volume claims (PVC) to mount persistent volumes.
- The Dev Workspace operator creates persistent volume claims.
Define a storage class name in the OpenShift Dev Spaces configuration to use the storage classes feature in the OpenShift Dev Spaces PVC.
Use CheCluster Custom Resource definition to define storage classes:
Prerequisites
-
You have an active
ocsession with administrative permissions to the OpenShift cluster. See This page is not included, but the link has been rewritten to point to the nearest parent document.Getting started with the CLI.
Procedure
Define storage class names: configure the
CheClusterCustom Resource, and install OpenShift Dev Spaces. See This content is not included.Configuring the CheCluster Custom Resource during installation.spec: devEnvironments: storage: perUserStrategyPvcConfig: claimSize: <claim_size> storageClass: <storage_class_name> perWorkspaceStrategyPvcConfig: claimSize: <claim_size> storageClass: <storage_class_name> pvcStrategy: <pvc_strategy>where:
- claimSize
- Persistent Volume Claim size.
- storageClass
- Storage class for the Persistent Volume Claim. When omitted or left blank, a default storage class is used.
- pvcStrategy
Persistent volume claim strategy. The supported strategies are:
-
per-user: All workspaces Persistent Volume Claims share one volume. -
per-workspace: Each workspace gets its own individual Persistent Volume Claim. -
ephemeral: Non-persistent storage. Local changes are lost when the workspace stops.
-
Verification
Start a workspace and verify that the PersistentVolumeClaim uses the configured storage class:
oc get pvc -n <user_namespace> -o jsonpath='{.items[*].spec.storageClassName}'
8.3. Choose how workspace data is persisted
Configure OpenShift Dev Spaces to provide persistent or non-persistent storage to workspaces by selecting a storage strategy. The selected strategy applies to all newly created workspaces by default.
Available storage strategies:
-
per-user: Use a single PVC for all workspaces created by a user. -
per-workspace: Each workspace gets its own PVC. -
ephemeral: Non-persistent storage; any local changes are lost when the workspace is stopped.
The default storage strategy used in OpenShift Dev Spaces is per-user.
Prerequisites
-
You have an active
ocsession with administrative permissions to the OpenShift cluster. See This page is not included, but the link has been rewritten to point to the nearest parent document.Getting started with the CLI.
Procedure
Set the
pvcStrategyfield in theCheClusterCustom Resource toper-user,per-workspace, orephemeral:spec: devEnvironments: storage: pvc: pvcStrategy: 'per-user'where:
- pvcStrategy
The available storage strategies are
per-user,per-workspace, andephemeral.Note- You can set this field at installation. See This content is not included.Configuring the CheCluster Custom Resource during installation.
- You can update this field on the command line. See Section 1.2, “Edit the central configuration from the command line”.
Verification
Verify the
pvcStrategyvalue in theCheClusterCustom Resource:oc get checluster devspaces -n openshift-devspaces -o jsonpath='{.spec.devEnvironments.storage.pvc.pvcStrategy}'
8.4. Adjust workspace storage capacity
Configure the persistent volume claim (PVC) size for the per-user or per-workspace storage strategy by setting the claimSize field in the CheCluster Custom Resource. Specify PVC sizes as a Kubernetes resource quantity.
Default persistent volume claim sizes:
per-user: 10Gi
per-workspace: 5Gi
Prerequisites
-
You have an active
ocsession with administrative permissions to the OpenShift cluster. See This page is not included, but the link has been rewritten to point to the nearest parent document.Getting started with the CLI.
Procedure
Set the appropriate
claimSizefield for the desired storage strategy in theCheClusterCustom Resource.Note- You can set this field at installation. See This content is not included.Configuring the CheCluster Custom Resource during installation.
- include::snippets/snip_edit-checluster-cr.adoc[]
spec: devEnvironments: storage: pvc: pvcStrategy: '<strategy_name>' perUserStrategyPvcConfig: claimSize: <resource_quantity> perWorkspaceStrategyPvcConfig: claimSize: <resource_quantity>where:
<strategy_name>-
Select the storage strategy:
per-userorper-workspaceorephemeral. Note: theephemeralstorage strategy does not use persistent storage, therefore you cannot configure its storage size or other PVC-related attributes. perUserStrategyPvcConfig,perWorkspaceStrategyPvcConfig- Specify a claim size on the next line or omit the next line to set the default claim size value. The specified claim size is only used when you select this storage strategy.
<resource_quantity>The claim size must be specified as a Content from kubernetes.io is not included.Kubernetes resource quantity. The available quantity units include:
Ei,Pi,Ti,Gi,MiandKi.ImportantManually modifying a PVC on the cluster that was provisioned by OpenShift Dev Spaces is not officially supported and may result in unexpected consequences.
If you want to resize a PVC that is in use by a workspace, you must restart the workspace for the PVC change to occur.
Verification
Start a workspace and verify that the PersistentVolumeClaim has the configured size:
oc get pvc -n <user_namespace> -o jsonpath='{.items[*].spec.resources.requests.storage}'
8.5. How workspace files persist across restarts
Red Hat OpenShift Dev Spaces preserves the /home/user directory across workspace restarts for each non-ephemeral workspace, so that user-specific configurations, shell history, and tooling settings persist between sessions.
This feature is enabled by default. To disable it, set spec.devEnvironments.persistUserHome.enabled to false in the CheCluster custom resource.
For newly started workspaces, this feature creates a persistent volume claim (PVC) mounted to the /home/user path of the tools container. The tools container is the first container defined in the devfile. This is the container that includes the project source code by default.
When the PVC is mounted for the first time, the persistent volume’s contents are empty and therefore must be populated with the /home/user directory content.
By default, the persistUserHome feature creates an init container for each new workspace pod named init-persistent-home. This init container is created with the tools container image. It runs a stow command to create symbolic links in the persistent volume, populating the /home/user directory.
For files that cannot be symbolically linked to the /home/user directory, such as .viminfo and .bashrc, cp is used instead of stow.
The primary function of the stow command is to run:
stow -t /home/user/ -d /home/tooling/ --no-folding
The stow command creates symbolic links in /home/user for files and directories located in /home/tooling. This populates the persistent volume with symbolic links to the content in /home/tooling. As a result, the persistUserHome feature expects the tooling image to have its /home/user/ content within /home/tooling.
For example, if the tools container image contains .config and .config-folder/another-file in the /home/tooling directory, stow creates symbolic links as follows:
Figure 8.1. Tools container with persistUserHome enabled
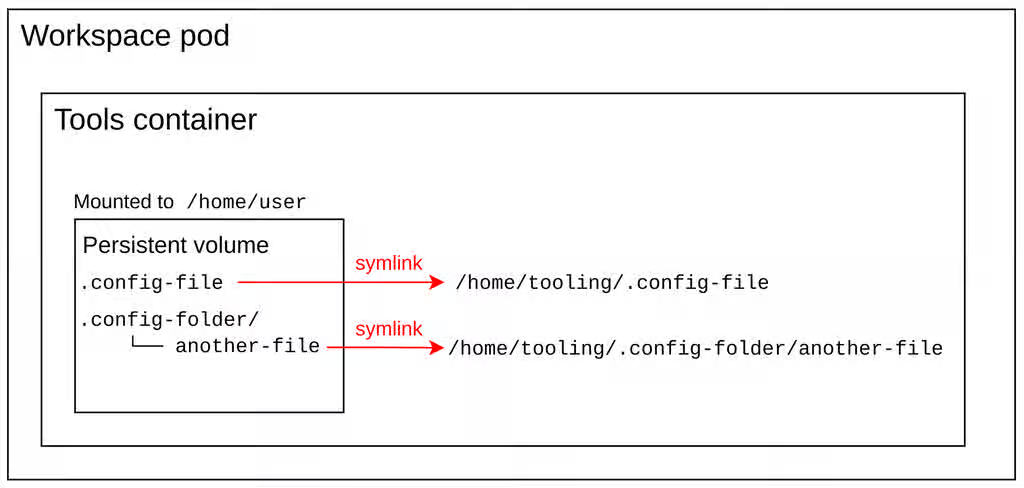
The init container writes the output of the stow command to /home/user/.stow.log and only runs stow the first time the persistent volume is mounted to the workspace.
Using the stow command to populate /home/user content in the persistent volume provides two main advantages:
-
Creating symbolic links is faster and consumes less storage than creating copies of the
/home/userdirectory content in the persistent volume. The persistent volume contains symbolic links, not the actual files. -
If the tools image is updated with newer versions of existing binaries, configs, and files, the init container does not need to rerun
stow. The existing symbolic links already point to the newer versions in/home/tooling.
If the tooling image is updated with additional binaries or files, they are not symbolically linked to the /home/user directory. The stow command does not run again automatically.
To rerun stow, delete the /home/user/.stow_completed file and restart the workspace.
8.5.1. persistUserHome tools image requirements
The persistUserHome depends on the tools image used for the workspace. By default OpenShift Dev Spaces uses the Universal Developer Image (UDI) for sample workspaces, which supports persistUserHome out of the box.
If you are using a custom image, the tools image must meet three requirements to support the persistUserHome feature.
-
The tools image must contain
stowversion >= 2.4.0. -
The
$HOMEenvironment variable is set to/home/user. -
The directory intended to contain the
/home/usercontent is/home/tooling.
Because the /home/user content must reside in /home/tooling, the default UDI image adds the /home/user content to /home/tooling instead, and runs:
RUN stow -t /home/user/ -d /home/tooling/ --no-folding
This RUN instruction in the Dockerfile ensures that files in /home/tooling are accessible from /home/user even when the persistUserHome feature is not enabled.
Chapter 9. Customize the developer dashboard
Tailor the OpenShift Dev Spaces dashboard to control the getting started samples, available editors, and branding that developers see when they log in.
9.1. Customize the dashboard samples for your team
Configure the OpenShift Dev Spaces Dashboard to display custom samples that reflect your organization’s preferred languages, frameworks, and project templates for faster onboarding.
Prerequisites
-
You have an active
ocsession with administrative permissions to the OpenShift cluster. See This page is not included, but the link has been rewritten to point to the nearest parent document.Getting started with the CLI.
Procedure
Create a JSON file with the samples configuration. The file must contain an array of objects, where each object represents a sample.
cat > my-samples.json <<EOF [ { "displayName": "<display_name>", "description": "<description>", "tags": <tags>, "url": "<url>", "icon": { "base64data": "<base64data>", "mediatype": "<mediatype>" } } ] EOFwhere:
displayName- The display name of the sample.
description- The description of the sample.
tags-
The JSON array of tags, for example,
["java", "spring"]. url- The URL to the repository containing the devfile.
base64data- The base64-encoded data of the icon.
mediatype-
The media type of the icon. For example,
image/png.
Create a ConfigMap with the samples configuration:
oc create configmap getting-started-samples --from-file=my-samples.json -n openshift-devspaces
Add the required labels to the ConfigMap:
oc label configmap getting-started-samples app.kubernetes.io/part-of=che.eclipse.org app.kubernetes.io/component=getting-started-samples -n openshift-devspaces
Verification
- Refresh the OpenShift Dev Spaces Dashboard page and verify that the new samples are displayed on the Create Workspace page.
9.2. Add custom editors to the dashboard
Configure custom editor definitions for OpenShift Dev Spaces by creating a devfile with the editor configuration and storing it in a ConfigMap to offer additional IDE options to your users.
Prerequisites
-
You have an active
ocsession with administrative permissions to the OpenShift cluster. See This page is not included, but the link has been rewritten to point to the nearest parent document.Getting started with the CLI.
Procedure
Create the
my-editor-definition-devfile.yamlYAML file with the editor definition configuration. Provide actual values forpublisherandversionundermetadata.attributesbecause these construct the editor ID in the formatpublisher/name/version.For example:
# Version of the devfile schema schemaVersion: 2.2.2 # Meta information of the editor metadata: # (MANDATORY) The editor name # Must consist of lower case alphanumeric characters, '-' or '.' name: editor-name displayName: Display Name description: Run Editor Foo on top of OpenShift Dev Spaces # (OPTIONAL) Array of tags of the current editor. The Tech-Preview tag means the option is considered experimental and is not recommended for production environments. While it can include new features and improvements, it may still contain bugs or undergo significant changes before reaching a stable version. tags: - Tech-Preview # Additional attributes attributes: title: This is my editor # (MANDATORY) The supported architectures arch: - x86_64 - arm64 # (MANDATORY) The publisher name publisher: publisher # (MANDATORY) The editor version version: version repository: https://github.com/editor/repository/ firstPublicationDate: '2024-01-01' iconMediatype: image/svg+xml iconData: | <icon-content> # List of editor components components: # Name of the component - name: che-code-injector # Configuration of devworkspace-related container container: # Image of the container image: 'quay.io/che-incubator/che-code:insiders' # The command to run in the dockerimage component instead of the default one provided in the image command: - /entrypoint-init-container.sh # (OPTIONAL) List of volumes mounts that should be mounted in this container volumeMounts: # The name of the mount - name: checode # The path of the mount path: /checode # (OPTIONAL) The memory limit of the container memoryLimit: 256Mi # (OPTIONAL) The memory request of the container memoryRequest: 32Mi # (OPTIONAL) The CPU limit of the container cpuLimit: 500m # (OPTIONAL) The CPU request of the container cpuRequest: 30m # Name of the component - name: che-code-runtime-description # (OPTIONAL) Map of implementation-dependant free-form YAML attributes attributes: # The component within the architecture app.kubernetes.io/component: che-code-runtime # The name of a higher level application this one is part of app.kubernetes.io/part-of: che-code.eclipse.org # Defines a container component as a "container contribution". If a flattened DevWorkspace has a container component with the merge-contribution attribute, then any container contributions are merged into that container component controller.devfile.io/container-contribution: true container: # Can be a placeholder image because the component is expected to be injected into workspace dev component image: quay.io/devfile/universal-developer-image:latest # (OPTIONAL) List of volume mounts that should be mounted in this container volumeMounts: # The name of the mount - name: checode # (OPTIONAL) The path in the component container where the volume should be mounted. If no path is defined, the default path is /<name> path: /checode # (OPTIONAL) The memory limit of the container memoryLimit: 1024Mi # (OPTIONAL) The memory request of the container memoryRequest: 256Mi # (OPTIONAL) The CPU limit of the container cpuLimit: 500m # (OPTIONAL) The CPU request of the container cpuRequest: 30m # (OPTIONAL) Environment variables used in this container env: - name: ENV_NAME value: value # Component endpoints endpoints: # Name of the editor - name: che-code # (OPTIONAL) Map of implementation-dependant string-based free-form attributes attributes: # Type of the endpoint. You can only set its value to main, indicating that the endpoint should be used as the mainUrl in the workspace status (i.e. it should be the URL used to access the editor in this context) type: main # An attribute that instructs the service to automatically redirect the unauthenticated requests for current user authentication. Setting this attribute to true has security consequences because it makes Cross-site request forgery (CSRF) attacks possible. The default value of the attribute is false. cookiesAuthEnabled: true # Defines an endpoint as "discoverable", meaning that a service should be created using the endpoint name (i.e. instead of generating a service name for all endpoints, this endpoint should be statically accessible) discoverable: false # Used to secure the endpoint with authorization on OpenShift, so that not anyone on the cluster can access the endpoint, the attribute enables authentication. urlRewriteSupported: true # Port number to be used within the container component targetPort: 3100 # (OPTIONAL) Describes how the endpoint should be exposed on the network (public, internal, none) exposure: public # (OPTIONAL) Describes whether the endpoint should be secured and protected by some authentication process secure: true # (OPTIONAL) Describes the application and transport protocols of the traffic that will go through this endpoint protocol: https # Mandatory name that allows referencing the component from other elements - name: checode # (OPTIONAL) Allows specifying the definition of a volume shared by several other components. Ephemeral volumes are not stored persistently across restarts. Defaults to false volume: {ephemeral: true} # (OPTIONAL) Bindings of commands to events. Each command is referred-to by its name events: # IDs of commands that should be executed before the devworkspace start. These commands would typically be executed in an init container preStart: - init-container-command # IDs of commands that should be executed after the devworkspace has completely started. In the case of Che-Code, these commands should be executed after all plugins and extensions have started, including project cloning. This means that those commands are not triggered until the user opens the IDE within the browser postStart: - init-che-code-command # (OPTIONAL) Predefined, ready-to-use, devworkspace-related commands commands: # Mandatory identifier that allows referencing this command - id: init-container-command apply: # Describes the component for the apply command component: che-code-injector # Mandatory identifier that allows referencing this command - id: init-che-code-command # CLI Command executed in an existing component container exec: # Describes component for the exec command component: che-code-runtime-description # The actual command-line string commandLine: 'nohup /checode/entrypoint-volume.sh > /checode/entrypoint-logs.txt 2>&1 &'where:
<icon-content>- The SVG icon data for the editor, displayed in the OpenShift Dev Spaces Dashboard editor selector.
Create a ConfigMap with the editor definition content:
oc create configmap my-editor-definition --from-file=my-editor-definition-devfile.yaml -n openshift-devspaces
Add the required labels to the ConfigMap:
oc label configmap my-editor-definition app.kubernetes.io/part-of=che.eclipse.org app.kubernetes.io/component=editor-definition -n openshift-devspaces
Verification
- Refresh the OpenShift Dev Spaces Dashboard page and verify that the new editor is available.
Verify the editor definition through the OpenShift Dev Spaces Dashboard API:
https://<openshift_dev_spaces_fqdn>/dashboard/api/editorsTo retrieve a specific editor definition, use the publisher, name, and version values:
https://<openshift_dev_spaces_fqdn>/dashboard/api/editors/devfile?che-editor=publisher/editor-name/versionWhen retrieving the editor definition from within the OpenShift cluster, access the OpenShift Dev Spaces Dashboard API through the dashboard service:
http://devspaces-dashboard.openshift-devspaces.svc.cluster.local:8080/dashboard/api/editors
9.3. Restore access to deprecated editors
Show deprecated OpenShift Dev Spaces editors on the Dashboard to support users who need them during migration to a supported editor. By default, the Dashboard UI hides them.
Prerequisites
-
You have an active
ocsession with administrative permissions to the OpenShift cluster. See This page is not included, but the link has been rewritten to point to the nearest parent document.Getting started with the CLI. -
You have
jqinstalled. See Content from stedolan.github.io is not included.Downloadingjq.
Procedure
Determine the IDs of the deprecated editors. An editor ID has the following format:
publisher/name/version.oc exec deploy/devspaces-dashboard -n openshift-devspaces \ -- curl -s http://localhost:8080/dashboard/api/editors | jq -r '[.[] | select(.metadata.tags != null) | select(.metadata.tags[] | contains("Deprecate")) | "\(.metadata.attributes.publisher)/\(.metadata.name)/\(.metadata.attributes.version)"]'include::snippets/snip_edit-checluster-cr.adoc[]
spec:
  components:
    dashboard:
      deployment:
        containers:
        - env:
          - name: CHE_SHOW_DEPRECATED_EDITORS
            value: 'true'
9.4. Set the default IDE for new workspaces
Configure the default editor that OpenShift Dev Spaces uses when creating new workspaces to ensure a consistent development experience. The default editor is specified by its plugin ID in the publisher/name/version format.
Prerequisites
-
You have an active
ocsession with administrative permissions to the OpenShift cluster. See This page is not included, but the link has been rewritten to point to the nearest parent document.Getting started with the CLI. -
You have
jqinstalled. See Content from stedolan.github.io is not included.Downloadingjq.
Procedure
Determine the IDs of the available editors. An editor ID has the following format:
publisher/name/version.oc exec deploy/devspaces-dashboard -n openshift-devspaces \ -- curl -s http://localhost:8080/dashboard/api/editors | jq -r '[.[] | "\(.metadata.attributes.publisher)/\(.metadata.name)/\(.metadata.attributes.version)"]'Configure the
defaultEditor:oc patch checluster/devspaces \ --namespace openshift-devspaces \ --type='merge' \ -p '{"spec":{"devEnvironments":{"defaultEditor": "<default_editor>"}}}'where:
<default_editor>-
The default editor specified as a plugin ID in
publisher/name/versionformat or as a URI.
Verification
- Create a new workspace from the OpenShift Dev Spaces Dashboard and verify that the configured default editor opens.
9.5. Hide editors from the dashboard
Conceal OpenShift Dev Spaces editors to hide selected editors from the Dashboard UI, for example hide IntelliJ IDEA Ultimate and have only Visual Studio Code - Open Source visible.
Prerequisites
-
You have an active
ocsession with administrative permissions to the OpenShift cluster. See This page is not included, but the link has been rewritten to point to the nearest parent document.Getting started with the CLI. -
You have
jqinstalled. See Content from stedolan.github.io is not included.Downloadingjq.
Procedure
Determine the IDs of the available editors. An editor ID has the following format:
publisher/name/version.oc exec deploy/devspaces-dashboard -n openshift-devspaces \ -- curl -s http://localhost:8080/dashboard/api/editors | jq -r '[.[] | "\(.metadata.attributes.publisher)/\(.metadata.name)/\(.metadata.attributes.version)"]'include::snippets/snip_edit-checluster-cr.adoc[]
spec: components: dashboard: deployment: containers: - env: - name: CHE_HIDE_EDITORS_BY_ID value: 'che-incubator/che-webstorm-server/latest, che-incubator/che-webstorm-server/next'where:
- value
- A string containing comma-separated IDs of editors to hide.
Verification
- In the OpenShift Dev Spaces Dashboard, go to Create Workspace and verify that the concealed editors are no longer visible.
9.6. Host editor binaries internally for air-gapped clusters
Configure custom download URLs for editors in air-gapped OpenShift Dev Spaces environments where editors cannot be retrieved from the public internet. This option applies only to JetBrains editors.
Prerequisites
-
You have an active
ocsession with administrative permissions to the OpenShift cluster. See This page is not included, but the link has been rewritten to point to the nearest parent document.Getting started with the CLI. -
You have
jqinstalled. See Content from stedolan.github.io is not included.Downloadingjq.
Procedure
Determine the IDs of the available editors. An editor ID has the following format:
publisher/name/version.oc exec deploy/devspaces-dashboard -n openshift-devspaces \ -- curl -s http://localhost:8080/dashboard/api/editors | jq -r '[.[] | "\(.metadata.attributes.publisher)/\(.metadata.name)/\(.metadata.attributes.version)"]'Configure the download URLs for editors:
oc patch checluster/devspaces \ --namespace openshift-devspaces \ --type='merge' \ -p '{ "spec": { "devEnvironments": { "editorsDownloadUrls": [ { "editor": "publisher1/editor-name1/version1", "url": "https://example.com/editor1.tar.gz" }, { "editor": "publisher2/editor-name2/version2", "url": "https://example.com/editor2.tar.gz" } ] } } }'where:
editor-
The editor ID in the format
publisher/name/version. Determine the IDs by running the command in step 1. url- The URL of the editor archive to download.
Verification
-
Verify that the editor download URLs appear in the
CheClusterCustom Resource specification.
9.7. Apply your organization’s branding to the dashboard
Customize the branding images for the OpenShift Dev Spaces dashboard by overriding the default images in the assets/branding directory, so that the dashboard reflects your organization’s visual identity.
The following images can be customized:
-
che-logo.svg: the logo displayed in the dashboard header. -
loader.svg: the loader icon displayed during dashboard loading. The loader image supports the following formats, in priority order:jpg,jpeg,png,gif,webp,svg. Thesvgformat is used as the default fallback. -
favicon.ico: the browser tab icon.
Prerequisites
-
You have an active
ocsession with administrative permissions to the OpenShift cluster. See This page is not included, but the link has been rewritten to point to the nearest parent document.Getting started with the CLI.
Procedure
Create a Secret that mounts custom branding images into the dashboard:
oc apply -f - <<EOF apiVersion: v1 kind: Secret metadata: name: devspaces-dashboard-customization namespace: openshift-devspaces annotations: che.eclipse.org/mount-as: subpath che.eclipse.org/mount-path: /public/dashboard/assets/branding labels: app.kubernetes.io/component: devspaces-dashboard-secret app.kubernetes.io/part-of: che.eclipse.org data: che-logo.svg: <Base64_encoded_content_of_the_image> loader.svg: <Base64_encoded_content_of_the_image> favicon.ico: <Base64_encoded_content_of_the_image> type: Opaque EOFwhere:
che-logo.svg- The dashboard logo. Replace the value with the Base64-encoded content of your custom logo with disabled line wrapping.
loader.svg-
The loader icon. Replace
loader.svgwith the filename matching your image format (for example,loader.png,loader.webp). The value is the Base64-encoded content of the image with disabled line wrapping. favicon.icoThe favicon. The value is the Base64-encoded content of the
.icofile with disabled line wrapping.NoteYou can override one or all images from the
/public/dashboard/assets/brandingdirectory in the dashboard pod. Only the images specified in the Secretdatasection are overridden. Unspecified images remain unchanged.
Verify that the rollout completes:
$ oc rollout status deployment/devspaces-dashboard -n openshift-devspaces
Verification
- Open the OpenShift Dev Spaces dashboard in a browser and confirm that the custom branding images are displayed.
Additional resources
Chapter 10. Configure AI providers
Register AI coding assistants so that developers can select them when creating workspaces.
10.1. Configure AI providers
The AI provider feature is a Technology Preview feature only. Technology Preview features are not supported with Red Hat production service level agreements (SLAs) and might not be functionally complete. Red Hat does not recommend using them in production. These features provide early access to upcoming product features, enabling customers to test functionality and provide feedback during the development process.
For more information about the support scope of Red Hat Technology Preview features, see https://access.redhat.com/support/offerings/techpreview/.
Register one or more AI providers in OpenShift Dev Spaces so that developers can select and use AI coding assistants when creating workspaces.
The AI tool registry is stored in a OpenShift ConfigMap with specific labels. When the ConfigMap exists and contains at least one provider with a matching tool, the AI Selector widget is displayed on the dashboard. When the ConfigMap is absent or empty, the widget is hidden.
Prerequisites
-
An active
ocsession with administrative permissions to the destination OpenShift cluster. See This page is not included, but the link has been rewritten to point to the nearest parent document.Getting started with the CLI. -
The devspaces-operator is installed and a
devspacescustom resource exists in theopenshift-devspacesnamespace.
Procedure
Optional: Build and push a custom AI tool injector image.
The injector image is a container that carries the AI tool binary. During workspace startup, OpenShift Dev Spaces runs it as an init container to copy the binary into a shared volume. The following minimal
Dockerfileis based on the Content from github.com is not included.OpenCode injector image:FROM alpine:3.21 AS builder ARG OPENCODE_VERSION=v1.2.27 ARG TARGETARCH RUN apk add --no-cache curl tar gzip RUN set -e && \ case "${TARGETARCH}" in \ amd64) ARCH="x64" ;; \ arm64) ARCH="arm64" ;; \ *) echo "Unsupported architecture: ${TARGETARCH}" && exit 1 ;; \ esac && \ curl -fsSL -o /tmp/opencode.tar.gz \ "https://github.com/anomalyco/opencode/releases/download/${OPENCODE_VERSION}/opencode-linux-${ARCH}.tar.gz" && \ tar -xzf /tmp/opencode.tar.gz -C /tmp && \ mv /tmp/opencode /usr/local/bin/opencode && \ chmod +x /usr/local/bin/opencode FROM registry.access.redhat.com/ubi10/ubi-minimal:10.0 COPY --from=builder /usr/local/bin/opencode /usr/local/bin/opencode-bin RUN printf '#!/bin/sh\n\ SCRIPT_DIR="$(cd "$(dirname "$0")" && pwd)"\n\ OC_HOME="/tmp/opencode-home"\n\ mkdir -p "$OC_HOME/.config" "$OC_HOME/.local/share"\n\ export XDG_CONFIG_HOME="${XDG_CONFIG_HOME:-$OC_HOME/.config}"\n\ export XDG_DATA_HOME="${XDG_DATA_HOME:-$OC_HOME/.local/share}"\n\ exec "$SCRIPT_DIR/opencode-bin" "$@"\n' > /usr/local/bin/opencode && \ chmod +x /usr/local/bin/opencode LABEL org.opencontainers.image.description="OpenCode CLI tool for DevWorkspace injection" \ org.opencontainers.image.source="https://github.com/che-incubator/che-ai-tool-images.git"Key design points:
-
Multi-stage build: the
builderstage downloads the architecture-specific binary; the minimal runtime stage keeps the final image small. -
Wrapper script: redirects
XDG_CONFIG_HOME,XDG_DATA_HOME, and related variables to writable paths under/tmp, allowing the tool to run as an arbitrary UID on OpenShift. Multi-arch: pass
--platform linux/amd64,linux/arm64topodman buildto produce a multi-arch image.Build and push the image:
$ {docker-cli} build --platform linux/amd64,linux/arm64 \ -t <your-registry>/<your-org>/opencode:next \ --push .See Content from github.com is not included.che-incubator/che-ai-tool-images for maintained injector image examples.
-
Multi-stage build: the
Create a
registry.jsonfile that defines providers, tools, and optional defaults:{ "providers": [ { "id": "opencodeai/opencode", "name": "OpenCode", "publisher": "opencode.ai", "description": "Open-source terminal AI coding agent supporting 75+ LLM providers.", "docsUrl": "https://opencode.ai", "icon": "https://example.com/opencode-icon.svg" } ], "tools": [ { "providerId": "opencodeai/opencode", "tag": "next", "name": "OpenCode", "url": "https://opencode.ai", "binary": "opencode", "pattern": "init", "injectorImage": "<your-registry>/<your-org>/opencode:next", "envVarName": "OPENAI_API_KEY" } ], "defaultAiProviders": ["opencodeai/opencode"] }The following table describes the key fields:
Field Description idUnique provider identifier in
<vendor>/<product>format.providerIdLinks the tool to its provider by
id.tagVersion tag. When multiple tools share the same
providerId, the dashboard selects by priority:next>latest> highest semver.binaryBinary name that must be available in
PATHinside the workspace after injection.patternInjection pattern:
initcopies a single binary into the shared volume;bundlecopies a full runtime directory and creates a symlink.injectorImageContainer image that carries the tool binary. Run as an init container at workspace start.
envVarNameEnvironment variable name for the API key. The dashboard creates a OpenShift Secret using this name as the data key.
defaultAiProvidersOptional. Provider IDs pre-selected in the AI Selector widget for new workspaces.
Create the
ConfigMapin theopenshift-devspacesnamespace with the required labels:$ oc create configmap ai-tool-registry \ --from-file=registry.json=registry.json \ -n openshift-devspaces \ --dry-run=client -o yaml | \ oc label --local -f - \ app.kubernetes.io/component=ai-tool-registry \ app.kubernetes.io/part-of=che.eclipse.org \ -o yaml | \ oc apply -f -
Verification
- Open the OpenShift Dev Spaces dashboard.
- Navigate to Create Workspace.
- Verify that an AI Provider section is visible, listing the providers you configured.
To disable the AI Selector widget, delete the ai-tool-registry ConfigMap. Users will no longer see the AI Provider section on the Create Workspace page. Existing API key Secrets in user namespaces are not deleted automatically.
When you update the registry (for example, to remove a tool or change the injector image tag), existing workspaces are updated automatically before their next start. The dashboard removes stale tool injectors and replaces outdated image tags without user intervention.
Additional resources
10.2. AI provider API key secret reference
Each user’s AI provider API key is stored as a OpenShift Opaque Secret in the user’s personal project. The Dev Workspace Controller automatically mounts matching Secrets as environment variables into all workspace containers. Use this reference when manually creating or troubleshooting AI provider key Secrets.
10.2.1. Secret schema
apiVersion: v1
kind: Secret
metadata:
  name: ai-provider-openai-api-key
  namespace: <user-namespace>
  labels:
    controller.devfile.io/mount-to-devworkspace: 'true'
    controller.devfile.io/watch-secret: 'true'
    che.eclipse.org/ai-provider-id: opencodeai-opencode
  annotations:
    controller.devfile.io/mount-as: env
type: Opaque
data:
  OPENAI_API_KEY: <base64-encoded-api-key>
+ name:: Secret name is derived as ai-provider- + envVarName.toLowerCase().replace(/_/g, '-'). For OPENAI_API_KEY the name is ai-provider-openai-api-key. mount-to-devworkspace: 'true':: Instructs the DevWorkspace Controller to mount this Secret into all DevWorkspace containers in the namespace. watch-secret: 'true':: Instructs the DevWorkspace Controller to watch for Secret changes and re-mount without a workspace restart. ai-provider-id:: Sanitized provider ID (characters other than letters, digits, dots, underscores, and dashes are replaced with dashes). Identifies which AI provider this Secret belongs to. Used by the OpenShift Dev Spaces dashboard to detect existing keys. mount-as: env:: Mounts the Secret data keys as environment variables (not as files). OPENAI_API_KEY:: The data key is the environment variable name. The value is base64-encoded. The variable is injected directly into all workspace containers.
10.2.2. Label and annotation reference
| Label / Annotation | Value | Purpose |
|---|---|---|
|
|
|
Causes the DevWorkspace Controller to mount this Secret into every |
|
|
| The DevWorkspace Controller re-mounts the Secret when its data changes, without requiring a workspace restart. |
|
|
| Each data key in the Secret becomes an environment variable with the key as the variable name and the decoded value as the variable value. |
|
|
Sanitized provider ID (for example, | Used by the OpenShift Dev Spaces dashboard to identify and list AI provider key Secrets when rendering the AI Selector widget. |
10.2.3. Secret naming convention
Secret names follow the pattern:
ai-provider-<envVarName-lowercased-underscores-as-dashes>
Example:
envVarName | Secret name |
|---|---|
|
|
|
10.2.4. Manual Secret creation
Advanced users can create AI provider key Secrets manually using oc instead of the dashboard UI. Use the same labels and annotations as shown in the schema above:
$ oc apply -f - <<EOF
apiVersion: v1
kind: Secret
metadata:
  name: ai-provider-openai-api-key
  namespace: <user-namespace>
  labels:
    controller.devfile.io/mount-to-devworkspace: 'true'
    controller.devfile.io/watch-secret: 'true'
    che.eclipse.org/ai-provider-id: opencodeai-opencode
  annotations:
    controller.devfile.io/mount-as: env
type: Opaque
data:
  OPENAI_API_KEY: <base64-encoded-api-key>
EOF
Chapter 11. Configure fuse-overlayfs
Configure fuse-overlayfs for building container images within OpenShift Dev Spaces workspaces.
11.1. fuse-overlayfs configuration
By default, Podman and Buildah in the Universal Developer Image (UDI) use the vfs storage driver, which does not provide copy-on-write support. For more efficient container image management, use the fuse-overlayfs storage driver.
To enable fuse-overlayfs for workspaces for OpenShift versions older than 4.15, the administrator must first enable /dev/fuse access on the cluster.
This is not necessary for OpenShift versions 4.15 and later, since the /dev/fuse device is available by default.
After enabling /dev/fuse access, fuse-overlayfs can be enabled in two ways:
- For all user workspaces within the cluster.
- For workspaces belonging to certain users.
11.2. Enable access to /dev/fuse for OpenShift versions older than 4.15
Make /dev/fuse accessible to workspace containers on OpenShift versions older than 4.15, so that workspaces can use the fuse-overlayfs storage driver for Podman and Buildah.
For OpenShift 4.15 and later, /dev/fuse is available by default and no additional configuration is needed. See Release Notes.
Creating MachineConfig resources on an OpenShift cluster is a potentially dangerous task, as you are making advanced, system-level changes to the cluster.
View the MachineConfig documentation for more details and possible risks.
Prerequisites
-
You have the Butane tool (
butane) installed. -
You have an active
ocsession with administrative permissions to the destination OpenShift cluster. See This page is not included, but the link has been rewritten to point to the nearest parent document.Getting started with the CLI.
Procedure
Set the environment variable based on the type of your OpenShift cluster: a single node cluster, or a multi node cluster with separate control plane and worker nodes.
For a single node cluster, set:
$ NODE_ROLE=master
For a multi node cluster, set:
$ NODE_ROLE=worker
Set the environment variable for the OpenShift Butane config version. This variable is the major and minor version of the OpenShift cluster. For example,
4.12.0,4.13.0, or4.14.0.$ VERSION=4.12.0
Create a
MachineConfigresource that creates a drop-in CRI-O configuration file named99-podman-fusein theNODE_ROLEnodes. This configuration file makes access to the/dev/fusedevice possible for certain pods.cat << EOF | butane | oc apply -f - variant: openshift version: ${VERSION} metadata: labels: machineconfiguration.openshift.io/role: ${NODE_ROLE} name: 99-podman-dev-fuse-${NODE_ROLE} storage: files: - path: /etc/crio/crio.conf.d/99-podman-fuse mode: 0644 overwrite: true contents: inline: | [crio.runtime.workloads.podman-fuse] activation_annotation = "io.openshift.podman-fuse" allowed_annotations = [ "io.kubernetes.cri-o.Devices" ] [crio.runtime] allowed_devices = ["/dev/fuse"] EOFwhere:
/etc/crio/crio.conf.d/99-podman-fuse- The absolute file path to the new drop-in configuration file for CRI-O.
contents- The content of the new drop-in configuration file.
[crio.runtime.workloads.podman-fuse]-
Define a
podman-fuseworkload. activation_annotation-
The pod annotation that activates the
podman-fuseworkload settings. allowed_annotations-
List of annotations the
podman-fuseworkload is allowed to process. allowed_devices-
List of devices on the host that a user can specify with the
io.kubernetes.cri-o.Devicesannotation.
After applying the
MachineConfigresource, scheduling is temporarily disabled for each node with theworkerrole as changes are applied. View the nodes' statuses.$ oc get nodes
Example output:
NAME                           STATUS                     ROLES    AGE   VERSION
ip-10-0-136-161.ec2.internal   Ready                      worker   28m   v1.27.9
ip-10-0-136-243.ec2.internal   Ready                      master   34m   v1.27.9
ip-10-0-141-105.ec2.internal   Ready,SchedulingDisabled   worker   28m   v1.27.9
ip-10-0-142-249.ec2.internal   Ready                      master   34m   v1.27.9
ip-10-0-153-11.ec2.internal    Ready                      worker   28m   v1.27.9
ip-10-0-153-150.ec2.internal   Ready                      master   34m   v1.27.9
After all nodes with the
workerrole have a statusReady,/dev/fuseis available to any pod with the following annotations.io.openshift.podman-fuse: '' io.kubernetes.cri-o.Devices: /dev/fuse
Verification
Get the name of a node with a
workerrole:$ oc get nodes
Open an
oc debugsession to a worker node.$ oc debug node/<nodename>Verify that a new CRI-O config file named
99-podman-fuseexists.sh-4.4# stat /host/etc/crio/crio.conf.d/99-podman-fuse
11.3. Enable fuse-overlayfs for all workspaces
Enable fuse-overlayfs for all workspaces to use the overlay storage driver.
Prerequisites
-
You have completed the Section 11.2, “Enable access to
/dev/fusefor OpenShift versions older than 4.15” section. This is not required for OpenShift versions 4.15 and later. -
You have an active
ocsession with administrative permissions to the destination OpenShift cluster. See This page is not included, but the link has been rewritten to point to the nearest parent document.Getting started with the CLI.
Procedure
Set the necessary annotation in the
spec.devEnvironments.workspacesPodAnnotationsfield of theCheClusterCustom Resource.kind: CheCluster apiVersion: org.eclipse.che/v2 spec: devEnvironments: workspacesPodAnnotations: io.kubernetes.cri-o.Devices: /dev/fuseNoteFor OpenShift versions before 4.15, the
io.openshift.podman-fuse: ""annotation is also required.NoteThe Universal Development Image (UDI) includes the following logic in the entrypoint script to detect fuse-overlayfs and set the storage driver. If you use a custom image, add equivalent logic to the image’s entrypoint.
if [ ! -d "${HOME}/.config/containers" ]; then
  mkdir -p ${HOME}/.config/containers
  if [ -c "/dev/fuse" ] && [ -f "/usr/bin/fuse-overlayfs" ]; then
    (echo '[storage]';echo 'driver = "overlay"';echo '[storage.options.overlay]';echo 'mount_program = "/usr/bin/fuse-overlayfs"') > ${HOME}/.config/containers/storage.conf
  else
    (echo '[storage]';echo 'driver = "vfs"') > "${HOME}"/.config/containers/storage.conf
  fi
fi
Verification
Start a workspace and verify that the storage driver is
overlay.$ podman info | grep overlay
Example output:
graphDriverName: overlay overlay.mount_program: Executable: /usr/bin/fuse-overlayfs Package: fuse-overlayfs-1.12-1.module+el8.9.0+20326+387084d0.x86_64 fuse-overlayfs: version 1.12 Backing Filesystem: overlayfsNoteThe following error might occur for existing workspaces:
ERRO[0000] User-selected graph driver "overlay" overwritten by graph driver "vfs" from database - delete libpod local files ("/home/user/.local/share/containers/storage") to resolve. May prevent use of images created by other toolsIn this case, delete the libpod local files shown in the error message.
Chapter 12. Back up OpenShift Dev Spaces workspaces
Back up OpenShift Dev Spaces workspace data to an OCI-compatible registry on a recurring schedule.
The Dev Workspace backup controller creates periodic snapshots of stopped workspace PVCs and stores them as tar.gz archives in a target registry. Supported registries include the OpenShift Container Platform integrated registry and Quay.io. Configure the backup schedule, target registry, and authentication by editing the DevWorkspaceOperatorConfig resource.
The backoffLimit field sets the number of retries before marking the backup job as failed. The default value is 1.
By default, the Dev Workspace backup job is disabled.
12.1. Configure backup with the integrated OpenShift registry
Configure the Dev Workspace backup job to use the integrated OpenShift Container Platform container registry. This option requires no additional authentication configuration.
Prerequisites
- You have administrator access to the OpenShift cluster.
- You have the integrated container registry enabled on the cluster.
Procedure
Configure the
DevWorkspaceOperatorConfigresource to enable the backup job:apiVersion: controller.devfile.io/v1alpha1 kind: DevWorkspaceOperatorConfig metadata: name: devworkspace-operator-config namespace: openshift-operators config: workspace: backupCronJob: enable: true registry: path: <integrated_registry_url> oras: extraArgs: '--insecure' schedule: '0 */4 * * *' imagePullPolicy: Alwayswhere:
openshift-operators- The default installation namespace for the Dev Workspace Operator on OpenShift. If the Dev Workspace Operator is installed in a different namespace, use that namespace instead.
<integrated_registry_url>- The URL to the OpenShift Container Platform integrated registry for your cluster.
--insecure-
The
--insecureflag may be required depending on the integrated registry’s routing configuration.
Get the default path to the integrated registry:
echo "$(oc get route default-route -n openshift-image-registry --template='{{ .spec.host }}')"
Verification
- After the backup job completes, verify that the backup archives are available in the integrated registry. Check the Dev Workspace project for a repository with a matching Dev Workspace name.
If the installation project for the Dev Workspace Operator is not openshift-operators, you must define it as an environment variable for the Red Hat OpenShift Dev Spaces dashboard in the CheCluster Custom Resource.
apiVersion: org.eclipse.che/v2
kind: CheCluster
spec:
  components:
    dashboard:
      deployment:
        containers:
          - env:
              - name: DWO_NAMESPACE
                value: <operator_install_namespace>
name: che-dashboard+ where:
+ <operator_install_namespace>:: The project where the Dev Workspace Operator is installed. The default installation project for the Dev Workspace Operator on OpenShift is openshift-operators.
For more information, see This content is not included.Dev Workspace Operator.
12.2. Configure backup with a regular OCI-compatible registry
Configure the Dev Workspace backup job to use a regular OCI-compatible registry for backups. Provide registry credentials through a Kubernetes Secret in the Operator project or in each Dev Workspace project.
A Secret in the Dev Workspace project enables using different registry accounts per project with more granular access control.
Prerequisites
- You have administrator access to the OpenShift cluster.
- You have credentials for an OCI-compatible registry such as Content from quay.io is not included.Quay.io.
Procedure
Configure the
DevWorkspaceOperatorConfigresource to enable the backup job:kind: DevWorkspaceOperatorConfig apiVersion: controller.devfile.io/v1alpha1 metadata: name: devworkspace-operator-config namespace: openshift-operators config: workspace: backupCronJob: enable: true registry: authSecret: devworkspace-backup-registry-auth path: <registry_url> schedule: '0 */4 * * *' imagePullPolicy: Alwayswhere:
openshift-operators- The default installation namespace for the Dev Workspace Operator on OpenShift. If the Dev Workspace Operator is installed in a different namespace, use that namespace instead.
<registry_url>The OCI registry URL. For example:
quay.io/my-company-org.The
authSecretmust be nameddevworkspace-backup-registry-auth. It must reference a Kubernetes Secret of typekubernetes.io/dockerconfigjsonthat contains credentials to access the registry. Create the Secret in the installation project for the Dev Workspace Operator.
Create the registry credentials Secret:
oc create secret docker-registry devworkspace-backup-registry-auth --from-file=config.json -n openshift-operators
Add the required label to the Secret for the Dev Workspace Operator to recognize it:
oc label secret devworkspace-backup-registry-auth controller.devfile.io/watch-secret=true -n openshift-operators
WarningThe Dev Workspace Operator copies the
devworkspace-backup-registry-authSecret to each Dev Workspace project so that backups from user workspaces can be pushed to the registry. To use different credentials per project, create adevworkspace-backup-registry-authSecret with user-specific credentials in each Dev Workspace project instead.
Verification
- After the backup job completes, verify that the backup archives are available in the OCI registry under the expected path.
If the installation project for the Dev Workspace Operator is not openshift-operators, you must define it as an environment variable for the Red Hat OpenShift Dev Spaces dashboard in the CheCluster Custom Resource.
apiVersion: org.eclipse.che/v2
kind: CheCluster
spec:
  components:
    dashboard:
      deployment:
        containers:
          - env:
              - name: DWO_NAMESPACE
                value: <operator_install_namespace>
name: che-dashboard+ where:
+ <operator_install_namespace>:: The project where the Dev Workspace Operator is installed. The default installation project for the Dev Workspace Operator on OpenShift is openshift-operators.
For more information, see This content is not included.Dev Workspace Operator.
Additional resources
Additional resources
Chapter 13. Control which IDE extensions are available
Manage the extensions available in OpenShift Dev Spaces workspaces so that you can enforce security policies, support air-gapped environments, and provide consistent developer tooling across teams.
13.1. How IDE extensions work in workspaces
OpenShift Dev Spaces uses an Open VSX registry instance to manage extensions for Microsoft Visual Studio Code - Open Source.
To manage extensions, this IDE uses one of the Open VSX registry instances:
-
The embedded instance of the Open VSX registry that runs in the
plugin-registrypod of OpenShift Dev Spaces to support air-gapped, offline, and proxy-restricted environments. The embedded Open VSX registry contains only a subset of the extensions published on the public open-vsx.org registry. This subset is customizable. - The public open-vsx.org registry that is accessed over the internet.
- A standalone Open VSX registry instance that is deployed on a network accessible from OpenShift Dev Spaces workspace pods.
The default is the embedded instance of the Open VSX registry.
Additional resources
- Content from github.com is not included.Microsoft Visual Studio Code - Open Source source code repository
- Content from open-vsx.org is not included.Open VSX registry
- Content from open-vsx.org is not included.open-vsx.org
- Section 13.3, “Add or remove extensions in an OpenShift Dev Spaces workspace”
- Section 13.4, “Add or remove extensions from the Linux command line”
13.2. Use an alternative extension registry
Configure OpenShift Dev Spaces to use an alternative Open VSX registry instance instead of the default embedded registry. Switch to the public open-vsx.org registry for internet-connected environments, or to a standalone on-premises instance for full control over available extensions.
The default is the embedded instance of the Open VSX registry.
If the default Open VSX registry instance does not meet your requirements, you can select one of the following instances:
-
The Open VSX registry instance at
https://open-vsx.orgthat requires access to the internet. - A standalone Open VSX registry instance that is deployed on a network accessible from OpenShift Dev Spaces workspace pods.
Prerequisites
- You have administrator access to the OpenShift cluster where OpenShift Dev Spaces is deployed.
-
You have an active
ocsession with administrative permissions. See This page is not included, but the link has been rewritten to point to the nearest parent document.Getting started with the CLI.
Procedure
Edit the
CheClustercustom resource to update theopenVSXURLvalue:spec: components: pluginRegistry: openVSXURL: "<url_of_an_open_vsx_registry_instance>"where:
<url_of_an_open_vsx_registry_instance>The URL of the Open VSX registry instance. For example:
openVSXURL: "https://open-vsx.org".-
To select the embedded Open VSX registry instance in the
plugin-registrypod, useopenVSXURL: ''. You can customize the list of included extensions. See Section 13.3, “Add or remove extensions in an OpenShift Dev Spaces workspace” or Section 13.4, “Add or remove extensions from the Linux command line”. -
You can also point
openVSXURLat the URL of a standalone Open VSX registry instance. The URL must be accessible from within your organization’s cluster and not blocked by a proxy.
NoteTo ensure the stability and performance of the community-supported Open VSX Registry, API usage is organized into defined tiers. The Eclipse Foundation implements these limits to protect infrastructure from high-frequency automated traffic and to provide consistent service quality for all users. For more information, see Content from github.com is not included.Rate Limits and Usage Tiers and the Content from github.com is not included.open-vsx.org wiki.
ImportantUsing Content from open-vsx.org is not included.https://open-vsx.org is not recommended in an air-gapped environment, isolated from the internet. To reduce the risk of malware infections and unauthorized access to your code, use the embedded or self-hosted Open VSX registry with a curated set of extensions.
WarningDue to the dedicated Microsoft Content from cdn.vsassets.io is not included.Terms of Use, Content from marketplace.visualstudio.com is not included.Visual Studio Code Marketplace is not supported by Red Hat OpenShift Dev Spaces.
-
To select the embedded Open VSX registry instance in the
Verification
-
Confirm that the
plugin-registrypod has restarted and is running. - Open a workspace and verify that extensions are available from the selected registry instance in the Extensions view.
13.3. Add or remove extensions in an OpenShift Dev Spaces workspace
Customize the embedded Open VSX registry instance by adding or removing extensions directly within an OpenShift Dev Spaces workspace to create a custom extension catalog for your organization.
The embedded plugin registry is deprecated; the Open VSX Registry is its successor. Setting up an internal, on-premises Open VSX Registry provides full control over the extension lifecycle, enables offline use, and improves compliance. See Section 13.5, “Deploy a private extension registry” or Section 13.6, “Build a custom extension registry from source” for detailed setup instructions.
Prerequisites
You are logged in to the OpenShift cluster from the workspace terminal with cluster administrator permissions:
oc login --token=<token> --server=<api_server_url>
- You have started a workspace using the Content from github.com is not included.plugin registry repository.
- You have created a Red Hat Registry Service Account and have the username and token available.
-
You have the custom plugin registry built locally on the corresponding hardware for IBM Power (
ppc64le) and IBM Z (s390x) architectures. - You have a container image based on the latest tag or SHA to include the latest security fixes.
Procedure
Identify the publisher and extension name for each extension you want to add:
- Find the extension on the Content from open-vsx.org is not included.Open VSX registry website.
- Copy the URL of the extension’s listing page.
Extract the <publisher> and <name> from the URL:
https://open-vsx.org/extension/<publisher>/<name>
TipIf the extension is only available from Content from marketplace.visualstudio.com is not included.Microsoft Visual Studio Marketplace and not Content from open-vsx.org is not included.Open VSX, ask the extension publisher to publish it on Content from open-vsx.org is not included.open-vsx.org. See the Content from github.com is not included.publishing instructions and the Content from github.com is not included.GitHub action.
If the publisher is unavailable or unwilling, and no Open VSX equivalent exists, consider Content from github.com is not included.reporting an issue to the Open VSX team.
-
Open the Content from github.com is not included.
openvsx-sync.jsonfile in the workspace. Add or remove extensions using the following JSON syntax:
{ "id": "<publisher>.<name>", "version": "<extension_version>" }TipIf you have a closed-source or internal-only extension, you can add it directly from a
.vsixfile. Use a URL accessible to your custom plugin registry container:{ "id": "<publisher>.<name>", "download": "<url_to_download_vsix_file>", "version": "<extension_version>" }Read the Content from aka.ms is not included.Terms of Use for the Content from marketplace.visualstudio.com is not included.Microsoft Visual Studio Marketplace before using its resources.
Log in to the Red Hat registry:
- Navigate to Terminal → Run Task… → devfile.
- Run the 1. Login to registry.redhat.io task.
- Enter your Red Hat Registry Service Account credentials when prompted.
Build and publish the custom plugin registry:
- Navigate to Terminal → Run Task… → devfile.
Run the 2. Build and Publish a Custom Plugin Registry task.
NoteVerify that the
CHE_CODE_VERSIONin the Content from github.com is not included.build-config.jsonfile matches the version of the editor currently used with OpenShift Dev Spaces. Update it if necessary.
Configure OpenShift Dev Spaces to use the custom plugin registry:
- Navigate to Terminal → Run Task… → devfile.
- Run the 3. Configure Che to use the Custom Plugin Registry task.
Verification
-
Check that the
plugin-registrypod has restarted and is running. - Restart your workspace.
- Open the Extensions view in the IDE and verify that your added extensions are available.
13.4. Add or remove extensions from the Linux command line
Build and publish a custom plugin registry from the Linux command line to create a tailored Open VSX registry with the specific extensions your organization needs.
Prerequisites
- You have podman installed.
- You have Node.js version 18.20.3 or higher installed.
- You have created a Red Hat Registry Service Account and have the username and token available.
- You have a container image based on the latest tag or SHA to include the latest security fixes.
Procedure
Clone the plugin registry repository:
$ git clone https://github.com/redhat-developer/che-plugin-registry.git
Change to the plugin registry directory:
$ cd che-plugin-registry/
Log in to the Red Hat registry:
$ podman login registry.redhat.io
Identify the publisher and extension name for each extension you want to add:
- Find the extension on the Content from open-vsx.org is not included.Open VSX registry website.
- Copy the URL of the extension’s listing page.
Extract the <publisher> and <name> from the URL:
https://open-vsx.org/extension/<publisher>/<name>
TipIf the extension is only available from Content from marketplace.visualstudio.com is not included.Microsoft Visual Studio Marketplace and not Content from open-vsx.org is not included.Open VSX, ask the extension publisher to publish it on Content from open-vsx.org is not included.open-vsx.org. See the Content from github.com is not included.publishing instructions and the Content from github.com is not included.GitHub action.
If the publisher is unavailable or unwilling, and no Open VSX equivalent exists, consider Content from github.com is not included.reporting an issue to the Open VSX team.
-
Open the Content from github.com is not included.
openvsx-sync.jsonfile. Add or remove extensions using the following JSON syntax:
{ "id": "<publisher>.<name>", "version": "<extension_version>" }TipIf you have a closed-source or internal-only extension, you can add it directly from a
.vsixfile. Use a URL accessible to your custom plugin registry container:{ "id": "<publisher>.<name>", "download": "<url_to_download_vsix_file>", "version": "<extension_version>" }Read the Content from aka.ms is not included.Terms of Use for the Content from marketplace.visualstudio.com is not included.Microsoft Visual Studio Marketplace before using its resources.
Build the plugin registry container image:
$ ./build.sh -o <username> -r quay.io -t customNoteVerify that the
CHE_CODE_VERSIONin the Content from github.com is not included.build-config.jsonfile matches the version of the editor currently used with OpenShift Dev Spaces. Update it if necessary.Push the image to a container registry such as Content from quay.io is not included.quay.io:
$ podman push quay.io/<username/plugin_registry:custom>Edit the
CheClustercustom resource in your organization’s cluster to point to the image and save the changes:spec: components: pluginRegistry: deployment: containers: - image: quay.io/<username/plugin_registry:custom> openVSXURL: ''
Verification
-
Check that the
plugin-registrypod has restarted and is running. - Restart your workspace.
- Open the Extensions view in the IDE and verify that your added extensions are available.
13.5. Deploy a private extension registry
Deploy a standalone Open VSX extension registry by using an existing container image. Use a private, on-premises registry to control which extensions are available in your OpenShift Dev Spaces workspaces without building from source.
Prerequisites
-
You have the
octool installed. You are logged in to the OpenShift cluster where OpenShift Dev Spaces is deployed as a cluster administrator.
Tip$ oc login https://<openshift_dev_spaces_fqdn> --username=<my_user>-
You have
jqinstalled.
Procedure
Create a new OpenShift project for Open VSX:
oc new-project openvsx
- Save the Content from github.com is not included.openvsx-deployment-no-es.yml deployment template file on your file system.
Deploy Open VSX from the directory where you saved the file:
oc process -f openvsx-deployment-no-es.yml \
   -p OPENVSX_SERVER_IMAGE=registry.redhat.io/devspaces/openvsx-rhel9:3.29 \
   | oc apply -f -
Verify that all pods in the
openvsxproject are running and ready:{orch-cli} get pods -n openvsx \ -o jsonpath='\{range .items[]}\{@.metadata.name}\{"\t"}\{@.status.phase}\{"\t"}\{.status.containerStatuses[].ready}\{"\n"}{end}'Add an Open VSX user with a Personal Access Token (PAT) to the database.
Find the PostgreSQL pod:
export POSTGRESQL_POD_NAME=$({orch-cli} get pods -n openvsx \ -o jsonpath="\{.items[*].metadata.name}" | tr ' ' '\n' | grep '^postgresql' | head -n 1)Insert the username into the Open VSX database:
oc exec -n openvsx "${POSTGRESQL_POD_NAME}" -- bash -c \ "psql -d openvsx -c \"INSERT INTO user_data (id, login_name, role) VALUES (1001, 'eclipse-che', 'privileged');\""Insert the user PAT into the Open VSX database:
oc exec -n openvsx "${POSTGRESQL_POD_NAME}" -- bash -c \ "psql -d openvsx -c \"INSERT INTO personal_access_token (id, user_data, value, active, created_timestamp, accessed_timestamp, description, notified) VALUES (1001, 1001, 'eclipse_che_token', true, current_timestamp, current_timestamp, 'extensions publisher', false);\""ImportantThe user PAT must match the decoded value of
OVSX_PAT_BASE64specified in the deployment file. If you updateOVSX_PAT_BASE64, use the new decoded value as the user PAT.
Configure OpenShift Dev Spaces to use the internal Open VSX registry:
export CHECLUSTER_NAME="$({orch-cli} get checluster --all-namespaces -o json | jq -r '.items[0].metadata.name')" && export CHECLUSTER_NAMESPACE="$({orch-cli} get checluster --all-namespaces -o json | jq -r '.items[0].metadata.namespace')" && export OPENVSX_ROUTE_URL="$({orch-cli} get route internal -n openvsx -o jsonpath='\{.spec.host}')" && export PATCH='\{"spec":\{"components":\{"pluginRegistry":\{"openVSXURL":"https://'"$OPENVSX_ROUTE_URL"'"\}\}\}\}' && {orch-cli} patch checluster "${CHECLUSTER_NAME}" --type=merge --patch "${PATCH}" -n "${CHECLUSTER_NAMESPACE}"TipFor detailed instructions on configuring the Open VSX registry URL, see Section 13.2, “Use an alternative extension registry”.
Publish a Visual Studio Code extension from a
.vsixfile. The Open VSX registry does not provide any extension by default. You need the extension publisher name and the download URL of the.vsixpackage.Retrieve the name of the pod running the Open VSX server:
export OVSX_POD_NAME=$({orch-cli} get pods -n openvsx -o jsonpath="\{.items[*].metadata.name}" | tr ' ' '\n' | grep ^openvsx-server)Download the
.vsixextension:oc exec -n openvsx "${OVSX_POD_NAME}" -- bash -c "wget -O /tmp/extension.vsix <EXTENSION_DOWNLOAD_URL>"Create an extension publisher:
oc exec -n openvsx "${OVSX_POD_NAME}" -- bash -c "ovsx create-namespace <EXTENSION_PUBLISHER_NAME>" || truePublish the extension:
oc exec -n openvsx "${OVSX_POD_NAME}" -- bash -c "ovsx publish /tmp/extension.vsix"Delete the downloaded extension file:
oc exec -n openvsx "${OVSX_POD_NAME}" -- bash -c "rm /tmp/extension.vsix"
Optional: Publish multiple extensions from a list. Update the
deploy/openshift/extensions.txtfile with the download URLs of each.vsixfile, then publish all listed extensions:while IFS= read -r url; do oc exec -n openvsx "${OVSX_POD_NAME}" -- bash -c "wget -O /tmp/extension.vsix '$url' && ovsx publish /tmp/extension.vsix && rm /tmp/extension.vsix" done < deploy/openshift/extensions.txt
Verification
- Start any workspace and verify the published extensions are available in the Extensions view of the workspace IDE.
- Navigate to the Open VSX route URL to verify the registry UI displays the published extensions.
Next steps
- To restrict the registry to internal cluster traffic, see Section 13.8, “Restrict the extension registry to internal traffic”.
- To remove a published extension, see Section 13.9, “Remove an extension through the registry API”.
Additional resources
- Content from github.com is not included.Eclipse Open VSX sources
- Content from github.com is not included.Eclipse Open VSX documentation
- Section 13.6, “Build a custom extension registry from source”
- Section 13.8, “Restrict the extension registry to internal traffic”
- Section 13.2, “Use an alternative extension registry”
13.6. Build a custom extension registry from source
Build custom Open VSX server and CLI images from source and deploy them to your cluster. Use this method when you need a specific Open VSX version or custom modifications to the registry.
Prerequisites
-
You have the
octool installed. You are logged in to the OpenShift cluster where OpenShift Dev Spaces is deployed as a cluster administrator.
Tip$ oc login https://<openshift_dev_spaces_fqdn> --username=<my_user>- You have Podman installed.
- You have access to a container registry where you can push images.
-
You have
jqinstalled.
Procedure
Create a new OpenShift project for Open VSX:
oc new-project openvsx
Clone the Open VSX repository and navigate to the deployment directory:
git clone https://github.com/eclipse-openvsx/openvsx.git &&
cd openvsx/deploy/openshift
Build and push the Open VSX server image:
export REGISTRY=<registry_hostname>
export NAMESPACE=<registry_namespace>
export OPENVSX_VERSION=<openvsx_version>
export OPENVSX_SERVER_IMAGE=$\{REGISTRY}/$\{NAMESPACE}/openvsx-server:$\{OPENVSX_VERSION}

podman build -t "$\{OPENVSX_SERVER_IMAGE}" \
  --build-arg "OPENVSX_VERSION=$\{OPENVSX_VERSION}" -f openvsx.Dockerfile . &&
podman login "$\{REGISTRY}" &&
podman push "$\{OPENVSX_SERVER_IMAGE}"
where:
<registry_hostname>-
The container registry hostname. For example:
quay.io. <registry_namespace>-
Your organization or account in the registry. For example:
myuser. <openvsx_version>The Open VSX version tag to build. For example:
v0.33.0. Available versions are listed on the Content from github.com is not included.Open VSX releases page.ImportantEnsure that the image is publicly accessible or that the cluster can pull from the registry with appropriate credentials.
Build and push the Open VSX CLI image:
export OPENVSX_CLI_VERSION=<cli_version> export OPENVSX_CLI_IMAGE=$\{REGISTRY}/$\{NAMESPACE}/openvsx-cli:$\{OPENVSX_CLI_VERSION} podman build -t "$\{OPENVSX_CLI_IMAGE}" \ --build-arg "OVSX_VERSION=$\{OPENVSX_CLI_VERSION}" -f cli.Dockerfile . && podman push "$\{OPENVSX_CLI_IMAGE}"where:
<cli_version>-
The Open VSX CLI version. For example:
0.10.9.
Deploy Open VSX with the custom images:
{orch-cli} process -f openvsx-deployment.yml \ -p OPENVSX_SERVER_IMAGE="${OPENVSX_SERVER_IMAGE}" \ -p OPENVSX_CLI_IMAGE="${OPENVSX_CLI_IMAGE}" \ | {orch-cli} apply -f -Verify that all pods in the
openvsxproject are running and ready:{orch-cli} get pods -n openvsx \ -o jsonpath='\{range .items[]}\{@.metadata.name}\{"\t"}\{@.status.phase}\{"\t"}\{.status.containerStatuses[].ready}\{"\n"}{end}'Add an Open VSX user with a Personal Access Token (PAT) to the database.
Find the PostgreSQL pod:
export POSTGRESQL_POD_NAME=$({orch-cli} get pods -n openvsx \ -o jsonpath="\{.items[*].metadata.name}" | tr ' ' '\n' | grep '^postgresql' | head -n 1)Insert the username into the Open VSX database:
oc exec -n openvsx "${POSTGRESQL_POD_NAME}" -- bash -c \ "psql -d openvsx -c \"INSERT INTO user_data (id, login_name, role) VALUES (1001, 'eclipse-che', 'privileged');\""Insert the user PAT into the Open VSX database:
oc exec -n openvsx "${POSTGRESQL_POD_NAME}" -- bash -c \ "psql -d openvsx -c \"INSERT INTO personal_access_token (id, user_data, value, active, created_timestamp, accessed_timestamp, description, notified) VALUES (1001, 1001, 'eclipse_che_token', true, current_timestamp, current_timestamp, 'extensions publisher', false);\""ImportantThe user PAT must match the decoded value of
OVSX_PAT_BASE64specified in the deployment file. If you updateOVSX_PAT_BASE64, use the new decoded value as the user PAT.
Configure OpenShift Dev Spaces to use the internal Open VSX registry:
export CHECLUSTER_NAME="$({orch-cli} get checluster --all-namespaces -o json | jq -r '.items[0].metadata.name')" && export CHECLUSTER_NAMESPACE="$({orch-cli} get checluster --all-namespaces -o json | jq -r '.items[0].metadata.namespace')" && export OPENVSX_ROUTE_URL="$({orch-cli} get route internal -n openvsx -o jsonpath='\{.spec.host}')" && export PATCH='\{"spec":\{"components":\{"pluginRegistry":\{"openVSXURL":"https://'"$OPENVSX_ROUTE_URL"'"\}\}\}\}' && {orch-cli} patch checluster "${CHECLUSTER_NAME}" --type=merge --patch "${PATCH}" -n "${CHECLUSTER_NAMESPACE}"Publish a Visual Studio Code extension from a
.vsixfile. The Open VSX registry does not provide any extension by default.Retrieve the name of the pod running the Open VSX server:
export OVSX_POD_NAME=$({orch-cli} get pods -n openvsx -o jsonpath="\{.items[*].metadata.name}" | tr ' ' '\n' | grep ^openvsx-server)Download the
.vsixextension:oc exec -n openvsx "${OVSX_POD_NAME}" -- bash -c "wget -O /tmp/extension.vsix <EXTENSION_DOWNLOAD_URL>"Create an extension publisher:
oc exec -n openvsx "${OVSX_POD_NAME}" -- bash -c "ovsx create-namespace <EXTENSION_PUBLISHER_NAME>" || truePublish the extension:
oc exec -n openvsx "${OVSX_POD_NAME}" -- bash -c "ovsx publish /tmp/extension.vsix"Delete the downloaded extension file:
oc exec -n openvsx "${OVSX_POD_NAME}" -- bash -c "rm /tmp/extension.vsix"
Optional: Publish multiple extensions from a list. Update the
deploy/openshift/extensions.txtfile with the download URLs of each.vsixfile, then publish all listed extensions:while IFS= read -r url; do oc exec -n openvsx "${OVSX_POD_NAME}" -- bash -c "wget -O /tmp/extension.vsix '$url' && ovsx publish /tmp/extension.vsix && rm /tmp/extension.vsix" done < deploy/openshift/extensions.txt
Verification
- Start any workspace and verify the published extensions are available in the Extensions view of the workspace IDE.
- Navigate to the Open VSX route URL to verify the registry UI displays the published extensions.
Next steps
- To restrict the registry to internal cluster traffic, see Section 13.8, “Restrict the extension registry to internal traffic”.
- To remove a published extension, see Section 13.9, “Remove an extension through the registry API”.
Additional resources
- Content from github.com is not included.Eclipse Open VSX sources
- Content from github.com is not included.Eclipse Open VSX releases
- Content from github.com is not included.Eclipse Open VSX documentation
- Section 13.5, “Deploy a private extension registry”
- Section 13.8, “Restrict the extension registry to internal traffic”
13.7. Build the extension registry inside a workspace
Deploy an on-premises Open VSX extension registry by using predefined devfile tasks in an OpenShift Dev Spaces workspace. The workspace environment includes all necessary tools and commands defined in the .devfile.yaml file of the Open VSX repository.
Prerequisites
- You have cluster administrator permissions on the OpenShift cluster.
- You have a running OpenShift Dev Spaces instance.
Procedure
- Start a workspace by using the Content from github.com is not included.Eclipse Open VSX repository.
Log in to the cluster from the workspace terminal:
oc login --token=<token> --server=<api_server_url>
WarningThe Content from github.com is not included..devfile.yaml includes an
elasticsearchcomponent that does not support IBM Power (ppc64le) or IBM Z (s390x) architectures. To start the workspace on these architectures, remove theelasticsearchcomponent from the devfile. Alternatively, use the Section 13.5, “Deploy a private extension registry” procedure to deploy Open VSX without starting a workspace.TipThe environment, including all necessary commands, is defined in the
.devfile.yamlfile. The numbered task names (such as2.1.,2.4.1.) are labels defined in the devfile. Use these exact names to locate each task in theTerminal>Run Task…menu.Create a new project for Open VSX.
Select
Terminal>Run Task…>devfileand run the2.1. Create Namespace for OpenVSXtask. A new project namedopenvsxis created on the cluster.Deploy Open VSX with the OpenShift Dev Spaces pre-built image.
Select
Terminal>Run Task…>devfileand run the2.4.1. Deploy Custom OpenVSXtask. When the task prompts for the Open VSX server image, enterregistry.redhat.io/devspaces/openvsx-rhel9:3.29.After the deployment completes, the
openvsxproject has two components: PostgreSQL database and Open VSX server. The Open VSX UI is accessible through an exposed route in the OpenShift cluster.TipAll deployment parameters are described in the
deploy/openshift/openvsx-deployment-no-es.ymlfile. The template includes default values such asOVSX_PAT_BASE64.Add an Open VSX user with a PAT to the database.
Select
Terminal>Run Task…>devfileand run the2.5. Add OpenVSX user with PAT to the DBtask. The task prompts you for the Open VSX username and user PAT. Press Enter to use the default values.ImportantThe user PAT must match the decoded value of
OVSX_PAT_BASE64specified in the deployment file. If you updateOVSX_PAT_BASE64, use the new decoded value as the user PAT.Configure OpenShift Dev Spaces to use the internal Open VSX registry.
Select
Terminal>Run Task…>devfileand run the2.6. Configure Che to use the internal OpenVSX registrytask. This task patches theCheClustercustom resource to use the deployed Open VSX registry URL.Publish a Visual Studio Code extension from a
.vsixfile.Select
Terminal>Run Task…>devfileand run the2.8. Publish a VS Code Extension from a VSIX filetask. The task prompts you to provide the extension publisher name and the path to the.vsixfile.Optional: Publish a predefined list of extensions.
Update the
deploy/openshift/extensions.txtfile with the download URLs of each.vsixfile, then selectTerminal>Run Task…>devfileand run the2.9. Publish list of VS Code Extensionstask.
Verification
- Start any workspace and verify the published extensions are available in the Extensions view of the workspace IDE.
-
Open the
internalroute in theopenvsxproject to verify the registry UI displays the published extensions.
Next steps
- To restrict the registry to internal cluster traffic, see Section 13.8, “Restrict the extension registry to internal traffic”.
- To remove a published extension, see Section 13.9, “Remove an extension through the registry API”.
Additional resources
- Content from github.com is not included.Eclipse Open VSX sources
- Content from github.com is not included.Open VSX devfile
- Section 13.5, “Deploy a private extension registry”
- Section 13.6, “Build a custom extension registry from source”
- Section 13.8, “Restrict the extension registry to internal traffic”
13.8. Restrict the extension registry to internal traffic
Restrict your Open VSX registry to internal cluster traffic by removing the public route and configuring OpenShift Dev Spaces to use the internal service URL. Internal routing keeps extension registry traffic within the cluster and avoids public exposure.
Prerequisites
-
You have Open VSX deployed in the
openvsxproject. -
You have the
octool installed. - You are logged in to the OpenShift cluster as a cluster administrator.
-
You have
jqinstalled.
Procedure
Delete the public route for the Open VSX registry:
oc delete route internal -n openvsx
Update the CheCluster custom resource to use the internal service DNS URL:
export CHECLUSTER_NAME="$({orch-cli} get checluster --all-namespaces -o json | jq -r '.items[0].metadata.name')" && export CHECLUSTER_NAMESPACE="$({orch-cli} get checluster --all-namespaces -o json | jq -r '.items[0].metadata.namespace')" && export PATCH='{"spec":{"components":{"pluginRegistry":{"openVSXURL":"http://openvsx-server.openvsx.svc:8080"}}}}' && {orch-cli} patch checluster "${CHECLUSTER_NAME}" --type=merge --patch "${PATCH}" -n "${CHECLUSTER_NAMESPACE}"- Restart any running workspaces to apply the new registry URL.
Verification
- Start a workspace and verify that extensions are available in the Extensions view using the internal registry.
13.9. Remove an extension through the registry API
Delete an extension from your private Open VSX registry by calling the administrator API with an administrator user and a Personal Access Token (PAT).
Prerequisites
-
You have access to the OpenShift cluster where the Open VSX registry is deployed in the
openvsxproject. -
You have the
octool installed.
Procedure
Add the Open VSX administrator user and PAT to the database:
export POSTGRESQL_POD_NAME=$(oc get pods -n openvsx \ -o jsonpath="{.items[*].metadata.name}" | tr ' ' '\n' | grep '^postgresql' | head -n 1)oc exec -n openvsx "$POSTGRESQL_POD_NAME" -- bash -c \ "psql -d openvsx -c \"INSERT INTO user_data (id, login_name, role) VALUES (1002, 'openvsx-admin', 'admin');\""
oc exec -n openvsx "$POSTGRESQL_POD_NAME" -- bash -c \ "psql -d openvsx -c \"INSERT INTO personal_access_token (id, user_data, value, active, created_timestamp, accessed_timestamp, description, notified) VALUES (1002, 1002, '<your_admin_token>', true, current_timestamp, current_timestamp, 'Admin API Token', false);\""NoteUse a strong, unique value for
<your_admin_token>in production environments.Delete an extension and all its versions:
curl -X POST \
  "https://<your_openvsx_server_url>/admin/api/extension/<publisher>/<extension>/delete?token=<your_admin_token>"
where:
<your_openvsx_server_url>- The URL of the Open VSX server.
<publisher>- The extension publisher name.
<extension>- The extension name.
<your_admin_token>- The PAT value created in step 1.
Optional: Delete a specific version of an extension:
curl -X POST \ -H "Content-Type: application/json" \ -d '[{"version": "<version>", "targetPlatform": "<platform>"}]' \ "https://<your_openvsx_server_url>/admin/api/extension/<publisher>/<extension>/delete?token=<your_admin_token>"You can list multiple version and platform pairs in the JSON array.
Verification
- Refresh the Open VSX registry and verify that the extension no longer appears.
13.10. Remove an extension directly from the database
Remove extension records and related data directly from the PostgreSQL database when the administrator API is not available or when you need to clean up specific data. If the extension uses local storage, you must also remove its files from the Open VSX server pod.
Prerequisites
-
You have access to the OpenShift cluster where the Open VSX registry is deployed in the
openvsxproject. -
You have the
octool installed. - You know the publisher name and extension name that you want to delete.
Procedure
Open a command prompt in the PostgreSQL pod and connect to the database:
export POSTGRESQL_POD_NAME=$(oc get pods -n openvsx \ -o jsonpath="{.items[*].metadata.name}" | tr ' ' '\n' | grep '^postgresql' | head -n 1) oc exec -it $POSTGRESQL_POD_NAME -n openvsx -- /bin/bashInside the pod, run
psql:psql
At the
postgres=#prompt, connect to the database:\c openvsx
You are now connected to the
openvsxdatabase as thepostgresuser.Find the publisher ID and extension ID:
Identify the extension publisher. Replace
<publisher_name>with the actual publisher name:SELECT id, name FROM namespace WHERE name = '<publisher_name>';Identify the extension ID. Replace
<publisher_id>and<extension_name>with the values from the previous query:SELECT id, name, namespace_id FROM extension WHERE namespace_id = <publisher_id> AND name = '<extension_name>';
Note the ID of the extension to use as
<extension_id>in the next steps.Optional: Preview extension versions and file resources:
Preview the versions:
SELECT id, version, pre_release, semver_pre_release, semver_is_pre_release FROM extension_version WHERE extension_id = <extension_id> ORDER BY timestamp DESC;Preview the file resources:
SELECT id, name, type, storage_type FROM file_resource WHERE extension_id = <extension_id> ORDER BY id;If the
storage_typevalue islocal, you must also remove the extension files from the file system on the Open VSX server pod.Delete the extension from the database:
Run the following commands in a single transaction. Replace
<extension_id>with the extension ID from step 2.BEGIN; -- 1. Delete all file resources for the extension DELETE FROM file_resource WHERE extension_id = <extension_id>; -- 2. Delete all extension reviews DELETE FROM extension_review WHERE extension_id = <extension_id>; -- 3. Delete all versions of the extension DELETE FROM extension_version WHERE extension_id = <extension_id>; -- 4. Delete the extension entry itself DELETE FROM extension WHERE id = <extension_id>; COMMIT;
ImportantRun these commands in order within one transaction. Do not skip the
COMMITcommand, or the system does not apply the changes.If the extension used local storage, remove the extension files from the Open VSX server pod:
Get the Open VSX server pod name:
export OPENVSX_POD_NAME=$(oc get pods -n openvsx -o jsonpath="{.items[*].metadata.name}" | tr ' ' '\n' | grep '^openvsx-server' | head -n 1)Delete the extension folder:
oc exec -it $OPENVSX_POD_NAME -n openvsx -- /bin/bash -c "rm -rf /tmp/extensions/<publisher>/<extension>"
Verification
- Refresh your Open VSX registry and verify that the extension no longer appears in the gallery.
Chapter 14. Customize the default IDE
Configure Visual Studio Code - Open Source for OpenShift Dev Spaces workspaces, including multi-root project layout, trusted and default extensions, and editor settings so that developers get a consistent IDE experience.
14.1. Work with multiple projects in one workspace
Work with multiple project folders in the same workspace by using the multi-root workspace feature. This is useful when you are working on several related projects at once, such as product documentation and product code repositories.
By default, workspaces open in multi-root mode. After a workspace starts, the /projects/.code-workspace workspace file is generated. The workspace file contains all the projects described in the devfile.
{
	"folders": [
		{
			"name": "project-1",
			"path": "/projects/project-1"
		},
		{
			"name": "project-2",
			"path": "/projects/project-2"
		}
	]
}If the workspace file already exists, it is updated and all missing projects are taken from the devfile. If you remove a project from the devfile, it remains in the workspace file.
You can change the default behavior and provide your own workspace file or switch to a single-root workspace.
Prerequisites
- You have a running instance of OpenShift Dev Spaces.
Procedure
Add a workspace file with the name
.code-workspaceto the root of your repository. After workspace creation, the Visual Studio Code - Open Source ("Code - OSS") uses the workspace file as it is.{ "folders": [ { "name": "project-name", "path": "." } ] }ImportantBe careful when creating a workspace file. In case of errors, an empty Visual Studio Code - Open Source ("Code - OSS") opens instead. If you have several projects, the workspace file is taken from the first project. If the workspace file does not exist in the first project, a new one is created and placed in the
/projectsdirectory.Define the
VSCODE_DEFAULT_WORKSPACEenvironment variable in your devfile with the path to an alternative workspace file.env: - name: VSCODE_DEFAULT_WORKSPACE value: "/projects/project-name/workspace-file"Define the
VSCODE_DEFAULT_WORKSPACEenvironment variable and set it to/to open a workspace in single-root mode.env: - name: VSCODE_DEFAULT_WORKSPACE value: "/"
Verification
- Start or restart the workspace and verify that Code - OSS opens with the expected workspace mode (single-root or multi-root).
14.2. Grant extensions access to OAuth tokens
Grant specific extensions access to OAuth authentication tokens in Microsoft Visual Studio Code by configuring the trustedExtensionAuthAccess field. This allows extensions that require access to services such as GitHub, Microsoft, or any other OAuth-enabled service to authenticate without manual intervention.
	"trustedExtensionAuthAccess": [
		"<publisher1>.<extension1>",
		"<publisher2>.<extension2>"
	]
Define the variable in the devfile or in a ConfigMap.
Use the trustedExtensionAuthAccess field with caution as it could potentially lead to security risks if misused. Give access only to trusted extensions.
Since the Microsoft Visual Studio Code editor is bundled within che-code image, you can only change the product.json file when the workspace is started up.
Prerequisites
- You have a running instance of OpenShift Dev Spaces.
Procedure
Define the
VSCODE_TRUSTED_EXTENSIONSenvironment variable in devfile.yaml:env: - name: VSCODE_TRUSTED_EXTENSIONS value: "<publisher1>.<extension1>,<publisher2>.<extension2>"Alternatively, mount a ConfigMap with the
VSCODE_TRUSTED_EXTENSIONSenvironment variable. With a ConfigMap, the variable is propagated to all your workspaces and you do not need to add the variable to each devfile you are using.kind: ConfigMap apiVersion: v1 metadata: name: trusted-extensions labels: controller.devfile.io/mount-to-devworkspace: 'true' controller.devfile.io/watch-configmap: 'true' annotations: controller.devfile.io/mount-as: env data: VSCODE_TRUSTED_EXTENSIONS: '<publisher1>.<extension1>,<publisher2>.<extension2>'
Verification
-
Start or restart the workspace and verify that the
trustedExtensionAuthAccesssection is added to theproduct.jsonfile.
14.3. Pre-install extensions in every workspace
Pre-install VS Code extensions in OpenShift Dev Spaces workspaces by configuring the DEFAULT_EXTENSIONS environment variable to provide a consistent set of editor extensions on workspace startup.
After startup, the editor checks for the DEFAULT_EXTENSIONS environment variable and installs the specified extensions in the background. To specify multiple extensions, separate the paths with a semicolon.
There are three ways to embed default .vsix extensions into your workspace:
- Add the extension binary to the source repository.
-
Use the devfile
postStartevent to fetch extension binaries from the network. -
Include the extensions'
.vsixbinaries in theche-codeimage.
Prerequisites
- You have a running OpenShift Dev Spaces instance.
Procedure
Add the extension binary to the source repository.
Adding the extension binary to the Git repository and defining the environment variable in the devfile is the easiest way to add default extensions to your workspace. If the
extension.vsixfile exists in the repository root, set theDEFAULT_EXTENSIONSenvironment variable for the tooling container in your.devfile.yaml:schemaVersion: 2.3.0 metadata: generateName: example-project components: - name: tools container: image: quay.io/devfile/universal-developer-image:ubi8-latest env: - name: 'DEFAULT_EXTENSIONS' value: '/projects/example-project/extension.vsix'Use the devfile
postStartevent to fetch extension binaries from the network.Use cURL or GNU Wget to download extensions to your workspace. Specify a devfile command to download extensions and add a
postStartevent to run the command on workspace startup. Define theDEFAULT_EXTENSIONSenvironment variable in the devfile:schemaVersion: 2.3.0 metadata: generateName: example-project components: - name: tools container: image: quay.io/devfile/universal-developer-image:ubi8-latest env: - name: DEFAULT_EXTENSIONS value: '/tmp/extension-1.vsix;/tmp/extension-2.vsix' commands: - id: add-default-extensions exec: # name of the tooling container component: tools # download several extensions using curl commandLine: | curl https://.../extension-1.vsix --location -o /tmp/extension-1.vsix curl https://.../extension-2.vsix --location -o /tmp/extension-2.vsix events: postStart: - add-default-extensionsWarningIn some cases curl may download a
.gzipcompressed file. This might make installing the extension impossible. To fix that, save the file as a .vsix.gz file and then decompress it with gunzip. This replaces the .vsix.gz file with an unpacked .vsix file:curl Content from some-extension-url is not included.https://some-extension-url --location -o /tmp/extension.vsix.gz && gunzip /tmp/extension.vsix.gzInclude the extensions
.vsixbinaries in theche-codeimage.Bundling extensions in the editor image and defining the
DEFAULT_EXTENSIONSenvironment variable in a ConfigMap applies default extensions without changing the devfile.-
Create a directory and place your selected
.vsixextensions in this directory. Create a Dockerfile with the following content:
# inherit che-incubator/che-code:latest
FROM quay.io/che-incubator/che-code:latest
USER 0

# copy all .vsix files to /default-extensions directory
RUN mkdir --mode=775 /default-extensions
COPY --chmod=755 *.vsix /default-extensions/

# add instruction to the script to copy default extensions to the working container
RUN echo "cp -r /default-extensions /checode/" >> /entrypoint-init-container.sh
Build the image and then push it to a registry:
$ docker build -t yourname/che-code:next .
$ docker push yourname/che-code:next
Add the new ConfigMap to the user’s project, define the
DEFAULT_EXTENSIONSenvironment variable, and specify the absolute paths to the extensions. This ConfigMap sets the environment variable to all workspaces in the user’s project.kind: ConfigMap apiVersion: v1 metadata: name: vscode-default-extensions labels: controller.devfile.io/mount-to-devworkspace: 'true' controller.devfile.io/watch-configmap: 'true' annotations: controller.devfile.io/mount-as: env data: DEFAULT_EXTENSIONS: '/checode/default-extensions/extension1.vsix;/checode/default-extensions/extension2.vsix'- Open the OpenShift Dev Spaces Dashboard and navigate to the Create Workspace tab on the left side.
-
In the Editor Selector section, expand the Use an Editor Definition dropdown and set the editor URI to
yourname/che-code:next. - Create a workspace by selecting a sample or entering a Git repository URL.
-
Create a directory and place your selected
Verification
- Verify that the extensions are installed in the workspace by checking the Extensions panel in the editor.
14.4. IDE configuration options you can customize
The Visual Studio Code - Open Source ("Code - OSS") editor supports several configuration sections in a ConfigMap. Each section maps to a specific editor config file and controls a different aspect of editor behavior.
The following sections are currently supported:
settings.json- Contains various settings with which you can customize different parts of the Code - OSS editor.
extensions.json- Contains recommended extensions that are installed when a workspace is started.
product.json- Contains properties that you need to add to the editor’s product.json file. If the property already exists, its value is updated.
configurations.jsonContains properties for Code - OSS editor configuration. For example, you can use the
extensions.install-from-vsix-enabledproperty to disable theInstall from VSIXmenu item in the Extensions panel.NoteThe
extensions.install-from-vsix-enabledproperty disables only the UI action. Extensions can still be installed by using theworkbench.extensions.command.installFromVSIXAPI command or the CLI. To block these paths as well, manage extension installation policies.policy.json-
Controls Code - OSS extension installation by using the
AllowedExtensionspolicy and the ability to fully block extension installation.
14.5. Apply IDE settings to all workspaces
Configure the Code - OSS editor for all workspaces by defining settings, recommended extensions, and product properties in a ConfigMap. When you start a workspace, the editor reads this ConfigMap and applies the configurations to the corresponding config files.
Prerequisites
- You have an active OpenShift Dev Spaces workspace or you are ready to start one.
-
You have an active
ocsession with permissions to create ConfigMaps in user projects.
Procedure
Add a new ConfigMap in valid JSON format to the user’s project, define the supported sections, and specify the properties you want to add.
apiVersion: v1 kind: ConfigMap metadata: name: vscode-editor-configurations labels: app.kubernetes.io/part-of: che.eclipse.org app.kubernetes.io/component: workspaces-config data: extensions.json: | { "recommendations": [ "dbaeumer.vscode-eslint", "github.vscode-pull-request-github" ] } settings.json: | { "window.header": "A HEADER MESSAGE", "window.commandCenter": false, "workbench.colorCustomizations": { "titleBar.activeBackground": "#CCA700", "titleBar.activeForeground": "#ffffff" } } product.json: | { "extensionEnabledApiProposals": { "ms-python.python": [ "contribEditorContentMenu", "quickPickSortByLabel" ] }, "trustedExtensionAuthAccess": [ "<publisher1>.<extension1>", "<publisher2>.<extension2>" ] } configurations.json: | { "extensions.install-from-vsix-enabled": false }where:
<publisher1>.<extension1>,<publisher2>.<extension2>-
The publisher and extension name pairs for extensions that are granted trusted authentication access. Use the format
publisher.extensionName.
-
Optional: To replicate the ConfigMap across all user projects while preventing user modifications, add the ConfigMap to the
openshift-devspacesnamespace instead of individual user projects. - Start or restart your workspace.
Verification
Verify that settings defined in the ConfigMap are applied using one of the following methods:
-
Use
F1 → Preferences: Open Remote Settingsto check if the defined settings are applied. -
Ensure that the settings from the ConfigMap are present in the
/checode/remote/data/Machine/settings.jsonfile by using theF1 → File: Open File…command to inspect the file’s content.
-
Use
Verify that extensions defined in the ConfigMap are applied:
-
Go to the
Extensionsview (F1 → View: Show Extensions) and check that the extensions are installed -
Ensure that the extensions from the ConfigMap are present in the
.code-workspacefile by using theF1 → File: Open File…command. By default, the workspace file is placed at/projects/.code-workspace.
-
Go to the
Verify that product properties defined in the ConfigMap are being added to the Visual Studio Code product.json:
-
Open a terminal, run the command
cat /checode/entrypoint-logs.txt | grep -a "Node.js dir"and copy the Visual Studio Code path. -
Press
Ctrl + O, paste the copied path and open product.json file. - Ensure that product.json file contains all the properties defined in the ConfigMap.
-
Open a terminal, run the command
Verify that
extensions.install-from-vsix-enabledproperty defined in the ConfigMap is applied to the Code - OSS editor:-
Open the Command Palette (use
F1) to check thatInstall from VSIXcommand is not present in the list of commands. -
Use
F1 → Open View → Extensionsto open theExtensionspanel, then click…on the view (Views and More Actionstooltip) to check thatInstall from VSIXaction is absent in the list of actions. -
Go to the Explorer, find a file with the
vsixextension (redhat.vscode-yaml-1.17.0.vsix, for example), open menu for that file.Install from VSIXaction should be absent in the menu.
-
Open the Command Palette (use
14.6. Control which extensions users can install
Control Code - OSS extension installation by using a ConfigMap. Enforce a fine-grained allow or deny list by using the AllowedExtensions policy.
You can also block installs through the CLI, default extensions, and the workbench.extensions.command.installFromVSIX API command. The following properties are supported:
-
BlockCliExtensionsInstallation— when enabled, blocks installation of extensions through the CLI. -
BlockDefaultExtensionsInstallation— when enabled, blocks installation of default extensions. See Section 14.3, “Pre-install extensions in every workspace”. -
BlockInstallFromVSIXCommandExtensionsInstallation— when enabled, blocks installation of extensions through theworkbench.extensions.command.installFromVSIXAPI command. -
AllowedExtensions— provides fine-grained control over Code - OSS extension installation. When this policy is applied, already installed extensions that are not allowed are disabled and display a warning. For conceptual background, see Content from code.visualstudio.com is not included.Configure allowed extensions.
Prerequisites
- You have administrator access to the OpenShift cluster.
Procedure
Add a new ConfigMap to the
openshift-devspacesnamespace and specify the properties you want to add:kind: ConfigMap apiVersion: v1 metadata: name: vscode-editor-configurations namespace: openshift-devspaces labels: app.kubernetes.io/component: workspaces-config app.kubernetes.io/part-of: che.eclipse.org annotations: controller.devfile.io/mount-as: subpath controller.devfile.io/mount-path: /checode-config controller.devfile.io/read-only: 'true' data: policy.json: | { "BlockCliExtensionsInstallation": true, "BlockDefaultExtensionsInstallation": true, "BlockInstallFromVSIXCommandExtensionsInstallation": true, "AllowedExtensions": { "*": true, "dbaeumer.vscode-eslint": false, "ms-python.python": false, "redhat": false } }NoteEnsure that the ConfigMap contains data in a valid JSON format.
Optional: To completely disable extension installation instead of using fine-grained control, set all extensions to disallowed:
kind: ConfigMap apiVersion: v1 metadata: name: vscode-editor-configurations namespace: openshift-devspaces labels: app.kubernetes.io/component: workspaces-config app.kubernetes.io/part-of: che.eclipse.org annotations: controller.devfile.io/mount-as: subpath controller.devfile.io/mount-path: /checode-config controller.devfile.io/read-only: 'true' data: policy.json: | { "AllowedExtensions": { "*": false } }- Start or restart your workspace.
Optional: Add the ConfigMap in the user’s project:
kind: ConfigMap apiVersion: v1 metadata: name: vscode-editor-configurations labels: controller.devfile.io/mount-to-devworkspace: 'true' controller.devfile.io/watch-configmap: 'true' annotations: controller.devfile.io/mount-as: subpath controller.devfile.io/mount-path: /checode-config controller.devfile.io/read-only: 'true' data: policy.json: | { "AllowedExtensions": { "*": false } }NoteWhen the ConfigMap is stored in the user’s project, the user can edit its values.
Verification
Verify that the
BlockCliExtensionsInstallationproperty is applied:-
Press F1, select Preferences: Open Settings (UI), and enter
BlockCliExtensionsInstallationin search. -
Provide a
.vsixfile and try CLI install. The installation fails with "Installation of extensions via CLI has been blocked by an administrator".
-
Press F1, select Preferences: Open Settings (UI), and enter
Verify that the
BlockDefaultExtensionsInstallationproperty is applied:- Check Settings for the property.
- Configure default extensions and verify they are not installed on workspace start or restart.
Verify that the
BlockInstallFromVSIXCommandExtensionsInstallationproperty is applied:- Check Settings for the property.
-
The
workbench.extensions.command.installFromVSIXAPI command is blocked.
Verify that rules defined in the
AllowedExtensionssection are applied:-
Check Settings →
extensions.allowed. - Disallowed extensions display a "This extension cannot be installed because it is not in the allowed list" warning.
-
Check Settings →
Chapter 15. Use the OpenShift Dev Spaces server API
Use the Swagger web user interface to explore and interact with the OpenShift Dev Spaces server and dashboard APIs for programmatic integration and automation.
Procedure
Navigate to the Swagger API web user interface:
-
https://<openshift_dev_spaces_fqdn>/swagger(OpenShift Dev Spaces server) https://<openshift_dev_spaces_fqdn>/dashboard/api/swagger(OpenShift Dev Spaces dashboard)ImportantDevWorkspace is a Kubernetes object and manipulations should happen on the Kubernetes API level. See Managing workspaces with APIs in the User Guide.
-
Additional resources
Chapter 16. Troubleshooting OpenShift Dev Spaces administration
Diagnose and resolve common OpenShift Dev Spaces administration issues including workspace startup failures and Dev Workspace Operator problems.
16.1. Workspace startup failure error messages
Diagnose and resolve common workspace startup failures based on error symptoms and root causes. The OpenShift Dev Spaces dashboard and the Dev Workspace Operator emit error messages that indicate pod scheduling, image pull, DevWorkspace, and resource quota issues.
16.1.1. Pod scheduling errors
Table 16.1. Pod scheduling error messages and resolutions
| Error message | Resolution |
|---|---|
|
| The cluster does not have enough resources to schedule the workspace Pod. Free resources by stopping idle workspaces, or add nodes to the cluster. |
|
| A PersistentVolumeClaim (PVC) cannot be bound. Verify that a StorageClass is configured and that the cluster has available persistent volumes. |
|
|
The workspace Pod has a |
16.1.2. Image pull errors
Table 16.2. Image pull error messages and resolutions
| Error message | Resolution |
|---|---|
|
| The container runtime cannot pull the workspace image. Verify that the image exists, the image name is correct in the devfile, and that image pull secrets are configured if the image is in a private registry. |
|
| The container runtime does not trust the TLS certificate of the container registry. Import the registry Certificate Authority (CA) certificate into OpenShift Dev Spaces. |
16.1.3. DevWorkspace errors
Table 16.3. DevWorkspace error messages and resolutions
| Error message | Resolution |
|---|---|
|
|
The workspace did not reach the |
|
| The Dev Workspace Operator webhook rejected the DevWorkspace. Verify that the Dev Workspace Operator is running and that CRDs are up to date. |
|
| An infrastructure-level error prevented workspace creation. Check the Dev Workspace Operator logs for details. |
16.1.4. Resource quota errors
Table 16.4. Resource quota error messages and resolutions
| Error message | Resolution |
|---|---|
|
| The user namespace has a ResourceQuota that prevents creating the workspace Pod or PVC. Increase the quota or reduce the workspace resource requests in the devfile. |
|
|
The workspace container exceeded its memory limit and was terminated. Increase the memory limit in the devfile |
Additional resources
16.2. Troubleshooting OAuth configuration
Verify your OAuth configuration against common misconfigurations when connecting OpenShift Dev Spaces to Git providers.
16.2.1. Callback URL mismatch
Every Git provider OAuth application requires a callback URL that matches your OpenShift Dev Spaces instance. If the callback URL is wrong, authentication fails after the user authorizes the application.
The correct callback URL for all providers is:
{prod-url}/api/oauth/callbackVerify this value in your Git provider OAuth application settings:
- GitHub: Authorization callback URL field
- GitLab: Redirect URI field
- Bitbucket Cloud: Callback URL field
- Bitbucket Server (OAuth 2.0): Redirect URL field
- Microsoft Azure DevOps: Redirect URI registered in Microsoft Entra ID
16.2.2. Secret labels and namespace
The OpenShift Secret that stores the OAuth credentials must have the correct labels and be in the correct namespace. If the labels or namespace are wrong, OpenShift Dev Spaces does not detect the OAuth configuration.
Required Secret labels
metadata:
  namespace: {prod-namespace}
  labels:
    app.kubernetes.io/part-of: che.eclipse.org
app.kubernetes.io/component: oauth-scm-configuration16.2.3. GitLab scope requirements
The GitLab authorized application must have the following scopes enabled. Missing scopes cause permission errors when developers push code or access repositories:
-
api -
write_repository -
openid
16.2.4. Bitbucket Server OAuth 1.0 public key
Bitbucket Server application links using OAuth 1.0 require an RSA public key. If the public key is missing or incorrectly formatted, authentication fails silently.
Verify that the content of the public-stripped.pub file (generated during setup) is pasted into the Public Key field of the incoming link configuration on Bitbucket Server.
Additional resources
Revised on 2026-07-27 19:47:40 UTC