Using Service Interconnect
Creating an application network with the CLI and YAML
Abstract
Chapter 1. Skupper overview
Skupper connects distributed applications across sites by creating an application network.
Hybrid clouds enable organizations to combine on-premises, private cloud, and public cloud resources. While such a solution provides many benefits, it also presents a unique challenge: enabling these resources to communicate with each other.
Skupper provides a solution to this challenge with an Application Network that simply and securely connects applications running in different network locations.
1.1. Application Networks
An application network connects services across sites as if they were running together.
Skupper solves multi-cluster communication challenges through something called a Virtual Application Network or just application network. To understand the value of Skupper, it is helpful to first understand what an application network is.
An application network connects the applications and services in your hybrid cloud into a virtual network so that they can communicate with each other as if they were all running in the same site. In this diagram, an application network connects three services, each of which is running in a different cloud:
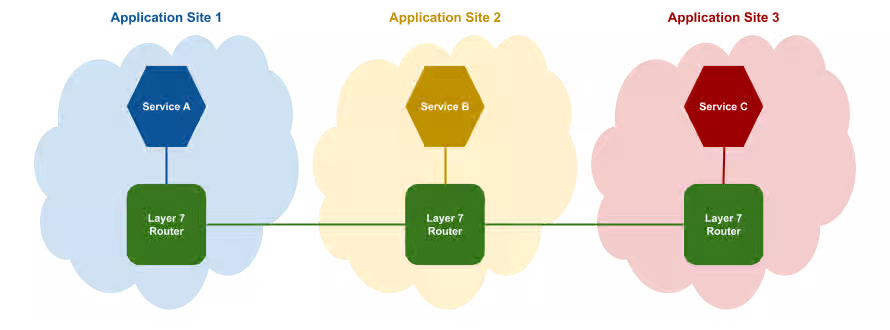
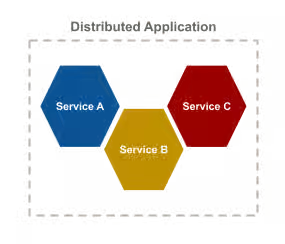
In essence, the application network connects the services in a distributed application with a microservice architecture.
Application networks are able to provide connectivity across the hybrid cloud by using Skupper routers.
1.2. Skupper routers
Skupper routers carry application traffic between services in different sites.
Skupper routers form the backbone of an application network in the same way that conventional network routers form the backbone of a VPN. However, instead of routing IP packets between network endpoints, Skupper routers route messages between application endpoints.
Application services
An application service represents an endpoint, or destination in the application network. When an application sends a communication to an service, the Skupper routers distribute the communication to any other application in the application network that has the same service.
For example, in this diagram, Service B sends a message with an application service to its local application router. Service A and Service C are subscribed to the same service, so the application router routes copies of the message through the application network until they arrive at each destination.
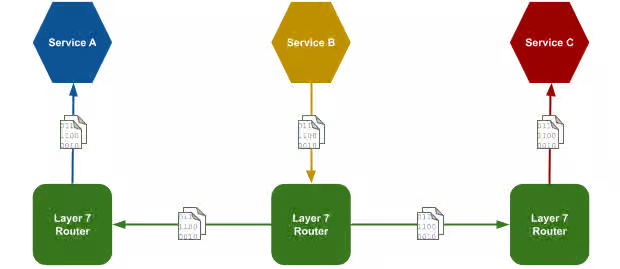
In the diagram, skupper-router is a container or systemd process that acts as a software router for service communication.
Application networks provide multiple routing patterns, so communications can be distributed in anycast (balanced or closest) or multicast patterns.
1.3. Skupper
Skupper is the tool that creates and manages application networks across sites.
Skupper is an open source tool for creating application networks in Kubernetes or Linux. By using Skupper, you can create a distributed application consisting of microservices running in different sites.
This diagram illustrates a Skupper network that connects three services running in three different sites:
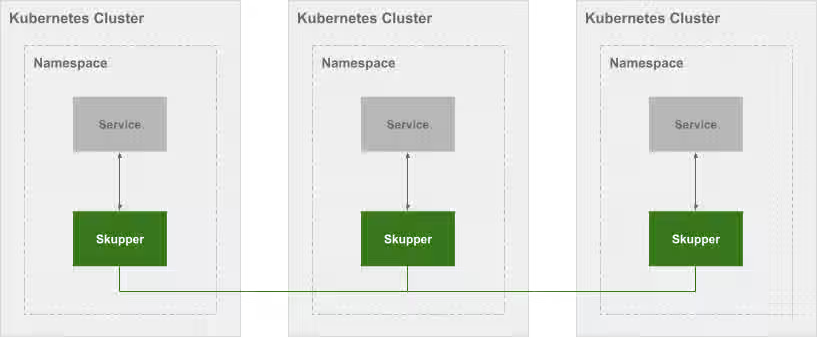
In a Skupper network, each namespace contains a Skupper instance. When these Skupper instances connect, they continually share information about the services that each instance exposes. This means that each Skupper instance is always aware of every service that has been exposed to the Skupper network, regardless of the namespace in which each service resides.
Once a Skupper network is formed across Kubernetes namespaces, any of the services in those namespaces can be exposed (through annotation) to the Skupper network. When a service is exposed, Skupper creates proxy endpoints to make that service available on each namespace in the Skupper network.
Chapter 2. Skupper security
Skupper protects service-to-service communication with built-in mutual TLS security.
Skupper securely connects your services with TLS authentication and encryption. See how Skupper enables you to deploy your application securely across Kubernetes clusters.
Security challenges in the cloud
Moving an application to the cloud raises security risks. Either your services must be exposed to the public internet, or you must adopt complex layer 3 network controls like VPNs, firewall rules, and access policies.
Increasing the challenge, layer 3 network controls do not extend easily to multiple clusters. These network controls must be duplicated for each cluster.
Built-in network isolation
Skupper provides default, built-in security that scales across clusters and clouds. In a Skupper network, the connections between Skupper routers are secured with mutual TLS using a private, dedicated certificate authority (CA). Each router is uniquely identified by its own certificate.
This means that the Skupper network is isolated from external access, preventing security risks such as lateral attacks, malware infestations, and data exfiltration.
Chapter 3. Skupper connectivity
Skupper provides secure connectivity for services running across multiple clusters.
Skupper represents a new approach to connecting services across multiple Kubernetes clusters. See how Skupper can give you the flexibility to deploy your services where you need them.
One cluster
Kubernetes services provide a virtual network address for each element of your distributed application. Service "A" can contact service "B", "B" can contact "C", and so on.
But if you want to deploy your application across multiple clusters, your options are limited. You have to either expose your services to the public internet or set up a VPN.
Skupper offers a third way. It connects clusters to a secure application network, also known as a virtual application network (VAN). It uses that network to forward local service traffic to remote clusters.
Secure hybrid cloud communication
Deploy your application across public and private clusters.
You can host your database on a private cluster and retain full connectivity with services running on the public cloud. All communication is secured by mutual TLS authentication and encryption.
Edge-to-edge connectivity
Distribute application services across geographic regions.
You can connect multiple retail sites to a central office. Once connected, each edge location can contact any other edge. You can add and remove sites on demand.
Scale up and out
Build large, robust networks of connected clusters.
Chapter 4. Skupper routing
Skupper routes application traffic by using routing keys, ports, and site-aware paths.
Skupper uses routing keys and ports to connect servers and clients. See how the power of application-layer addressing can bring new capabilities to your applications.
Multi-cluster services
Deploy a single logical service across multiple clusters.
Skupper can route requests to instances of a single service running on multiple clusters. If a provider or data center fails, the service instances running at unaffected sites can scale to meet the need and maintain availability.
Dynamic load balancing
Balance requests across clusters according to service capacity.
The Skupper network has cross-cluster visibility. It can see which services are already loaded and which have spare capacity, and it directs requests accordingly.
You can assign a cost to each inter-site connection. This enables you to configure a preference for one resource over another. If demand is normal, you can keep all traffic on your private cloud. If demand peaks, you can dynamically spill over to public cloud resources.
Reliable networks
Skupper uses redundant network paths and smart routing to provide highly available connectivity at scale.
Chapter 5. Skupper load balancing and failover
Skupper balances new TCP connections across sites and reroutes traffic when a site fails.
Skupper enables load balancing and failover across servers located across the application network. Specifically, Skupper balances new TCP connections across workloads deployed in distinct sites. If a workload at one site becomes unavailable, traffic is automatically rerouted to available sites. For example, if you deploy the same backend code on two sites and expose the backend on the application network, concurrent requests from a third site to the backend service are processed by both sites.
5.1. Preferred approach: Multi-key listeners
A multi-key listener provides per-service control over load balancing and failover by binding a single endpoint to multiple routing keys (connectors). This is the recommended approach for most use cases because it offers:
- Per-service configuration — Each service can have its own distribution strategy, independent of network topology.
- Predictable behavior — Traffic distribution is explicitly controlled by strategy, not influenced by connection timing or link metrics.
Two strategies:
-
weighted — Proportional distribution across routing keys. For example, assign weights of
25and75to send a quarter of TCP connections to the first backend and three-quarters to the second. - priority — Failover with preference order. Traffic uses the first available routing key; if that connector becomes unavailable, traffic automatically shifts to the next routing key in the list.
-
weighted — Proportional distribution across routing keys. For example, assign weights of
For configuration details and examples, see Creating a multi-key listener using YAML.
5.2. Alternative: Link cost
Link cost is a configurable integer value that influences how Skupper routes traffic across all services that traverse a link between two sites. The routing algorithm favors paths with the lowest total cost from client to target server.
📌 NOTE Link cost applies to all services on a link and cannot be set differently for individual services. For per-service control, use a multi-key listener instead.
Understanding link cost behavior
-
The default link cost is
1. Local workloads have an implicit cost of0. - If a connection traverses more than one link, the path cost is the sum of all link costs along the path.
- Cost acts as a threshold. When only one path exists, traffic flows on that path regardless of cost. If a target becomes unavailable, traffic moves to the remaining path regardless of cost.
- When multiple paths exist, traffic flows on the lowest-cost path until the number of open connections exceeds the cost of an alternative path. After that threshold is reached, new connections are spread across both paths.
- Traffic distribution is statistical, not round robin.
Using link cost for failover
You can configure link cost so that a primary location handles all traffic until failure, then traffic fails over to a backup location. To achieve this, set the cost from the client to the backup server very high, for example 99999:
-
local server — effective cost
0 -
remote backup server — link cost
99999
In this configuration, all connections are routed to the local server. If the local server becomes unavailable, traffic fails over to the remote server regardless of the high cost.
📌 NOTE Skupper does not provide orchestrated failover for stateful applications that require control over the order in which traffic is redirected. You must implement that orchestration separately.
For details on configuring link cost, see:
Chapter 6. Overview of Skupper CLI on Kubernetes
You can use the skupper CLI on Kubernetes after installing the Skupper controller to configure sites, links and services.
The Skupper CLI is designed to generate and consume standard resources, ensuring that a sites, links and services configured using the CLI are identical to those configured directly through YAML.
- Create sites
- Link sites (requires that one site has link access enabled)
- Configure link cost
- Expose and consume services
Chapter 7. Creating a site on Kubernetes using the Skupper CLI
Using the skupper command-line interface (CLI) allows you to create and manage sites from the context of the current namespace.
A typical workflow is to create a site, link sites together, and expose services to the application network.
7.1. Checking the Skupper CLI
Installing the skupper command-line interface (CLI) provides a simple method to get started with Skupper.
Procedure
- Follow the instructions for Content from skupper.io is not included.Installing Skupper.
Verify the installation.
skupper version

COMPONENT               VERSION
cli                     2.2.1-rh-1
7.2. Creating a simple site using the CLI on Kubernetes
Use the Skupper CLI to create a site on Kubernetes from the current namespace context.
Prerequisites
-
The
skupperCLI is installed. - The Skupper controller is running on the Kubernetes cluster.
Procedure
Check that the
SKUPPER_PLATFORMenvironment is unset or set tokubernetes.-
kubernetes- default -
podman -
docker -
linux
-
Create a site on Kubernetes:
skupper site create <site-name> --namespace <namespace>
Specifying the namespace is not required if the context is set to the namespace where you want to create the site. For example:
skupper site create my-site

Waiting for status...
Site "my-site" is ready.
There are many options to consider when creating sites using the CLI, see Content from skupperproject.github.io is not included.CLI Reference, including frequently used options.
For example,
--enable-link-accessallows you to create tokens and link to this site. By default, this option is disabled, but you can change the setting later:skupper site update --enable-link-access
You can use
--timeout <time>to specify the maximum time that the CLI waits for the site status to reportready.skupper site create my-site --timeout 2m
The timeout option does not stop the site from being created, but if the site is not ready, the following is output:
Site "my-site" is not yet ready: Pending
You can check the status of the site at any time by using
skupper site status.By default, the router CPU allocation is BestEffort as described in Content from kubernetes.io is not included.Pod Quality of Service Classes, and this might affect performance under network load. To configure site resources, see Setting site resources.
7.3. Creating a high availability site using the CLI on Kubernetes
Create a highly available Skupper site on Kubernetes by enabling HA mode in the CLI.
You can create a site that is highly available by using the ha option. High availability mode is intended to maintain service continuity during router restarts or pod rescheduling, but it does not provide failover if network connectivity between sites is lost. High availability mode deploys two router pods with anti-affinity rules to ensure service continuity during node failures.
Prerequisites
-
The
skupperCLI is installed. - The Skupper controller is running on the Kubernetes cluster.
Procedure
Create a high availability site on Kubernetes:
skupper site create <site-name> --enable-ha
If the site already exists, you can use the
updatecommand to enable high availability:skupper site update --enable-ha
To verify that the site is running in high availability mode, run the following command:
kubectl get site -o yaml | grep ha
The output should be similar to the following:
ha: true
When high availability mode is enabled, two router pods are created so that traffic can continue if one pod restarts or is rescheduled. High availability can also help during a node failure.
7.4. Deleting a site using the CLI on Kubernetes
Delete a Skupper site on Kubernetes by using the CLI from the namespace where the site was created.
Prerequisites
-
The
skupperCLI is installed.
Procedure
Change context to the namespace where the site was created, for example:
kubectl config set-context --current --namespace west
Enter the following command to delete a site:
skupper site delete
Chapter 8. Linking sites on Kubernetes using the Skupper CLI
Create links between sites on Kubernetes by using the CLI.
Using the Skupper command-line interface (CLI) allows you to create links between sites. The link direction is not significant, and is typically determined by ease of connectivity. For example, if east is behind a firewall, linking from east to west is the easiest option.
Once sites are linked, services can be exposed and consumed across the application network without the need to open ports or manage inter-site connectivity.
8.1. Linking sites using a token
A token provides a secure method to link sites. By default, a token can only be used once and must be used within 15 minutes to link sites. This procedure describes how to issue a token from one site and redeem that token on another site to create a link.
Prerequisites
- Two sites
-
At least one site with
enable-link-accessenabled.
To link sites, you create a token on one site and redeem that token on the other site to create the link.
Procedure
On the site where you want to issue the token, make sure link access is enabled:
skupper site update --enable-link-access
Create a token:
skupper token issue <filename>
where
<filename>is the name of a YAML file that is saved on your local filesystem.This file contains a key and the location of the site that created it.
📌 NOTE Access to this file provides access to the application network. Protect it appropriately. A token can be restricted by any combination of:
Time - prevents token reuse after a specified period.
For example, to allow a token to be used for 1 hour after it is issued:
skupper token issue build/west.yaml --expiration-window 60m
Usage - prevents creating multiple links from a single token.
For example, to allow a token to be used 3 times:
skupper token issue output/west.yaml --redemptions-allowed 3
All inter-site traffic is protected by mutual TLS using a private, dedicated certificate authority (CA). A token is not a certificate, but is securely exchanged for a certificate during the linking process.
Redeem the token on a different site to create a link:
skupper token redeem <filename>
where
<filename>is the name of a YAML file that is saved on your local filesystem.Check the status of the link:
skupper link status
You might need to issue the command multiple times before the link is ready:
skupper link status
Example output:
NAME                                            STATUS  COST    MESSAGE
west-12f75bc8-5dda-4256-88f8-9df48150281a       Pending 1       Not Operational
skupper link status
Example output:
NAME                                            STATUS  COST    MESSAGE
west-12f75bc8-5dda-4256-88f8-9df48150281a       Ready   1       OK
You can now expose services on the application network.
There are many options to consider when linking sites using the CLI, see Content from skupperproject.github.io is not included.CLI Reference, including frequently used options.
8.2. Linking sites using a link resource
An alternative approach to linking sites using tokens is to create a link resource YAML file using the CLI, and to apply that resource to another site.
Prerequisites
- Two sites
-
At least one site with
enable-link-accessenabled.
To link sites, you create a link resource YAML file on one site and apply that resource on the other site to create the link.
Procedure
On the site where you want to create a link, make sure link access is enabled:
skupper site update --enable-link-access
Create a
linkresource YAML file:skupper link generate > <filename>
where
<filename>is the name of a YAML file that is saved on your local filesystem. ThelinkYAML file contains the following information:- The name of the link
- The certificate used to authenticate the link
- Two host and port entries for the listening site are included for each link.
If the listening site uses high availability mode, two link resources are created.
Apply the
linkresource YAML file on a different site to create a link:kubectl apply -f <filename>
where
<filename>is the name of a YAML file that is saved on your local filesystem.Check the status of the link:
skupper link status
You might need to issue the command multiple times before the link is ready:
skupper link status
Example output:
NAME                                            STATUS  COST    MESSAGE
west-12f75bc8-5dda-4256-88f8-9df48150281a       Pending 1       Not Operational
skupper link status
Example output:
NAME                                            STATUS  COST    MESSAGE
west-12f75bc8-5dda-4256-88f8-9df48150281a       Ready   1       OK
You can now expose services on the application network.
There are many options to consider when linking sites using the CLI, see Content from skupperproject.github.io is not included.CLI Reference, including frequently used options.
8.3. Linking sites through an HTTP proxy
If your network requires routing through an HTTP CONNECT proxy to reach remote sites, you can configure Skupper links to use a proxy. This feature is only available when using link resources, not tokens.
Prerequisites
- Two sites
-
At least one site with
enable-link-accessenabled. - An HTTP CONNECT proxy accessible from the linking site
- Network connectivity from the proxy to the listening site’s router endpoints
The proxy must allow HTTP CONNECT requests to ports 55671 (inter-router) and 45671 (edge). For example, Squid requires:
acl skupper_ports port 55671 45671
http_access allow CONNECT skupper_ports
To link sites through a proxy, you create a Secret containing the proxy configuration, generate a link resource YAML file, reference the proxy Secret in the link settings, and apply that resource to create the link.
Procedure
On the listening site, make sure link access is enabled:
skupper site update --enable-link-access
On the listening site, create a
linkresource YAML file:skupper link generate > link.yaml
-
Copy the generated
link.yamlfile to the linking site. On the linking site, create a Secret with the proxy configuration:
apiVersion: v1
kind: Secret
metadata:
  name: my-proxy-config
type: kubernetes.io/basic-auth
stringData:
  host: proxy.example.com
  port: "3128"
  username: myuser
  password: mypassword
📌 NOTE If your proxy does not require authentication, remove the username and password.
-
On the linking site, edit the
link.yamlfile to add the proxy configuration in the settings section:
apiVersion: skupper.io/v2alpha1
kind: Link
metadata:
  name: link-to-remote-site
spec:
  cost: 1
  endpoints:
  - host: remote-site.example.com
    name: inter-router
    port: "55671"
  - host: remote-site.example.com
    name: edge
    port: "45671"
  tlsCredentials: link-to-remote-site
  settings:
    proxy-configuration: my-proxy-config
where my-proxy-config is the name of the Secret created in step 4. . On the linking site, apply the link resource YAML file to create the link:
+
kubectl apply -f link.yaml
Check the status of the link:
skupper link status
You might need to issue the command multiple times before the link is ready.
If the link remains in "Pending" or "Not Operational" status, check:
- The proxy Secret exists and contains the correct host and port
- The proxy is accessible from the router pod
-
Router logs for connection errors:
kubectl logs deployment/skupper-router
📌 NOTE If you update the proxy Secret, you must trigger a reconciliation to apply the changes:
+
kubectl annotate link <link-name> reconcile=$(date +%s) --overwrite
All inter-site traffic is protected by mutual TLS and routed through the HTTP CONNECT proxy tunnel. You can now expose services on the application network.
There are many options to consider when linking sites using the CLI, see Content from skupperproject.github.io is not included.CLI Reference, including frequently used options.
8.4. Specifying link cost
Link cost is a configurable integer value that influences how Skupper routes traffic across links between sites. The routing algorithm favors paths with the lowest total cost from client to target server.
📌 NOTE For most load-balancing and failover use cases, a multi-key listener provides per-service control. Link cost applies to all services that traverse a link; it is not possible to set different costs for distinct services on the same link.
Understanding link cost behavior:
-
The default link cost is
1. Local workloads have an implicit cost of0. - If a connection traverses more than one link, the path cost is the sum of all link costs along the path.
- Cost acts as a threshold. When only one path exists, traffic flows on that path regardless of cost. If a target becomes unavailable, traffic moves to the remaining path regardless of cost.
- When multiple paths exist, traffic flows on the lowest-cost path until the number of open connections exceeds the cost of an alternative path. After that threshold is reached, new connections are spread across both paths.
- Traffic distribution is statistical, not round robin.
The following procedure describes how to set link cost in various scenarios:
Procedure
To issue a token and specify the cost:
skupper token issue <filename> --cost <integer-cost>
where
<integer-cost>is a positive integer (minimum1) and traffic favors lower-cost links.For example, to issue a token and set the link cost to
2:skupper token issue token.yaml --cost 2
To update the cost on an existing link:
skupper link update <link-name> --cost <integer-cost>
For example:
skupper link update west-6bfn6 --cost 2
Waiting for status...
Link "west-6bfn6" is ready.
To check the cost of a specific link:
skupper link status <link-name>
Example output:
Name:     west-6bfn6
Status:   Ready
Cost:     2
Message:  <none>
Additional information
A common use case for link cost is automatic failover. You can configure a primary site with an effective cost of 0 (local) and a backup site with a high link cost, for example 99999:
-
local server — effective cost
0 -
remote backup server — link cost
99999
In this configuration, all connections are routed to the local server. If the local server becomes unavailable, traffic fails over to the remote server regardless of the high cost.
📌 NOTE Skupper does not provide orchestrated failover for stateful applications that require control over the order in which traffic is redirected. You must implement that orchestration separately.
For per-service failover or weighted traffic distribution, use a multi-key listener instead.
Chapter 9. Exposing services on the application network using the CLI
Create connectors and listeners to expose services across the application network.
After creating an application network by linking sites, you can expose services from one site using connectors and consume those services on other sites using listeners. A routing key is a string that matches one or more connectors with one or more listeners. For example, if you create a connector with the routing key backend, you need to create a listener with the routing key backend to consume that service.
This section assumes you have created and linked at least two sites.
9.1. Creating a connector using the CLI
A connector binds a local workload to listeners in remote sites. Listeners and connectors are matched using routing keys.
For more information about connectors, see Content from skupperproject.github.io is not included.Connector concept.
Procedure
Create a workload that you want to expose on the network, for example:
kubectl create deployment backend --image quay.io/skupper/hello-world-backend --replicas 3
Create a connector:
skupper connector create <name> <port> [--routing-key <name>]
For example:
skupper connector create backend 8080 --workload deployment/backend
Check the connector status:
skupper connector status
For example:
skupper connector status
Example output:
NAME    STATUS  ROUTING-KEY     SELECTOR        HOST    PORT    HAS MATCHING LISTENER    MESSAGE
backend Pending backend         app=backend             8080    false   No matching listeners
📌 NOTE By default, the routing key name is set to the name of the connector. If you want to use a custom routing key, set the
--routing-keyto your custom name.
There are many options to consider when creating connectors using the CLI, see Content from skupperproject.github.io is not included.CLI Reference, including frequently used options.
Additional information
If you need to expose a service from another namespace, you must use YAML as described in Creating a connector for a different namespace using YAML.
9.2. Creating a listener using the CLI
A listener binds a local connection endpoint to connectors in remote sites. Listeners and connectors are matched using routing keys.
For more information about listeners. see Content from skupperproject.github.io is not included.Listener concept.
Procedure
- Identify a connector that you want to use. Note the routing key of that connector.
Create a listener:
skupper listener create <name> <port> [--routing-key <name>]
For example:
skupper listener create backend 8080
Example output:
Waiting for create to complete...
Listener "backend" is ready
Check the listener status:
skupper listener status
For example:
skupper listener status
Example output:
NAME    STATUS  ROUTING-KEY     HOST    PORT    MATCHING-CONNECTOR      MESSAGE
backend Ready   backend         backend 8080    true                    OK
📌 NOTE There must be a
MATCHING-CONNECTORfor the service to operate. By default, the routing key name is the listener name. If you want to use a custom routing key, set the--routing-keyto your custom name.
There are many options to consider when creating connectors using the CLI, see Content from skupperproject.github.io is not included.CLI Reference, including frequently used options.
Chapter 10. Overview of using YAML on Kubernetes
You can use YAML on Kubernetes after installing the Skupper controller to create sites, link sites, and expose or consume services.
- Create sites
- Link sites (requires that one site has link access enabled)
- Configure link cost
- Expose and consume services
Chapter 11. Creating a site on Kubernetes using YAML
Using YAML allows you to create and manage sites from the context of the current namespace.
A typical workflow is to create a site, link sites together, and expose services to the application network.
11.1. Creating a simple site on Kubernetes using YAML
You can use YAML to create and manage Skupper sites.
Prerequisites
- The Skupper controller is running on the Kubernetes cluster.
By default, the router CPU allocation is BestEffort as described in Content from kubernetes.io is not included.Pod Quality of Service Classes, and this might affect performance under network load. Consider setting resources as described in Setting site resources.
There are many options to consider when creating sites using YAML, see the Content from skupperproject.github.io is not included.YAML Reference, including frequently used options.
Procedure
Create a site CR YAML file named
my-site.yaml, for example:apiVersion: skupper.io/v2alpha1 kind: Site metadata: name: my-site namespace: west
This YAML creates a site named
my-sitein thewestnamespace. Specifying the namespace is not required if the context is set to the namespace where you want to create the site.If you need to link to this site, enable link access:
apiVersion: skupper.io/v2alpha1 kind: Site metadata: name: my-site namespace: west spec: linkAccess: default
Create the site:
kubectl apply -f my-site.yaml
Check the status of the site:
kubectl get site
You might need to issue the command multiple times before the site is ready:
$ kubectl get site
NAME   STATUS    SITES IN NETWORK   MESSAGE
west   Pending                      containers with unready status: [router kube-adaptor]
$ kubectl get site
NAME   STATUS   SITES IN NETWORK   MESSAGE
west   Ready    1                  OK
You can now link this site to another site to create an application network.
11.2. Creating a high availability site using YAML
Use the ha option to create a highly available site on Kubernetes.
High availability mode is intended to maintain service continuity during router restarts or pod rescheduling, but it does not provide failover if network connectivity between sites is lost. High availability mode deploys two router pods with anti-affinity rules to ensure service continuity during node failures.
Prerequisites
- The Skupper controller is running on the Kubernetes cluster you are running
Procedure
Create a site CR YAML file named
ha-site.yaml, for example:apiVersion: skupper.io/v2alpha1 kind: Site metadata: name: ha-site namespace: west spec: ha: true linkAccess: default # Optional: configure external access
This YAML creates a high availability site named
ha-sitein thewestnamespace.See Setting site resources for more information about sizing the site.
Apply the YAML to create the site:
kubectl apply -f ha-site.yaml
11.3. Setting site resources
You can configure the Skupper Router and Kube Adaptor components with minimum and maximum CPU and memory resources by defining sizing models using ConfigMaps.
Increasing the number of routers does not improve network performance. An incoming router-to-router link is associated with just one active router. Additional routers do not receive traffic while that router is responding.
You can define multiple sizing configurations using separate ConfigMaps. Only one ConfigMap should be annotated as the default (skupper.io/default-site-sizing: "true").
Prerequisites
- The Skupper V2 controller is running in your cluster.
You have determined the router CPU allocation you require.
Consider the following CPU allocation options:
Router CPU Description 1
Helps avoid issues with BestEffort on low resource clusters
2
Suitable for production environments
5
Maximum performance
Procedure
Create a sizing ConfigMap in the same namespace where your Skupper V2 controller is running.
The following example defines a sizing configuration named
mediumwith 2 CPU cores suitable for production:apiVersion: v1 kind: ConfigMap metadata: name: sizing-medium labels: skupper.io/site-sizing: "medium" annotations: skupper.io/default-site-sizing: "true" data: router-cpu-limit: "2" router-memory-limit: 1024MiThe Skupper controller selects ConfigMaps based on the presence of a
skupper.io/site-sizinglabel. The label’s value serves as an internal identifier for that particular sizing configuration.To designate a sizing model as the default for all sites managed by your Skupper V2 controller instance, annotate the ConfigMap with
skupper.io/default-site-sizing: "true".A sizing ConfigMap can define the following fields:
-
router-cpu-request -
router-cpu-limit -
router-memory-request -
router-memory-limit -
adaptor-cpu-request -
adaptor-cpu-limit -
adaptor-memory-request -
adaptor-memory-limit
NoteIf only the
limitfield is defined, Kubernetes will also set therequestwith the same value. If this is not what you want, make sure to set the respectiverequestfield with a smaller value.-
Determine the controller namespace. Depending on your installation method, the controller namespace may be
skupper,openshift-operators, or have a different name. You can check that you have chosen the correct namespace by running:kubectl get pods
Confirm that the skupper controller pod is running in the namespace.
Apply the ConfigMap in the controller namespace:
kubectl apply -f sizing-medium.yaml
Assign the sizing configuration to a site by setting the
spec.settings.sizefield in the site resource:apiVersion: skupper.io/v2alpha1 kind: Site metadata: name: my-site spec: settings: size: mediumVerify the resource limits have been applied by inspecting the
skupper-routerdeployment:kubectl get deployment skupper-router -o json | jq .spec.template.spec.containers[].resources
The output should look like:
{
  "limits": {
    "cpu": "1",
    "memory": "1Gi"
  },
  "requests": {
    "cpu": "500m",
    "memory": "512Mi"
  }
}
Chapter 12. Linking sites on Kubernetes using YAML
Once sites are linked, services can be exposed and consumed across the application network without the need to open ports or manage inter-site connectivity.
Terminology:
- Connecting site: The site that initiates the link connection.
- Listening site: The site receives the link connection.
The link direction is not significant, and is typically determined by ease of connectivity. For example, if east is behind a firewall and west is a cluster on the public cloud, linking from east to west is the easiest option.
12.1. Linking sites using AccessGrant and AccessToken resources
Use AccessGrant and AccessToken resources to create a link between two Kubernetes sites using YAML.
Prerequisites
- Two sites
The listening site must have
link-accessenabled. For example:apiVersion: skupper.io/v2alpha1 kind: Site metadata: name: west namespace: west spec: linkAccess: default
To link sites, you create
AccessGrantandAccessTokenresources on the listening site and apply theAccessTokenresource on the connecting site to create the link.
AccessGrant is a permission on a listening site that allows redemption of access tokens to create links. The component it gives permission to is the GrantServer which is a HTTPS server that ultimately sets up the link.
The GrantServer provides a URL, a secret code, and a cert that are bundled together to form an AccessToken. The number of times an AccessToken can be redeemed and how long it remains active are both configurable. On OpenShift, the GrantServer is exposed by a Route, while other systems use a LoadBalancer to make it accessible.
AccessToken is short-lived, usually single-use credential that contains the AccessGrant URL, secret code and a cert to establish a secure connection to the GrantServer. A connecting site redeems this token for a Link resource to establish a link to the listening site.
Procedure
On the listening site, for example
westnamespace, create anAccessGrantresource:apiVersion: skupper.io/v2alpha1 kind: AccessGrant metadata: name: grant-west spec: redemptionsAllowed: 2 # default 1 expirationWindow: 25m # default 15m
For example, if you created
accessgrant.yaml, apply and check status:kubectl apply -f accessgrant.yaml kubectl get accessgrants NAME REDEMPTIONS ALLOWED REDEMPTIONS MADE EXPIRATION STATUS MESSAGE grant-west 20 20 2025-10-15T12:33:04Z Ready OK
On the listening site, populate environment variables to allow token generation:
URL="$(kubectl get accessgrant grant-west -o template --template '{{ .status.url }}')" CODE="$(kubectl get accessgrant grant-west -o template --template '{{ .status.code }}')" CA_RAW="$(kubectl get accessgrant grant-west -o template --template '{{ .status.ca }}')"These environment variable settings support the next step of generating the token.
- URL is the URL of the GrantServer
- CODE is the secret code to access the GrantServer
- CA_RAW is the cert required to establish a HTTPS connection to the GrantServer
On the listening site, create a token YAML file:
cat > token.yaml <<EOF
apiVersion: skupper.io/v2alpha1
kind: AccessToken
metadata:
  name: token-to-west
spec:
  code: "$(printf '%s' "$CODE")"
  ca: |-
$(printf '%s\n' "$CA_RAW" | sed 's/^/    /')
  url: "$(printf '%s' "$URL")"
EOF
where
token.yamlis the name of the YAML file that is saved on your local filesystem.📌 NOTE Access to this file provides access to the application network. Protect it appropriately.
-
Securely transfer the
token.yamlfile to context of the connecting site. If you have both sites available from your terminal session, this step is not required. On the connecting site, apply the token and check status:
kubectl apply -f token.yaml
kubectl get accesstokens
NAME            URL                                                                REDEEMED   STATUS   MESSAGE
token-to-west   https://10.110.160.132:9090/87426fa9-5623-49af-a612-47d33b7a4200   true       Ready    OK
The GrantServer has validated the AccessToken and redeemed it for a
Linkresource. The connecting site usesLinkresource to establish an mTLS connection between routers.On the connecting site, check link status:
kubectl get link
NAME            STATUS   REMOTE SITE   MESSAGE
token-to-west   Ready    my-site       OK
12.2. Specifying link cost using YAML
Link cost is a configurable integer value that influences how Skupper routes traffic across links between sites. The routing algorithm favors paths with the lowest total cost from client to target server.
📌 NOTE For most load-balancing and failover use cases, a multi-key listener provides more predictable, per-service control than link cost. Link cost applies to all services that traverse a link; it is not possible to set different costs for distinct services on the same link.
Understanding link cost behavior:
-
The default link cost is
1. Local workloads have an implicit cost of0. - If a connection traverses more than one link, the path cost is the sum of all link costs along the path.
- Cost acts as a threshold. When only one path exists, traffic flows on that path regardless of cost. If a target becomes unavailable, traffic moves to the remaining path regardless of cost.
- When multiple paths exist, traffic flows on the lowest-cost path until the number of open connections exceeds the cost of an alternative path. After that threshold is reached, new connections are spread across both paths.
- Traffic distribution is statistical, not round robin.
Link cost is set on the Link custom resource via spec.cost. The AccessToken resource also exposes spec.linkCost, which is applied to the Link created when the token is redeemed.
Prerequisites
- Two or more linked sites.
-
The name of the
Linkresource whose cost you want to set.
Procedure
Option A — Set cost when redeeming a token
Add linkCost to the AccessToken resource before applying it. When the token is redeemed, the resulting Link is created with that cost.
apiVersion: skupper.io/v2alpha1
kind: AccessToken
metadata:
  name: my-token
spec:
  url: <grant-url>
  code: <secret-code>
  ca: <ca-cert>
  linkCost: 2
Apply it:
kubectl apply -f token.yaml
Option B — Update cost on an existing link
Find the link name:
kubectl get links
Example output:
NAME          STATUS   REMOTE SITE   MESSAGE
west-6bfn6    Ready    west
Patch the cost on the link:
kubectl patch link west-6bfn6 --type merge -p '{"spec":{"cost":2}}'Or edit the resource directly:
kubectl edit link west-6bfn6
Set the
costfield inspec:apiVersion: skupper.io/v2alpha1 kind: Link metadata: name: west-6bfn6 spec: cost: 2 endpoints: - host: <remote-host> name: inter-router port: "55671" - host: <remote-host> name: edge port: "45671" tlsCredentials: west-6bfn6
Verifying link cost
Check the cost of a specific link:
kubectl get link west-6bfn6 -o yaml
Look for spec.cost in the output. Alternatively, for a summary:
kubectl get links
Additional information
-
The minimum enforced cost is
1. Ifspec.costis set to0or omitted, the router treats it as1. -
For the failover pattern (primary cost
0/local, backup cost99999), setspec.cost: 99999on the backup site’sLinkresource.
A common use case for link cost is automatic failover. You can configure a primary site with an effective cost of 0 (local) and a backup site with a high link cost, for example 99999:
-
local server — effective cost
0 -
remote backup server — link cost
99999
In this configuration, all connections are routed to the local server. If the local server becomes unavailable, traffic fails over to the remote server regardless of the high cost.
📌 NOTE Skupper does not provide orchestrated failover for stateful applications that require control over the order in which traffic is redirected. You must implement that orchestration separately.
For per-service failover or weighted traffic distribution, use a multi-key listener instead.
Chapter 13. Exposing services on the application network using YAML
After creating an application network by linking sites, you can expose services from one site using connectors and consume those services on other sites using listeners.
A routing key is a string that matches one or more connectors with one or more listeners. For example, if you create a connector with the routing key backend, you need to create a listener with the routing key backend to consume that service.
This section assumes you have created and linked at least two sites.
13.1. Creating a connector using YAML
A connector binds a local workload to listeners in remote sites. Listeners and connectors are matched using routing keys.
There are many options to consider when creating connectors using YAML, see Content from skupperproject.github.io is not included.Connector resource.
Procedure
Create a workload that you want to expose on the network, for example:
kubectl create deployment backend --image quay.io/skupper/hello-world-backend --replicas 3
Create a connector resource YAML file:
apiVersion: skupper.io/v2alpha1
kind: Connector
metadata:
  name: backend
  namespace: east
spec:
  routingKey: backend
  selector: app=backend
  port: 8080
This creates a connector in the
eastsite and exposes thebackenddeployment on the network on port 8080. You can create a listener on a different site using the matching routing keybackendto address this service.To create the connector resource:
kubectl apply -f <filename>
where
<filename>is the name of a YAML file that is saved on your local filesystem.Check the connector status:
kubectl get connector
For example:
NAME    STATUS  ROUTING-KEY     SELECTOR        HOST    PORT    HAS MATCHING LISTENER    MESSAGE
backend Pending backend         app=backend             8080    false   No matching listeners
📌 NOTE By default, the routing key name is set to the name of the connector. If you want to use a custom routing key, set
spec.routingKeyto your custom value.
13.2. Creating a listener using YAML
A listener binds a local connection endpoint to connectors in remote sites. Listeners and connectors are matched using routing keys.
For more information about listeners. see Content from skupperproject.github.io is not included.Listener concept.
For configuration details, see Content from skupperproject.github.io is not included.Listener resource.
Procedure
- Identify a connector that you want to use. Note the routing key of that connector.
Create a listener resource YAML file:
apiVersion: skupper.io/v2alpha1
kind: Listener
metadata:
  name: backend
  namespace: west
spec:
  routingKey: backend
  host: east-backend
  port: 8080
This creates a listener in the
westsite and matches with the connector that uses the routing keybackend. It also creates a service namedeast-backendexposed on port 8080 in the current namespace.To create the listener resource:
kubectl apply -f <filename>
where
<filename>is the name of a YAML file that is saved on your local filesystem.Check the listener status:
kubectl get listener
For example:
NAME      ROUTING KEY   PORT   HOST           STATUS   HAS MATCHING CONNECTOR   MESSAGE
backend   backend       8080   east-backend   Ready    true                     OK
📌 NOTE There must be a
MATCHING-CONNECTORfor the service to operate.
13.3. Creating a multi-key listener using YAML
A multi-key listener binds a single local host and port to multiple routing keys in remote sites. Use a multi-key listener when you want one service endpoint to aggregate traffic from multiple connectors.
With multi-key listeners, you must choose a strategy which determines how the traffic is distributed:
- priority - Uses the first routing key in list that is available for traffic. If the connectors for that routing key become unavailable, the listener matches with the next routing key in list.
-
weighted - Uses the routing keys in proportion to the assigned weights. For example, if
backend1is assigned 25 andbackend2is assigned 75, then only a quarter of the TCP connections are directed tobackend1.
📌 NOTE Multi-key listeners select between routing keys using the configured strategy. Each routing key may have multiple connectors, and link cost determines which connector is used within each routing key. The two mechanisms are independent.
For configuration details, see Content from skupperproject.github.io is not included.MultiKeyListener resource.
Prerequisites
- Multiple connectors created with different routing keys. See Creating a connector using YAML.
Procedure
- Identify the connectors that you want to aggregate. Note the routing keys for each connector.
-
Determine which strategy is best for your use case. For example, failover is best achieved using the
prioritystrategy. Create a multi-key listener resource YAML file. For example:
apiVersion: skupper.io/v2alpha1 kind: MultiKeyListener metadata: name: mkl-backend spec: host: mkl-backend port: 9092 strategy: weighted: routingKeys: east-backend: 1 west-backend: 1This creates a listener named
mkl-backendthat exposes a single endpoint on port 9092 and distributes traffic evenly between theeast-backendandwest-backendrouting keys. Each routing key may have multiple connectors; link cost determines which connector is used within each routing key.To prefer one routing key first and fall back to another, use the
prioritystrategy:apiVersion: skupper.io/v2alpha1 kind: MultiKeyListener metadata: name: mkl-backend-priority spec: host: mkl-backend-priority port: 9095 strategy: priority: routingKeys: - east-backend-http - west-backend-httpTo create the multi-key listener resource:
kubectl apply -f <filename>
where
<filename>is the name of a YAML file that is saved on your local filesystem.Check the multi-key listener status:
kubectl get multikeylistener
📌 NOTE If you need to change strategy after you created a multi-key listener, you must delete and recreate the resource. This does not affect changing routing keys or weights.
13.4. Creating a connector for a different namespace using YAML
A connector binds a local workload to listeners in remote sites.
If you create a site in one namespace and need to expose a service in a different namespace, use this procedure to create an attached connector in the other namespace and an AttachedConnectorBinding in the site namespace.
- An attached connector is a connector in a peer namespace, that is, not the site namespace.
- The AttachedConnectorBinding is a binding to an attached connector in a peer namespace and is created in the site namespace.
- Creating attached connectors requires that Skupper is deployed cluster wide.
For configuration details, see Content from skupperproject.github.io is not included.Connector resource.
Procedure
Create a workload that you want to expose on the network in a non-site namespace, for example:
kubectl create deployment backend --image quay.io/skupper/hello-world-backend --replicas 3 --namespace attached
Create an AttachedConnector resource YAML file in the same namespace:
apiVersion: skupper.io/v2alpha1
kind: AttachedConnector
metadata:
  name: backend
  namespace: attached
spec:
  siteNamespace: skupper
  selector: app=backend
  port: 8080
To create the AttachedConnector resource:
kubectl apply -f <filename>
where
<filename>is the name of a YAML file that is saved on your local filesystem.Create an AttachedConnectorBinding resource YAML file in the site namespace:
apiVersion: skupper.io/v2alpha1
kind: AttachedConnectorBinding
metadata:
  name: backend
  namespace: east
spec:
  connectorNamespace: attached
  routingKey: backend
To create the AttachedConnectorBinding resource:
kubectl apply -f <filename>
where
<filename>is the name of a YAML file that is saved on your local filesystem.Check the AttachedConnectorBinding status from the context of the site namespace:
kubectl get AttachedConnectorBinding
For example:
NAME      ROUTING KEY   CONNECTOR NAMESPACE   STATUS   HAS MATCHING LISTENER
backend   backend       attached              Ready    true
Chapter 14. Overview of Skupper CLI on local systems
This is a Technology Preview feature.
Technology Preview features are not supported with Red Hat production service level agreements (SLAs) and might not be functionally complete. Red Hat does not recommend using them in production. These features provide early access to upcoming product features, enabling customers to test functionality and provide feedback during the development process. For more information about the support scope of Red Hat Technology Preview features, see Technology Preview Features Support Scope.
Use the Skupper CLI on local systems to create sites, link them to other sites, and expose or consume services.
- Create sites
- Link sites (requires that one site has link access enabled)
- Expose and consume services
Chapter 15. Creating a site on a local system using the Skupper CLI
Using the skupper command-line interface (CLI) allows you to create and manage Skupper sites from the context of the current user.
A typical workflow is to create a site, link sites together, and expose services to the application network.
A local system includes Docker, Podman or Linux system.
If you require more than one site, specify a unique namespace when using skupper, for example skupper --namespace second-site ....
15.1. Checking the Skupper CLI and environment
Installing the skupper command-line interface (CLI) provides a simple method to get started with Skupper.
Procedure
- Follow the instructions for Content from skupper.io is not included.Installing Skupper.
Verify the installation.
skupper version

COMPONENT               VERSION
cli                     2.2.1-rh-1
For podman sites:
Make sure the Podman socket is available. To enable it:
systemctl --user enable --now podman.socket
Enable lingering to ensure the site persists over logouts:
loginctl enable-linger <username>
15.2. Creating a simple site using the CLI on local systems
Use the Skupper CLI to create a site on a local system.
Prerequisites
-
The
skupperCLI is installed.
By default, all sites are created with the namespace default. On non-Kubernetes sites, you can create multiple sites per-user by specifying a namespace, for example:
skupper site create systemd-site -p linux -n linux-ns
skupper site create docker-site -p docker -n docker-ns
Procedure
Set the
SKUPPER_PLATFORMfor type of site you want to install:-
podman -
docker -
linux
-
Install the controller for Podman and Docker sites:
skupper system install
This runs a container to support site, link and service operations. This feature is not available on Linux local system sites (systemd).
Optional: Enable the Dynamic System Controller to automatically process YAML resources and commands:
export SKUPPER_SYSTEM_RELOAD_TYPE=auto
skupper system install
Alternatively, you can enable this feature with:
skupper system install --reload-type auto
With this feature enabled, you can create sites, links, connectors and listeners without needing a system reload to apply your configuration.
NoteWhen the dynamic system controller is enabled, the
skupper system start,skupper system reload, andskupper system stopcommands are not needed as configuration changes are automatically applied.Create a site:
skupper site create <site-name>
For example:
skupper site create my-site

Waiting for status...
Site "my-site" is ready.
While the site is created, the site is not running at this point. To run the site:
skupper system start
15.3. Deleting a site using the CLI on local systems
Delete a Skupper site on a local system by using the CLI.
Prerequisites
-
The
skupperCLI is installed.
Procedure
Enter the following command to delete a site:
skupper site delete <sitename>
skupper system stop
You can also uninstall the controller after deleting all existing sites:
skupper system uninstall
15.4. Creating a site bundle using the CLI on local systems
Create a site bundle when you want to prepare a site on one system and install it on a remote host.
Sometimes, you might want to create all the configuration for a site and apply it automatically to a remote host. To support this, Skupper allows you create a .tar.gz file with all the required files and an install.sh script to start the remote site.
Prerequisites
-
The
skupperCLI is installed. The CLI is not required on the remote site.
Procedure
Set the
SKUPPER_PLATFORMfor type of site you want to install:-
podman -
docker -
linux
-
Install the controller for Podman and Docker sites:
skupper system install
This runs a container to support site, link and service operations. This feature is not available on Linux local system sites (systemd).
Optional: Enable the Dynamic System Controller to automatically process YAML resources:
export SKUPPER_SYSTEM_RELOAD_TYPE=auto
skupper system install
With this feature enabled, you can create sites, links, connectors and listeners without needing a system reload to apply your configuration.
NoteWhen the dynamic system controller is enabled, the
skupper system start,skupper system reload, andskupper system stopcommands are not needed as configuration changes are automatically applied.Create a site:
skupper site create <site-name>
For example:
skupper site create remote-site

Waiting for status...
Site "remote-site" is ready.
While the site is created, the site is not running and that is not a requirement for this usecase.
Create the bundle:
skupper system generate-bundle remote-site
The output shows the location of the generated
.tar.gzfile, for example:Site "remote-site" has been created (as a distributable bundle) Installation bundle available at: /home/user/.local/share/skupper/bundles/remote-site.tar.gz Default namespace: default Default platform: podman
Transfer the bundle file to the remote location and uncompress the file in an appropriate location:
tar -xzvf remote-site.tar.gz
Start the site:
install.sh
The site is now running, you can verify with
skupper site statusif the CLI is installed at that location.
Chapter 16. Linking sites on local systems using the Skupper CLI
Use the Skupper CLI on local systems to create links between sites.
Using the Skupper command-line interface (CLI) allows you to create links between sites. The link direction is not significant, and is typically determined by ease of connectivity. For example, if east is behind a firewall, linking from east to west is the easiest option.
Once sites are linked, services can be exposed and consumed across the application network without the need to open ports or manage inter-site connectivity.
A local system includes Docker, Podman or Linux system.
In this release, the CLI does not support issuing tokens for local systems. However, you can redeem tokens on a local system, and you can create and use 'link' resources.
16.1. Linking to Kubernetes sites using a token
A token lets a local system site link securely to a Kubernetes site.
A token provides a secure method to link sites. By default, a token can only be used once and must be used within 15 minutes to link sites. This procedure describes how to issue a token from a Kubernetes site and redeem that token on a local system site to create a link.
Prerequisites
- A local system site and a Kubernetes site.
-
A Kubernetes site with
enable-link-accessenabled.
To link sites, you create a token on the Kubernetes site and redeem that token on the local system site to create the link.
There are many options to consider when linking sites using the CLI, see Content from skupperproject.github.io is not included.CLI Reference, including frequently used options.
Procedure
On the Kubernetes site where you want to issue the token, make sure link access is enabled:
skupper site update --enable-link-access
Create a token:
skupper token issue <filename>
where
<filename>is the name of a YAML file that is saved on your local filesystem.This file contains a key and the location of the site that created it.
📌 NOTE Access to this file provides access to the application network. Protect it appropriately. A token can be restricted by any combination of:
Time - prevents token reuse after a specified period.
For example, to allow a token to be used for 1 hour after it is issued:
skupper token issue build/west.yaml --expiration-window 60m
Usage - prevents creating multiple links from a single token.
For example, to allow a token to be used 3 times:
skupper token issue output/west.yaml --redemptions-allowed 3
All inter-site traffic is protected by mutual TLS using a private, dedicated certificate authority (CA). A token is not a certificate, but is securely exchanged for a certificate during the linking process.
Redeem the token on a local system site to create a link:
skupper token redeem <filename>
where
<filename>is the name of a YAML file that is saved on your local filesystem.Check the status of the link:
skupper link status
You might need to issue the command multiple times before the link is ready:
$ skupper link status
NAME                                            STATUS  COST    MESSAGE
west-12f75bc8-5dda-4256-88f8-9df48150281a       Pending 1       Not Operational
$ skupper link status
NAME                                            STATUS  COST    MESSAGE
west-12f75bc8-5dda-4256-88f8-9df48150281a       Ready   1       OK
You can now expose services on the application network.
16.2. Linking sites using a link resource
An alternative approach to linking sites using tokens is to create a link resource YAML file using the CLI, and to apply that resource to another site.
Prerequisites
- Two sites
-
At least one site with
enable-link-accessenabled.
To link sites, you create a link resource YAML file on one site and apply that resource on the other site to create the link.
There are many options to consider when linking sites using the CLI, see Content from skupperproject.github.io is not included.CLI Reference, including frequently used options.
Procedure
On the site where you want to create a link , make sure link access is enabled:
skupper site update --enable-link-access
skupper site reload
Create a
linkresource YAML file:skupper link generate > <filename>
where
<filename>is the name of a YAML file that is saved on your local filesystem.Apply the
linkresource YAML file on a different site to create a link:skupper system apply -f <filename>
where
<filename>is the name of a YAML file that is saved on your local filesystem.Check the status of the link:
skupper link status
You might need to issue the command multiple times before the link is ready:
$ skupper link status
NAME                                            STATUS  COST    MESSAGE
west                                            Pending 1       Not Operational
$ skupper link status
NAME                                            STATUS  COST    MESSAGE
west                                            Ready   1       OK
You can now expose services on the application network.
Chapter 17. Exposing services on the application network using the CLI
Use the CLI on local systems to create connectors and listeners for services on the application network.
After creating an application network by linking sites, you can expose services from one site using connectors and consume those services on other sites using listeners. A routing key is a string that matches one or more connectors with one or more listeners. For example, if you create a connector with the routing key backend, you need to create a listener with the routing key backend to consume that service.
This section assumes you have created and linked at least two sites.
17.1. Creating a connector using the CLI
A connector binds a local workload to listeners in remote sites. Listeners and connectors are matched using routing keys.
For more information about connectors see Content from skupperproject.github.io is not included.Connector concept
Prerequisites
-
The
skupperCLI is installed. -
The
SKUPPER_PLATFORMenvironment variable is set to one of *podman,dockerorlinux.
There are many options to consider when creating connectors using the CLI, see Content from skupperproject.github.io is not included.CLI Reference, including frequently used options.
Procedure
- Create a server that you want to expose on the network. For example, run a HTTP server on port 8080.
Create a connector:
skupper connector create <name> <port> [--routing-key <name>]
For example:
skupper connector create my-server 8080 --host localhost
Check the connector status:
skupper connector status
For example:
$ skupper connector status
NAME		STATUS	ROUTING-KEY	HOST		PORT
my-server	Ok	my-server	localhost	8081
📌 NOTE By default, the routing key name is set to the name of the connector. If you want to use a custom routing key, set the
--routing-keyto your custom name.Apply the configuration using:
skupper system reload
17.2. Creating a listener using the CLI
A listener binds a local connection endpoint to connectors in remote sites. Listeners and connectors are matched using routing keys.
Prerequisites
-
The
skupperCLI is installed. -
The
SKUPPER_PLATFORMenvironment variable is set to one of *podman,dockerorlinux.
There are many options to consider when creating listeners using the CLI, see Content from skupperproject.github.io is not included.CLI Reference, including frequently used options.
Procedure
- Identify a connector that you want to use. Note the routing key of that connector.
Create a listener:
skupper listener create <name> <port> [--routing-key <name>]
For example:
$ skupper listener create my-server 8080
File written to /home/user/.local/share/skupper/namespaces/default/input/resources/Listener-my-server.yaml
Apply the configuration using:
skupper system reload
Check the listener status:
skupper listener status
For example:
$ skupper listener status
NAME      STATUS  ROUTING-KEY  HOST     PORT  MATCHING-CONNECTOR  MESSAGE
backend   Ready   backend      0.0.0.0  8080  true                OK
📌 NOTE There must be a matching connector for the service to operate. By default, the routing key name is the listener name. If you want to use a custom routing key, set the
--routing-keyto your custom name.
Chapter 18. Overview of using YAML on local systems
This is a Technology Preview feature.
Technology Preview features are not supported with Red Hat production service level agreements (SLAs) and might not be functionally complete. Red Hat does not recommend using them in production. These features provide early access to upcoming product features, enabling customers to test functionality and provide feedback during the development process. For more information about the support scope of Red Hat Technology Preview features, see Technology Preview Features Support Scope.
Use YAML on local systems to create sites, link them to other sites, and expose or consume services.
- Create sites
- Link sites (requires that one site has link access enabled)
- Expose and consume services
Chapter 19. Creating a site on local systems using YAML
Using YAML allows you to create and manage sites on Docker, Podman and Linux.
A typical workflow is to create a site, link sites together, and expose services to the application network.
If you require more than one site, specify a unique namespace when using skupper, for example skupper --namespace second-site ....
19.1. Creating a simple site on local systems using YAML
You can use YAML to create and manage Skupper sites.
Prerequisites
-
The
skupperCLI is installed.
There are many options to consider when creating sites using YAML, see Content from skupperproject.github.io is not included.YAML Reference, including frequently used options.
Procedure
Create a site CR YAML file named
my-site.yamlin an empty directory, for example,local:apiVersion: skupper.io/v2alpha1 kind: Site metadata: name: my-site
This YAML creates a site named
my-sitein thedefaultnamespace.Create the site:
skupper system setup --path ./local
Skupper attempts to process any files in the
localdirectory. Typically, you create all resources you require for a site before runningskupper system setup.Optional: Enable the Dynamic System Controller to automatically process YAML resources:
export SKUPPER_SYSTEM_RELOAD_TYPE=auto
skupper system install
With this feature enabled, you can create sites, links, connectors and listeners without needing a system reload to apply your configuration.
Check the status of the site:
skupper site status
You might need to issue the command multiple times before the site is ready:
NAME    STATUS  MESSAGE
default Ready   OK
You can now link this site to another site to create an application network.
Chapter 20. Linking sites on local systems using YAML
Use a link resource YAML file to create links between local system and Kubernetes sites.
Using a link resource YAML file allows you to create links between sites. The link direction is not significant, and is typically determined by ease of connectivity. For example, if east is behind a firewall, linking from east to west is the easiest option.
Once sites are linked, services can be exposed and consumed across the application network without the need to open ports or manage inter-site connectivity.
The procedures below describe linking an existing site. Typically, it is easier to configure a site, links, and services in a set of files and then create a configured site by placing all the YAML files in a directory such as local before running skupper system setup.
20.1. Linking sites using a link resource
Create a link resource YAML file and apply it to the local system site to establish a link.
An alternative approach to linking sites using tokens is to create a link resource YAML file using the CLI, and to apply that resource to another site.
Prerequisites
- A local system site
-
A Kubernetes site with
enable-link-accessenabled.
To link sites, you create a link resource YAML file on one site and apply that resource on the other site to create the link.
Procedure
On the site where you want to create a link , make sure link access is enabled:
skupper site update --enable-link-access
Create a
linkresource YAML file:skupper link generate > <filename>
where
<filename>is the name of a YAML file that is saved on your local filesystem.Apply the
linkresource YAML file on a local system site to create a link:mv <filename> ~/.local/share/skupper/namespaces/default/input/resources/ skupper system setup --force
where
<filename>is the name of a YAML file that is saved on your local filesystem.The path shown is specific to the
defaultnamespace. If you are configuring a different namespace, use that name instead.The site is recreated and you see some of the internal resources that are not affected, for example:
Sources will be consumed from namespace "default"
2025/03/09 22:43:14 WARN certificate will not be overwritten path=~/.local/share/skupper/namespaces/default/runtime/issuers/skupper-local-ca/tls.crt
2025/03/09 22:43:14 WARN certificate will not be overwritten path=~/.local/share/skupper/namespaces/default/runtime/issuers/skupper-local-ca/tls.key
2025/03/09 22:43:14 WARN certificate will not be overwritten path=~/.local/share/skupper/namespaces/default/runtime/issuers/skupper-local-ca/ca.crt
2025/03/09 22:43:14 WARN certificate will not be overwritten path=~/.local/share/skupper/namespaces/default/runtime/issuers/skupper-site-ca/tls.crt
2025/03/09 22:43:14 WARN certificate will not be overwritten path=~/.local/share/skupper/namespaces/default/runtime/issuers/skupper-site-ca/tls.key
2025/03/09 22:43:14 WARN certificate will not be overwritten path=~/.local/share/skupper/namespaces/default/runtime/issuers/skupper-site-ca/ca.crt
2025/03/09 22:43:15 WARN certificate will not be overwritten path=~/.local/share/skupper/namespaces/default/runtime/issuers/skupper-service-ca/tls.crt
2025/03/09 22:43:15 WARN certificate will not be overwritten path=~/.local/share/skupper/namespaces/default/runtime/issuers/skupper-service-ca/tls.key
2025/03/09 22:43:15 WARN certificate will not be overwritten path=~/.local/share/skupper/namespaces/default/runtime/issuers/skupper-service-ca/ca.crt
Check the status of the link:
skupper link status
The output shows the link name:
$ skupper link status
NAME            STATUS
link-west       Ok
You can now expose services on the application network.
Chapter 21. Exposing services on the application network using YAML
Use YAML to create connectors and listeners for services on the application network.
After creating an application network by linking sites, you can expose services from one site using connectors and consume those services on other sites using listeners. A routing key is a string that matches one or more connectors with one or more listeners. For example, if you create a connector with the routing key backend, you need to create a listener with the routing key backend to consume that service.
This section assumes you have created and linked at least two sites.
21.1. Creating a connector using YAML
A connector binds a local workload to listeners in remote sites. Listeners and connectors are matched using routing keys.
For more information about connectors see Content from skupperproject.github.io is not included.Connector concept. For configuration details, see Content from skupperproject.github.io is not included.Connector resource.
Procedure
Create a workload that you want to expose on the network, for example:
kubectl create deployment backend --image quay.io/skupper/hello-world-backend --replicas 3
Create a connector resource YAML file:
apiVersion: skupper.io/v2alpha1
kind: Connector
metadata:
  name: backend
  namespace: east
spec:
  routingKey: backend
  selector: app=backend
  port: 8080
This creates a connector in the
eastsite and exposes thebackenddeployment on the network on port 8080. You can create a listener on a different site using the matching routing keybackendto address this service.To create the connector resource:
skupper system apply -f <filename>
where
<filename>is the name of a YAML file that is saved on your local filesystem.Check the connector status:
skupper connector status
For example:
NAME    STATUS  ROUTING-KEY     SELECTOR        HOST    PORT    HAS MATCHING LISTENER    MESSAGE
backend Pending backend         app=backend             8080    false   No matching listeners
📌 NOTE By default, the routing key name is set to the name of the connector. If you want to use a custom routing key, set
spec.routingKeyto your custom value.
21.2. Creating a listener using YAML
A listener binds a local connection endpoint to connectors in remote sites. Listeners and connectors are matched using routing keys.
For more information about listeners, see Content from skupperproject.github.io is not included.Listener concept. For configuration details, see Content from skupperproject.github.io is not included.Listener resource.
Procedure
- Identify a connector that you want to use. Note the routing key of that connector.
Create a listener resource YAML file:
apiVersion: skupper.io/v2alpha1
kind: Listener
metadata:
  name: backend
  namespace: west
spec:
  routingKey: backend
  host: east-backend
  port: 8080
This creates a listener on the local system site and matches it with connectors that use the routing key
backend. The listener accepts connections on port 8080 using the configured host value.To create the listener resource:
skupper system apply -f <filename>
where
<filename>is the name of a YAML file that is saved on your local filesystem.Check the listener status:
skupper listener status
For example:
NAME      STATUS  ROUTING-KEY  HOST     PORT  MATCHING-CONNECTOR  MESSAGE
backend   Ready   backend      0.0.0.0  8080  true                OK
📌 NOTE There must be a
MATCHING-CONNECTORfor the service to operate.
21.3. Creating a multi-key listener using YAML
A multi-key listener binds a single local host and port to multiple routing keys in remote sites. Use a multi-key listener when you want one service endpoint to aggregate traffic from multiple connectors.
With multi-key listeners, you must choose a strategy which determines how the traffic is distributed:
- priority - Uses the first routing key in list that is available for traffic. If the connector becomes unavailable, the listener matches with the next available routing key in list.
-
weighted - Uses the routing keys in proportion to the assigned weights. For example, if
backend1is assigned 25 andbackend2is assigned 75, then only a quarter of the TCP connections are directed tobackend1.
Multi-key listeners provide predictable traffic distribution from the client side and typically are not influenced by link costs.
For configuration details, see Content from skupperproject.github.io is not included.Listener resource.
Prerequisites
- Multiple connectors created with different routing keys. See Creating a connector using YAML.
Procedure
- Identify the connectors that you want to aggregate. Note the routing keys for each connector.
-
Determine which strategy is best for your use case. For example, failover is best achieved using the
prioritystrategy. Create a multi-key listener resource YAML file. For example:
apiVersion: skupper.io/v2alpha1 kind: MultiKeyListener metadata: name: mkl-backend spec: host: mkl-backend port: 9092 strategy: weighted: routingKeys: east-backend: 1 west-backend: 1This creates a listener named
mkl-backendthat exposes a single endpoint on port 9092 and distributes traffic evenly across theeast-backendandwest-backendrouting keys.To prefer one routing key first and fall back to another, use the
prioritystrategy:apiVersion: skupper.io/v2alpha1 kind: MultiKeyListener metadata: name: mkl-backend-priority spec: host: mkl-backend-priority port: 9095 strategy: priority: routingKeys: - east-backend-http - west-backend-httpTo create the multi-key listener resource:
skupper system apply -f <filename>
where
<filename>is the name of a YAML file that is saved on your local filesystem.📌 NOTE If you need to change strategy after you created a multi-key listener, you must delete and recreate the resource. This does not affect changing routing keys or weights.
Chapter 22. Using the Skupper console
You can use the Skupper console to monitor and troubleshoot your application network. The console provides a visual overview of the sites, links, services, and communication metrics.
Prerequisites
- Access to an Kubernetes cluster with Network Observer installed.
- A site is created in a namespace
Procedure
- Change context to the site namespace.
If you are using the OpenShift console:
- Navigate to → .
- Choose Red Hat Service Interconnect Network Observer Operator from the list of available Operators, and then click .
If you are not using the OpenShift console:
Create a file named
network-observer.yamlwith the following CR:apiVersion: observability.skupper.io/v2alpha1 kind: NetworkObserver metadata: name: networkobserver-sample namespace: west spec: {}Change the namespace value to match the site namespace.
Apply the CR YAML:
$ kubectl apply -f network-observer.yaml
Determine the console URL:
kubectl get --namespace west -o jsonpath="{.spec.host}" route networkobserver-sample-network-observer- Navigate to the console.
22.1. Configuring the Network observer
Currently the primary purpose of the Network Observer is to provide a console for monitoring your application network. This section describes advanced configuration.
- Change context to a site namespace.
Apply a CR to create the Network Observer instance, for example:
apiVersion: observability.skupper.io/v2alpha1
kind: NetworkObserver
metadata:
  name: networkobserver-sample
  namespace: west
spec:
  # OpenShift Route for external access
  route:
    enabled: true
    annotations:
      haproxy.router.openshift.io/timeout: 5m

  # OpenShift OAuth authentication
  auth:
    strategy: openshift
    openshift:
      createCookieSecret: true
      serviceAccount:
        create: true

  # OpenShift Service CA for TLS
  tls:
    openshiftIssued: true

  # Resource limits for production
  containerResources:
    networkObserver:
      requests:
        cpu: 200m
        memory: 512Mi
      limits:
        cpu: 1000m
        memory: 1Gi
    prometheus:
      requests:
        cpu: 500m
        memory: 1Gi
      limits:
        cpu: 2000m
        memory: 4Gi

  # Enable persistent storage for metrics
  prometheus:
    persistence:
      enabled: true
      size: 8Gi
Troubleshooting
If you are concerned about Network Observer resources, consider using standard techniques to monitor those resources. The following example demonstrates how to configure a Prometheus alert that triggers when memory usage exceeds 90% of the defined limit.
apiVersion: monitoring.coreos.com/v1
kind: PrometheusRule
metadata:
  name: network-observer-memory-alert
  namespace: west
spec:
  groups:
  - name: network-observer.rules
    rules:
    - alert: NetworkObserverHighMemory
      expr: |
        (container_memory_working_set_bytes{namespace="west", container="network-observer"}
        /
        kube_pod_container_resource_limits{namespace="west", container="network-observer", resource="memory"}) > 0.9
      for: 5m
      labels:
        severity: warning
      annotations:
        summary: "Network Observer pod in namespace {{ $labels.namespace }} is using > 90% of its memory limit."
description: "Pod {{ $labels.pod }} is currently using {{ $value | humanizePercentage }} of its memory limit."<a></a>
Chapter 23. Network Observer Configuration Reference
The following configuration options are for the Skupper Network Observer which enables the network console.
<a></a>
23.1. External access
23.1.1. Ingress
| Path | Type | Default | Description |
|---|---|---|---|
|
| bool |
| Enable Kubernetes Ingress resource |
|
| string |
|
IngressClass name (e.g., |
|
| map |
| Annotations for Ingress resource |
|
| array |
| Host configurations |
|
| string | - | Hostname |
|
| array | - | Path configurations |
|
| string | - | URL path |
|
| string | - |
|
|
| array |
| TLS configurations |
|
| string | - | TLS certificate Secret name |
|
| array | - | Hostnames for this certificate |
Notes:
- Backend always uses HTTPS (re-encryption required)
- Controller must support TLS backend
23.1.2. Route (OpenShift)
| Path | Type | Default | Description |
|---|---|---|---|
|
| bool |
| Enable OpenShift Route resource |
|
| string |
| Explicit hostname |
|
| string |
| Subdomain for automatic FQDN |
|
| map |
| Route annotations |
|
| map |
| Route labels |
Notes:
-
Automatically uses
reencryptTLS termination -
Use
hostORsubdomain, not both - OpenShift only
<a></a>
23.2. Authentication
| Path | Type | Default | Description |
|---|---|---|---|
|
| string |
|
Authentication strategy: |
23.2.1. Basic Authentication
| Path | Type | Default | Description |
|---|---|---|---|
|
| bool |
| Auto-generate htpasswd Secret with random password |
|
| string |
|
Existing htpasswd Secret name (requires |
Generated credentials:
-
Username:
skupper - Password: Random 16-character string (stored in Secret)
23.2.2. OpenShift OAuth
| Path | Type | Default | Description |
|---|---|---|---|
|
| bool |
| Auto-generate session cookie secret |
|
| string |
| Existing cookie Secret name |
|
| bool |
| Create ServiceAccount for OAuth |
|
| string |
| Custom ServiceAccount name |
Requirements:
- OpenShift cluster
- RBAC permissions for delegated authentication
<a></a>
23.3. TLS Certificates
| Path | Type | Default | Description |
|---|---|---|---|
|
| bool |
| Use Skupper controller CA (default) |
|
| bool |
| Use OpenShift Service CA |
|
| string |
| Existing TLS Secret name |
Priority: secretName > openshiftIssued > skupperIssued
Methods:
- Skupper-issued: Auto-provisioned by controller, uses same CA as inter-site links
- OpenShift Service CA: Platform-issued, automatic rotation
-
External: Manual management, Secret type
kubernetes.io/tls
<a></a>
23.4. Router Connection
| Path | Type | Default | Description |
|---|---|---|---|
|
| string |
| AMQP endpoint URL |
|
| bool |
| Auto-create client certificate |
|
| string |
| Custom certificate name |
Notes:
-
Endpoint must use
amqps://scheme - Client certificate provisioned by Skupper controller
-
Certificate mounted at
/etc/messaging/
<a></a>
23.5. Network Observer Tuning
| Path | Type | Default | Description |
|---|---|---|---|
|
| array |
| Command-line flags for observer container |
Available flags:
| Flag | Type | Default | Description |
|---|---|---|---|
|
| bool |
| Enable web console UI |
|
| duration |
| Flow record retention time |
|
| bool |
| Allow all CORS origins (dev only) |
|
| string |
|
Vanflow logging: |
Example:
extraArgs:
  - -flow-record-ttl=1h
  - -vanflow-logging-profile=minimal
<a></a>
23.6. Prometheus Configuration
The Prometheus container supports custom configuration and tuning options.
23.6.1. Configuration File
| Path | Type | Default | Description |
|---|---|---|---|
|
| string | embedded |
Complete |
Default scrape config:
scrape_configs:
  - job_name: 'network-observer'
    static_configs:
- targets: ['localhost:8080']23.6.2. Command-Line Flags
| Path | Type | Default | Description |
|---|---|---|---|
|
| array |
| Additional Prometheus flags |
Common flags:
-
--storage.tsdb.retention.time=<duration> -
--storage.tsdb.retention.size=<bytes> -
--query.max-samples=<int>
Example:
prometheus:
  extraArgs:
    - --storage.tsdb.retention.time=15d
- --storage.tsdb.retention.size=10GB23.6.3. Extra Volumes and Mounts
| Path | Type | Default | Description |
|---|---|---|---|
|
| array |
| Additional volumes (Kubernetes volume spec) |
|
| array |
| Volume mount points (Kubernetes volumeMount spec) |
Example:
prometheus:
  extraVolumes:
    - name: extra-config
      configMap:
        name: prometheus-rules
  extraVolumeMounts:
    - name: extra-config
mountPath: /etc/prometheus/rules<a></a>
23.7. Data Persistence
By default, Prometheus uses ephemeral storage (emptyDir). For persistent time-series data, enable a PersistentVolumeClaim.
23.7.1. Persistence Options
| Path | Type | Default | Description |
|---|---|---|---|
|
| bool |
| Enable persistent storage |
|
| string |
| StorageClass name (empty = default) |
|
| string |
| PVC size |
|
| array |
| PVC access modes |
Behavior:
-
Disabled: Uses
emptyDir(ephemeral) -
Enabled: Creates PVC, uses
Recreatedeployment strategy
Prerequisites
- A StorageClass that can provision PersistentVolumes, or a default StorageClass configured in your cluster
Procedure
Configure persistence in your values file:
prometheus: persistence: enabled: true storageClass: "" # Use default StorageClass size: 8Gi accessModes: - ReadWriteOnceInstall or upgrade the chart with your values:
helm upgrade --install skupper-network-observer oci://quay.io/skupper/helm/network-observer --version {{skupper_cli_version}} -f values.yamlVerify the PersistentVolumeClaim is bound:
kubectl get pvc
Example output:
NAME                                    STATUS   VOLUME                                     CAPACITY   ACCESS MODES   STORAGECLASS   AGE
skupper-network-observer-prometheus-0   Bound    pvc-a1b2c3d4-e5f6-7890-abcd-ef1234567890   8Gi        RWO            standard       2m
When persistence is enabled, the Deployment uses a Recreate update strategy to ensure the single read-write volume can attach cleanly during pod updates.
<a></a>
23.8. Container Resources
Resource requests and limits can be configured for each container in the Pod.
23.8.1. Network Observer Container
| Path | Type | Default | Description |
|---|---|---|---|
|
| string | - | CPU request |
|
| string | - | Memory request |
|
| string | - | CPU limit |
|
| string | - | Memory limit |
23.8.2. Prometheus Container
| Path | Type | Default | Description |
|---|---|---|---|
|
| string | - | CPU request |
|
| string | - | Memory request |
|
| string | - | CPU limit |
|
| string | - | Memory limit |
23.8.3. Proxy Container
| Path | Type | Default | Description |
|---|---|---|---|
|
| string | - | CPU request |
|
| string | - | Memory request |
|
| string | - | CPU limit |
|
| string | - | Memory limit |
Example:
containerResources:
  networkObserver:
    requests:
      cpu: 200m
      memory: 512Mi
    limits:
      cpu: 1000m
      memory: 1Gi
  prometheus:
    requests:
      cpu: 500m
      memory: 1Gi
    limits:
      cpu: 2000m
      memory: 4Gi
  proxy:
    requests:
      cpu: 50m
      memory: 64Mi
    limits:
      cpu: 200m
memory: 256Mi<a></a>
23.9. Container Images
23.9.1. Network Observer Image
| Path | Type | Default | Description |
|---|---|---|---|
|
| string |
| Image repository |
|
| string | chart appVersion | Image tag |
|
| string |
| Pull policy |
23.9.2. Prometheus Image
| Path | Type | Default | Description |
|---|---|---|---|
|
| string |
| Image repository |
|
| string |
| Image tag |
|
| string |
| Pull policy |
23.9.3. NGINX Proxy Image
Used when auth.strategy is basic or none:
| Path | Type | Default | Description |
|---|---|---|---|
|
| string |
| Image repository |
|
| string |
| Image tag |
|
| string |
| Pull policy |
|
| array |
| Override default command |
23.9.4. OpenShift OAuth Proxy Image
Used when auth.strategy is openshift:
| Path | Type | Default | Description |
|---|---|---|---|
|
| string |
| Image repository |
|
| string |
| Image tag |
|
| string |
| Pull policy |
<a></a>
23.10. Labels and Annotations
| Path | Type | Default | Description |
|---|---|---|---|
|
| map |
| Labels on all resources |
|
| map |
| Annotations on all resources |
|
| map |
| Labels on Pod resources only |
|
| map |
| Annotations on Pod resources only |
Standard labels (always present):
-
app.kubernetes.io/name: network-observer -
app.kubernetes.io/instance: <name> -
app.kubernetes.io/version: <version> -
app.kubernetes.io/managed-by: Helmornetwork-observer-operator
Example:
commonLabels:
  environment: production
  team: platform-engineering
  cost-center: "12345"

commonAnnotations:
  owner: "platform-team@company.com"
  docs: "https://wiki.company.com/network-observer"

podLabels:
  app.kubernetes.io/tier: monitoring

podAnnotations:
  prometheus.io/scrape: "false"
<a></a>
23.11. Service
| Path | Type | Default | Description |
|---|---|---|---|
|
| string |
|
Service type: |
|
| int |
| External port |
Notes:
-
targetPortalwayshttps(8443) -
Metrics service always
ClusterIPon port9000
<a></a>
23.12. Security
23.12.1. Pod Security Context
| Path | Type | Default | Description |
|---|---|---|---|
|
| string |
| Seccomp profile |
23.12.2. Container Security Contexts
Available for: securityContext, prometheus.securityContext, nginx.securityContext, openshiftOauthProxy.securityContext
| Path | Type | Default | Description |
|---|---|---|---|
|
| bool |
| Allow privilege escalation |
|
| array |
| Capabilities to drop |
<a></a>
23.13. Advanced Options
23.13.1. Name Overrides
| Path | Type | Default | Description |
|---|---|---|---|
|
| string |
| Override chart name |
|
| string |
| Override full resource name |
23.13.2. Skip Management Labels
| Path | Type | Default | Description |
|---|---|---|---|
|
| bool |
| Skip Skupper management labels |
<a></a>
23.14. Metrics Endpoint
The Network Observer serves Prometheus metrics on a dedicated HTTP listener, separate from the main API endpoint.
Listener Configuration:
-
Address:
:9000(container-wide) -
Path:
/metrics - Protocol: HTTP (no TLS/auth)
Service:
-
Name:
<name>-metrics -
Type:
ClusterIP -
Port:
9000 → 9000
Security: Cluster-internal only. Do not expose publicly.
23.14.1. Metrics Service
The chart creates a second ClusterIP Service named <release-name>-metrics that targets the metrics listener on port 9000.
| Property | Value |
|---|---|
| Listener address |
|
| Service name |
|
| Service port |
|
| Metrics path |
|
23.14.2. Scraping Metrics
Configure your Prometheus instance or monitoring operator to scrape the metrics endpoint.
ServiceMonitor example (Prometheus Operator):
apiVersion: monitoring.coreos.com/v1
kind: ServiceMonitor
metadata:
  name: skupper-network-observer
spec:
  selector:
    matchLabels:
      app.kubernetes.io/name: network-observer
  endpoints:
    - port: metrics
path: /metricsStatic scrape configuration:
scrape_configs:
  - job_name: 'network-observer'
    static_configs:
- targets: ['skupper-network-observer-metrics.default.svc:9000']Security note: The metrics Service is ClusterIP by default and does not include the TLS proxy or authentication that protects the main console endpoint. Do not expose this Service publicly without additional access controls if your metrics contain sensitive data.
<a></a>
23.15. Validation and Troubleshooting
23.15.1. Verify Services
Check that both Services are created:
kubectl get svc -l app.kubernetes.io/name=network-observer
Example output:
NAME                              TYPE        CLUSTER-IP      EXTERNAL-IP   PORT(S)    AGE
skupper-network-observer          ClusterIP   10.96.123.45    <none>        443/TCP    5m
skupper-network-observer-metrics  ClusterIP   10.96.123.46    <none>        9000/TCP   5m
23.15.2. Test Metrics Endpoint
From a pod in the same namespace:
kubectl run -it --rm curl --image=curlimages/curl --restart=Never -- curl -sS http://skupper-network-observer-metrics:9000/metrics
Example output:
# HELP skupper_network_observer_info Network Observer build information
# TYPE skupper_network_observer_info gauge
skupper_network_observer_info{version="2.2.0"} 1
...23.15.3. Check Observer Logs
Look for the metrics listener startup message:
kubectl logs deployment/skupper-network-observer -c network-observer
Example output:
2025/03/15 10:23:45 Starting metrics server on :9000
2025/03/15 10:23:45 Starting API server on 127.0.0.1:8080
23.15.4. Verify Prometheus Configuration
If the embedded Prometheus shows no data, check the ConfigMap:
kubectl get configmap skupper-network-observer-prometheus-config -o yaml
Ensure the prometheus.yml content is valid and the scrape target matches the observer’s API listener (localhost:8080).
23.15.5. PersistentVolumeClaim Issues
If the pod remains in Pending state with persistence enabled:
kubectl describe pvc skupper-network-observer-prometheus-0
Look for events indicating StorageClass issues, volume provisioning failures, or capacity constraints.