Management, configuration, and operations
Post-installation tasks that help to maintain Red Hat Directory Server
Abstract
Preface
This guide covers management, configuration, and operations for Red Hat Directory Server 13.
Providing feedback on Red Hat Directory Server
We appreciate your input on our documentation and products. Please let us know how we could make it better. To do so:
For submitting feedback on the Red Hat Directory Server (RHDS) documentation through Jira (account required):
- Go to the Content from redhat.atlassian.net is not included.Red Hat Issue Tracker for the RHDS project.
- Enter a descriptive title in the Summary field.
- Enter your suggestion for improvement in the Description field. Include links to the relevant parts of the documentation.
Click Create at the bottom of the dialogue.
Alternatively, you can use the Share Feedback option on the product documentation page.
For submitting feedback on the RHDS product through Jira (account required):
- Go to the Content from redhat.atlassian.net is not included.Red Hat Issue Tracker for the RHDS project.
- Enter a descriptive title in the Summary field.
- Select the component in the Component field.
Fill in the Description field including:
- The version number of the selected component.
- Steps to reproduce the problem or your suggestion for improvement.
- Click Create at the bottom of the dialogue.
Chapter 1. Basic management tasks
Perform basic tasks of managing Red Hat Directory Server instances after the installation to maintain your directory environment and ensure continuous service availability.
1.1. Logging in to the Directory Server by using the web console
The web console is a browser-based graphical user interface (GUI) that you can use for performing administrative tasks. The Red Hat Directory Server package automatically installs the Red Hat Directory Server user interface for the web console.
Prerequisites
- You have permissions to access the web console.
Procedure
Access the web console by using the following URL in your browser:
https://<directory_server_host>:9090
-
Log in as a user with
sudoprivileges. Select the
Red Hat Directory Serverentry.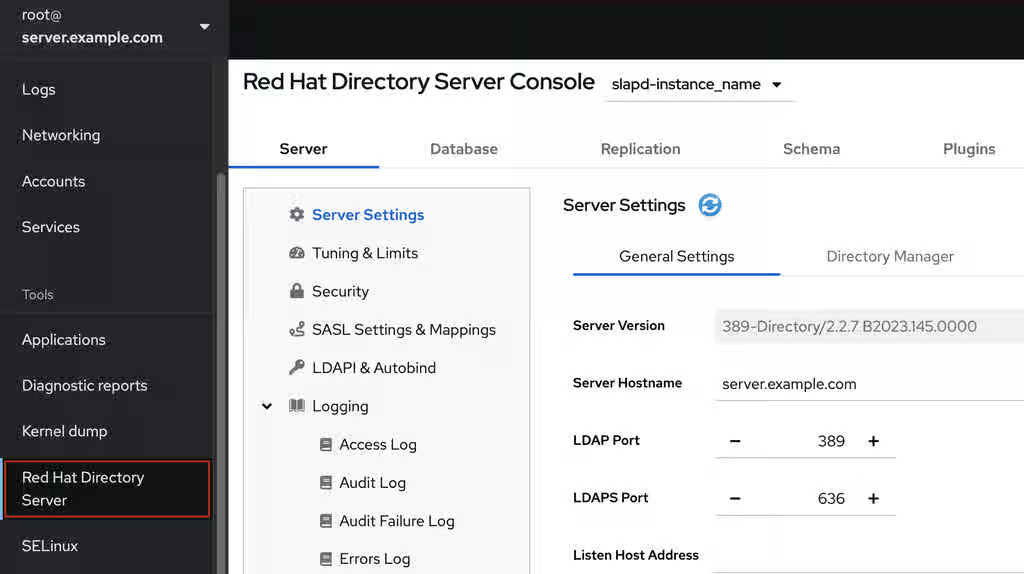
Additional resources
1.2. Starting and stopping a Directory Server instance
Start and stop Red Hat Directory Server instances to control the operational state of your directory server. Managing the server process helps you to apply configuration changes, perform maintenance tasks, and recover from interruptions, ensuring that directory services are available to clients when needed.
You can start, stop, and restart a Directory Server instance by using the command line or the web console.
1.2.1. Starting and stopping a Directory Server instance by using the command line
Use the dsctl utility to start, stop, or restart a Directory Server instance.
The dsctl utility is the only correct way to stop the Directory Server instances. Do not use the kill command to terminate the ns-slapd process to avoid any data loss and corruption.
Procedure
To start the instance, run:
# dsctl <instance_name> startTo stop the instance, run:
# dsctl <instance_name> stopTo restart the instance, run:
# dsctl <instance_name> restartOptionally, you can enable Directory Server instances to automatically start when the system boots:
For a single instance, run:
# systemctl enable dirsrv@<instance_name>For all instances on a server, run:
# systemctl enable dirsrv.target
Verification
You can check the instance status by using the dsctl or systemctl utility:
To view the instance status by using the
dsctlutility, run:# dsctl <instance_name> statusTo view the instance status by using the
systemctlutility, run:# systemctl status dirsrv@<instance_name>
Additional resources
1.2.2. Starting and stopping a Directory Server instance by using the web console
Use the web console to start, stop, or restart a Directory Server instance.
Prerequisites
- You are logged in to the web console. For more details, see Logging in to the Directory Server by using the web console.
Procedure
- Select the Directory Server instance.
Click the Actions button and select the action to execute:
- Start Instance
- Stop Instance
Restart Instance
Verification
Ensure that the Directory Server instance is running. When the instance is not running, the web console displays the following message:
This server instance is not running, either start it from the Actions dropdown menu, or choose a different instance.
1.3. Changing the LDAP and LDAPS port numbers
By default, Directory Server uses port 389 for the LDAP and, if you enabled, port 636 for the LDAPS protocol. You can change the port numbers, for example, to run multiple Directory Server instances on one host.
Other services must not use new ports that you assigned to the protocols for an instance.
1.3.1. Changing the port numbers using the command line
Change LDAP and LDAPS ports in Red Hat Directory Server by modifying the nsslapd-port and nsslapd-securePort attributes. Modifying these settings helps you to resolve port conflicts with other services or adhere to specific security policies, ensuring that client applications connect to the correct interface.
Procedure
Optionally: Display the current port numbers for the instance:
# dsconf <instance_name> config get nsslapd-port nsslapd-securePortChange the LDAP port:
Set the new port for the LDAP protocol. For example, to set it to
1389, run:# dsconf <instance_name> config replace nsslapd-port=1389Set the
ldap_port_ttype for the LDAP port you assigned in the previous step:# semanage port -a -t ldap_port_t -p tcp 1389
Change the LDAPS port:
Set the new port for the LDAPS protocol. For example, to set it to
1636, run:# dsconf <instance_name> config replace nsslapd-securePort=1636Set the
ldap_port_ttype for the LDAPS port you assigned in the previous step:# semanage port -a -t ldap_port_t -p tcp 1636
Restart the instance:
# dsctl <instance_name> restart
Verification
Verify that Directory Server now uses the new LDAP port by the command:
# dsconf <instance_name> config get nsslapd-portVerify that Directory Server now uses the new LDAPS port number by the command:
# dsconf <instance_name> config get nsslapd-securePort
Additional resources
1.3.2. Changing the port numbers using the web console
Change the LDAP and LDAPS port numbers in Red Hat Directory Server to customize the server network configuration. Modifying these settings helps you to resolve port conflicts with other services or adhere to specific security policies, ensuring that client applications connect to the correct interface.
Prerequisites
- You are logged in to the instance in the web console.
Procedure
Change the LDAP port:
- Open the menu.
-
On the
Server Settingtab, enter the new port number into the LDAP Port field.
- Click .
Change the LDAPS port:
- Open the menu.
-
On the
General Settingstab, enter the new port number into the LDAPS Port field. - Click .
- Restart the instance by clicking and selecting Restart Instance.
Verification
- Verify in the server setting that the changed port is reflected .
1.4. Managing default options for Directory Server command-line utilities using .dsrc file
Manage default options for command-line utilities in Red Hat Directory Server by configuring the .dsrc file. Storing frequently used parameters in the file helps you to execute commands efficiently without manually entering credentials and connection details for every operation.
1.4.1. How a .dsrc file simplifies commands
Simplify command-line administration in Red Hat Directory Server by storing default connection parameters, such as the instance name and credentials, in the .dsrc file.
You can specify the LDAP URL of an instance and a bind DN in a ~/.dsrc file as follows:
# server1
uri = ldap://server1.example.com
binddn = cn=Directory Manager
basedn = dc=example,dc=com
For example, to create a user account run:
# dsidm server1 user create
Without the ~/.dsrc file, you must specify the bind DN, LDAP URL, and base DN in the command as follows:
# dsidm -D cn=Directory Manager ldap://server1.example.com -b "dc=example,dc=com" user create1.4.2. Using the dsctl utility to create a .dsrc file
Use the dsctl dsrc create command to create a ~/.dsrc file instead of creating it manually. The following table lists the most common options of the command:
Table 1.1. Common dsctl dsrc create options
| Option | Description |
|---|---|
|
|
Sets the URL to the instance in the format Examples:
When you set the path to the Directory Server socket, use
|
|
|
Configures the utilities to connect to an LDAP port and then send the |
|
| Sets the base distinguished name (DN). Example:
|
|
| Sets the bind DN. Example:
|
|
| Sets the path to a file that contains the password of the bind DN. Example:
|
|
| Sets the path to the directory with the certificate authority (CA) certificate that is required to verify the server’s certificate if you use the LDAPS connection. Example:
|
|
| Sets the absolute path to the server’s certificate. Example:
|
|
| Sets the absolute path to the server’s private key. Example:
|
|
| Sets which checks the client utilities perform on server certificates in a TLS session. The following parameters are available:
|
|
|
Sets the SASL mechanism to use. Only two parameters are available: Example:
|
Procedure
To create a
.dsrcfile, run:# dsctl <instance_name> dsrc create --uri ldap://server.example.com --basedn "dc=example,dc=com" --binddn "cn=Directory Manager" --pwdfile /root/rhds.pwd
1.4.3. Remote and local connection resolution when using directory server utilities
To secure your connections, review how Red Hat Directory Server utilities resolve local and remote commands. Understanding how the server evaluates LDAP URLs, instance names, and configuration files helps you properly route and execute tasks.
You can call Red Hat Directory Server commands remotely and locally when securing the connection.
When you run a Red Hat Directory Server command with an LDAP URL specified, the server considers it as a remote connection and checks the /etc/openldap/ldap.conf configuration file along with system-wide settings to proceed with the command.
When you run a Red Hat Directory Server command with an instance name specified, the server checks if the ~/.dsrc file is present and applies the following logic to proceed:
-
The Red Hat Directory Server considers the
~/.dsrcfile as a remote connection and checks whether the/etc/openldap/ldap.confconfiguration file and system-wide settings contain both the instance name and the LDAP URL. -
The Red Hat Directory Server considers the
~/.dsrcfile as a local connection and uses thensslapd-certdirsetting from the localdse.ldiffile to secure the connection if the~/.dsrcfile contains only the specified instance name, or if the~/.dsrcfile does not exist. The server uses the default path/etc/dirsrv/slapd-<instance_name>/to store the Network Security Services (NSS) database of the instance ifnsslapd-certdiris not present.
Additional resources
Chapter 2. Exporting and importing data
Export and import data in Red Hat Directory Server to manage directory content by using LDIF files. By performing these operations, you can migrate data between server instances, populate new databases, or create portable backups, ensuring that you can maintain data consistency and mobility across your environment.
Learn about procedures on how to extract or populate directory databases online or offline.
2.1. Exporting data from Directory Server
Export your directory content into portable LDIF files to simplify data migrations and bulk updates.
The export operations include only directory data. Export does not include the configuration information (cn=config), schema information (cn=schema), and monitoring information (cn=monitor).
Use the export feature to:
- Copy data to another Directory Server.
- Export data to another application.
- Repopulate databases after a change to the directory topology.
- Split the database.
2.1.1. Exporting data using the command line while the server is running
Export directory data from Red Hat Directory Server to an LDIF file by using the dsconf backend export command while the server instance remains active to back up or migrate entries without interrupting directory services.
Prerequisites
The
dirsrvuser has write permissions in the destination directory.Note that Directory Server uses its own private directories by default. As a result, backups and exports under directories
/var/tmp/,/tmp/, and/root/fail unless you disabled the PrivateTmp systemd directive.- The Directory Server instance is running.
Procedure
Use the
dsconf backend exportcommand to export data to an LDIF file.For example, to export the
userRootdatabase:# dsconf <instance_name> backend export userRootThe export task has finished successfully
By default,
dsconfstores the export in a file calledinstance_name_database_name-time_stamp.ldifin the/var/lib/dirsrv/slapd-<instance_name>/ldif/directory. Alternatively, add the-l file_nameoption to the command to specify a different location.To display all additional settings that you can use to export data, see the output of the
dsconf <instance_name> backend export --helpcommand.-
Search the
/var/log/dirsrv/slapd-<instance_name>/errorslog for problems during the export.
2.1.2. Exporting data using the command line while the server is offline
Export directory data from Red Hat Directory Server to an LDIF file by using the dsctl db2ldif command while the server instance is stopped to create a consistent snapshot of the database.
Prerequisites
The
dirsrvuser has write permissions in the destination directory.Note that Directory Server uses its own private directories by default. As a result, backups and exports under directories
/var/tmp/,/tmp/, and/root/fail unless you disabled the PrivateTmp systemd directive.- The Directory Server instance is not running.
Procedure
Use the
dsctl db2ldifcommand to export data to an LDIF file. For example, to export theuserRootdatabase to the/var/lib/dirsrv/slapd-<instance_name>/ldif/example.ldiffile:# dsctl <instance_name> db2ldif userRoot /var/lib/dirsrv/slapd-<instance_name>/ldif/example.ldifOK group dirsrv exists OK user dirsrv exists ldiffile: /var/lib/dirsrv/slapd-<instance_name>/example.ldif [18/Jul/2021:10:46:03.353656777 +0200] - INFO - ldbm_instance_config_cachememsize_set - force a minimal value 512000 [18/Jul/2021:10:46:03.383101305 +0200] - INFO - ldbm_back_ldbm2ldif - export userRoot: Processed 160 entries (100%). [18/Jul/2021:10:46:03.391553963 +0200] - INFO - dblayer_pre_close - All database threads now stopped db2ldif successfulTo display all additional settings that you can use to import data, see the output of the
dsctl db2ldif --helpcommand.-
Search the
/var/log/dirsrv/slapd-<instance_name>/errorslog for problems during the export. Optional: Start the instance:
# dsctl <instance_name> start
2.1.3. Exporting data using the web console while the server is running
Export directory data from Red Hat Directory Server to an LDIF file by using the web console to create a consistent snapshot of the database.
Prerequisites
The
dirsrvuser has write permissions in the destination directory.Note that Directory Server uses its own private directories by default. As a result, backups and exports under directories
/var/tmp/,/tmp/, and/root/fail unless you disabled the PrivateTmp systemd directive.- The Directory Server instance is running.
- You are logged in to the instance in the web console.
Procedure
- Open the menu.
- Select the suffix entry.
- Click , and select Export Suffix.
-
Enter the name of the LDIF file in which you want to store the export. Directory Server will store the file in the
/var/lib/dirsrv/slapd-<instance_name>/ldif/directory using the specified file name. - Click .
- To check the log for problems during the export, open the → → menu.
2.1.4. Additional resources
2.2. Importing data to Directory Server
Import data into Red Hat Directory Server to populate directory databases by using LDIF files. You can reduce manual data entry and simplify system initialization by using the web console or command-line utilities to import data.
To import data, you must store the LDIF file that you want to import in the /var/lib/dirsrv/slapd-<instance_name>/ldif/ directory.
2.2.1. Importing data using the command line while the server is running
Import directory data into Red Hat Directory Server from an LDIF file using the dsconf backend import command while the server instance remains active to populate a database or restore entries without interrupting directory services.
When you start an import operation, Directory Server first removes all existing data from the database and, subsequently, imports the data from the LDIF file. Therefore, if the import fails, the server returns no entries or a partial set of entries.
Prerequisites
-
The LDIF file permissions allow the
dirsrvuser to read the file. - The LDIF file to import contains the root suffix entry.
- The suffix and its database, to which you want to import data, exists in the directory.
- The Directory Server instance is running.
- The LDIF file to import uses UTF-8 character set encoding.
Procedure
Optional: By default, Directory Server sets the entry update sequence numbers (USNs) of all imported entries to
0. To set an alternative initial USN value, set thensslapd-entryusn-import-initvalparameter. For example, to set USN for all imported values to12345, enter:# dsconf <instance_name> config replace nsslapd-entryusn-import-initval=12345If you copied the file you want to import to
/var/lib/dirsrv/slapd-<instance_name>/ldif/, reset the SELinux context on that file:# restorecon -Rv /var/lib/dirsrv/slapd-instance_name/ldif/example.ldifUse the
dsconf backend importcommand to import data from an LDIF file.For example, to import the
/var/lib/dirsrv/slapd-<instance_name>/ldif/example.ldiffile into theuserRootdatabase:# dsconf <instance_name> backend import userRoot /var/lib/dirsrv/slapd-instance_name/ldif/example.ldifThe import task has finished successfully
-
Search the
/var/log/dirsrv/slapd-<instance_name>/errorslog for problems during the import.
Verification
Search for entries under the imported suffix, for example
dc=example,dc=com:# ldapsearch -D "cn=Directory Manager" -W -H ldap://server.example.com -b "dc=example,dc=com" -s sub -x
Additional resources
2.2.2. Importing data using the command line while the server is offline
Import directory data into Red Hat Directory Server from an LDIF file by using the dsctl ldif2db command while the server instance is stopped to rapidly populate a database or restore entries from a backup.
When you start an import operation, Red Hat Directory Server first removes all existing data from the database and, subsequently, imports the data from the LDIF file. Therefore, if the import fails, the server returns no entries or a partial set of entries.
Prerequisites
-
The LDIF file permissions allow the
dirsrvuser to read the file. - The LDIF file to import contains the root suffix entry.
- The suffix and its database, to which you want to import data, exists in the directory.
- The Red Hat Directory Server instance is not running.
- The LDIF file to import uses UTF-8 character set encoding.
Procedure
Optional: By default, Red Hat Directory Server sets the entry update sequence numbers (USNs) of all imported entries to
0. To set an alternative initial USN value, set thensslapd-entryusn-import-initvalparameter. For example, to set USN for all imported values to12345, enter:# dsconf <instance_name> config replace nsslapd-entryusn-import-initval=12345If you copied the file you want to import to
/var/lib/dirsrv/slapd-<instance_name>/ldif/, reset the SELinux context on that file:# restorecon -Rv /var/lib/dirsrv/slapd-instance_name/ldif/example.ldifUse the
dsctl ldif2dbcommand to import data from an LDIF file. For example, to import the/var/lib/dirsrv/slapd-<instance_name>/ldif/example.ldiffile into theuserRootdatabase:# dsctl <instance_name> ldif2db userRoot /var/lib/dirsrv/slapd-instance_name/ldif/example.ldifOK group dirsrv exists OK user dirsrv exists [17/Jul/2021:13:42:42.015554231 +0200] - INFO - ldbm_instance_config_cachememsize_set - force a minimal value 512000 ... [17/Jul/2021:13:42:44.302630629 +0200] - INFO - import_main_offline - import userRoot: Import complete. Processed 160 entries in 2 seconds. (80.00 entries/sec) ldif2db successful
To display all additional settings that you can use to import data, see the output of the
dsctl ldif2db --helpcommand.-
Search the
/var/log/dirsrv/slapd-<instance_name>/errorslog for problems during the import. Optional: Start the instance:
# dsctl <instance_name> start
Verification
Search for entries under the imported suffix, for example
dc=example,dc=com:# ldapsearch -D "cn=Directory Manager" -W -H ldap://server.example.com -b "dc=example,dc=com" -s sub -x
Additional resources
2.2.3. Importing data using the web console while the server is running
Import directory data into Red Hat Directory Server from an LDIF file using the web console while the server instance remains active to populate a database or restore entries without interrupting directory services.
When you start an import operation, Red Hat Directory Server first removes all existing data from the database and, subsequently, imports the data from the LDIF file. Therefore, if the import fails, the server returns no entries or a partial set of entries.
Prerequisites
-
The LDIF file permissions allow the
dirsrvuser to read the file. - The LDIF file to import contains the root suffix entry.
- The suffix and its database, to which you want to import data, exists in the directory.
-
The LDIF file is stored in the
/var/lib/dirsrv/slapd-<instance_name>/ldif/directory and has thedirsrv_var_lib_tSELinux context set. - The Directory Server instance is running.
- You are logged in to the instance in the web console.
- The LDIF file to import uses UTF-8 character set encoding.
Procedure
- In the web console, open the menu.
- Select the suffix entry.
- Click , and select Initialize Suffix.
-
Click the button next to the LDIF file you want to import. If the LDIF file is stored in a directory different than
/var/lib/dirsrv/slapd-<instance_name>/ldif/, enter the full path to the file and click the button. - Select Yes, I am sure, and click to confirm.
- To check the log for problems during the import, open the → → menu.
Verification
Search for entries under the imported suffix, for example
dc=example,dc=com:#
ldapsearch -D "cn=Directory Manager" -W -H ldap://server.example.com -b "dc=example,dc=com" -s sub -x
Additional resources
2.3. Enabling members of a group to export data and performing the export as one of the group members
Enable members of a specific group to export your directory data securely. Granting export privileges to a designated group helps you to distribute administrative responsibilities without sharing the root or Directory Manager credentials.
Additionally, you can easily grant and revoke the export permissions by modifying the group.
2.3.1. Enabling a group to export data
Enable a group in Red Hat Directory Server to export directory content to LDIF files without requiring full Directory Manager credentials.
For example, add the cn=export_users,ou=groups,dc=example,dc=com group and enable members of this group to create export tasks.
Procedure
Create the
cn=export_users,ou=groups,dc=example,dc=comgroup:# dsidm <instance_name> -b "dc=example,dc=com" group create --cn export_usersAdd access control instructions (ACIs) that allow members of the
cn=export_users,ou=groups,dc=example,dc=comgroup to create export tasks:# ldapadd -D "cn=Directory Manager" -W -H ldap://server.example.comThe
ldapaddutility requests you to provide the LDIF statement with the ACIs details:dn: cn=config changetype: modify add: aci aci: (target = "ldap:///cn=export,cn=tasks,cn=config") (targetattr="*") (version 3.0 ; acl "permission: Allow export_users group to export data" ; allow (add, read, search) groupdn = "ldap:///cn=export_users,ou=groups,dc=example,dc=com";) - add: aci aci: (target = "ldap:///cn=config")(targetattr = "objectclass || cn || nsslapd-suffix || nsslapd-ldifdir") (version 3.0 ; acl "permission: Allow export_users group to access ldifdir attribute" ; allow (read,search) groupdn = "ldap:///cn=export_users,ou=groups,dc=example,dc=com";)
Create a user:
Create a user account:
# dsidm <instance_name> -b "dc=example,dc=com" user create --uid="example" --cn="example" --uidNumber="1000" --gidNumber="1000" --homeDirectory="/home/example/" --displayName="Example User"Set a password on the user account:
# dsidm <instance_name> -b "dc=example,dc=com" account reset_password "uid=example,ou=People,dc=example,dc=com" "password"
Add the
uid=example,ou=People,dc=example,dc=comuser to thecn=export_users,ou=groups,dc=example,dc=comgroup:# dsidm <instance_name> -b "dc=example,dc=com" group add_member export_users uid=example,ou=People,dc=example,dc=com
Verification
Display the ACIs set on the
cn=configentry:# ldapsearch -o ldif-wrap=no -LLLx -D "cn=Directory Manager" -W -H ldap://<server.example.com> -b cn=config aci=* aci -s basedn: cn=config aci: (target = "ldap:///cn=export,cn=tasks,cn=config")(targetattr="*")(version 3.0 ; acl "permission: Allow export_users group to export data" ; allow (add, read, search) groupdn = "ldap:///cn=export_users,ou=groups,dc=example,dc=com";) aci: (target = "ldap:///cn=config")(targetattr = "objectclass || cn || nsslapd-suffix || nsslapd-ldifdir")(version 3.0 ; acl "permission: Allow export_users group to access ldifdir attribute" ; allow (read,search) groupdn = "ldap:///cn=export_users,ou=groups,dc=example,dc=com";)
2.3.2. Performing an export as a regular user
Export directory data in Red Hat Directory Server as a regular user to back up or migrate entries without requiring root or Directory Manager privileges.
Prerequisites
-
You enabled members of the
cn=export_users,ou=groups,dc=example,dc=comgroup to export data. -
The user you use to perform the export is a member of the
cn=export_users,ou=groups,dc=example,dc=comgroup.
Procedure
Create a export task using one of the following methods:
Using the
dsconf backend exportcommand:# dsconf -D "uid=example,ou=People,dc=example,dc=com" ldap://server.example.com backend export userRootBy manually creating the task:
# ldapadd -D "uid=example,ou=People,dc=example,dc=com" -W -H ldap://server.example.comThe
ldapaddutility requests you to provide the LDIF statement with task information:dn: cn=userRoot-2021_07_23_12:55_00,cn=export,cn=tasks,cn=config changetype: add objectClass: extensibleObject nsFilename: /var/lib/dirsrv/slapd-instance_name/ldif/None-userroot-2021_07_23_12:55_00.ldif nsInstance: userRoot cn: export-2021_07_23_12:55_00
Verification
Verify that the backup was created:
# ls -l /var/lib/dirsrv/slapd-instance_name/ldif/*.ldiftotal 0 -rw-------. 1 dirsrv dirsrv 10306 Jul 23 12:55 None-userroot-2021_07_23_12_55_00.ldif ...
Additional resources
Chapter 3. Backing up and restoring Red Hat Directory Server
Back up and restore Red Hat Directory Server to protect directory databases and configuration files against data loss. You can recover quickly from system failures or data corruption by using the web console or command line.
Back up the Red Hat Directory Server database, configuration files, and custom schema files and restore the database when the instance is offline or online.
3.1. Backing up Directory Server
Back up Red Hat Directory Server data and configuration to protect against data loss and enable recovery. Performing regular backups helps you to restore the system to a functional state, ensuring data integrity and availability in the event of hardware failure or data corruption.
A backup in Directory Server contains the following files:
-
An LDIF file
dse_index.ldifcontaining database indexed attributes -
An LDIF file
dse_instance.ldifcontaining instance configuration attributes -
A directory for each backend, for example
userRoot, which contains.dbfiles for indexes defined in the database -
A transaction log file
log.* -
A database version file
DBVERSION
Note that Directory Server does not support backing up individual databases.
For details about backing up other important files, such as the configuration, see Backing up configuration files, the certificate database, and custom schema files.
In contrast to a backup, you can export data as described in Exporting data from Directory Server. Use the export feature to export specific data from a server, such as a subtree, in LDIF format.
3.1.1. Backing up all databases by-using the command line while the instance is running
Perform a full backup of your directory databases from the command line while the server is active without service interruptions. An online backup helps you to create a reliable recovery archive while ensuring that the server remains available to process client requests.
To back up all databases of the Directory Server instance that is running, use the dsconf backup create command.
Directory Server cleans the changelog when the database is restored from the online backup. Therefore, using online backup requires you to reinitialize the replica after the database restore. To avoid reinitialization, use the offline backup.
Prerequisites
The
dirsrvuser has write permissions in the destination directory.Note that Directory Server uses its own private directories by default. As a result, backups and exports under directories
/var/tmp/,/tmp/, and/root/fail unless you disabled the PrivateTmp systemd directive.- The Directory Server instance is running.
Procedure
Back up all databases:
# dsconf <instance_name> backup createThe backup create task has finished successfully
By default,
dsconfstores the backup in a subdirectory called<instance_name>-YYYY_MM_DD_hh_mm_ssin the/var/lib/dirsrv/slapd-<instance_name>/bak/directory. To specify a different location, append a directory name to the command.Search the
/var/log/dirsrv/slapd-<instance_name>/errorslog for problems during the backup.To display all additional settings that you can use to back up data, see the output of the
dsconf <instance_name> backup create --helpcommand.
3.1.2. Backing up all databases by using the command line while the instance is offline
Minimize data corruption risks by performing full offline backups of directory databases. Use the dsctl db2bak command while the Red Hat Directory Server instance is stopped to create reliable archives for migrations and recovery scenarios.
Prerequisites
The
dirsrvuser has write permissions in the destination directory.Note that Directory Server uses its own private directories by default. As a result, backups and exports under directories
/var/tmp/,/tmp/, and/root/fail unless you disabled the PrivateTmp systemd directive.- The Directory Server instance is not running.
Procedure
Back up all databases:
# dsctl <instance_name> db2bakdb2bak successful
By default,
dsctl db2bakstores the backup in the<instance_name>-YYYY_MM_DD_hh_mm_ss__subdirectory in the/var/lib/dirsrv/slapd-<instance_name>/bak/directory. To specify a different location, append a directory name to the command.Optionally, pass the
-voption to the command to display verbose output:# dsctl -v <instance_name> db2bak... DEBUG: Instance allocated DEBUG: systemd status -> True ... INFO: db2bak successful
-
Search the
/var/log/dirsrv/slapd-<instance_name>/errorslog for problems during the backup. Optional: Start the instance:
# dsctl <instance_name> start
3.1.3. Backing up all databases by using the web console
Perform a full backup of your directory databases by using the web console while the server is active without service interruptions. An online backup helps you to create a reliable recovery archive while ensuring that the server remains available to process client requests.
Directory Server supports data backup using the web console.
Directory Server cleans the changelog when the database is restored from the online backup. Therefore, using online backup requires you to reinitialize the replica after the database restore. To avoid reinitialization, use the offline backup.
Prerequisites
The
dirsrvuser has write permissions in the destination directory.Note that Directory Server uses its own private directories by default. As a result, backups and exports under
/var/tmp/,/tmp/, and/root/directories fail unless you disabled the PrivateTmp systemd directive.- You are logged in to the instance in the web console.
Procedure
- Click the button, and select Manage Backups.
- Click .
- Enter a name for the backup, such as a time stamp to indicate the creation date and time of the backup.
- Click .
To check the log for problems during the backup, open the → → menu.
The server stores the backup in a subdirectory with the name you entered in the
/var/lib/dirsrv/slapd-<instance_name>/bak/directory.
3.1.4. Backing up configuration files, the certificate database, and custom schema files
Secure the Red Hat Directory Server operational environment by backing up configuration files, the certificate database, and custom schema files. Regular backups protect critical server settings and ensure rapid recovery from system failures.
When you back up databases while the instance is online or offline, Red Hat Directory Server also backs up configuration files, the certificate database, and custom schema files. The dsconf backup create and dsctl db2bak commands back up files to the /var/lib/dirsrv/slapd-<instance_name>/bak/<example_backup>/config_files/ backup default directory. You might need these files to restore the instance on a different server after a hardware failure.
During the backup, do not update the certificate database. Otherwise, this database might not be consistent in the backup.
Procedure
- Perform a backup of Red Hat Directory Server while the instance is running or is offline as described in Backing up all databases using the command line while the instance is running or Backing up all databases using the command line while the instance is offline.
Verification
Find backed up configuration files in the backup directory:
# ls /var/lib/dirsrv/slapd-<instance_name>/bak/<example_backup>/config_files/NoteDirectory Server does not automatically restore backed up configuration files. You need to restore these files manually.
Additional resources
3.2. Restoring Directory Server
Recover from data loss or system corruption by returning your directory to a previous known-good state. You can minimize downtime and ensure business continuity by using the web console or command-line utilities to restore your database instances online or offline.
Note that Red Hat Directory Server does not support restoration of individual databases.
When you want to populate the database with custom data, use the import feature. You can import specific data from a server in LDIF format. For details, see Importing data to Directory Server.
3.2.1. Restoring all databases by using the command line while the instance is running
Restore your entire directory environment from the command line while the server is active to minimize administrative downtime. Restore all databases on a running Red Hat Directory Server instance by executing the dsconf backup restore command.
Prerequisites
- You have a Red Hat Directory Server backup.
-
The
dirsrvuser has read permissions in the backup directory. - The Red Hat Directory Server instance is running.
Procedure
Restore all databases from the backup stored in the
/var/lib/dirsrv/slapd-<instance_name>/bak/<instance_name>-YYYY_MM_DD_hh_mm_ssdirectory:# dsconf <instance_name> backup restore /var/lib/dirsrv/slapd-<instance_name>/bak/<instance_name>-YYYY_MM_DD_hh_mm_ssThe backup restore task has finished successfully
To display all additional settings that you can use to restore data, see the output of the
dsconf <instance_name> backup restore --helpcommand.-
Search the
/var/log/dirsrv/slapd-<instance_name>/errorslog for problems during the restore.
3.2.2. Restoring all databases by using the command line while the instance is offline
Restore all Red Hat Directory Server databases from a backup archive while the instance is offline to ensure total data consistency. Running the dsctl bak2db command during a server shutdown replaces existing database contents and returns the directory to a known operational state.
Prerequisites
- You have a Directory Server backup.
-
The
dirsrvuser has read permissions in the backup directory. - The Directory Server instance is not running.
Procedure
Restore all databases from the backup stored in the
/var/lib/dirsrv/slapd-<instance_name>/bak/<instance_name>-YYYY_MM_DD_hh_mm_ssdirectory:# dsctl <instance_name> bak2db /var/lib/dirsrv/slapd-<instance_name>/bak/<instance_name>-YYYY_MM_DD_hh_mm_ss/bak2db successful
Optionally, pass the
-voption to the command to display verbose output:# dsctl -v <instance_name> bak2db /var/lib/dirsrv/slapd-<instance_name>/bak/<instance_name>-YYYY_MM_DD_hh_mm_ss/DEBUG: Instance allocated DEBUG: OK group dirsrv exists DEBUG: OK user dirsrv exists DEBUG: systemd status -> True ... INFO: bak2db successful
-
Search the
/var/log/dirsrv/slapd-<instance_name>/errorslog for problems during the restore. Optional: Start the instance:
# dsctl <instance_name> start
3.2.3. Restoring all databases by using the web console
Restore all Red Hat Directory Server databases by using the web console to recover directory data from a backup archive.
Prerequisites
-
A backup is stored in the
/var/lib/dirsrv/slapd-<instance_name>/bak/directory. -
The
dirsrvuser has read permissions in the backup directory. - You are logged in to the instance in the web console.
Procedure
-
Click the
Actionsmenu, and selectManage Backups. The displayed window lists the available backups in the/var/lib/dirsrv/slapd-<instance_name>/bak/directory. -
Open the
Actionsmenu next to the backup you want to restore, and selectRestore Backup. - Click to confirm.
- To check the log for problems during the restore, open the → → menu.
Additional resources
3.2.4. Restoring databases that include replicated entries
Maintain environment synchronization by recovering replicated directory instances according to the established topology. You can prevent data conflicts and ensure that your consumer or supplier nodes remain consistent with the rest of the topology.
Several situations can occur when a supplier server is restored:
The consumer servers are also restored.
For the very unlikely situation, that all databases are restored from backups taken at exactly the same time (so that the data are in sync), the consumers remain synchronized with the supplier, and it is not necessary to do anything else. Replication resumes without interruption.
Only the supplier is restored.
If only the supplier is restored or if the consumers are restored from backups taken at different times, reinitialize the consumers for the supplier to update the data in the database.
Changelog entries have not yet expired on the supplier server.
If the supplier’s changelog has not expired since the database backup was taken, then restore the local consumer and continue with normal operations. This situation occurs only if the backup was taken within a period of time that is shorter than the value set for the maximum changelog age attribute,
nsslapd-changelogmaxage, in thecn=changelog,cn=<database_name>,cn=ldbm database,cn=plugins,cn=configentry.Red Hat Directory Server automatically detects the compatibility between the replica and its changelog. When a mismatch occurs, the server replaces the existing changelog file with a new, empty one.
Changelog entries have expired on the supplier server since the time of the local backup.
If changelog entries have expired, reinitialize the consumer.
Example 3.1. Restoring a Red Hat Directory Server replication topology
To restore all servers in a replication environment, consisting of two suppliers and two consumer servers:
- Reinitialize the first supplier using either restore or import.
Online-initialize the remaining servers by using replication:
- Initialize the second supplier from the first one.
- Initialize the consumers from the supplier.
- On each server, display the replication status to verify that replication works correctly.
The changelog associated with the restored database will be erased during the restore operation. A message will be logged to the supplier server’s log files indicating that reinitialization is required.
3.2.5. Restoring configuration files, the certificate database, and custom schema files
Restore Red Hat Directory Server configuration files, the certificate database, and custom schema files from a backup archive to recover the server’s operational environment.
Prerequisites
- You have a Directory Server backup.
-
The
dirsrvuser has read permissions in the/var/lib/dirsrv/slapd-<instance_name>/bak/backup directory. - The Directory Server instance is not running.
Procedure
Copy files you want to restore from the backup directory to the Directory Server configuration directory. For example, to restore the
dse.ldifconfiguration file, enter:# cp /var/lib/dirsrv/slapd-<instance_name>/bak/<example_backup>/config_files/dse.ldif /etc/dirsrv/slapd-<instance_name>/Start the instance:
# dsctl <instance_name> start
Verification
Verify that the server restored the server configuration:
# dsconf <instance_name> config get
Additional resources
3.3. Enabling members of a group to back up Directory Server and performing the backup as one of the group members
Enable members of a specific group to back up Red Hat Directory Server to securely delegate data protection tasks. Granting backup privileges to a designated group helps you to distribute administrative responsibilities without sharing the root or Directory Manager credentials.
Additionally, you can easily grant and revoke the backup permissions by modifying the group.
3.3.1. Enabling a group to back up Directory Server
Delegate administrative tasks and improve operational security by granting specific groups the permission to perform directory backups. Configuring specific backup permissions allows authorized users to secure directory data while maintaining the security of the Directory Manager account.
Create the cn=backup_users,ou=groups,dc=example,dc=com group and grant its members the necessary permissions to execute backup tasks.
Prerequisites
-
The entry
ou=groups,dc=example,dc=comexists in the database.
Procedure
Create the
cn=backup_users,ou=groups,dc=example,dc=comgroup:# dsidm <instance_name> -b "dc=example,dc=com" group create --cn backup_usersAdd access control instructions (ACIs) that allow members of the
cn=backup_users,ou=groups,dc=example,dc=comgroup to create backup tasks:# ldapadd -D "cn=Directory Manager" -W -H ldap://server.example.comThe
ldapaddutility requests you to provide the LDIF statement with the ACIs details:dn: cn=config changetype: modify add: aci aci: (target = "ldap:///cn=backup,cn=tasks,cn=config")(targetattr="*") (version 3.0 ; acl "permission: Allow backup_users group to create backup tasks" ; allow (add, read, search) groupdn = "ldap:///cn=backup_users,ou=groups,dc=example,dc=com";) - add: aci aci: (target = "ldap:///cn=config")(targetattr = "nsslapd-bakdir || objectClass") (version 3.0 ; acl "permission: Allow backup_users group to access bakdir attribute" ; allow (read,search) groupdn = "ldap:///cn=backup_users,ou=groups,dc=example,dc=com";)
Create a user:
Create a user account:
# dsidm <instance_name> -b "dc=example,dc=com" user create --uid="example" --cn="example" --uidNumber="1000" --gidNumber="1000" --homeDirectory="/home/example/" --displayName="Example User"Set a password on the user account:
# dsidm <instance_name> -b "dc=example,dc=com" account reset_password "uid=example,ou=People,dc=example,dc=com" "password"
Add the
uid=example,ou=People,dc=example,dc=comuser to thecn=backup_users,ou=groups,dc=example,dc=comgroup:# dsidm <instance_name> -b "dc=example,dc=com" group add_member backup_users uid=example,ou=People,dc=example,dc=com
Verification
Display the ACIs set on the
cn=configentry:# ldapsearch -o ldif-wrap=no -LLLx -D "cn=Directory Manager" -W -H ldap://server.example.com -b cn=config aci=* aci -s basedn: cn=config aci: (target = "ldap:///cn=backup,cn=tasks,cn=config")(targetattr="*")(version 3.0 ; acl "permission: Allow backup_users group to create backup tasks" ; allow (add, read, search) groupdn = "ldap:///cn=backup_users,ou=groups,dc=example,dc=com";) aci: (target = "ldap:///cn=config")(targetattr = "nsslapd-bakdir || objectClass")(version 3.0 ; acl "permission: Allow backup_users group to access bakdir attribute" ; allow (read,search) groupdn = "ldap:///cn=backup_users,ou=groups,dc=example,dc=com";) ...
3.3.2. Performing a backup as a regular user
Perform a backup of Red Hat Directory Server as a regular user to protect directory data without requiring Directory Manager privileges. Running backup tasks with a standard user account enables you to separate duties while ensuring that you can recover the directory in the event of failure.
Prerequisites
-
You enabled members of the
cn=backup_users,ou=groups,dc=example,dc=comgroup to perform backups. -
The user you use to perform the backup is a member of the
cn=backup_users,ou=groups,dc=example,dc=comgroup.
Procedure
Create a backup task using one of the following methods:
Using the
dsconf backup createcommand:# dsconf -D "uid=example,ou=People,dc=example,dc=com" ldap://server.example.com backup createBy manually creating the task:
# ldapadd -D "uid=example,ou=People,dc=example,dc=com" -W -H ldap://server.example.comThe
ldapaddutility requests you to provide the LDIF statement with the task details:dn: cn=backup-2021_07_23_12:55_00,cn=backup,cn=tasks,cn=config changetype: add objectClass: extensibleObject nsarchivedir: /var/lib/dirsrv/slapd-<instance_name>/bak/backup-2021_07_23_12:55_00 nsdatabasetype: ldbm database cn: backup-2021_07_23_12:55_00
Verification
Verify that the backup was created:
# ls -l /var/lib/dirsrv/slapd-instance_name/bak/total 0 drwx------. 3 dirsrv dirsrv 108 Jul 23 12:55 backup-2021_07_23_12_55_00 ...
Additional resources
Chapter 4. Configuring directory databases in Directory Server
Configure directory databases in Red Hat Directory Server to manage the storage for your directory. You can optimize resource allocation and improve data isolation by using the web console or the command line.
In addition, you can organize entries in custom groupings or hierarchies by using virtual directory trees.
4.1. Storing suffixes in separate databases
Design distributed data storage logic in Red Hat Directory Server (RHDS) by dividing data in an instance into several databases. You can use suffixes of directory trees as the method of data division.
You can create several directory trees and store them in separate databases by root suffixes. You can also divide a single directory tree into branches and store the branches in separate databases by sub-suffixes.
4.1.1. Role of a suffix in the data structure
Red Hat Directory Server presents data in hierarchical structures called directory trees (DIT), and a suffix defines the top-level entry of a directory tree, establishing a distinct namespace for organizing data.
The following is a simple directory tree:
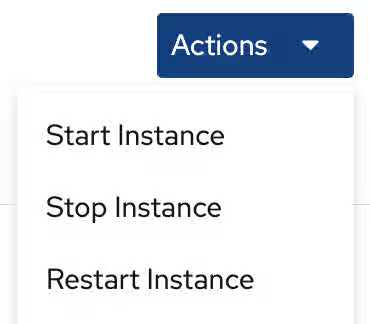
Figure 4.1. A simple directory tree with a single root suffix
Each directory tree has a single root entry which defines the naming context of that directory tree, such as dc=example,dc=com.
You can store various pieces of a directory tree in different databases, and then distribute these databases across multiple servers.
Use suffixes to define the distribution logic of your data storage. A suffix associates a branch (subtree) of the directory tree with a particular database.
This way you can have multiple databases in a single instance of the server. You are not confined to a single database.
4.1.2. Root suffix vs. sub-suffixes
A root suffix in Red Hat Directory Server defines the top-level entry of a directory tree, while a sub-suffix organizes a specific branch into a separate database. Comparing these structures helps you to choose the correct hierarchy for your deployment, ensuring efficient data distribution.
A root suffix associates an entire directory tree (DIT) with a database. The root suffix does not have a parent suffix.
When you want to store a branch of a directory tree in a separate database, you create a sub-suffix, which associates the branch of the tree with a different database than ancestors of the branch. A sub-suffix must be attached to a parent suffix. The parent suffix can be the root suffix or a sub-suffix, which means that a branch of any subtree can be stored in a separate database.
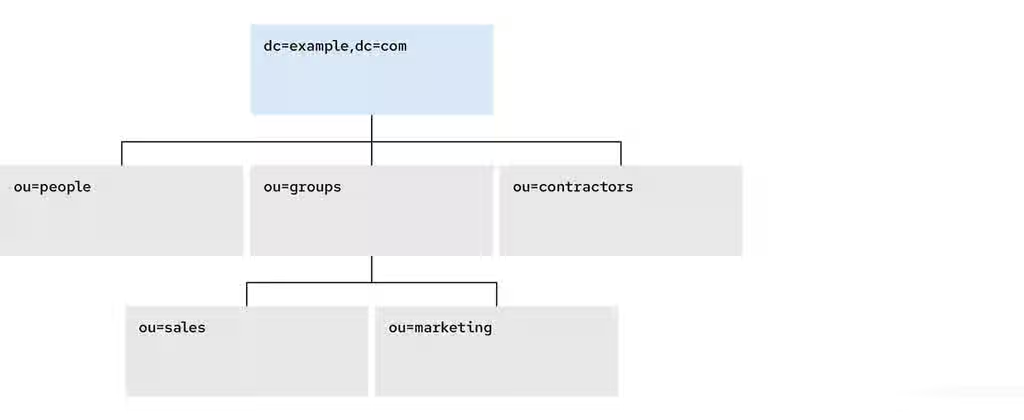
Figure 4.2. A directory tree with a sub-suffix in a separate database
In this example, the ou=people,dc=example,dc=com sub-suffix is stored in one database and the rest of the directory tree under the root suffix is stored in a different database.
Advantages of using sub-suffixes:
- You can perform database maintenance (import/export/indexing) at a granular level.
- You can store sub-suffixes on separate disks, which resolves disk space concerns.
Disadvantages of using sub-suffixes:
- You need more management actions during setup time.
- Replication needs a separate configuration and replication agreement for each sub-suffix.
4.1.3. Several root suffixes
You can have several directory trees (DIT) with different root suffixes in a single instance. For example, when you want to separate some portions of data from the user root.
Figure 4.3. Several directory trees defined by root suffixes
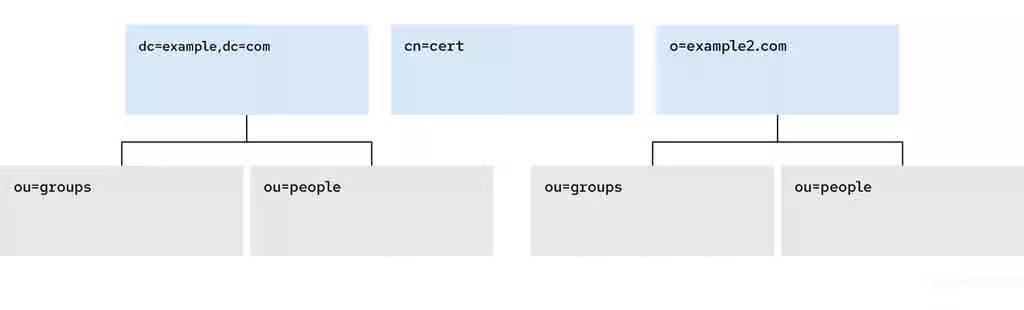
When clients search the dc=example,dc=com tree, the search does not return entries from the other trees, because they are off limits to the searching algorithm.
You can then choose which directory tree and naming context is default for your instance.
4.1.4. Creating a root suffix by using the command line
To define a new top-level namespace for your directory data in Red Hat Directory Server, create a root suffix through the command line.
Procedure
Optional: List the suffixes and back-end databases that are already in use:
# dsconf <instance_name> backend suffix listdc=example,dc=com (userroot)
The name in parentheses is the back-end database that stores the data of the corresponding suffix. You cannot use an existing database name when you create the root suffix in the next step.
Specify the DN of the root suffix in the
--suffixargument and associate it with a new database using the--be-nameargument:# dsconf <instance_name> backend create --suffix="dc=example,dc=net" --be-name="example"
Verification
- List the suffixes and databases using the command from the first step of this procedure.
4.1.5. Creating a root suffix using the web console
To define a new top-level namespace for your directory data in Red Hat Directory Server (RHDS), create a root suffix.
Prerequisites
- You are logged in to the RHDS instance in the web console.
Procedure
- Under Database, click the button below the configuration tree.
- Fill in the Suffix DN and Database Name.
- Select Create The Top Suffix Entry and click .
Verification
- The new suffix should appear in the tree of suffixes.
4.1.6. Changing the default naming context
You can modify the root suffix managed by a database instance by changing the default naming context in Red Hat Directory Server (RHDS) set in the nsslapd-defaultnamingcontext attribute.
Update nsslapd-defaultnamingcontext to align the directory structure with a new domain name or organizational hierarchy and ensure that client applications query the correct base distinguished name (DN).
A naming context is an attribute of a directory tree (DIT) that defines the root namespace for entries in that DIT. When you structure data in your instance with multiple root suffixes, your instance has several DITs, each with a different naming context.
The following procedure instructs you how to change the default naming context on the command line when you work with multiple root suffixes in your instance.
Clients that access your instance, may not know which naming context they need to use. The Directory Server signals to clients what the default naming context is, if they have no other configuration of a naming context known to them.
You set the default naming context in the nsslapd-defaultnamingcontext attribute in cn=config. Directory Server propagates this value over to the Directory Server Agent Service Entry (root DSE) and clients can query it anonymously.
Prerequisites
- You have created the root suffix that defines the default naming context of your instance.
Procedure
Optional: View the current default naming context:
# dsconf <instance_name> config get nsslapd-defaultnamingcontext nsslapd-defaultnamingcontext: dc=example,dc=comReplace the value of the
nsslapd-defaultnamingcontextparameter with the required naming context:# dsconf <instance_name> config replace nsslapd-defaultnamingcontext=dc=example,dc=net
Verification
- View the current default naming context. The value should be updated.
4.1.7. Creating a sub-suffix by using the command line
To store a specific subtree in a separate database, create a sub-suffix by using the command line. This sub-suffix defines a branch within an existing root suffix in Red Hat Directory Server.
Prerequisites
- You created the parent suffix for the sub-suffix.
Procedure
Optional: List the suffixes and back-end databases that are already in use:
# dsconf <instance_name> backend suffix listdc=example,dc=com (userroot)
The name in parentheses is the back-end database that stores the data of the corresponding suffix. You cannot use an existing database name when you create the sub-suffix in the next step.
Specify the full DN of the sub-suffix in the
--suffixargument, associate it with a new database using the--be-nameargument, and specify the parent suffix in the--parent-suffixargument:# dsconf <instance_name> backend create --suffix="ou=People,dc=example,dc=com" --be-name="example" --parent-suffix="dc=example,dc=com" --create-suffixWith
--create-suffixargument, the command creates the configuration entry for the sub-suffix and the sub-suffix entryou=People,dc=example,dc=com.The
--create-suffixargument supports the creation of suffixes with the following RDN attribute types:c,cn,dc,o, andou. If you want to create a suffix with RDN such asl, you can use thedsconf backend createcommand without the--create-suffixoption and then add the suffix entry by using an LDAP add operation or importing the entry from an LDIF file.
Verification
- List the suffixes and databases using the command from the first step of this procedure.
4.1.8. Creating a sub-suffix by using the web console
To store a specific subtree in a separate database, create a sub-suffix by using the web console. This sub-suffix defines a branch within an existing root suffix in Red Hat Directory Server (RHDS).
Prerequisites
- You are logged in to the RHDS instance in the web console.
- You created the parent suffix for the sub-suffix.
Procedure
- Under Database, select a suffix from the configuration tree that is the parent of the sub-suffix.
- Click the and select .
-
Fill in the Sub-Suffix DN, such as
ou=People, andDatabase Name. -
Select
Create The Top Suffix Entryand click .
Verification
- The new sub-suffix should appear among suffixes in the configuration tree.
4.2. Configuring referrals to redirect requests to other hosts or entries
Referrals inform client applications to perform the operation on a different host, suffix, or entry. These pointers help maintain high availability and directory integrity by ensuring that requests for non-existent entries or offline databases redirect to active resources rather than failing.
4.2.1. Configure a referral for a replicated suffix to redirect requests to a different host by using the command line
In Red Hat Directory Server, replication handles the suffix level referrals. With the dsconf utility, you can add, delete, and list referrals for a replicated suffix.
The replicated suffix returns a referral in the following cases:
- When the server attempts to perform a write operation over a read-only replica.
- When the server attempts to perform an operation over a busy replica, for example, when an import or reindex task is in progress.
Prerequisites
- The destination of the referral exists.
- You have root permissions.
Procedure
Add a referral for a replicated suffix by using the
dsconfcommand with the--repl-add-refoption:# dsconf <server1_instance_name> replication set --suffix="ou=people,dc=example,dc=com" --repl-add-ref="ldap://server2.example.com:389"The command sets the referral for the
ou=people,dc=example,dc=comsuffix on theserver1.example.comhost that points to theserver2.example.comhost.Delete a referral for a replicated suffix by using the
dsconfcommand with the--repl-del-refoption:# dsconf <server1_instance_name> replication set --suffix="ou=people,dc=example,dc=com" --repl-del-ref="ldap://server2.example.com:389"The command deletes the referral that points to the
server2.example.comhost.
Verification
List referrals for the replicated suffix:
# dsconf <server1_instance_name> replication get --suffix="ou=people,dc=example,dc=com" | grep nsDS5ReplicaReferralnsDS5ReplicaReferral: ldap://server2.example.com:389
4.2.2. Redirect requests for non-existent DNs to a different directory by using a default referral
Set up a default referral as a fallback solution when clients access a distinguished name (DN) that does not exist in the directory. This global redirect guides the client to a different LDAP server to continue the search.
This can occur, for example, after a migration to Red Hat Directory Server (RHDS) with a new directory structure. If a client application still expects the old directory structure, the default referral redirects these requests to the previous LDAP server when the application accesses DNs that do not exist.
Prerequisites
- The LDAP directory RHDS refers to exists.
- You have root permissions.
Procedure
Add the default referral:
# dsconf <server1_instance_name> config replace nsslapd-referral="ldap://server2.example.com/"The command adds a default referral to RHDS instance on server1, and if a client searches for an entry that does not exist, RHDS redirects the request to
server2.example.com.
Verification
Search for a non-existent DN by using an LDAP client that can handle LDAP referrals.
Note that the OpenLDAP client utilities do not support following LDAP referrals. For example, a search using the
ldapsearchutility returns only the referral information and not the actual result from the destination directory:# ldapsearch -H ldap://server1.example.com -x -D "cn=Directory Manager" -W -b "dc=<non_existent_DN>,dc=example,dc=com"... # search result search: 2 result: 10 Referral ref: ldap://server2.example.com/
4.2.3. Redirect requests for a specific entry to a different host or entry by using smart referrals
Configure smart referrals to automatically redirect a client request for an entry or a tree to a different LDAP server. The destination of the referral can be in the same directory or on a different host.
To use smart referrals, the entry you want to redirect, requires:
-
The
referralobject class -
The
refattribute set to the destination LDAP URL
The procedure updates an existing directory entry. Red Hat Directory Server then redirects requests for this entry to an entry on a different host.
Prerequisites
- The destination of the referral exists.
- You have root permissions.
Procedure
Add the
referralobject class and therefattribute to the entry that requires a redirect:# ldapmodify -D "cn=Directory Manager" -W -H ldap://server1.example.com -x << EOF dn: uid=example,ou=People,dc=example,dc=com changetype: modify add: objectclass objectclass: referral - add: ref ref: ldap://server2.example.com/uid=demo,ou=People,dc=example,dc=com EOF
modifying entry "uid=example,ou=People,dc=example,dc=com"
The
ref: ldap://server2.example.com/uid=demo,ou=People,dc=example,dc=comstatement in theuid=example,ou=People,dc=example,dc=comentry defines that RHDS redirects requests foruid=example,ou=People,dc=example,dc=comto theuid=demo,ou=People,dc=example,dc=comentry onserver2.example.com.
Verification
Search the entry that contains the newly added referral using an LDAP client that can handle referrals:
Note that the OpenLDAP client utilities do not support following LDAP referrals. For example, a search using the
ldapsearchutility returns only the referral information and not the actual result from the destination directory:# ldapsearch -H ldap://server1.example.com -x -D "cn=Directory Manager" -W -b "uid=example,ou=People,dc=example,dc=com"... # search result search: 2 result: 10 Referral ref: ldap://server2.example.com/uid=demo,ou=People,dc=example,dc=com
4.2.4. Redirect requests for a non-replicated suffix to a different host or entry by using the command line
By using a suffix referral, you can redirect requests from a non-replicated suffix and its sub-entries to a specific LDAP URL. The destination of the referral can be in the same directory or on a different host.
For example, configure a referral for the ou=People,dc=example,dc=com non-replicated suffix on server1.example.com. After the referral is configured, Red Hat Directory Server redirects requests for this suffix and sub-entries to the ou=users,dc=example,dc=com entry on server2.example.com.
Prerequisites
- The destination of the referral exists.
- You have root permissions.
Procedure
Optional: Identify the suffixes and databases that are already in use:
# dsconf <server1_instance_name> backend suffix list dc=example,dc=com (userroot) ...The name in parentheses is the database that stores the data of the corresponding suffix. You must choose a unique database name for the new sub-suffix in the next step.
Create the sub-suffix:
# dsconf <server1_instance_name> backend create --suffix="ou=people,dc=example,dc=com" --be-name="people" --parent-suffix="dc=example,dc=com"The command creates the
ou=people,dc=example,dc=comsub-suffix along with thepeopledatabase, under thedc=example,dc=comparent suffix.Add the referral to the
peopledatabase that holds the suffix you want to redirect:# dsconf <server1_instance_name> backend suffix set --add-referral="ldap://server2.example.com:389/ou=users,dc=example,dc=com" peopleUpdate the
peopledatabase status:# dsconf <server1_instance_name> backend suffix set --state=referral people
Verification
Use an LDAP client that can handle LDAP referrals, and search for the entry that contains the referral.
Note that the OpenLDAP client utilities do not support following LDAP referrals. For example, a search using the
ldapsearchutility returns only the referral information and not the actual result from the destination directory:# ldapsearch -H ldap://server1.example.com -x -D "cn=Directory Manager" -W -b "ou=people,dc=example,dc=com"... # search result search: 2 result: 10 Referral ref: ldap://server2.example.com/ou=users,dc=example,dc=com
4.2.5. Redirect requests for a non-replicated suffix to a different host or entry by using the web console
By using a suffix referral, you can redirect requests for a non-replicated suffix and its sub-entries to a specific LDAP URL. The destination of the referral can be in the same directory or on a different host.
For example, configure a referral for the ou=People,dc=example,dc=com non-replicated suffix on server1.example.com. After the referral is configured, Red Hat Directory Server (RHDS) redirects requests for this suffix and sub-entries to the ou=users,dc=example,dc=com entry on server2.example.com.
Prerequisites
- The destination of the referral exists.
- You are logged in to the instance in the web console.
Procedure
- Open the Database menu.
Create the sub-suffix that RHDS must redirect:
- Select an entry from the Suffixes list to which you want to add the sub-suffix.
- Click → .
-
Enter the first part of the sub-suffix distinguished name (DN),
ou=People, and a database name, suchpeople. -
In the Initialization Option field, select
Create The Top Suffix-Entry. - Click .
Create the referral for the new sub-suffix:
- Select the newly created sub-suffix from the list.
- Navigate to the Referrals tab and click .
Fill in the fields to create the referral URL:

- Click .
Update the database state:
- Select the sub-suffix from the list.
-
On the Settings tab, select
Referralfrom the Backend State field. - Click Save Configuration.
Verification
Use an LDAP client that can handle LDAP referrals, and search for the entry that contains the referral.
Note that the OpenLDAP client utilities do not support following LDAP referrals. For example, a search using the
ldapsearchutility returns only the referral information and not the actual result from the destination directory:# ldapsearch -H ldap://server1.example.com -x -D "cn=Directory Manager" -W -b "ou=people,dc=example,dc=com" ... # search result search: 2 result: 10 Referral ref: ldap://server2.example.com/ou=users,dc=example,dc=com
Additional resources
4.3. Using views to create a virtual directory hierarchy
Create virtual directory-tree (DIT) views to organize entries in custom groupings or hierarchies and thus navigate the standard DIT from various perspectives. This way you can save costs on management of your directory and make navigation through entries more intuitive to the users of your service.
4.3.1. About views
Virtual directory-tree views, or views, are an optional layer of structure in addition to your standard directory tree (DIT) to categorize and search entries in your DIT.
Using views, you can create virtual directory hierarchies, so it is easy to navigate entries, regardless of their placement in the standard DIT. A view uses attributes of entries to include them in the virtual hierarchy, similarly to members of a filtered role or a dynamic group. To client applications, views appear as ordinary container hierarchies.
This way, you can initially place entries in a flat DIT and use views to categorize the entries in complex hierarchies without the need to move the entries. Additionally, entries can appear in multiple views, which you cannot achieve with a standard DIT.
You can think of views as named filters. Each view is an entry of the nsView object class and may have the nsViewFilter attribute, which says what entries are visible in that view. It may be desirable to restrict the type of entries to be returned by specifying an object class in the filter.
You can use a view as a container of other views and thus create the virtual hierarchy. A nested view inherits filters from its ancestors and restricts the view by combining its filter and ancestor filters with an AND, such as (&(container filter)(view filter)).
When a search is performed with a view as the base, entries that match the filter are returned from this virtual search space. The entries only appear to be nested under the view virtually, but they can actually be stored at any position in the DIT.
You can create a testing instance and explore how views work on data imported from the example file located in /usr/share/dirsrv/data/Example-views.ldif.
Additional resources
4.3.2. Directory design considerations
To ensure efficient navigation and data organization, evaluate key directory design considerations. Use views in Red Hat Directory Server to organize data effectively and support the specific needs of your client applications.
When you design a directory tree (DIT), you naturally tend to categorize entries with hierarchies to reflect hierarchies in your organization. A standard DIT without views ties the position of an entry in the DIT to the distinguished name (DN) of the entry and therefore it is more suitable for use with fixed hierarchies.
Figure 4.4. Standard hierarchy DIT based on functional units

However, the nature of hierarchies in an organization is dynamic. Moving an entry in a standard DIT is time-consuming, because with every change of the position of the entry, the entry and all its descendants must also be renamed. This leads to service disruptions and additional expenses, especially in changes of top-level subtrees.
It is a good idea to design a flat hierarchy with categorization of resources by characteristics that do not change, such as the resource type (people, equipment, etc.), and capture this hierarchy in a standard flat DIT.
Figure 4.5. Standard flat DIT based on resource types

However, a flat DIT is not convenient for navigating the resources. Different users need to navigate the resources from different perspectives, such as an association with a functional unit or a geographical location, which would require additional tools or complex search queries in case of a flat DIT.
The solution to overcome the limitations of a flat DIT is provided by virtual hierarchies of views. Views allow creation of flexible hierarchies by separating the name of an entry from the position of the entry in the hierarchy. The virtual hierarchies are based on attributes instead.
Figure 4.6. DIT with virtual hierarchies of views

4.3.3. Benefits of using views
Using virtual directory-tree views has the benefits of custom flexible hierarchies that are more intuitive for users to navigate and for administrators more efficient to maintain than a deeply-nested standard directory tree (DIT).
- Flat and flexible naming
Views facilitate the use of a flat namespace for entries, because virtual DIT views provide navigational and managerial support similar to those provided by traditional hierarchies.
Whenever there is a change to the DIT, the entries never need to be moved; only the virtual DIT view hierarchies change. Because these hierarchies do not contain actual entries, they are simple and quick to modify.
- Reduction of costs in case of design errors
- Oversights during deployment planning are less catastrophic with virtual DIT views. If the hierarchy is not developed correctly in the first instance, it can be changed easily and quickly without disrupting the service.
- Fast and cheap maintenance
View hierarchies can be completely revised in minutes and the results instantly realized, significantly reducing the cost of directory maintenance.
Changes to a virtual DIT hierarchy are instantly realized. When an organizational change occurs, a new virtual DIT view can be created quickly. The new virtual DIT view can exist at the same time as the old view, thereby facilitating a more gradual changeover for the entries themselves and for the applications that use them. Because an organizational change in the directory is not an all-or-nothing operation, it can be performed over a period of time and without service disruption.
- Enhanced overall flexibility
Using multiple virtual DIT views for navigation and management allows for more flexible use of the directory service.
With the functionality provided by virtual DIT views, an organization can use both the old and new methods to organize directory data without any requirement to place entries at certain positions in the DIT.
- Intuitive user navigation
Views promote flexibility in working practices and reduce the requirement that directory users create complex search filters, using attribute names and values that they would otherwise have no need to know.
The flexibility of having more than one way to view and query directory information allows end users and applications to find what they need intuitively through hierarchical navigation.
- Shortcut to frequent search queries
- Virtual DIT view hierarchies can be created as a kind of ready-made queries to facilitate the retrieval of frequently-required information.
4.3.4. Compatibility of views with other features
When working with views, the search space is limited to entries under a single suffix. Users must base their search queries on a view to get results from a virtual hierarchy. Therefore, use entry grouping with roles and classes of service (CoS) in views to change the approach to access control.
- Multiple backends
Virtual DIT views are not entirely compatible with multiple backends.
The search is limited to a single back end, which means that the entries to be returned by the views must reside under the same suffix.
- Search space
The virtual search space is separate from the standard search space. The virtual search space is accessible only when a search is based on a view node with a filter. Otherwise it is a conventional search over the standard directory tree (DIT) that does not return entries contained under virtual DIT hierarchies.
For example, a search based on
dc=example,dc=comdoes not return any entries from the virtual search space of views; in fact, no virtual-search-space search is performed. Views processing occurs if the search base is such asou=Cupertino,ou=Location Views,dc=example,dc=com.This way, Directory Server ensures that the search does not result in entries from both places.
- Access control
- The use of views requires a slightly different approach to access control. Because there is currently no explicit support for access control lists (ACL) in views, create role-based ACL at the view parent and add the roles to the appropriate parts of the view hierarchy. In this way, take advantage of the organizational property of the hierarchy.
- Entries grouping
- Both class of service and roles in Directory Server support views. When adding a class of service or a role under a view hierarchy, the entries that are both logically and actually contained in the view are considered within scope. This means that roles and class of service can be applied using a virtual DIT view, but the effects of that application can be seen even when querying the flat namespace.
4.3.5. Compatibility of views with client applications
To avoid compatibility issues when connecting standard LDAP clients, understand how Red Hat Directory Server (RHDS) views interact with client applications. Views present entries from different locations as a unified subtree, so review the supported operations and limitations.
Virtual directory tree (DIT) views are designed to mimic standard DITs to a high degree. The existence of views should be transparent to most applications; there should be no indication that they are working with views. Except for a few specialized cases, there is no need for directory users to know that views are being used in a Directory Server instance; views appear and behave like standard DITs.
Certain types of applications may have problems working with a views-enabled directory service. For example:
Applications that use the distinguished name (DN) of a target entry to navigate up the DIT.
This type of application would find that it is navigating up the hierarchy in which the entry physically exists instead of the view hierarchy in which the entry was found. The reason for this is that views make no attempt to disguise the true location of an entry by changing the DN of the entry to conform to the view’s hierarchy.
This is by design - many applications would not function if the true location of an entry were disguised, such as those applications that rely on the DN to identify a unique entry. This upward navigation by deconstructing a DN is an unusual technique for a client application, but, nonetheless, those clients that do this may not function as intended.
Applications that use the
numSubordinatesoperational attribute to determine how many entries exist beneath a node.For the nodes in a view, this is currently a count of only those entries that exist in the standard search space, ignoring the virtual search space. Consequently, applications may not evaluate the view in a search.
4.3.6. Creating a view
To define a virtual subtree that presents entries from other parts of the directory tree in Red Hat Directory Server, create a view.
Procedure
Add a view entry with the
ldapaddutility:# ldapadd -D "cn=Directory Manager" -W -H ldap://server.example.com -xThe
ldapaddutility requests you to provide thensViewobject class and define a view filter in thensViewFilterattribute in the LDIF statement:dn: ou=PeopleInRoom0466,dc=example,dc=com objectClass: top objectClass: organizationalUnit objectClass: nsView ou: PeopleInRoom0466 description: People in the room 0466 nsViewFilter: (&(objectClass=inetOrgPerson)(roomNumber=0466))
Verification
Perform a search with the view as the search base:
# ldapsearch -D "cn=Directory Manager" -W -H ldap://server.example.com -x -b ou=PeopleInRoom0466,dc=example,dc=com
4.3.7. Creating indexes to improve the performance of views by using the command line
To improve the performance of directory views and optimize search queries in Red Hat Directory Server (RHDS), index entryid and parentid or other attributes in the nsViewFilter by using the command line.
Views are derived from search results based on a given filter. A part of the filter are the attributes given explicitly in the nsViewFilter; the rest of the filter is based on the entry hierarchy, looking for the entryid and parentid operational attributes of the actual entries included in the view.
(|(parentid=search_base_id)(entryid=search_base_id)
If any of the searched attributes — entryid, parentid, or the attributes in the nsViewFilter — are not indexed, then the search becomes partially unindexed and RHDS searches the entire directory tree for matching entries.
To improve views performance, create the indexes as follows:
-
Create equality index (
eq) forentryid. Theparentidattribute is indexed in the system index by default. -
If a filter in
nsViewFiltertests presence (attribute=*), then create presence index (pres) for the attribute being tested. You should use this index type only with attributes that appear in a minority of directory entries. -
If a filter in
nsViewFiltertests equality (attribute=value), create equality index (eq) for the attribute being tested. -
If a filter in
nsViewFiltertests a substring (attribute=value*), create substring index (sub) for the attribute being tested. -
If a filter in
nsViewFiltertests approximation (attribute~=value), create approximate index (approximate) for the attribute being tested.
For example, when you use the following view filter:
nsViewFilter: (&(objectClass=inetOrgPerson)(roomNumber=*66))
you should index objectClass with the equality index, which is done by default, and roomNumber with the substring index.
Prerequisites
- You are aware of the attributes that you use in a view filter.
Procedure
Optional: List the back ends to determine the database to index:
# dsconf <instance_name> backend suffix listdc=example,dc=com (userroot)
Note the selected database name (in parentheses).
Create index configuration with the
dsconfigutility for the selected back-end database.Specify the attribute name, index type, and, optionally, matching rules to set collation order (OID), especially in case of an internationalized instance.
# dsconf <instance_name> backend index add --attr roomNumber --index-type sub userrootRepeat this step for each attribute used in the view filter.
Reindex the database to apply the new indexes:
# dsconf <instance_name> backend index reindex userroot
Verification
Perform a search that is based on the standard directory tree with the same filter that you use in the view:
# ldapsearch -D "cn=Directory Manager" -W -H ldap://server.example.com -x -b dc=example,dc=com (&(objectClass=inetOrgPerson)(roomNumber=*66))
# ldapsearch -D "cn=Directory Manager" -W -H ldap://server.example.com -x -b dc=example,dc=com "(&(objectClass=inetOrgPerson)(roomNumber=*66))"
View the access log in
/var/log/dirsrv/slapd-<instance_name>/access.The
RESULTof your search should not containnote=UorPartially Unindexed Filterin the details.
Additional resources
4.3.8. Creating indexes to improve the performance of views by using the web console
To improve the performance of directory views and optimize search queries in Red Hat Directory Server (RHDS), index entryid and parentid or other attributes in the nsViewFilter by using the web console.
Views are derived from search results based on a given filter. Part of the filter are the attributes given explicitly in the nsViewFilter; the rest of the filter is based on the entry hierarchy, looking for the entryid and parentid operational attributes of the actual entries included in the view.
(|(parentid=search_base_id)(entryid=search_base_id)
If any of the searched attributes — entryid, parentid, or the attributes in the nsViewFilter — are not indexed, then the search becomes partially unindexed and Directory Server searches the entire directory tree for matching entries.
To improve views performance, create the indexes as follows:
-
Create equality index (
eq) forentryid. Theparentidattribute is indexed in the system index by default. -
If a filter in
nsViewFiltertests presence (attribute=*), then create presence index (pres) for the attribute being tested. You should use this index type only with attributes that appear in a minority of directory entries. -
If a filter in
nsViewFiltertests equality (attribute=value), create equality index (eq) for the attribute being tested. -
If a filter in
nsViewFiltertests a substring (attribute=value*), create substring index (sub) for the attribute being tested. -
If a filter in
nsViewFiltertests approximation (attribute~=value), create approximate index (approximate) for the attribute being tested.
For example, when you use the following view filter:
nsViewFilter: (&(objectClass=inetOrgPerson)(roomNumber=*66))
you should index objectClass with the equality index, which is done by default, and roomNumber with the substring index.
Prerequisites
- You are logged in to the RHDS instance in the web console.
- You are aware of the attributes that you use in a view filter.
Procedure
- Under Database, select a suffix from the configuration tree for which you want to create an index.
- Navigate to Indexes and Database Indexes.
- Click the button.
- Type the name of the attribute and select the attribute.
- Select the Index Types that should be created for this attribute.
- Optionally, add Matching Rules to specify collation order (OID), especially in case of an internationalized instance.
- Select Index attribute after creation to rebuild the index afterwards.
- Click .
- Repeat the steps for each attribute to be indexed.
Verification
- Filter Indexes by typing the name of the added attribute.
- The newly indexed attribute should appear in the results.
Additional resources
4.4. Switching a database to read-only mode
Temporarily switch a specific database to read-only mode in Red Hat Directory Server to prevent data modifications during maintenance period, for example, before a backup or a manual initialization of a consumer. Enabling this local setting prevents users from creating, modifying, or deleting entries.
By default, Red Hat Directory Server databases run in read-write mode.
4.4.1. Switching a database to read-only mode using the command line
You can protect specific database from modifications during maintenance by switching the database to read-only mode. This prevents write operations while keeping the data searchable for clients.
Prerequisites
- The database is in read-write mode.
- The database is not used in replication, since enabling read-only mode disables replication.
Procedure
List the suffixes and their corresponding databases:
# dsconf <instance_name> backend suffix listdc=example,dc=com (userroot) o=test (test_database)
Note the name or suffix of the database that you want to switch.
Enable read-only mode with the
--enable-readonlyparameter and specify the database either by name or suffix:# dsconf <instance_name> backend suffix set --enable-readonly "test_database"
Verification
Attempt a write operation to the directory, such as:
# ldapmodify -D "cn=Directory Manager" -W -H ldap://server.example.com -xThe
ldapmodifyutility requests you to provide the LDIF statement with the write operation details:dn: dc=example,dc=com changetype: modify add: description description: foo
The server should refuse to perform.
modifying entry "dc=example,dc=com"
ldap_modify: Server is unwilling to perform (53)
	additional info: Server is read-only
Additional resources
4.4.2. Switching a database to read-only mode using the web console
You can protect specific database from modifications during maintenance by switch the database to read-only mode. This prevents write operations while keeping the data searchable for clients.
Prerequisites
- The database is in read-write mode.
- The database is not used in replication, since enabling read-only mode disables replication.
- You are logged in to the instance in the web console.
Procedure
-
Under
Database, select the suffix in the configuration tree. -
Check the
Database Read-Only Modeoption. - Click .
Verification
Attempt a write operation to the directory, such as:
# ldapmodify -D "cn=Directory Manager" -W -H ldap://server.example.com -xThe
ldapmodifyutility requests you to provide the LDIF statement with the write operation details:dn: dc=example,dc=com changetype: modify add: description description: Example description
The server should refuse to perform.
modifying entry "dc=example,dc=com"
ldap_modify: Server is unwilling to perform (53)
	additional info: Server is read-only
4.4.3. Additional resources
4.5. Switching an instance to read-only mode
Temporarily switch a Red Hat Directory Server instance to read-only mode to restrict write operations for the entire server. Enabling this global setting protects data consistency during critical maintenance tasks, backups, or reindexing, while ensuring that client applications can still perform search operations.
By default, instances run in read-write mode. If Red Hat Directory Server maintains more than one database and all databases need to be switched to read-only, you can do this in a single operation, on the command line or in the web console.
In read-only mode, you cannot restart the instance, but you may still modify the configuration.
If you stop an instance in read-only mode, you cannot start it again until you manually disable read-only mode.
To disable read-only mode manually, open the /etc/dirsrv/slapd-instance_name/dse.ldif file, navigate to the cn=config section, and set the nsslapd-readonly parameter to off.
4.5.1. Switching an instance to read-only mode using the command line
You can protect all directory data from modifications by switching the entire server to read-only mode. This prevents write operations while keeping the data searchable for clients.
Prerequisites
- The instance is in read-write mode.
- The instance is not used in replication, since enabling read-only mode disables replication.
Procedure
Set the
nsslapd-readonlyparameter toon:# dsconf <instance_name> config replace nsslapd-readonly=on
Verification
Attempt a write operation to the directory, such as:
# ldapmodify -D "cn=Directory Manager" -W -H ldap://server.example.com -xThe
ldapmodifyutility requests you to provide the LDIF statement with the write operation details:dn: dc=example,dc=com changetype: modify add: description description: foo
The server should refuse to perform.
modifying entry "dc=example,dc=com"
ldap_modify: Server is unwilling to perform (53)
	additional info: Server is read-only
Additional resources
4.5.2. Switching an instance to read-only mode using the web console
You can protect all directory data from modifications by switching the entire server to read-only mode. This prevents write operations while keeping the data searchable for clients.
Prerequisites
- The instance is in read-write mode.
- The instance is not used in replication, since enabling read-only mode disables replication.
- You are logged in to the instance in the web console.
Procedure
- Under Server, select the Advanced Settings tab.
- Check the Server Read-Only option.
- Click .
Verification
Attempt a write operation to the directory, such as:
# ldapmodify -D "cn=Directory Manager" -W -H ldap://server.example.com -xThe
ldapmodifyutility requests you to provide the LDIF statement with the write operation details:dn: dc=example,dc=com changetype: modify add: description description: foo
The server should refuse to perform.
modifying entry "dc=example,dc=com"
ldap_modify: Server is unwilling to perform (53)
	additional info: Server is read-only
Additional resources
4.6. Deleting a database of a suffix that is no longer needed
Delete databases of suffixes that are not in use anymore to reclaim disk space on your Directory Server host.
4.6.1. Deleting a database using the command line
To erases the suffix and its associated entries, delete a database in Red Hat Directory Server.
Procedure
List suffixes and their corresponding databases:
# dsconf <instance_name> backend suffix listdc=example,dc=com (userroot) o=test (test_database)
Note the name of the database that you want to delete.
Enter the
dsconf backend deletecommand and specify the name of the database:# dsconf <instance_name> backend delete "test_database"Confirm the deletion by typing "Yes I am sure" in the prompt:
Deleting Backend cn=test_database,cn=ldbm database,cn=plugins,cn=config:
Type 'Yes I am sure' to continue: Yes I am sure
Verification
List the suffixes/databases:
# dsconf <instance_name> backend suffix listdc=example,dc=com (userroot)
4.6.2. Deleting a database using the web console
To erases the suffix and its associated entries, delete a database in Red Hat Directory Server (RHDS).
Prerequisites
- You are logged in to the RHDS instance in the web console.
Procedure
- Under Database, select the suffix that you want to delete.
- Navigate to → .
- Select Yes, I am sure..
- Click .
Verification
- Under Database, review the list of suffixes in the configuration tree.
4.7. Performing a database integrity check
To detect problems, such as corrupt metadata pages and the sorting of duplicate keys, verify the integrity of Red Hat Directory Server backend databases by using the dsctl dbverify command. In case of problems, you can re-index the database or restore a backup.
Procedure
Optional: List the back-end databases of the instance:
# dsconf <instance_name> backend suffix listdc=example,dc=com (userRoot)
Stop the instance:
# dsctl <instance_name> stopVerify the database. For example, to verify the
userRootdatabase, enter:# dsctl <instance_name> dbverify userRoot[04/Feb/2022:13:11:02.453624171 +0100] - INFO - ldbm_instance_config_cachememsize_set - force a minimal value 512000 [04/Feb/2022:13:11:02.465339507 +0100] - WARN - ldbm_instance_add_instance_entry_callback - ldbm instance userroot already exists [04/Feb/2022:13:11:02.468060144 +0100] - ERR - ldbm_config_read_instance_entries - Failed to add instance entry cn=userroot,cn=ldbm database,cn=plugins,cn=config [04/Feb/2022:13:11:02.471079045 +0100] - ERR - bdb_config_load_dse_info - failed to read instance entries [04/Feb/2022:13:11:02.476173304 +0100] - ERR - libdb - BDB0522 Page 0: metadata page corrupted [04/Feb/2022:13:11:02.481684604 +0100] - ERR - libdb - BDB0523 Page 0: could not check metadata page [04/Feb/2022:13:11:02.484113053 +0100] - ERR - libdb - /var/lib/dirsrv/slapd-instance_name/db/userroot/entryrdn.db: BDB0090 DB_VERIFY_BAD: Database verification failed [04/Feb/2022:13:11:02.486449603 +0100] - ERR - dbverify_ext - verify failed(-30970): /var/lib/dirsrv/slapd-<instance_name>/db/userroot/entryrdn.db dbverify failed
- If the verification process reported any problems, fix them manually or restore a backup.
Start the instance:
# dsctl <instance_name> start
Additional resources
4.8. Managing attribute encryption
Manage attribute encryption in Red Hat Directory Server to protect sensitive data stored in the directory. Encrypting specific attributes helps you to secure confidential information at the field level, ensuring that data remains unreadable to unauthorized users even if the database files are compromised.
Directory Server offers a number of mechanisms to secure access to sensitive data in the directory. However, by default, the server stores data unencrypted in the database. For highly sensitive information, the potential risk that an attacker could gain access to the database, can be a significant risk.
With the attribute encryption, you can store specific attributes with sensitive data, such as government identification numbers, encrypted in the database. When enabled for a suffix, every instance of these attributes, even the index data, is encrypted for every entry stored in this attribute in the database. Note that you can enable attribute encryption for suffixes. To enable this feature for the whole server, you must enable attribute encryption for each suffix on the server. Attribute encryption is fully compatible with eq and pres indexing.
Any attribute you use within the entry distinguished name (DN) cannot be efficiently encrypted. For example, if you have configured to encrypt the uid attribute, the value is encrypted in the entry, but not in the DN:
dn: uid=demo_user,ou=People,dc=example,dc=com
...
uid::Sf04P9nJWGU1qiW9JJCGRg==
4.8.1. Keys Directory Server uses for attribute encryption
To use attribute encryption, you must configure encrypted connections using TLS. Red Hat Directory Server (RHDS) uses the server’s TLS encryption key and the same PIN input methods for attribute encryption.
The server uses randomly generated symmetric cipher keys to encrypt and decrypt attribute data. The server wraps these keys using the public key from the server’s TLS certificate. As a consequence, the effective strength of the attribute encryption cannot be higher than the strength of the server’s TLS key.
Without access to the server’s private key, it is not possible to recover the symmetric keys from the wrapped copies. Therefore, back up the server’s certificate database regularly. If you lose the key, you will no longer be able to decrypt and encrypt data stored in the database.
4.8.2. Enabling attribute encryption by using the command line
To protect sensitive data stored in the directory, enable attribute encryption in Red Hat Directory Server (RHDS).
For example, enable attribute encryption for the telephoneNumber attribute in the userRoot database using the command line. After you perform the procedure, the server stores existing and new values of this attribute AES-encrypted.
Prerequisites
- You have enabled TLS encryption in RHDS.
Procedure
Export the
userRootdatabase:# dsconf <instance_name> backend export -E userRootThe server stores the export in an LDIF file in the
/var/lib/dirsrv/slapd-instance_name/ldif/directory. The-Eoption decrypts attributes that are already encrypted during the export.Enable AES encryption for the
telephoneNumberattribute:# dsconf <instance_name> backend attr-encrypt --add-attr telephoneNumber dc=example,dc=comStop the instance:
# dsctl <instance_name> stopImport the LDIF file:
# dsctl <instance_name> ldif2db --encrypted userRoot /var/lib/dirsrv/slapd-instance_name/ldif/None-userroot-2022_01_24_10_28_27.ldifThe
--encryptedparameter enables the script to encrypt attributes configured for encryption during the import.Start the instance:
# dsctl <instance_name> start
Additional resources
4.8.3. Enabling attribute encryption by using the web console
To protect sensitive data stored in the directory, enable attribute encryption in Red Hat Directory Server (RHDS).
For example, enable attribute encryption for the telephoneNumber attribute in the userRoot database using the web console. After you perform the procedure, the server stores existing and new values of this attribute AES-encrypted.
Note that the export and import features in the web console do not support encrypted attributes. Therefore, you must perform these steps on the command line.
Prerequisites
- You have enabled TLS encryption in RHDS.
- You are logged in to the RHDS instance in the web console.
Procedure
Export the
userRootdatabase:# dsconf <instance_name> backend export -E userRootThe server stores the export in an LDIF file in the
/var/lib/dirsrv/slapd-instance_name/ldif/directory. The-Eoption decrypts attributes that are already encrypted during the export.- In the web console, navigate to → → → .
- Enter the attribute to encrypt, and click .
- In the menu, select Stop Instance.
On the command line, import the LDIF file:
# dsctl <instance_name> ldif2db --encrypted userRoot /var/lib/dirsrv/slapd-instance_name/ldif/None-userroot-2022_01_24_10_28_27.ldifThe
--encryptedparameter enables the script to encrypt attributes configured for encryption during the import.-
In the web console, open the menu, and select
Start Instance.
Additional resources
4.8.4. General considerations after enabling attribute encryption
Because encryption modifies how data is stored and accessed, understanding the effects on performance, backups, and replication enables you to adjust your maintenance procedures and avoid potential service interruptions.
Consider the following points after you have enabled encryption for data that is already in the database:
Unencrypted data can persist in the server’s database page pool backing file. To remove this data:
Stop the instance:
# dsctl <instance_name> stopRemove the
/var/lib/dirsrv/slapd-<instance_name>/db/guardianfile:# rm /var/lib/dirsrv/slapd-<instance_name>/db/guardianStart the instance:
# dsctl <instance_name> start
- After you enabled have encryption and successfully imported the data, delete the LDIF file with the unencrypted data.
- Directory Server does not encrypt the replication log file. To protect this data, store the replication log on an encrypted disk.
- Data in the server’s memory (RAM) is unencrypted and can be temporarily stored in swap partitions. To protect this data, configure encrypted swap space.
Even if you delete files that contain unencrypted data, this data can be restored under certain circumstances.
4.8.5. Updating the TLS certificates used for attribute encryption
To prevent attribute encryption failure after renewing or replacing the TLS certificate, correctly update these TLS certificates.
Prerequisites
- You configured attribute encryption.
- The TLS certificate will expire in the near future.
Procedure
Export the
userRootdatabase:# dsconf <instance_name> backend export -E userRootThe server stores the export in an LDIF file in the
/var/lib/dirsrv/slapd-instance_name/ldif/directory. The-Eoption decrypts attributes that are already encrypted during the export.Create a private key and a certificate signing request (CSR). Skip this step if you want to create them using an external utility.
If your host is reachable only by one name, enter:
# dsctl <instance_name> tls generate-server-cert-csr -s "CN=server.example.com,O=example_organization"If your host is reachable by multiple names:
# dsctl <instance_name> tls generate-server-cert-csr -s "CN=server.example.com,O=example_organization" server.example.com server.example.netIf you specify the host names as the last parameter, the command adds the Subject Alternative Name (SAN) extension with the
DNS:server.example.com, DNS:server.example.netentries to the CSR.
The string specified in the
-s subjectparameter must be a valid subject name according to RFC 1485. TheCNfield in the subject is required, and you must set it to one of the fully-qualified domain names (FQDN) of the server. The command stores the CSR in the/etc/dirsrv/slapd-<instance_name>/Server-Cert.csrfile.- Submit the CSR to the certificate authority (CA) to get a certificate issued. For further details, see your CA’s documentation.
Import the server certificate issued by the CA to the NSS database:
If you created the private key using the
dsctl tls generate-server-cert-csrcommand, enter:# dsconf <instance_name> security certificate add --file /root/instance_name.crt --name "server-cert" --primary-certRemember the name of the certificate you set in the
--name _certificate_nicknameparameter. You require it in a later step.If you created the private key using an external utility, import the server certificate and the private key:
# dsctl <instance_name> tls import-server-key-cert /root/server.crt /root/server.keyNote that the command requires you to specify the path to the server certificate first and then the path to the private key. This method always sets the nickname of the certificate to
Server-Cert.
Import the CA certificate to the NSS database:
# dsconf <instance_name> security ca-certificate add --file /root/ca.crt --name "Example CA"Set the trust flags of the CA certificate:
# dsconf <instance_name> security ca-certificate set-trust-flags "Example CA" --flags "CT,,"This configures Directory Server to trust the CA for TLS encryption and certificate-based authentication.
Stop the instance:
# dsctl <instance_name> stopEdit the
/etc/dirsrv/slapd-<instance_name>/dse.ldiffile, and remove the following entries including their attributes:-
cn=AES,cn=encrypted attribute keys,cn=database_name,cn=ldbm database,cn=plugins,cn=config -
cn=3DES,cn=encrypted attribute keys,cn=database_name,cn=ldbm database,cn=plugins,cn=config
ImportantRemove the entries for all databases. If any entry that contains the
nsSymmetricKeyattribute is left in the/etc/dirsrv/slapd-<instance_name>/dse.ldiffile, Directory Server will fail to start.-
Import the LDIF file:
# dsctl <instance_name> ldif2db --encrypted userRoot /var/lib/dirsrv/slapd-instance_name/ldif/None-userroot-2022_01_24_10_28_27.ldifThe
--encryptedparameter enables the script to encrypt attributes configured for encryption during the import.Start the instance:
# dsctl <instance_name> start
4.9. Creating and maintaining database links
You can use database links to implement a chaining process, where a server contacts other servers on behalf of a client application and then returns the combined results.
When a client application requests data from a database link, it retrieves the data from the remote database and returns the data to the client.
4.9.1. Creating a new database link
To establish a connection with a remote Red Hat Directory Server (RHDS) instance, create a new database link. With the link, the chaining backend forwards LDAP requests to an external instance, ensuring that client operations are correctly routed and processed within a distributed directory environment.
Basic database link configuration requires the following information:
Suffix informationThe suffix information must correspond to the suffix on the remote server that contains the data. You can create suffix in the directory tree managed by the database link.
Bind credentialsWhen the database link binds to a remote server, it impersonates a user, and this specifies the
DNand the credentials for each database link to use to bind with remote servers.LDAP URLThe
LDAP URLinformation provides theLDAP URLof the remote server to which the database link connects. URL consists of the protocol (LDAPorLADPS), the host name or IP address (IPv4orIPv6) for the server, and the port.List of failover serversThe list of failover servers is a list of alternative servers for the database link to contact in the case of a failure and is optional.
If secure binds are required for simple password authentication, using a secure connection (TLS and STARTTLS connections or the SASL authentication) is recommended when any chaining operations are performed .
4.9.2. Creating a new database link by using the command line
To establish a connection with a remote server, create a new database link in Red Hat Directory Server (RHDS) by using the dsconf chaining link-create command.
Prerequisites
- You have root permissions.
Procedure
Create a new database link:
# dsconf <instance_name> chaining link-create --suffix="ou=Customers,dc=example,dc=com" --server-url="ldap://remote_server.example.com:389" --bind-mech=SIMPLE --bind-dn="cn=proxy_user,cn=config" --bind-pw="password" "example_chain_name"By using this command, you create the database link named
example_chain_nameforou=Customers,dc=example,dc=comwhich refers to theldap://remote_server.example.com:389server and uses the specified bindDNandpasswordto authenticate. You must set bind-mech toSIMPLE(EXTERNALfor certificate based authentication) orGSSAPIfor kerberos authentication.Display additional settings that you can set when you create the database link:
# dsconf <instance_name> chaining link-create --helpNoteTo grant the
proxy_userthe rights to access data, you must create the proxy ACI entry in thedc=example,dc=comsuffix on remote server.
Verification
Display the new database link:
# dsconf <instance_name> chaining link-get <example_chain_name>
4.9.3. Creating a new database link by using the web console
To establish a connection with a remote server, create a new database link in Red Hat Directory Server (RHDS) by using the web console.
Prerequisites
- You have opened the RHDS user interface in the web console and selected the instance.
Procedure
- Open the Database menu.
Create a new suffix:
- Click button.
-
Enter the
DNsuffix and back end name. - Select Create The Top Suffix Entry and click .
- Select the suffix, click button on the right side, and select Create Database Link.
- Fill the fields with the details about the connection to the remote server.
- Click .
Verification
- Open the Database menu and ensure that the new database link appears in this menu.
4.9.4. Managing the default configuration for new database links
To define the standard settings inherited by future chaining connections in Red Hat Directory Server, configure the default settings for new database links. Use the dsconf chaining command to manage these defaults and ensure consistent configuration across all new backend links.
Procedure
Display the current default values of the database link:
# dsconf <instance_name> chaining config-get-defUse the
dsconf chaining config-set-defcommand to change the new database links configuration. For example, to set theresponse-delayparameter to30, run:# dsconf <instance_name> chaining config-set-def --response-delay 30The example command sets the default response timeout for all chaining connections. You can overwrite the response timeout for a specific chaining link by using the
dsconf instance chaining link-setcommand.To see the list of all parameters you can set, run:
# dsconf <instance_name> chaining config-set-def --help
4.10. Settings required for creating a database link
When creating a database link, you must configure the suffix, bind credentials, bind mechanisms and LDAP URL settings.
4.10.1. Bind credentials
You can chain request from a client application to remote server by using specific bind credentials. The chained suffix on the remote server must have an Access Control Instruction (ACI) that allows proxy authorization to the user.
Without bind credentials, a database link binds to the remote server as anonymous.
When you enable chaining, carefully examine access controls to avoid providing access to restricted areas of a directory. For example, a user that connects by using the database link can see all entries below the branch. To restrict access to the subtree when not all subtrees must be visible to the user, create an additional ACI to avoid any security issues.
When a client application creates or modifies entries by using database links, the creatorsName and modifiersName attributes do not reflect the real creator or modifier of the entries. These attributes contain the name of the administrative user granted proxied authorization rights on the remote data server.
Providing bind credentials involves the following steps on the remote server:
-
Creating an administrative user, such as
cn=proxy_user,cn=config, for the database link. - Providing proxy access rights for the administrative user created in the previous step on the target subtree chained by using the database link.
For example, the following ACI grants read-only access to the cn=proxy_admin,cn=config user to access data contained on the remote server only within the subtree where the ACI is set.
aci: (targetattr = "*")(version 3.0; acl "Proxied authorization
     for database links"; allow (proxy) userdn = "ldap:///cn=proxy_admin
,cn=config";)When a user binds to a database link, the user’s identity is sent to the remote server. Access controls are always evaluated on the remote server. To allow the user to modify or write the data to the remote server, set up the correct access controls on the remote server.
Additional resources
4.10.2. LDAP URL in a database link
Identify the remote server that the database link connects with by using LDAP URL on a server containing the database link. The URL of the remote server does not specify a suffix and is in the ldap://host_name:port form.
The remote server uses the LDAPS protocol instead of LDAP in the URL and points to the secure port of the server, when you connect the database link to the remote server by using LDAP over TLS, for example:
ldaps://africa.example.com:636/
You must enable TLS on the local Directory Server and the remote Directory Server to be chained over. When the database link and the remote server communicate by using TLS, the client application that creates operation request can bind by using the normal port and not necessarily use TLS for communication.
Additional resources
4.10.3. Bind mechanisms
When creating a database link, set bind mechanisms that determine how a local server connects to a remote one. If you require secure binds, select the right bind mechanism to safely perform chaining operations and verify server identities.
You can connect a local server to a remote server either of the following ways:
-
By using a standard
LDAPport. -
By using a dedicated
LDAPSport. -
By using the
STARTTLSconnection, which is more secure connection than a standard port.
If secure binds are required for simple password authentication, using a secure connection (TLS and STARTTLS connections or SASL authentication) is recommended when you perform any chaining operation.
The local server can use following methods to authenticate to the remote server:
EMPTYWhen using the
EMPTYmethod, the local server performs simple authentication and requires a bind DN and a password if bind mechanism is not set.EXTERNALWhen using the
EXTERNALmethod, the local server applies the TLS certificate to authenticate the local server to the remote server. Note that you must either set the local server URL to the secure URL (ldaps) or thensUseStartTLSattribute toon. Additionally, you must configure the remote server to map the local server’s certificate to its bind identity.DIGEST-MD5When using the
DIGEST-MD5method, the local server applies theSASLauthentication with theDIGEST-MD5encryption. Similarly to simple authentication, this type of authentication requires thensMultiplexorBindDNandnsMultiplexorCredentialsattributes to give the bind information.GSSAPIWhen using the
GSSAPImethod, the local server applies theKerberos-basedauthentication over theSASLauthentication.You can configure the local server with a
Kerberoskeytab, and the remote server must configure a definedSASLmapping for the local server’s bind identity.
SASL connections can establish over standard connections or TLS connections. You can configure local server to chain the SASL and password policy components when SASL is used.
Additional resources
4.11. Configuring the chaining policy
You can configure Red Hat Directory Server to chain requests from client applications to Directory Server containing database links. Chaining policy applies to all database links created on Directory Server.
4.11.1. Chaining component operations
To control how Red Hat Directory Server (RHDS) forwards specific LDAP requests, such as binds, searches, and modifications, to remote backends, use chaining component operations in Red Hat Directory Server (RHDS).
A component is any functional unit in the server that uses internal operations, for example, a plug-in or function in the front end.
Some components send internal LDAP requests to the server, expecting to access local data only. For such components, you must control the chaining policy so that the components can complete there operations successfully. For example, the certificate verification function. You can chain the LDAP request made by the function to check certificates that implies the remote server is trusted. If the remote server is not trusted, then there is a security problem.
By default, you cannot chain all the internal operations and any component, but the default can be overridden.
Additionally, you must create an ACI on the remote server to enable the specified plug-in to perform its operation on the remote server. The ACI must exist in the suffix assigned to database link.
The following are component names, their potential side-effects of when you allow these components to chain internal operations, and the permissions the components need in the ACI on the remote server:
The
ACI plug-incomponentThe
ACI plug-incomponent implements access control. You cannot chain operations used to retrieve and updateACIattributes because it not safe to mix the local and the remote attributes. However, you can chain requests used to retrieve user entries by setting the following chaining components attribute:nsActiveChainingComponents: cn=ACI Plugin,cn=plugins,cn=config
Permissions: Read, search, and compare.
The
resource limitcomponentThe
resource limitscomponent sets server limits depending on the user bind DN. If you chain the resource limitation component, you can apply resource limits on the remote users. To chain resource limit component operations, add the following chaining component attribute:nsActiveChainingComponents: cn=resource limits,cn=components,cn=config
Permissions: Read, search, and compare.
The
certificate-based authenticationcomponentYou can use the
certificate-based authenticationcomponent during the external bind method.This component retrieves user certificates from the database on the remote server. When you allow this component to chain, it enables certificate-based authentication to work with the database link. To chain this component’s operations, add the following chaining component attribute:nsActiveChainingComponents: cn=certificate-based authentication,cn=components,cn=config
Permissions: Read, search, and compare.
The
password policycomponentThe
password policycomponent addsSASLbinds to the remote server. Authenticating with a user name and password is essential for some forms of SASL authentication. When you enable the password policy, it allows the server to verify and implement the specific authentication method requested and to apply the appropriate password policies. To chain this component’s operations, add the chaining component attribute:nsActiveChainingComponents: cn=password policy,cn=components,cn=config
Permissions: Read, search, and compare.
The
SASLcomponentThe
SASLcomponent allows SASL to bind to the remote server. To chain this component’s operations, add the chaining component attribute:nsActiveChainingComponents: cn=password policy,cn=components,cn=config
Permissions: Read, search, and compare.
The
referential integrity postoperationcomponentThe
referential integrity postoperationcomponent propagates updates made to attributes containing DNs to the entries that contain pointers to the attributes. For example, you can automatically remove an entry from a group when group is deleted. By using thereferential integrity postoperationplug-in together with the chaining simplifies the management of static group when the group members are remote to the static group definition.nsActiveChainingComponents: cn=referential integrity postoperation,cn=plugins,cn=config
Permissions: Read, search, and compare.
The
attribute UniquenesscomponentThe
attribute Uniquenesscomponent validates that all the values for a specified attribute are unique. When you chain the plug-in, it confirms that attribute values are unique even when attributes are changed through a database link. To chain this component’s operations, add the chaining component attribute:nsActiveChainingComponents: cn=attribute uniqueness,cn=plugins,cn=config
Permissions: Read, search, and compare.
The
rolescomponentThe
rolescomponent chains the roles and roles assignments for the entries in a database. When you chain this component, it maintains the roles even on chained databases. To chain this component’s operations, addthe chaining component attribute:nsActiveChainingComponents: cn=roles,cn=components,cn=config
Permissions: Read, search, and compare.
You cannot chain Roles plug-in, Password policy component, Replication plug-in, and Referential Integrity plug-in components. When you enable the Referential Integrity plug-in on servers that issue chaining requests, ensure that you analyzed the performance, resource, time, and integrity needs. Not that integrity checks can be time-consuming and draining on memory and CPU.
4.11.2. Chaining component operations using the command line
Add a component allowed to chain by using the command line to manage your distributed directory data.
Procedure
Specify the components to include in chaining:
# dsconf <instance_name> chaining config-set \
--add-comp="cn=referential integrity postoperation,cn=components,cn=config"
Restart the instance:
# dsctl <instance_name> restartCreate an ACI in the suffix on the remote server to which the operation will be chained:
# ldapmodify -D "cn=Directory Manager" -W -H 389 remoteserver.example.com -xThe
ldapmodifyutility requests you to provide the LDIF statement with the ACIs details:dn: ou=People,dc=example,dc=com changetype: modify add: aci aci: (targetattr = "*")(target="ldap:///ou=customers,ou=People,dc=example,dc=com") (version 3.0; acl "RefInt Access for chaining"; allow (read,write,search,compare) userdn = "ldap:///cn=referential integrity postoperation,cn=plugins,cn=config";)
Verification
Display the components allowed to chain:
# dsconf <instance_name> chaining config-set \
--add-comp="cn=referential integrity postoperation,cn=components,cn=config"
4.11.3. Chaining component operations using the web console
To manage your distributed directory data, add a component that can be chained by using the web console.
Prerequisites
- You have opened the Directory Server user interface in the web console and selected the instance.
Procedure
- Open the Database menu.
- In the navigation on the left, select the Chaining Configuration entry.
- Click the button below the components to Chain field.
- Select the component that you want to chain, and click .
Create ACI in the suffix on the remote server to which the operation will be chained:
# ldapmodify -D "cn=Directory Manager" -W -H 389 remoteserver.example.com -xThe
ldapmodifyutility requests you to provide the LDIF statement with the ACIs details:dn: ou=People,dc=example,dc=com changetype: modify add: aci aci: (targetattr = "*")(target="ldap:///ou=customers,ou=People,dc=example,dc=com") (version 3.0; acl "RefInt Access for chaining"; allow (read,write,search,compare) userdn = "ldap:///cn=referential integrity postoperation,cn=plugins,cn=config";)
Verification
- Selected component should be chained.
4.12. Chaining LDAP controls
Configure chaining in Red Hat Directory Server to proxy LDAP requests and controls to remote servers. Implementing database links helps you to distribute data storage across multiple instances while maintaining a single access point for client applications.
LDAP operations can contain controls that change the operations behavior. Controls are specified in the LDAP protocol. You can specify which LDAP controls to forward to the remote server.
4.12.1. About chaining LDAP controls
To forward metadata requests to a remote server, you need to understand how Red Hat Directory Server (RHDS) chaining works with LDAP controls.
Configure the chaining backend to handle and pass specific control Object Identifiers (OIDs) so that remote servers can process specialized search requests, such as server-side sorting or virtual list views. The database link forwards requests containing the following controls to the remote server for chaining LDAP controls:
-
The
Virtual List View (VLV)control provides lists of certain entries. -
The
Server-side sortingcontrol categorizes entries according to their attribute values, usually by using a specific matching rule. -
The
Dereferencingcontrol pulls specified attribute information from the referenced entry and returns this information with the rest of the search results. -
The
Managed DSAcontrols returns smart referrals as entries, rather than following these referrals. Therefore, a smart referral itself can be changed or deleted. -
The
Loop detectioncontrol tracks how many times a server chains with another server. When the count reaches the configured number,Loop detectiondetects a loop and notifies the client application.
Database links cannot support Server-side sorting and VLV controls when a client application makes a request to multiple databases.
The following are some of the LDAP controls that are allowed to chain and their object identifiers (OID):
| Control Name | OID |
|---|---|
| Virtual list view (VLV) | 2.16.840.1.113730.3.4.9 |
| Server-side sorting | 1.2.840.113556.1.4.473 |
| Managed DSA | 2.16.840.1.113730.3.4.2 |
| Loop detection | 1.3.6.1.4.1.1466.29539.12 |
| Dereferencing searches | 1.3.6.1.4.1.4203.666.5.16 |
4.12.2. Chaining LDAP controls using the command line
To forward operation-specific metadata to remote backend servers, you need to chain Lightweight Directory Access Protocol (LDAP) controls in Red Hat Directory Server (RHDS) through the command line. To chain LDAP controls, use the dsconf chaining config-set --add-control command.
Procedure
Chain
LDAPcontrols:# dsconf <instance_name> chaining \ config-set --add-control="2.16.840.1.113730.3.4.9"
Add the object identifier (OID) of the custom control if clients of Directory Server create their own controls and chain there operations to remote servers.
4.12.3. Chaining LDAP controls using the web console
To forward operation-specific metadata to remote backend servers, you need to chain Lightweight Directory Access Protocol (LDAP) controls in Red Hat Directory Server (RHDS) by using the web console.
Prerequisites
- You have opened the Directory Server user interface in the web console and selected the instance.
Procedure
- Open the Database menu.
- Select the Chaining Configuration entry.
- Click button below the Forwarded LDAP Controls field.
Select the LDAP control and click button.
Add the object identifier (OID) of the custom control if clients of Directory Server create their own controls and chain there operations to remote servers.
- Click button.
Verification
- Click the Database menu and ensure that the selected LDAP control is chained.
4.13. Database links and access control evaluation
You can evaluate access control on the remote server to ensure correct policies are applied on the bind user. In Red Hat Directory Server, access control evaluation for database links defines how permissions apply to chained requests across distributed directories.
When a user binds to a server containing a database link, the database link sends the user’s identity to the remote server. Use the proxied authorization control to pass the original identity of the client application when you evaluate the LDAP operation on the remote server.
You must have the correct access controls on the subtree present on the remote server for the operations to succeed on the remote server.
You can add usual access controls to the remote server with the following restrictions:
- You cannot use all types of access control. For example, role-based or filter-based ACIs need access to the user entry, because the data is accessed through database links.
- Remote server views the client application in the same IP address and DNS domain as the database link. Because the original domain of the client is lost during chaining, all access controls based on the IP address or DNS domain of the client cannot work.
Directory Server supports both IPv4 and IPv6 IP addresses.
The following restrictions apply to the ACIs used with database links:
- You must locate ACIs with any groups they use. For the dynamic groups, all users in the group are located with the ACI and the group. For the static group, user links to remote server.
- You must locate ACIs with any role definitions they use and with any users who intend to use these roles.
- ACIs that link to values of a user’s entry must work when the user is remote.
Though evaluation of access controls is always done on the remote server, access controls can also be evaluated on both the server containing the database link and the remote server. This poses the following several limitations:
- When you evaluate the access control, for example, on the server containing the database link and when the entry is located on a remote server, the contents of user entries are not necessarily available.
For performance reasons, clients cannot perform remote inquiries and evaluate access controls.
- When you perform modify operation, the database link does not have access to the full entry stored on the remote server and necessarily does not have access to the entries being modified by the client application.
-
When you perform delete operation, the database link is only aware of the entry’s
DN. If an access control specifies a particular attribute, then delete operation must fail when conducted through a database link.
By default, evaluation of access controls on the server containing the database link is not allowed. You can override this default setting by using the nsCheckLocalACI attribute in the cn=database_link, cn=chaining database, cn=plugins, and cn=config entry. However, evaluating access controls on the server containing the database link is not recommended except for cascading chaining.
Chapter 5. Managing directory attributes and values
Manage directory attributes and values in Red Hat Directory Server to maintain accurate and up-to-date directory content. Update user details, operational data, and configuration settings, ensuring that client applications and authentication services rely on valid information.
Enforce attribute uniqueness, assign class of services (CoS) to simplify entry management, reduce storage requirements, and avoid replication conflicts.
5.1. Managing directory entries by using the command line
Maintain a precise and up-to-date directory by managing entries directly from the command line. Performing operations such as adding, modifying, and deleting entries in the terminal helps you to automate administrative tasks and execute bulk updates efficiently.
5.1.1. Providing input to the ldapadd, ldapmodify, and ldapdelete utilities
When you add, update, or delete entries or attributes in the directory, you can either use the interactive mode of the utilities to enter LDAP Data Interchange Format (LDIF) statements or pass an LDIF file to them.
5.1.1.1. The interactive mode of OpenLDAP client utilities
In the interactive mode, the ldapadd, ldapmodify, and ldapdelete utilities read the input from the command line. To exit the interactive mode, press the Ctrl+D (^D) key combination to send the end-of-file (EOF) escape sequence.
In interactive mode, the utility sends the statements to the LDAP server when you press Enter twice or when you send the EOF sequence.
Use the interactive mode in the following situations:
To enter LDAP Data Interchange Format (LDIF) statements without creating a file, use the following command:
# ldapmodify -D "cn=Directory Manager" -W -H ldap://server.example.com -xNext, the
ldapmodifyutility requires you to provide the LDIF statement:dn: uid=user,ou=people,dc=example,dc=com changetype: modify delete: telephoneNumber - add: manager manager: cn=manager_name,ou=people,dc=example,dc=com
modifying entry "uid=user,ou=people,dc=example,dc=com" ^DThe following example runs
ldapmodifyin interactive mode, deletes thetelephoneNumberattribute, and adds themanagerattribute with thecn=manager_name,ou=people,dc=example,dc=comvalue to theuid=user,ou=people,dc=example,dc=comentry. Press after the last statement to exit the interactive mode.To redirect LDIF statements, outputted by another command, to the server, use the following command:
# <command_that_outputs_LDIF> | ldapmodify -D "cn=Directory Manager" -W -H ldap://server.example.com -xThe interactive mode exits automatically after the redirected command exits.
For more details, see the
ldif(5)man page on your system.
5.1.1.2. The file mode of OpenLDAP client utilities
In the interactive mode, the ldapadd, ldapmodify, and ldapdelete utilities read the LDAP Data Interchange Format (LDIF) statements from a file. Use this mode to send a larger number of LDIF statements to the server.
Example 5.1. Passing a File with LDIF Statements to ldapmodify
Create a file with the LDIF statements. For example, create the
~/example.ldiffile with the following statements:dn: uid=user,ou=people,dc=example,dc=com changetype: modify delete: telephoneNumber - add: manager manager: cn=manager_name,ou=people,dc=example,dc=com
This example deletes the
telephoneNumberattribute and to adds themanagerattribute with thecn=manager_name,ou=people,dc=example,dc=comvalue to theuid=user,ou=people,dc=example,dc=comentry.Pass the file to the
ldapmodifycommand using the-fparameter:# ldapmodify -D "cn=Directory Manager" -W -H ldap://server.example.com -x -f ~/example.ldif
For details, see the ldif(5) man page on your system.
5.1.1.3. The continuous operation mode of OpenLDAP client utilities
By default, if you send multiple LDAP Data Interchange Format (LDIF) statements to the server and one operation fails, the process stops. However, entries processed before the error occurred were successfully added, modified, or deleted.
To ignore errors and continue processing further LDIF statements in a batch, pass the -c parameter to ldapadd and ldapmodify:
# ldpamodify -c -D "cn=Directory Manager" -W -H ldap://server.example.com -x5.1.2. Adding an LDAP entry by using the command line
To add a new entry to the directory, use the ldapadd or ldapmodify utility. Note that /bin/ldapadd is a symbolic link to /bin/ldapmodify. Therefore, ldapadd performs the same operation as ldapmodify -a.
You can only add a new directory entry if the parent entry already exists. For example, you cannot add cn=user,ou=people,dc=example,dc=com, if the ou=people,dc=example,dc=com parent entry does not exist.
5.1.2.1. Adding an entry by using ldapadd
You can use the ldapadd utility that processes LDIF statements for adding entries to your directory.
Procedure
For example, to add the
cn=user,ou=people,dc=example,dc=comuser entry, enter:# ldapadd -D "cn=Directory Manager" -W -H ldap://server.example.com -xThe
ldapaddutility requests you to provide the LDIF statement entry details:dn: uid=user,ou=People,dc=example,dc=com uid: user givenName: given_name objectClass: top objectClass: person objectClass: organizationalPerson objectClass: inetorgperson sn: surname cn: user
NoteRunning
ldapaddautomatically performs achangetype: addoperation. Therefore, you do not need to specifychangetype: addin the LDIF statement.For details, see the
ldapadd(1)man page on your system.
5.1.2.2. Adding an entry by using ldapmodify
You can use the ldapmodify utility that processes LDIF statements for adding entries to your directory.
Procedure
For example, to add the
cn=user,ou=people,dc=example,dc=comuser entry, enter:# ldapmodify -a -D "cn=Directory Manager" -W -H ldap://server.example.com -xThe
ldapmodifyutility requests you to provide the LDIF statement with the entry details:dn: uid=user,ou=People,dc=example,dc=com uid: user givenName: given_name objectClass: top objectClass: person objectClass: organizationalPerson objectClass: inetorgperson sn: surname cn: user
NoteWhen passing the
-aparameter to theldapmodifycommand, the utility automatically performs achangetype: addoperation. Therefore, you do not need to specifychangetype: addin the LDIF statement.For details, see the
ldapmodify(1)man page on your system.
5.1.2.3. Creating a root entry of a database suffix
To create the root entry of a database suffix, such as dc=example,dc=com, bind as the cn=Directory Manager user and add the entry. The distinguished name (DN) corresponds to the DN of the root or sub-suffix of the database.
Procedure
For example, to add the
dc=example,dc=comsuffix, enter:# ldapmodify -D "cn=Directory Manager" -W -H ldap://server.example.com -xThe
ldapmodifyutility requires you to provide the LDIF statement:dn: dc=example,dc=com changetype: add objectClass: top objectClass: domain dc: example
NoteYou can add root objects only if you have one database per suffix. If you create a suffix that is stored in several databases, you must use the
dsctl ldif2dbcommand to set the database that will hold the new entries.
Additional resources
5.1.3. Updating an LDAP entry by using the command line
When you modify a directory entry, use the changetype: modify statement. Depending on the change operation, you can add, change, or delete attributes from the entry.
5.1.3.1. Adding attributes to an LDAP entry
To add an attribute to an LDAP entry, use the add operation.
Prerequisites
- The Directory Manager permissions
Procedure
For example, to add the
telephoneNumberattribute with the555-1234567value to theuid=user,ou=People,dc=example,dc=comentry, enter:# ldapmodify -D "cn=Directory Manager" -W -H ldap://server.example.com -xThe
ldapmodifyutility requests you to provide the LDIF statement:dn: uid=user,ou=People,dc=example,dc=com changetype: modify add: telephoneNumber telephoneNumber: 555-1234567
If an attribute is multi-valued, you can specify the attribute name multiple times to add all the values in a single operation. For example, to add two
telephoneNumberattributes at once to theuid=user,ou=People,dc=example,dc=com, enter:# ldapmodify -D "cn=Directory Manager" -W -H ldap://server.example.com -xThe
ldapmodifyutility requests you to provide the LDIF statement:dn: uid=user,ou=People,dc=example,dc=com changetype: modify add: telephoneNumber telephoneNumber: 555-1234567 telephoneNumber: 555-7654321
5.1.3.2. Updating the value of an attribute
To modify specific data within an existing entry, update the value of an attribute in the entry. The update procedure of an attribute’s value depends on whether the attribute is single-valued or multi-valued.
Prerequisites
- The Directory Manager permissions
Procedure
To update a single-value attribute, use the
replaceoperation to override the existing value. The following command updates themanagerattribute of theuid=user,ou=People,dc=example,dc=comentry:# ldapmodify -D "cn=Directory Manager" -W -H ldap://server.example.com -xThe
ldapmodifyutility requires you to provide the LDIF statement:dn: uid=user,ou=People,dc=example,dc=com changetype: modify replace: manager manager: uid=manager_name,ou=People,dc=example,dc=com
To update a specific value of a multi-value attribute, first delete the entry you want to replace, and then add the new value. The following command updates only the
telephoneNumberattribute that is currently set to555-1234567in theuid=user,ou=People,dc=example,dc=comentry:# ldapmodify -D "cn=Directory Manager" -W -H ldap://server.example.com -xThe
ldapmodifyutility requires you to provide the LDIF statement:dn: uid=user,ou=People,dc=example,dc=com changetype: modify delete: telephoneNumber telephoneNumber: 555-1234567 - add: telephoneNumber telephoneNumber: 555-9876543
5.1.3.3. Deleting attributes from an entry
Remove unnecessary or outdated information from specific entries by deleting corresponding attributes from the entries. You can delete an attribute with all it values or only a specified value of an attribute by performing the delete operation.
Prerequisites
- The Directory Manager permissions
Procedure
To delete , for example, the
managerattribute from theuid=user,ou=People,dc=example,dc=comentry, enter:# ldapmodify -D "cn=Directory Manager" -W -H ldap://server.example.com -xThe
ldapmodifyutility requires you to provide the following LDIF statement:dn: uid=user,ou=People,dc=example,dc=com changetype: modify delete: manager
ImportantIf the attribute contains multiple values, this operation deletes all of them.
To delete a specific value from a multi-value attribute, provide the attribute and its value in the LDIF statement. For example, to delete only the
telephoneNumberattribute that is set to555-1234567from theuid=user,ou=People,dc=example,dc=comentry, enter:# ldapmodify -D "cn=Directory Manager" -W -H ldap://server.example.com -xThe
ldapmodifyutility requires you to provide the LDIF statement:dn: uid=user,ou=People,dc=example,dc=com changetype: modify delete: telephoneNumber telephoneNumber: 555-1234567
5.1.4. Renaming and moving an LDAP entry
Rename or move LDAP entries in Red Hat Directory Server to reflect organizational changes, such as department transfers, without deleting and recreating the original entry.
The following rename operations exist:
- Renaming an entry
If you rename an entry, the
modrdnoperation changes the relative distinguished name (RDN) of the entry:
- Renaming a subentry
For subtree entries, the
modrdnoperation renames the subtree and also the DN components of child entries: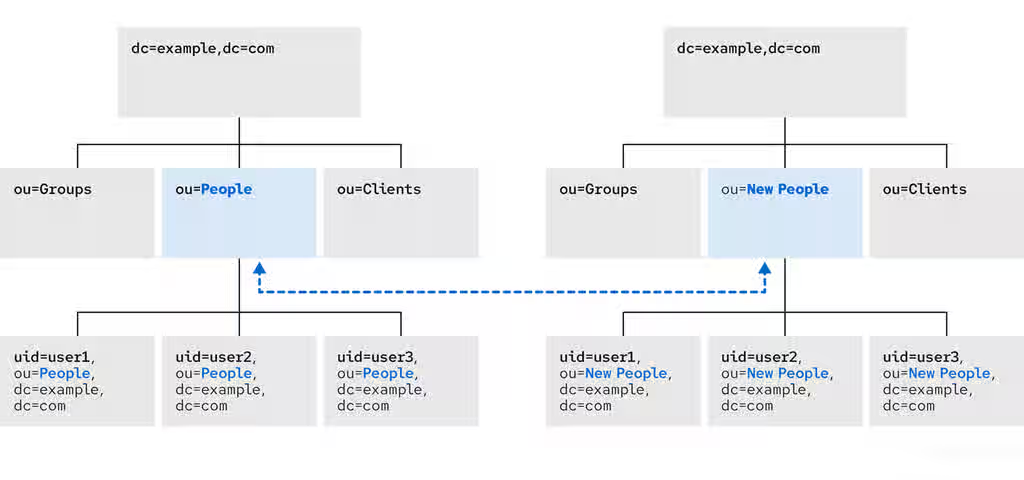
Note that for large subtrees, this process can take a lot of time and resources.
- Moving an entry to a new parent
A similar action to renaming a subtree is moving an entry from one subtree to another. This is an expanded type of the
modrdnoperation, which simultaneously renames the entry and sets anewSuperiorattribute which moves the entry from one parent to another: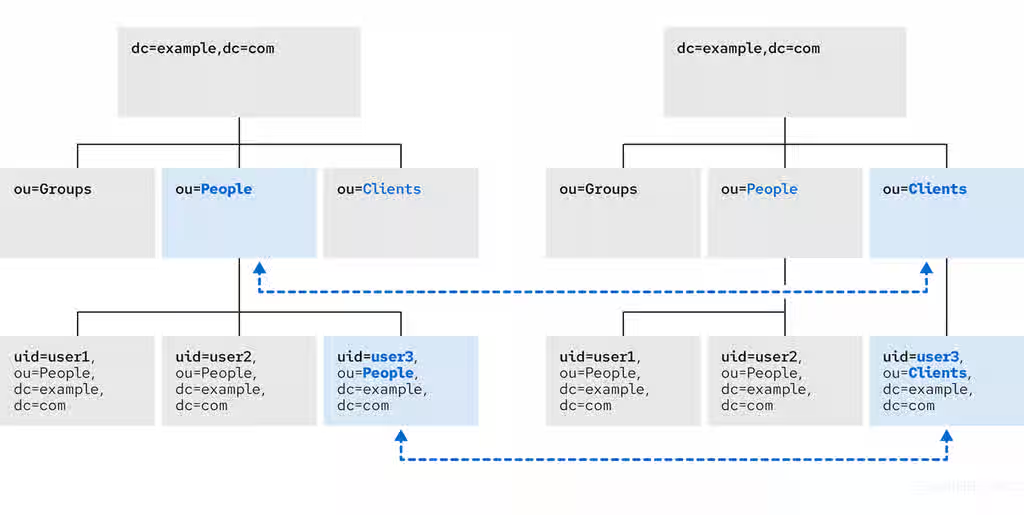
5.1.4.1. Considerations for renaming LDAP entries
Renaming LDAP entries in Red Hat Directory Server (RHDS) changes their Distinguished Name (DN), which can impact group memberships, access control instructions (ACIs), and client applications. Understanding the limitations helps you to restructure your directory tree safely.
Keep the following in mind when performing rename operations:
- You cannot rename the root suffix.
- Subtree rename operations have minimal effect on replication. Replication agreements are applied to an entire database, not to a subtree within the database. Therefore, a subtree rename operation does not require re-configuring a replication agreement. All name changes after a subtree rename operation are replicated as normal.
- Renaming a subtree might require any synchronization agreements to be reconfigured. Synchronization agreements are set at the suffix or subtree level. Therefore, renaming a subtree can break synchronization.
- Renaming a subtree requires that any subtree-level access control instructions (ACI) set for the subtree be reconfigured manually, as well as any entry-level ACIs set for child entries of the subtree.
-
Trying to change the component of a subtree, such as moving from
outodc, might fail with a schema violation. For example, theorganizationalUnitobject class requires theouattribute. If that attribute is removed as part of renaming the subtree, the operation fails. -
If you move a group, the
MemberOfplugin automatically updates thememberOfattributes. However, if you move a subtree that contain groups, you must manually create a task in thecn=memberoftask entry or use thedsconf memberof fixupcommand to update the relatedmemberOfattributes.
5.1.4.2. Controlling the relative distinguished name behavior when renaming entries
When you rename an entry, the deleteOldRDN attribute controls whether the old relative distinguished name (RDN) is deleted or retained.
- deleteOldRDN: 0
The existing RDN is retained as a value in the new entry. The resulting entry contains two
cnattributes: one with the old and one with the new common name (CN).For example, the following attributes belong to a group that was renamed from
cn=old_group,dc=example,dc=comtocn=new_group,dc=example,dc=comwith thedeleteOldRDNattribute set to0:dn: cn=new_group,ou=Groups,dc=example,dc=com objectClass: top objectClass: groupOfUniqueNames cn: old_group cn: new_group
- deleteOldRDN: 1
Directory Server deletes the old entry and creates a new entry using the new RDN. The new entry only contains the
cnattribute of the new entry.For example, the following group was renamed to
cn=new_group,dc=example,dc=comwith thedeleteOldRDNattribute set to1:dn: cn=new_group,ou=Groups,dc=example,dc=com objectClass: top objectClass: groupofuniquenames cn: new_group
Additional resources
5.1.4.3. Renaming an LDAP entry or subtree
To rename an entry or subtree, use the modify operation that sets the new relative distinguished name (RDN) in the newrdn attribute of an entry.
Prerequisites
- The Directory Manager permissions
Procedure
For example, to rename the
cn=demo1,dc=example,dc=comentry tocn=demo2,dc=example,dc=com, enter:# ldapmodify -D "cn=Directory Manager" -W -H ldap://server.example.com -xThe
ldapmodifyutility requires you to provide the following LDIF statement:dn: cn=demo1,dc=example,dc=com changetype: modrdn newrdn: cn=demo2 deleteOldRDN: 1
Additional resources
5.1.4.4. Moving an LDAP entry to a new parent
To move an entry to a new parent, use the modify operation that changes the newrdn and newSuperior attributes of an entry.
newrdn- Sets the relative distinguished name (RDN) of the moved entry. You must set this entry, even if the RDN remains the same.
newSuperior- Sets the distinguished name (DN) of the new parent entry.
Prerequisites
- The Directory Manager permissions
Procedure
For example, to move the
cn=demoentry fromou=Germany,dc=example,dc=comtoou=France,dc=example,dc=com, enter:# ldapmodify -D "cn=Directory Manager" -W -H ldap://server.example.com -xThe
ldapmodifyutility requires you to provide the following LDIF statement:dn: cn=demo,ou=Germany,dc=example,dc=com changetype: modrdn newrdn: cn=demo newSuperior: ou=France,dc=example,dc=com deleteOldRDN: 1
Additional resources
5.1.5. Deleting an LDAP entry by using the command line
You can remove entries from an LDAP directory, but you can only delete entries that have no child entries. For example, you cannot delete ou=People,dc=example,dc=com, if the uid=user,ou=People,dc=example,dc=com entry still exists.
5.1.5.1. Deleting an entry by using ldapdelete
To delete entries from Red Hat Directory Server (RHDS), use the ldapdelete command-line utility that removes obsolete objects from the directory tree.
Prerequisites
- The Directory Manager permissions
Procedure
To delete one entry, such as the
uid=user,ou=People,dc=example,dc=comentry, enter:# ldapdelete -D "cn=Directory Manager" -W -H ldap://server.example.com -x "uid=user,ou=People,dc=example,dc=com"To delete multiple entries in one operation, append them to the command:
# ldapdelete -D "cn=Directory Manager" -W -H ldap://server.example.com -x "uid=user1,ou=People,dc=example,dc=com" "uid=user2,ou=People,dc=example,dc=com"For details, see the
ldapdelete(1)man page on your system.
5.1.5.2. Deleting an entry by using ldapmodify
To delete entries from Red Hat Directory Server (RHDS), use the ldapmodify command-line utility with the changetype: delete operation that removes obsolete objects from the directory tree.
Prerequisites
- The Directory Manager permissions
Procedure
To delete, for example, the
uid=user,ou=People,dc=example,dc=comentry, enter:# ldapmodify -D "cn=Directory Manager" -W -H ldap://server.example.com -xThe
ldapmodifyutility requires you to provide the following LDIF statement:dn: uid=user,ou=People,dc=example,dc=com changetype: delete
5.1.6. Using special characters in OpenLDAP client utilities
When using the command line, enclose characters that have a special meaning to the command-line interpreter, such as space ( ), asterisk (*), or backslash (\), with quotation marks. Depending on the command-line interpreter, use single or double quotation marks.
Review how to use special characters to perform authentication to the Red Hat Directory Server instance as different users.
Prerequisites
- The Directory Manager permissions
-
The
uid=user,ou=People,dc=example.com Chicago, ILuser permissions
Procedure
To authenticate as the
cn=Directory Manageruser, enclose the user’s distinguished name (DN) in quotation marks:# ldapmodify -a -D "cn=Directory Manager" -W -H ldap://server.example.com -xTo authenticate as the
uid=user,ou=People,dc=example.com Chicago, ILuser whose DN contains a comma in a component, escape it using a backslash:# ldapmodify -a -D "cn=uid=user,ou=People,dc=example.com Chicago\, IL" -W -H ldap://server.example.com -x
5.1.7. Using binary attributes in LDIF statements
To add or update attributes that support binary values, such as jpegPhoto, use the ldapmodify utility. The utility reads the value of the attributes from a file.
Prerequisites
- The Directory Manager permissions
Procedure
For example, to add the
jpegPhotoattribute to theuid=user,ou=People,dc=example,dc=comentry, and read the value for the attribute from the/home/user_name/photo.jpgfile, enter:# ldapmodify -D "cn=Directory Manager" -W -H ldap://server.example.com -xThe
ldapmodifyutility requires you to provide the LDIF statement of the modify operation:dn: uid=user,ou=People,dc=example,dc=com changetype: modify add: jpegPhoto jpegPhoto:< file:///home/user_name/photo.jpg
ImportantNote that there is no space between
:and<.
5.1.8. Updating an LDAP entry in an internationalized directory
To use attribute values with languages other than English, associate the attribute’s value with a language tag. When using ldapmodify to update an attribute that has a language tag set, you must match the value and language tag exactly or the operation will fail.
Prerequisites
- The Directory Manager permissions
Procedure
For example, to modify an attribute value that has the
lang-frlanguage tag set, include the tag in the modify operation:# ldapmodify -D "cn=Directory Manager" -W -H ldap://server.example.com -xThe
ldapmodifyutility requires you to provide the LDIF statement of the modify operation:dn: uid=user,ou=People,dc=example,dc=com changetype: modify replace: homePostalAddress;lang-fr homePostalAddress;lang-fr: 34 rue de Seine
5.2. Managing directory entries by using the web console
Maintain a precise and up-to-date directory by performing operations such as adding, modifying, and deleting entries in the web console.
5.2.1. Adding an LDAP entry by using the web console
Add entries to Red Hat Directory Server (RHDS) by using the web console to populate your directory. You can create users, groups, roles, organizational units (OUs), and custom entries in the web console.
For example, you want to create a POSIX user cn=John Smith,ou=people,dc=example,dc=com with a password.
Prerequisites
- You are logged into the Directory Server web console.
-
The parent entry exists. For example,
ou=people,dc=example,dc=com.
Procedure
- Open the menu to reveal the list of existing suffixes.
-
Using the Tree or Table view, expand the parent entry
ou=people,dc=example,dc=comunder which you want to create a user. Click the Options menu (⋮) and select to open the wizard window.
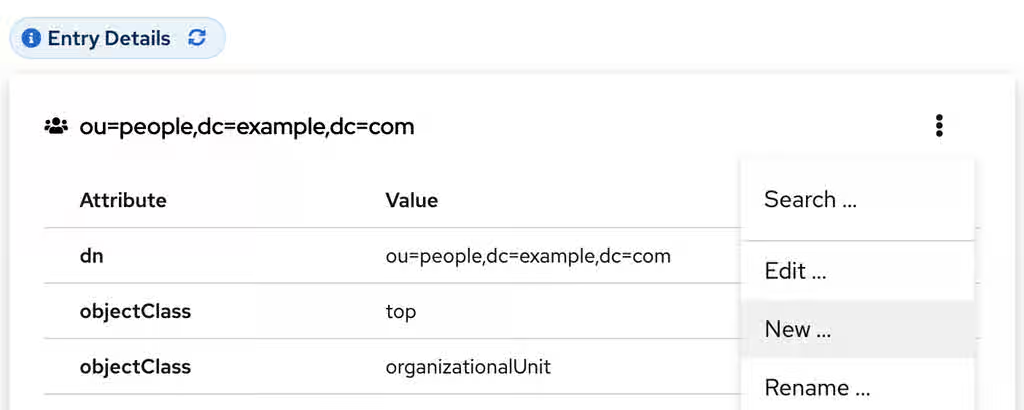
- Select the Create a new User option and click .
- For the user entry, select Posix Account type and click .
Optional: Select additional attributes, such as
userPassword, and click . You can view all selected attributes by expanding the drop-down list near the step name.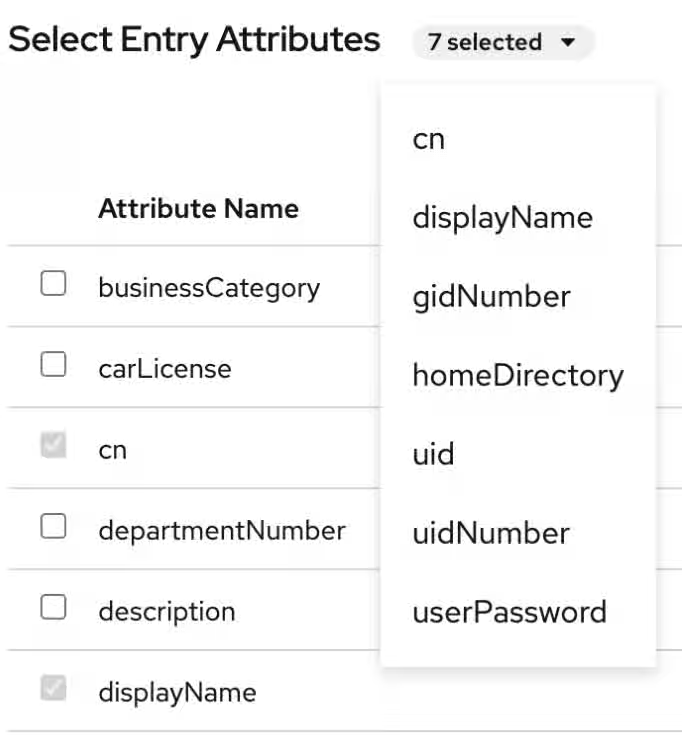
Set a value for each attribute:
Click on the pencil button of the attribute and add a value.
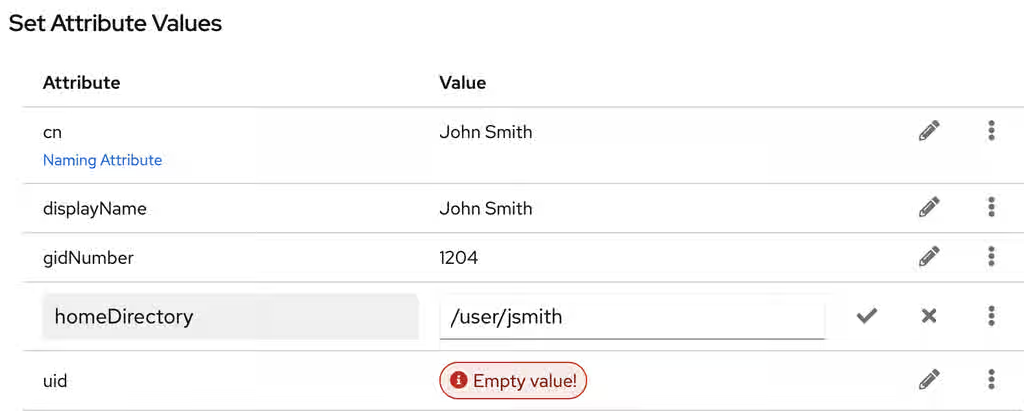
Note that a separate menu opens when you set the
userPasswordvalue. The value is filled with asterisks (*) to hide the plain text.- Click on the check button to save changes.
- Optional: Set an additional attribute value by clicking the → .
- After you have set all values, click .
- Verify that all entry details are correct and click . Directory Server creates the entry with mandatory attributes for a POSIX user and sets the password to it. You can click to modify entry settings, or click to cancel the entry creation.
- View the Result for Entry Creation and click .
Verification
- Navigate to → .
-
Select the database suffix that contains the entry, such as
dc=example,cd=com. -
Enter your search criteria in the field, such as
John, and press . - Find the entry you recently created in the list of entries.
Additional resources
5.2.2. Editing an LDAP entry using the web console
Modify an entry to maintain data accuracy in your directory.
The example modifies a user entry cn=John Smith,ou=people,dc=example,dc=com by:
-
adding telephone numbers
556778987and556897445. -
adding email
jsmith@example.com. - changing the password.
Prerequisites
- You are logged into the Directory Server web console.
Procedure
- Open the menu.
-
Using the Tree or Table view, expand the entry you want to edit, such as
cn=John Smith,ou=people,dc=example,dc=com. - Click the Options menu (⋮) and select to open the wizard window.
- Optional: In the Select ObjectClasses step, add or delete object classes for the entry. Click .
In the Select Attributes step, add
telephoneNumberandmailattributes to the entry and click . If you do not see an attribute you want to add to the entry it means that you did not add corresponding object class in the previous step.NoteIn this step, you can not delete mandatory attributes of the selected object classes.
In the Edit Attribute Values step, set
telephoneNumberto556778987and556897445,mailtojsmith@example.comand changeuserPasswordvalue:- Click on the pencil button of the attribute and add or change a new value.
- Click on the check button to save changes.
-
Optional: Set an additional value to an attribute by clicking the → . The
telephoneNumberattribute has two values in this example. When you set all values, click .
- Review your changes and click .
- To edit the entry, click . You can click to make other changes to the entry, or click to cancel the entry editing.
- View the Result for Entry Modification and click .
Verification
- Expand the entry details and view the new changes appear among the entry attributes.
Additional resources
5.2.3. Renaming and relocating an LDAP entry or subtree by using the web console
You can rename or relocate a directory entry or a subtree to restructure your directory data.
The example renames and relocates the entry cn=John Smith,ou=people,dc=example,dc=com to cn=Tom Smith,ou=clients,dc=example,dc=com.
Prerequisites
- You are logged into the Directory Server web console.
Procedure
- Open the menu.
-
Using the Tree or Table view, expand the entry you want to modify, such as
cn=John Smith,ou=people,dc=example,dc=com. - Click the Options menu (⋮) and select to open the wizard window.
In the Select The Naming Attribute And Value step:
-
Set a new value
Tom Smithfor the naming attributecnand click . - Optional: Select another naming attribute from the drop-down menu.
- Optional: In case you want to delete the old entry and create a new one using the new RDN, check the Delete the old RDN.
-
Set a new value
- In Select The Entry Location step, select the parent entry for the new location, and click .
- Review changes you made to the entry and click .
- If the entry details are correct, click . You can click to make other changes to the entry or click to cancel the entry modification.
- View Result for Entry Modification and click .
Verification
- Expand the entry details and review the updated entry.
Additional resources
5.2.4. Deleting an LDAP entry by using the web console
Delete entries from Red Hat Directory Server to remove obsolete objects from the directory tree.
Prerequisites
- You are logged into the RHDS web console.
Procedure
- Open the menu.
-
Using the Tree or Table view, expand the entry you want to delete, such as
cn=Tom Smith,ou=people,dc=example,dc=com. - Click the Options menu (⋮) and select to open the wizard window.
- Click after you review the data about the entry you want to delete.
-
In the Deletion step, toggle the switch to the
Yes, I’m sureposition and click . You can click to cancel the entry deletion. - View the Result for Entry Deletion and click .
Verification
- Navigate to → .
-
Select the suffix where the entry previously existed, such as
dc=example,cd=com. -
Enter your search criteria in the field, such as
Tom, and press . - Verify that the deleted entry is no longer present.
5.3. Assigning and managing unique numeric attribute values
Some entry attribute values require a unique number, such as uidNumber and gidNumber. Using the Distributed Numeric Assignment (DNA) plugin, you can configure Red Hat Directory Server to generate and assign unique numbers from the configured range of numbers automatically to specified attributes.
The DNA plugin does not guarantee attribute uniqueness. If you manually assigned a value from the range that the plugin manages, the plugin does not check if the value is unique.
With DNA plugin, you can effectively avoid replication conflicts by setting different ranges for different local DNA plugin instances on suppliers. For example, supplier A can assign numbers from 1 to 1000, and supplier B can assign numbers from 1001 to 2000. This ensures that each supplier is using a truly unique set of numbers.
5.3.1. About dynamic number assignments
The Distributed Numeric Assignment (DNA) plugin assigns a range of available numbers that an instance can issue. Two attributes define the range definition: the server next available number (the botton value of the range) and its maximum value (the upper value of the range).
You need to set the initial bottom value when you configure the plugin. Later, the plugin updates this bottom value. By splitting the available numbers into separate ranges on each replica, the servers can continually assign numbers without overlapping with each other.
5.3.1.1. Filters, searches, and target entries
When using the Distributed Numeric Assignment (DNA) plugin, server performs a sorted search internally to verify if another server has already taken the next specified range, requiring the managed attribute to have an equality index with the proper ordering matching rule.
The DNA plugin is always applied to a specific area of the directory tree (the scope) and specific entry types within that subtree (the filter).
The DNA plugin works only on a single database, unable to manage number assignments for multiple databases. The DNA plugin uses the sort control to check whether a value has been manually allocated outside of the DNA plugin. However, this validation using the sort control works only on a single database.
Additional resources
5.3.1.2. Assigning unique numbers by using dnaMagicRegen
Use a magic value (dnaMagicRegen) as a template value for the Distributed Numeric Assignment (DNA) plugin managed attributes.
The dnaMagicRegen value can be a number or word that is outside the server range. When an entry is added with the magic value and the entry is within the configured scope and filter of the DNA plugin, the magic value automatically triggers the plugin to generate a new unique value.
Prerequisites
- The Directory Manager permissions
Procedure
For example, add zero (
0) as a magic value by using theldapmodifyutility:# ldapmodify -D "cn=Directory Manager" -W -xThe
ldapmodifyutility requests you to provide the LDIF statement:dn: uid=jsmith,ou=people,dc=example,dc=com changetype: add objectClass: top objectClass: person objectClass: posixAccount uid: jsmith cn: John Smith uidNumber: 0 gidNumber: 0
With the configured
dnaMagicRegen, the DNA plugin generates unique values only for attributes whose values are equal to the magic values when the entry is added. If you do not set the magic value for the DNA plugin, then the plugin overwrites any value of the managed attributes.- Note
- In a situation, where the DNA plugin manages only one attribute and the added entry does not contain the managed attribute, the add operation triggers the DNA plugin to add this attribute and generate the unique value for it.
5.3.1.3. Multiple attributes in the same range
The Distributed Numeric Assignment (DNA) plugin can assign unique numbers to a single or multiple attribute types from a single range of unique numbers.
This offers multiple options for assigning unique numbers to attributes:
- A single number for a single attribute type from a unique range.
- The same unique number for two attributes in one entry.
- Two different attributes assigned two different numbers from the same range of unique numbers.
In many cases, it is sufficient to have a unique number assigned per attribute type. For example, when assigning an employeeID to a new employee entry, it is crucial to ensure each employee entry receives a unique employeeID.
However, you can assign unique numbers from the same range of numbers to multiple attributes. For example, when assigning uidNumber and gidNumber to a posixAccount entry, the DNA plugin can assign the same number to both attributes. To achieve this, pass both managed attributes to the modify operation and specify the magic value (0) using the ldapmodify utility:
# ldapmodify -D "cn=Directory Manager" -W -H ldap://server.example.com -xdn: uid=jsmith,ou=people,dc=example,dc=com changetype: modify add: uidNumber uidNumber: 0 - add:gidNumber gidNumber: 0
When the DNA plugin handles multiple attributes, it can assign a unique value to only one attribute if the object class permits only one. For example, the posixGroup object class allows gidNumber but not uidNumber. If the DNA plugin manages both uidNumber and gidNumber, it assigns a unique number for gidNumber from the uidNumber and gidNumber attribute range when creating a posixGroup entry. Sharing a pool for all managed attributes ensures consistent assignment of unique numbers, preventing conflicts where uidNumber and gidNumber on different entries end up with the same number from separate ranges.
If the DNA plugin manages multiple attributes, it assigns the same value to all of them in a single modify operation. However, in cases, where an entry does not allow each type of attribute defined for the range, or an entry allows all of the attributes types defined, but only a subset of the attributes require the unique value, you must assign different numbers from the same range by performing separate modify operations. For example:
The first modify operation
# ldapmodify -D "cn=Directory Manager" -W -H ldap://server.example.com -xdn: uid=jsmith,ou=people,dc=example,dc=com changetype: modify add: uidNumber idNumber: 0
The second modify operation
# ldapmodify -D "cn=Directory Manager" -W -H ldap://server.example.com -xdn: uid=jsmith,ou=people,dc=example,dc=com changetype: modify add: employeeId employeeId: magic
Example 5.2. Example. DNA and unique bank account numbers
Example Bank wants to use the same unique number for a customer’s primaryAccount and customerID attributes. The Example Bank administrator configured the DNA plugin to assign unique values for both attributes from the same range.
Additionally, the bank wants to assign numbers for secondary accounts from the same range as the customer ID and primary account numbers, but these numbers cannot be the same as the primary account numbers. The Example Bank administrator configures the DNA plug-in to also manage the secondaryAccount attribute, but will only add the secondaryAccount attribute to an entry after the entry is created and the primaryAccount and customerID attributes are assigned. This ensures that primaryAccount and customerID share the same unique number, and any secondaryAccount numbers are entirely unique but still from the same range of numbers.
5.3.2. Syntax of the DNA plugin
The Distributed Numeric Assignment (DNA) plugin itself is a container entry with the distinguished name (DN) cn=Distributed Numeric Assignment Plugin,cn=plugins,cn=config. Each DNA entry under the DNA plugin entry defines a new managed range for the DNA plugin.
Therefore, to configure new managed ranges for the DNA plugin, create entries under the container entry. For example, if you want the plugin to manage uidNumber attribute in entries, create the cn=Account UIDs,cn=Distributed Numeric Assignment Plugin,cn=plugins,cn=config configuration entry where you define ranges and other plugin settings.
The plugin syntax varies on whether you configure the plugin for the use on a single server or across multiple servers in a replication topology.
DNA plugin syntax for a single server
If you use the plugin on a single server, a basic DNA configuration entry defines the following attributes:
- dnaType
- Defines the attribute which value the plugin manages.
- dnaScope
- Defines the entry (DN) the plugin uses as the base to search for entries.
- dnaFilter
- Defines the search filter the plugin uses to identify entries to manage.
- dnaNextValue
- Defines the next available value that the plugin assigns after an entry is created.
The following is the example of the DNA configuration entry on a single server for a single attribute type:
dn: cn=Account UIDs,cn=Distributed Numeric Assignment Plugin,cn=plugins,cn=config
objectClass: top
objectClass: dnaPluginConfig
cn: Account UIDs
dnatype: uidNumber
dnafilter: (objectclass=posixAccount)
dnascope: ou=people,dc=example,dc=com
dnaNextValue: 1
DNA plugin syntax for servers in replication topology
To configure distributed numeric assignments on multiple suppliers, the configuration entry must also contain the following information to share and transfer ranges:
- dnaMaxValue
- Defines the maximum number that the server can assign.
- dnaThreshold
-
Defines the threshold where the range is low enough to trigger a range transfer. If
dnaThresholdis not set, the default value is1. - dnaRangeRequestTimeout
-
Defines a timeout period that a server waits for an answer from another server when requesting a range transfer. If the server does not receive the range within this time period, the range transfer request goes to another server. By default, the value is set to
10seconds. - dnaSharedCfgDN
- Defines a configuration entry DN which is shared among all supplier servers, which stores the range information for each supplier.
- dnaNextRange
-
Defines the specific number range that a server assigns to the manages attribute. The
dnaNextRangevalue shows the next available range for transfer and is managed automatically by the plugin as ranges are assigned or used by the server. This range has not yet been assigned to another server and is still available for its local Directory Server to use.
The following is the example of the DNA configuration entry on a supplier in replication topology:
dn: cn=Account UIDs,cn=Distributed Numeric Assignment Plugin,cn=plugins,cn=config
objectClass: top
objectClass: dnaPluginConfig
cn: Account UIDs
dnatype: uidNumber
dnafilter: (objectclass=posixAccount)
dnascope: ou=people,dc=example,dc=com
dnanextvalue: 1
dnaMaxValue: 1300
dnasharedcfgdn: cn=Account UIDs,ou=ranges,dc=example,dc=com
dnathreshold: 100
dnaRangeRequestTimeout: 60
dnaNextRange: 1301-2301
For the full list of attributes you can use in the DNA configuration entry, see This content is not included.Distributed Numeric Assignment plugin attributes.
With no dnaNextRange attribute value configured, Directory Server automatically assigns ranges using the dnaMaxValue value as the upper limit for the next range. You must explicitly set the dnaNextRange attribute, if you want Directory Server to assign a separate, specific range to other servers.
Each supplier keeps a track of its current range in a separate configuration entry which contains information about the range and the connection settings. This entry is a child of the location in dnaSharedCfgDN. Directory Server replicates the configuration entry to all other suppliers, so each supplier can check that configuration to find a server to contact for a new range. For example:
dn: dnaHostname=ldap1.example.com+dnaPortNum=389,cn=Account UIDs,ou=Ranges,dc=example,dc=com
objectClass: dnaSharedConfig
objectClass: top
dnahostname: ldap1.example.com
dnaPortNum: 389
dnaSecurePortNum: 636
dnaRemainingValues: 1000
5.3.3. Creating a DNA plugin configuration entry on a supplier by using the command line
If you want a supplier to assign unique numbers to a managed attribute, create a DNA plugin configuration entry for each configuration you want to apply.
A DNA plugin configuration entry is a subentry under the cn=Distributed Numeric Assignment Plugin,cn=plugins,cn=config plugin container entry.
In a multi-supplier environment, each supplier manages its own range of values. The ranges are replicated between suppliers and each supplier is aware of which supplier manages which range. Later, a supplier uses this information to request a range transfer from another supplier if the first supplier is running out of range values.
The following example creates a new DNA plugin configuration entry on a supplier by using the dsconf utility.
Prerequisites
-
You have
rootpermissions.
Procedure
Create the DNA configuration entry on a supplier:
# dsconf <instance_name> plugin dna config "Account UIDs" add --type uidNumber --filter "(objectclass=posixAccount)" --scope ou=People,dc=example,dc=com --next-value 1 --max-value 1300 --shared-config-entry "cn=Account UIDs,ou=Ranges,dc=example,dc=com" --threshold 100 --range-request-timeout 60 --magic-regen 99999Successfully created the cn=Account UIDs,cn=Distributed Numeric Assignment Plugin,cn=plugins,cn=config
The command creates the DNA plugin configuration that sets a unique value to the
uidNumberattribute instead of the99999magic value in all newly createdposixAccountentries underou=People,dc=example,dc=com. The supplier sets values up to1300and requests a range transfer from the second supplier when reaches the value1200. If the second supplier is unresponsive for 60 seconds, the first supplier requests the range transfer from the third supplier.- NOTE
If you create the configuration entry for a server without replication or for a supplier in one-supplier environment, set only the
--type,--filter,--scope,--next-valueoptions.For details about the DNA plugin configuration attributes, see This content is not included.Distributed Numeric Assignment Plugin Attributes and Syntax of the DNA plugin sections.
Optional: Create the configuration entry that is shared among all supplier server:
# ldapmodify -D "cn=Directory Manager" -W -H ldap://server.example.com -xThe
ldapmodifyutility requires you to provide the following LDIF statement:dn: ou=Ranges,dc=example,dc=com changetype: add objectclass: top objectclass: extensibleObject objectclass: organizationalUnit ou: Ranges - dn: cn=Account UIDs,ou=Ranges,dc=example,dc=com changetype: add objectclass: top objectclass: extensibleObject cn: Account UIDs
Enable the DNA plugin:
# dsconf <instance_name> plugin dna enableEnabled plugin 'Distributed Numeric Assignment Plugin'
Verification
View the configuration entry details:
# dsconf <instance_name> plugin dna config "Account UIDs" showdn: cn=Account UIDs,cn=Distributed Numeric Assignment Plugin,cn=plugins,cn=config cn: Account UIDs dnaFilter: "(objectclass=posixAccount)" dnaInterval: 1 dnaMagicRegen: 99999 dnaMaxValue: 1300 dnaNextValue: 1 dnaRangeRequestTimeout: 60 dnaScope: ou=People,dc=example,dc=com dnaSharedCfgDN: cn=Account UIDs,ou=Ranges,dc=example,dc=com dnaThreshold: 100 dnaType: uidNumber objectClass: top objectClass: dnaPluginConfig
Additional resources
5.3.4. Creating a DNA plugin configuration entry on a supplier using the web console
If you want Red Hat Directory Server (RHDS) to assign unique numbers to a managed attribute, create a DNA plugin configuration entry for each configuration you want to apply. RHDS stores such plugin configuration entries under cn=Distributed Numeric Assignment Plugin,cn=plugins,cn=config.
In a multi-supplier environment, each supplier manages its own range of values. The ranges are replicated between suppliers and each supplier is aware of which supplier manages which range. Later, a supplier uses this information to request a range transfer from another supplier if the first supplier is running out of range values.
Prerequisites
- You are logged in to the web console. For more details, see Logging in to the Directory Server by using the web console.
Procedure
- Select the RHDS instance.
- Open the Plugins menu and select the DNA plugin from the list.
- Click button to start the configuration of the new plugin configuration entry.
On the DNA Configuration tab, set the fields.
For example, you want the plugin to set a unique value to the
uidNumberattribute instead of the99999magic value in all newly createdposixAccountentries underou=People,dc=example,dc=com. In addition, you want the supplier to set values up to1300and request a range transfer from the second supplier when the unique value reaches the value1200. In this case, set the following fields:-
Config Name to
Account UIDs -
DNA Managed Attributes to
uidNumber -
Filter to
"(objectclass=posixAccount)" -
Subtree Scope to
ou=People,dc=example,dc=com -
Next Value to
1 -
Max Value to
1300 -
Magic Regeneration Value to
99999 -
Threshold to
100 Range Request Timeout to
60- NOTE
- If you create the configuration entry for a server without replication or for a supplier in one-supplier environment, set only the DNA Managed Attributes, Filter, Subtree Scope, and Next Value fields.
-
Config Name to
-
Go to the Shared Config Settings tab and set the Shared Config Entry DN field to, for example,
cn=Account UIDs,ou=Ranges,dc=example,dc=com. This shared configuration entry contains information which server to contact for the range transfer if the current server is out of unique values. - Click the Save Config button to save the plugin settings.
- Toggle the switch to the Plugin is enabled position to enable the plugin.
5.4. Enforcing attribute uniqueness
To ensure that the value of an attribute is unique across the whole directory or a subtree, you can use the Attribute Uniqueness plugin, which is disabled by default.
You can configure the plugin to verify attribute uniqueness either of the following ways:
Set a list of subtrees where the plugin must check attribute uniqueness by using the
uniqueness-subtreesparameter, for example:uniqueness-attribute-name: mail uniqueness-subtrees: ou=accounting,dc=example,dc=com uniqueness-subtrees: ou=sales,dc=example,dc=com uniqueness-across-all-subtrees: on uniqueness-exclude-subtrees: ou=private,ou=people,dc=example,dc=com
For more details, see Configuring the Attribute Uniqueness plugin over subtrees.
Set a parent entry object class by using the
uniqueness-top-entry-ocparameter. If a parent entry of the updated entry contains this object class then the plugin checks for the uniqueness of attributes under the parent entry subtree. For example, you can configure the plugin the following way:uniqueness-attribute-name: mail uniqueness-top-entry-oc: nsContainer uniqueness-subtree-entries-oc: inetOrgPerson uniqueness-exclude-subtrees: ou=private,ou=people,dc=example,dc=com
For more details, see Configuring the Attribute Uniqueness plugin over object classes.
You can create multiple configuration entries of the plugin to apply different conditions. Red Hat Directory Server stores all configuration entries of the plugin under cn=plugins,cn=config.
5.4.1. Configuring the Attribute Uniqueness plugin over subtrees by using the command line
Use the dsconf utility to set the list of subtrees where the plug-n must check the attribute uniqueness. A subtree can be any entry in the directory, including a suffix.
Use the following example procedure to configure the plugin to verify uniqueness of the mail attribute in entries under the ou=sales,dc=example,dc=com and ou=accounting,dc=example,dc=com subtrees.
Prerequisites
- You have root permissions.
Procedure
Create a new plugin configuration entry:
# dsconf <instance_name> plugin attr-uniq add "Mail Uniqueness" --attr-name mail --subtree ou=sales,dc=example,dc=com ou=accounting,dc=example,dc=comThe command creates the
cn=Mail Uniqueness,cn=plugins,cn=configconfiguration entry.NoteYou can set the plugin to verify uniqueness of multiple attributes in one configuration entry.
Optional: Configure uniqueness across all subtrees configured in this plugin configuration entry:
# dsconf <instance_name> plugin attr-uniq set "Mail Uniqueness" --across-all-subtrees onThe command sets the
uniqueness-across-all-subtreesplugin configuration parameter toon. Therefore, the plugin checks uniqueness of themailattribute across both theou=sales,dc=example,dc=comandou=accounting,dc=example,dc=comsubtrees. By default, the plugin only checks uniqueness across the subtree where the entry is created or updated, which means that if you create or update an entry underou=sales,dc=example,dc=com, the plugin checks themailattribute uniqueness only across this subtree.Optional: Set a subtree that the plugin must exclude from the attribute uniqueness verification.
For example, if you want the plugin to skip the
ou=internal,ou=sales,dc=example,dc=comsubtree, set theuniqueness-exclude-subtreesmulti-valued parameter:# dsconf <instance_name> plugin attr-uniq set "Mail Uniqueness" --exclude-subtree "ou=internal,ou=sales,dc=example,dc=com"Successfully changed the cn=Mail Uniqueness,cn=plugins,cn=config
Optional: If you what the plugin to verify uniqueness only in entries that contain a specific object class, set this object class as a value for the
uniqueness-subtree-entries-ocparameter.For example, you want the
mailattribute to be unique only in entries that contain theinetOrgPersonobject class, enter:# dsconf <instance_name> plugin attr-uniq set "Mail Uniqueness" --subtree-entries-oc=inetOrgPersonEnable the plugin on the server:
# dsconf <instance_name> plugin attr-uniq enable "Mail Uniqueness"Restart the instance:
# dsctl <instance_name> restart
Verification
View the configuration entry details:
# dsconf <instance_name> plugin attr-uniq show "Mail Uniqueness"dn: cn=Mail Uniqueness,cn=plugins,cn=config cn: Mail Uniqueness nsslapd-plugin-depends-on-type: database nsslapd-pluginDescription: Enforce unique attribute values nsslapd-pluginEnabled: on ... uniqueness-across-all-subtrees: on uniqueness-attribute-name: mail uniqueness-exclude-subtrees: ou=internal,ou=sales,dc=example,dc=com uniqueness-subtree-entries-oc: inetOrgPerson uniqueness-subtrees: ou=accounting,dc=example,dc=com uniqueness-subtrees: ou=sales,dc=example,dc=com
Additional resources
5.4.2. Configuring the Attribute Uniqueness plugin over object classes
To ensure that values of an attribute are unique in entries that contain a specific object class, configure the Attribute Uniqueness plugin.
Prerequisites
- You have root permissions.
To configure the plugin, you must set the following configuration parameters:
-
uniqueness-top-entry-oc. This parameter uniquely identifies a subtree under which the plugin verifies attribute uniqueness. The plugin verifies uniqueness only in entries whose parent entries contain the specific object class you set inuniqueness-top-entry-oc. If Directory Server did not find the object class in the parent entry of the updated entry, the search continues at the next higher level entry up to the root of the directory tree. -
uniqueness-subtree-entries-oc. This parameter identifies which entries the plugin must check. When you set an object class in theuniqueness-subtree-entries-ocparameter, the plugin verifies uniqueness of attributes only in updated entries that contain this specific object class.
Note that both uniqueness-top-entry-oc and uniqueness-subtree-entries-oc parameters are mandatory when you configure an attribute uniqueness over object classes.
Use the following example procedure to set the mail attribute to be unique in all entries under the entry that contains the nsContainer object class set and for the plugin to search the mail attribute in entries that contain the inetOrgPerson object class.
Procedure
Create a new plugin configuration entry:
# dsconf <instance_name> plugin attr-uniq add "Mail Uniqueness with OC" --attr-name mail --top-entry-oc=nsContainer --subtree-entries-oc=inetOrgPersonThe command creates the
cn=Mail uniqueness with OC,cn=plugins,cn=configentry with the configureduniqueness-top-entry-ocanduniqueness-subtree-entries-ocplugin parameters.Optional: Set a subtree that the plugin must exclude from the attribute uniqueness verification.
For example, if you want the plugin to skip the
ou=internal,ou=sales,dc=example,dc=comsubtree, set theuniqueness-exclude-subtreesmulti-valued parameter:# dsconf <instance_name> plugin attr-uniq set "Mail Uniqueness with OC" --exclude-subtree "ou=internal,ou=sales,dc=example,dc=com"Successfully changed the cn=Mail Uniqueness with OC,cn=plugins,cn=config
Enable the plugin on the server:
# dsconf <instance_name> plugin attr-uniq enable "Mail Uniqueness with OC"Successfully enabled the cn=Mail Uniqueness with OC,cn=plugins,cn=config
Restart the instance:
# dsctl <instance_name> restart
Verification
View the configuration entry details:
# dsconf <instance_name> plugin attr-uniq show "Mail Uniqueness with OC"dn: cn=Mail Uniqueness with OC,cn=plugins,cn=config cn: Mail Uniqueness with OC nsslapd-plugin-depends-on-type: database nsslapd-pluginDescription: none nsslapd-pluginEnabled: on ... uniqueness-attribute-name: mail uniqueness-exclude-subtrees: ou=internal,ou=sales,dc=example,dc=com uniqueness-subtree-entries-oc: inetOrgPerson uniqueness-top-entry-oc: nsContainer
5.4.3. Configuring the Attribute Uniqueness plugin over subtrees by using the web console
To configure the Attribute Uniqueness plugin, use the web console. Note that you can create different configuration entries of the plugin to apply different conditions.
Use the following example procedure to configure the plugin to verify uniqueness of the mail attribute in entries under the ou=sales,dc=example,dc=com and ou=accounting,dc=example,dc=com subtrees.
Prerequisites
- You have root permissions.
- You are logged in to the web console. For more details, see Logging in to the Directory Server by using the web console.
Procedure
- Select the instance, where you want to configure the plugin.
- Open the Plugins menu and select the Attribute Uniqueness plugin from the list.
- Click button to start configuring the new configuration entry of the plugin.
- Enter the name of the configuration entry in the Config Name field.
-
Select which attributes must be unique in the Attribute Names field. The field sets the
uniqueness-attribute-nameattribute. Enter the subtrees under which the plugin checks uniqueness of attributes in the Subtrees field. The field sets the
uniqueness-subtreesattribute.By default, the plugin checks uniqueness across only the subtree where the entry is created or updated. To check across all listed subtrees, check the checkbox that sets the
uniqueness-across-all-subtreesattribute toon.-
Optional: Enter the subtrees which the plugin must exclude from the attribute uniqueness verification in the Excluded Subtrees field. For example, you want to exclude
ou=eu_department,ou=accounting,dc=example,dc=com. The field sets theuniqueness-exclude-subtreesmulti-valued attribute. -
Toggle the switch to the
Configuration is enabledposition. Click button to finish creation of the plugin configuration entry.
Figure 5.1. Configuration example of the Attribute Uniqueness plugin.
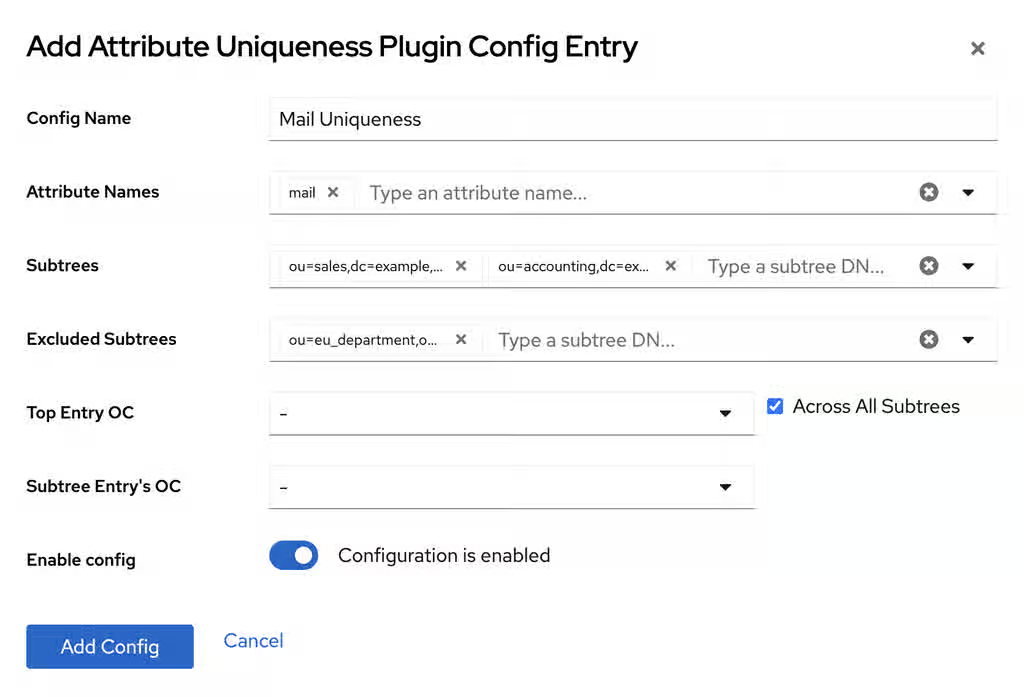
- Restart the instance. For more details, see Starting and stopping a Directory Server instance by using the web console.
Verification
- Find the newly created plugin entry in the list of configuration entries.
Additional resources
Chapter 6. Managing indexes in Directory Server
Indexing makes searching for and retrieving information faster by classifying and organizing attributes or values. You can request a contiguous subset of a large search result by using virtual list view control.
6.1. About indexes
Understand the purpose of indexes in Red Hat Directory Server to optimize the performance of search operations. With indexes, the server can locate specific directory entries without scanning the entire database, ensuring faster response times for client applications and reduced server load.
6.1.1. The different index types
Red Hat Directory Server supports several index types, each optimized for specific search operations. Understanding these types helps you to apply the correct indexing strategy to your attributes, ensuring efficient query processing while minimizing storage overhead and write performance costs.
Directory Server stores the indexes of each indexed attribute in a separate database file in the instance’s database directory. For example, the indexes of the sn attribute are stored in the /var/lib/dirsrv/slapd-<instance_name>/db/database_name/sn.db file. Each index file can contain multiple index types if Directory Server maintains different indexes for an attribute.
Directory Server supports the following index types:
-
The presence index (
pres) is a list of the entries that contain a particular attribute. For example, use this type when clients frequently perform searches, such asattribute=mail. -
The equality index (
eq) improves searches for entries containing a specific attribute value. For example, an equality index on thecnattribute enables faster searches forcn=first_name last_name. -
The approximate index (
approx) enables efficient approximate or sounds-like searches. For example, searches forcn~=first_name last_name,cn~=first_name, orcn~=first_nam(note the misspelling) would return an entrycn=first_name X last_name. Note that the metaphone phonetic algorithm in Directory Server supports only US-ASCII letters. Therefore, use approximate indexing only with English values. -
The substring index (
sub) is a costly index to maintain, but it enables efficient searching against substrings within entries. Substring indexes are limited to a minimum of three characters for each entry. For example, searches fortelephoneNumber=*555*return all entries in the directory with a value that contains555in thetelephoneNumberattribute. - International index speeds up searches for information in international directories. The process for creating an international index is similar to the process for creating regular indexes, except that it applies a matching rule by associating an object identifier (OID) with the attributes to be indexed.
6.1.2. Balancing the benefits of indexing
Indexing in Red Hat Directory Server accelerates search operations but consumes storage and impacts write performance. Understanding these trade-offs helps you to implement an indexing strategy that maximizes query speed without overburdening system resources or degrading update efficiency.
Before you create new indexes, balance the benefits of maintaining indexes against the costs:
- Approximate indexes are not efficient for attributes commonly containing numbers, such as phone numbers.
- Substring indexes do not work for binary attributes.
- Avoid equality indexes on attributes that contain big values, such as an image.
- Maintaining indexes for attributes that are not commonly used in searches increases the overhead without improving the search performance.
- Attributes that are not indexed can still be used in search requests, although the search performance can be degraded significantly, depending on the type of search.
Indexes can become very time-consuming. For example, if Directory Server receives an add operation, the server examines the indexing attributes to determine whether an index is maintained for the attribute values. If the created attribute values are indexed, Directory Server adds the new attribute values to the index, and then the actual attribute values are created in the entry.
Example 6.1. Indexing steps Directory Server performs when a user adds an entry
Assume that Directory Server maintains the following indexes:
-
Equality, approximate, and substring indexes for the
cnandsnattributes. -
Equality and substring indexes for the
telephoneNumberattribute. -
Substring indexes for the
descriptionattribute.
For example, a user adds the following entry:
dn: cn=John Doe,ou=People,dc=example,dc=com
objectclass: top
objectClass: person
objectClass: orgperson
objectClass: inetorgperson
cn: John Doe
cn: John
sn: Doe
ou: Manufacturing
ou: people
telephoneNumber: 408 555 8834
description: Manufacturing lead
When the user adds the entry, Directory Server performs the following steps:
-
Create the
cnequality index entry forJohnandJohn Doe. -
Create the
cnapproximate index entries forJohnandJohn Doe. -
Create the
cnsubstring index entries forJohnandJohn Doe. -
Create the
snequality index entry forDoe. -
Create the
snapproximate index entry forDoe. -
Create the
snsubstring index entry forDoe. -
Create the
telephoneNumberequality index entry for408 555 8834. -
Create the
telephoneNumbersubstring index entry for408 555 8834. -
Create the
descriptionsubstring index entry forManufacturing lead.
This example illustrates that the number of actions required to create and maintain databases for a large directory can be very resource-intensive.
Do not define a substring index for membership attributes (for example, member,uniquemember) because it can impact Directory Server performance. When adding or removing members, for example,uniquemember to a group with many members, the computation of the uniquemember substring index requires to evaluating all uniquemember values and not only added or removed values.
6.2. Defining a default index that applies to all newly created databases
Define a default index in Red Hat Directory Server to automatically apply specific indexing rules to all newly created databases.
The default index in Directory Server defines a set of attributes to be indexed. When you create a new database, Directory Server copies the default index attributes from cn=default indexes,cn=config,cn=ldbm database,cn=plugins,cn=config entry to the database-specific cn=index,cn=database_name,cn=ldbm database,cn=plugins,cn=config entry.
Directory Server does not apply changes in the default index to existing databases.
6.2.1. Default index attributes
Red Hat Directory Server includes a preconfigured set of default index attributes that support common LDAP search operations immediately after installation and stores these default index attributes in the cn=default indexes,cn=config,cn=ldbm database,cn=plugins,cn=config entry.
To display the default index attributes, including their index types, enter:
# ldapsearch -D "cn=Directory Manager" -W -H ldap://server.example.com -b "cn=default indexes,cn=config,cn=ldbm database,cn=plugins,cn=config" -s one -o ldif-wrap=noTable 6.1. Directory Server default index attributes
|
|
|
|
|
|
|
|
|
|
|
|
|
|
|
|
|
|
|
|
|
|
|
|
|
|
|
|
|
|
|
|
|
|
Removing the attributes listed in the table (system indexes) from the index of databases can significantly affect the Directory Server performance.
6.2.2. Maintaining the default index
Manage the default index configuration in Red Hat Directory Server to control the standard index types applied to attributes. Modifying these defaults helps you to optimize search performance and storage usage by ensuring that only necessary indexes are created automatically for new attributes.
Directory Server stores the default index attributes in the cn=default indexes,cn=config,cn=ldbm database,cn=plugins,cn=config entry. Note that you can only maintain the default index attributes by using LDIF statements.
Procedure
For example, to add the
roomNumberattribute to the default index with the index typeseqandsub, enter:# ldapadd -D "cn=Directory Manager" -W -H ldap://server.example.com -xThe
ldapaddutility requests you to provide the LDIF statement:dn: cn=roomNumber,cn=default indexes,cn=config,cn=ldbm database,cn=plugins,cn=config objectClass: nsIndex objectClass: top cn: roomNumber nsSystemIndex: false nsIndexType: eq nsIndexType: sub
where:
objectClass: nsIndex- Defines that this entry is an index entry.
objectClass: top- This object class is additionally required in index entries.
cn- Sets the name of the attribute to index.
nsSystemIndex- Indicates whether or not the index is essential to Directory Server operations.
nsIndexType- This multi-value attribute specifies the index types.
For example, to add the
presindex type to the default index attributes of theroomNumberattribute, enter:# ldapmodify -D "cn=Directory Manager" -W -H ldap://server.example.com -xThe
ldapmodifyutility requests you to provide the LDIF statement with updated index type:dn: cn=roomNumber,cn=default indexes,cn=config,cn=ldbm database,cn=plugins,cn=config changetype: modify add: nsIndexType nsIndexType: pres
For example, to remove the
presindex type from the default index attributes of theroomNumberattribute, enter:# ldapmodify -D "cn=Directory Manager" -W -H ldap://server.example.com -xThe
ldapmodifyutility requests you to provide the LDIF statement:dn: cn=roomNumber,cn=default indexes,cn=config,cn=ldbm database,cn=plugins,cn=config changetype: modify delete: nsIndexType nsIndexType: pres
For example, to remove the
roomNumberattribute from the default index, enter:# ldapdelete -D "cn=Directory Manager" -W -H ldap://server.example.com -x cn=roomNumber,cn=default indexes,cn=config,cn=ldbm database,cn=plugins,cn=config
Verification
List the default index attributes to verify your changes:
# ldapsearch -H ldap://server.example.com:389 -D "cn=Directory Manager" -W -b "cn=default indexes,cn=config,cn=ldbm database,cn=plugins,cn=config" -x -s one -o ldif-wrap=no
6.3. Maintaining the indexes of a specific database
Maintain the indexes of a specific database in Red Hat Directory Server to optimize search performance and ensure data integrity. Rebuilding or verifying indexes helps you to repair fragmented or corrupted index files.
Each database in Red Hat Directory Server has its own set of indexes. You can create, update, and delete indexes by using the dsconf utility or the web console.
When you regenerate an index while the server is online, after a new index creation or an index type change, Red Hat Directory Server continues to process search requests. However, this might lead to incorrect or inconsistent search results.
6.3.1. Maintaining the indexes of a specific database using the command line
Maintain the indexes of a specific database in Red Hat Directory Server by using the dsconf utility to ensure optimal search performance and data integrity.
Procedure
For example, to add the
roomNumberattribute to the index of theuserRootdatabase with the index typeseqandsub, enter:# dsconf <instance_name> backend index add --attr roomNumber --index-type eq --index-type sub --reindex userRootThe
--reindexoption causes that Directory Server automatically re-indexes the database.For example, to add the
presindex type to the index settings of theroomNumberattribute in theuserRootdatabase, enter:# dsconf <instance_name> backend index set --attr roomNumber --add-type pres userRootFor example, to remove the
presindex type from the index settings of theroomNumberattribute in theuserRootdatabase, enter:# dsconf <instance_name> backend index set --attr roomNumber --del-type pres userRootFor example, to remove the
roomNumberattribute from the index in theuserRootdatabase, enter:# dsconf <instance_name> backend index delete --attr roomNumber userRoot
Verification
List the index settings of the
userRootdatabase:# dsconf <instance_name> backend index list userRoot
6.3.2. Recreating an index while the instance is offline
Recreate an index in Red Hat Directory Server by using the dsctl db2index command while the server instance is stopped. Performing an offline index rebuild helps you to repair corrupted files or apply new configuration settings, ensuring maximum data integrity and processing speed.
Prerequisites
-
You created an indexing entry or added additional index types to the existing
userRootdatabase.
Procedure
Shut down the instance:
# dsctl <instance_name> stopRecreate the index:
For all indexes in the database, run:
# dsctl <instance_name> db2index[23/Feb/2023:05:38:28.034826108 -0500] - INFO - check_and_set_import_cache - pagesize: 4096, available bytes 1384095744, process usage 27467776 [23/Feb/2023:05:38:28.037952026 -0500] - INFO - check_and_set_import_cache - Import allocates 540662KB import cache. [23/Feb/2023:05:38:28.055104135 -0500] - INFO - bdb_db2index - userroot: Indexing attribute: aci ... [23/Feb/2023:05:38:28.134350191 -0500] - INFO - bdb_db2index - userroot: Finished indexing. [23/Feb/2023:05:38:28.151907852 -0500] - INFO - bdb_pre_close - All database threads now stopped db2index successful
For specific attribute indexes, run:
# dsctl <instance_name> db2index userRoot --attr aci cn givennameThe following command recreates indexes for
aci,cn, andgivennameattributes.Note that if no database is specified, the command recreates indexes for all attributes.
For more information regarding
dsctl(offline) command, run:# dsctl <instance_name> db2index --help
Start the instance:
# dsctl <instance_name> start
Verification
List the index settings of the
userRootdatabase:# dsconf <instance_name> backend index list userRoot
6.3.3. Maintaining the indexes of a specific database using the web console
Maintain the indexes of a specific database in Red Hat Directory Server by the web console to ensure optimal search performance and data integrity.
Prerequisites
- You are logged in to the instance in the web console.
Procedure
Navigate to → → → → .
To add an attribute to the index:
- Click .
-
Enter the attribute name to the
Select An Attributefield. - Select the index types.
- Select Index attribute after creation.
- Click .
To update the index settings of an attribute:
- Click the overflow menu next to the attribute, and select Edit Index.
- Update the index settings to your needs.
- Select Index attribute after creation.
- Click .
To delete an attribute from the index:
- Click the overflow menu next to the attribute, and select Delete Index.
- Select Yes, I am sure, and click .
- In the menu, select Reindex Suffix.
Verification
- Navigate to → → → → , and verify that the index settings reflect the changes you made.
6.4. Changing the search key length in a substring index
Optimize substring search performance and disk space usage by adjusting the index key length for specific attributes in Red Hat Directory Server.
By default, the length of the search key for substring indexes must be at least three characters. For example, Directory Server will add the string abc as a search key to an index while ab* will not. However, to improve the search performance, particularly for searches with many wildcard characters, you can shorten the search key length. This increases the number of search keys in the index.
Directory Server has three attributes that change the minimum number of characters required for a search key:
-
nsSubStrBegin: Sets the minimum number of characters for the beginning of a search key, before the wildcard character. For example:
abc*
-
nsSubStrMiddle: Sets the minimum number of characters in the search key between wildcard characters. For example:
*abc*
-
nsSubStrEnd: Sets the number of characters for the end of a search key, after the wildcard character. For example:
*xyz
6.4.1. Changing the search key length in a substring index using the command line
Improve search speeds by setting a new search key length for an attribute index.
Procedure
To set new search key length, add the
extensibleObjectobject class and then add thensSubStrBegin,nsSubStrEnd, ornsSubStrMiddleattributes to the entry. For example:# ldapmodify -D "cn=Directory Manager" -W -H ldap://server.example.com -xThe
ldapmodifyutility requires you to provide the LDIF statement with the new search key length details:dn: <attribute_name>,cn=index,cn=<database_name>,cn=ldbm database,cn=plugins,cn=config changetype: modify add: objectclass objectclass: extensibleObject - add: nsSubStrBegin nsSubStrBegin: 2 - add: nsSubStrMiddle nsSubStrMiddle: 2 - add: nsSubStrEnd nsSubStrEnd: 2
Recreate the index to apply the new setting. For example, while the Directory Server instance is running, use the following command to recreate the index for the specified attribute:
# dsconf <instance_name> backend index reindex --attr <attribute_name> <database_name>
Verification
-
Select the attribute for which you want to change the search key length, for example,
cn. Dump the
cnindex:# dbscan -f /var/lib/dirsrv/slapd-<instance_name>/db/database/cn.db > /tmp/default_len- Configure the new search key length as described in section Changing the search key length in a substring index using the command line.
Stop the instance to synchronize the database on the disk:
# dsctl <instance_name> stopDump the
cnindex:# dbscan -f /var/lib/dirsrv/slapd-<instance_name>/db/database/cn.db > /tmp/len_2Compare
len_2anddefault_lenfiles:# diff /tmp/len_2 /tmp/default_len
6.5. Using virtual list view control to request a contiguous subset of a large search result
Use the Virtual List View (VLV) control in Red Hat Directory Server to efficiently retrieve contiguous subsets of large search results. With configured VLV, clients can display sorted data in scrolling lists or pages without retrieving the entire dataset, ensuring faster response times and reduced network load.
The VLV control enables an LDAP client to request a contiguous subset of a large search result.
For example, you have stored an address book with 100.000 entries in Red Hat Directory Server. By default, a query for all entries returns all entries at once. This is a resource and time-consuming operation, and clients often do not require the whole data set because, if the user scrolls through the results, only a partial set is visible.
However, if the client uses the VLV control, the server only returns a subset and, for example, if the user scrolls in the client application, the server returns more entries. This reduces the load on the server, and the client does not need to store and process all data at once.
VLV also improves the performance of server-sorted searches when all search parameters are fixed. Red Hat Directory Server pre-computes the search results within the VLV index. Therefore, the VLV index is much more efficient than retrieving the results and sorting them afterwards.
In Red Hat Directory Server, the VLV control is always available. However, if you use it in a large directory, a VLV index, also called browsing index, can significantly improve the speed.
Red Hat Directory Server does not maintain VLV indexes for attributes, such as for standard indexes. The server generates VLV indexes dynamically based on attributes set in entries and the location of those entries in the directory tree. Unlike standard entries, VLV entries are special entries in the database.
6.5.1. How the VLV control works in ldapsearch commands
Typically, you use the virtual list view (VLV) feature in LDAP client applications. For example, for testing, you can use the ldapsearch utility to request only partial results.
To use the VLV feature in ldapsearch commands, specify the -E option for both the sss (server-side sorting) and vlv search extensions:
# ldapsearch ... -E 'sss=attribute_list' -E 'vlv=query_options'
The sss search extension has the following syntax:
[!]sss=[-]<attr[:OID]>[/[-]<attr[:OID]>...]
The vlv search extension has the following syntax:
[!]vlv=<before>/<after>(/<offset>/<count>|:<value>)
-
beforesets the number of entries returned before the targeted one. -
aftersets the number of entries returned after the targeted one. -
index,count, andvaluehelp to determine the target entry. If you setvalue, the target entry is the first one having its first sorting attribute starting with the value. Otherwise, you setcountto0, and the target entry is determined by theindexvalue (starting from 1). If thecountvalue is higher than0, the target entry is determined by the ratioindex * number of entries / count.
Example 6.2. Output of an ldapsearch command with VLV search extension
The following command searches in ou=People,dc=example,dc=com. The server then sorts the results by the cn attribute and returns the uid attributes of the 70th entry together with one entry before and two entries after the offset.
# ldapsearch -D "cn=Directory Manager" -W -H ldap://server.example.com -b "ou=People,dc=example,dc=com" -s one -x -E 'sss=cn' -E 'vlv=1/2/70/0' uid# user069, People, example.com dn: uid=user069,ou=People,dc=example,dc=com uid: user069 # user070, People, example.com dn: uid=user070,ou=People,dc=example,dc=com uid: user070 # user071, People, example.com dn: uid=user071,ou=People,dc=example,dc=com uid: user071 # user072, People, example.com dn: uid=user072,ou=People,dc=example,dc=com uid: user072 # search result search: 2 result: 0 Success control: 1.2.840.113556.1.4.474 false MIQAAAADCgEA sortResult: (0) Success control: 2.16.840.1.113730.3.4.10 false MIQAAAALAgFGAgMAnaQKAQA= vlvResult: pos=70 count=40356 context= (0) Success # numResponses: 5 # numEntries: 4 Press [before/after(/offset/count|:value)] Enter for the next window.
For details about the -E parameter, see the ldapsearch(1) man page on your system.
6.5.2. Enabling unauthenticated users to use the VLV control
Enable unauthenticated users to use the Virtual List View (VLV) control in Red Hat Directory Server to allow anonymous clients to perform sorted and paged search operations.
By default, the access control instruction (ACI) in the oid=2.16.840.1.113730.3.4.9,cn=features,cn=config entry enables only authenticated users to use the VLV control. To enable unauthenticated users to use the VLV control, update the ACI by changing userdn = "ldap:///all" to userdn = "ldap:///anyone"
Procedure
Update the ACI in
oid=2.16.840.1.113730.3.4.9,cn=features,cn=config:# ldapmodify -D "cn=Directory Manager" -W -H ldap://server.example.com -xThe
ldapmodifyutility requests you to provide the LDIF statement with the ACI update information:dn: oid=2.16.840.1.113730.3.4.9,cn=features,cn=config changetype: modify replace: aci aci: (targetattr != "aci")(version 3.0; acl "VLV Request Control"; allow( read, search, compare, proxy ) userdn = "ldap:///anyone";)
Verification
Perform a query with VLV control not specify a bind user:
# ldapsearch -H ldap://server.example.com -b "ou=People,dc=example,dc=com" -s one -x -E 'sss=cn' -E 'vlv=1/2/70/0' uidThis command requires that the server allows anonymous binds.
If the command succeeds but returns no entries, run the query again with a bind user to ensure that the query works when using authentication.
Additional resources
6.5.3. Creating a VLV index using the command line to improve the speed of VLV queries
Create a Virtual List View (VLV) index in Red Hat Directory Server to optimize the performance of search operations that request sorted and paged results. VLV indexes reduce the time and resources required to display large lists of entries to client applications.
For example, create a virtual list view (VLV) index, also called browsing index, for entries in ou=People,dc=example,dc=com that contain a mail attribute and have the objectClass attribute set to person.
Prerequisites
- Your client applications use the VLV control.
- Client applications require to query a contiguous subset of a large search result.
- The directory contains a large number of entries.
Procedure
Create the VLV search entry:
# dsconf <instance_name> backend vlv-index add-search --name "VLV People" --search-base "ou=People,dc=example,dc=com" --search-filter "(&(objectClass=person)(mail=*))" --search-scope 2 userRootThis command uses the following options:
-
--namesets the name of the search entry. This can be any name. -
--search-basesets the base DN for the VLV index. Directory Server creates the VLV index on this entry. -
--search-scopesets the scope of the search to run for entries in the VLV index. You can set this option to0(base search),1(one-level search), or2(subtree search). -
--search-filtersets the filter Directory Server applies when it creates the VLV index. Only entries that match this filter become part of the index. -
userRootis the name of the database in which to create the entry.
-
Create the index entry:
# dsconf <instance_name> backend vlv-index add-index --index-name "VLV People - cn sn" --parent-name "VLV People" --sort "cn sn" --index-it userRootThis command uses the following options:
-
--index-namesets the name of the index entry. This can be any name. -
--parent-namesets the name of the VLV search entry and must match the name you set in the previous step. -
--sortsets the attribute names and their sort order. Separate the attributes by space. -
--index-itcauses that Directory Server automatically starts an index task after the entry was created. -
userRootis the name of the database in which to create the entry.
-
Verification
Verify the successful creation of the VLV index in the
/var/log/dirsrv/slapd-<instance_name>/errorsfile:[26/Nov/2021:11:32:59.001988040 +0100] - INFO - bdb_db2index - userroot: Indexing VLV: VLV People - cn sn [26/Nov/2021:11:32:59.507092414 +0100] - INFO - bdb_db2index - userroot: Indexed 1000 entries (2%). ... [26/Nov/2021:11:33:21.450916820 +0100] - INFO - bdb_db2index - userroot: Indexed 40000 entries (98%). [26/Nov/2021:11:33:21.671564324 +0100] - INFO - bdb_db2index - userroot: Finished indexing.Use the VLV control in an
ldapsearchcommand to query only specific records from the directory:# ldapsearch -D "cn=Directory Manager" -W -H ldap://server.example.com -b "ou=People,dc=example,dc=com" -s one -x -E 'sss=cn' -E 'vlv=1/2/70/0' uid# user069, People, example.com dn: uid=user069,ou=People,dc=example,dc=com cn: user069 # user070, People, example.com dn: uid=user070,ou=People,dc=example,dc=com cn: user070 # user071, People, example.com dn: uid=user071,ou=People,dc=example,dc=com cn: user071 # user072, People, example.com dn: uid=user072,ou=People,dc=example,dc=com cn: user072
This example assumes you have entries continuously named
uid=user001to at leastuid=user072inou=People,dc=example,dc=com.For details about the
-Eparameter, see theldapsearch(1)man page on your system.
Additional resources
6.5.4. Creating a VLV index using the web console to improve the speed of VLV queries
Create a Virtual List View (VLV) index in Red Hat Directory Server to optimize the performance of search operations that request sorted and paged results. VLV indexes reduce the time and resources required to display large lists of entries to client applications.
For example, create a virtual list view (VLV) index, also called browsing index, for entries in ou=People,dc=example,dc=com that contain a mail attribute and have the objectClass attribute set to person.
Prerequisites
- You are logged in to the instance in the web console.
- Your client applications use the VLV control.
- Client applications require to query a contiguous subset of a large search result.
- The directory contains a large number of entries.
Procedure
- Navigate to → → → .
Click , and fill the fields:
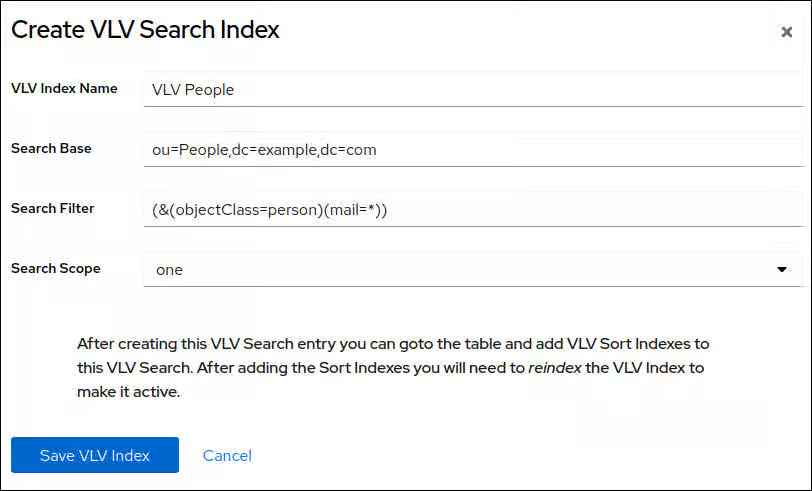
-
VLV Index Name: The name of the search entry. This can be any name. -
Search base: The base DN for the VLV index. Directory Server creates the VLV index on this entry. -
Search Filter: The filter Directory Server applies when it creates the VLV index. Only entries that match this filter become part of the index. -
Search Scope: The scope of the search to run for entries in the VLV index.
-
- Click .
- Click
Enter the attribute names, and select Reindex After Saving.
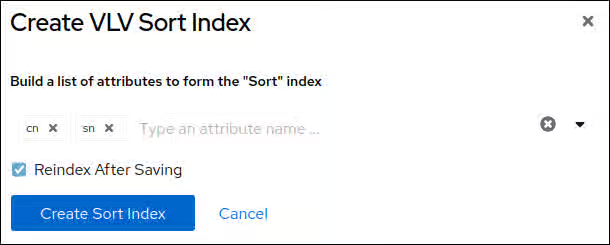
- Click .
Verification
Navigate to → → and verify the successful creation of the VLV index:
[26/Nov/2021:11:32:59.001988040 +0100] - INFO - bdb_db2index - userroot: Indexing VLV: VLV People - cn sn [26/Nov/2021:11:32:59.507092414 +0100] - INFO - bdb_db2index - userroot: Indexed 1000 entries (2%). ... [26/Nov/2021:11:33:21.450916820 +0100] - INFO - bdb_db2index - userroot: Indexed 40000 entries (98%). [26/Nov/2021:11:33:21.671564324 +0100] - INFO - bdb_db2index - userroot: Finished indexing.Use the VLV control in an
ldapsearchcommand to query only specific records from the directory:# ldapsearch -D "cn=Directory Manager" -W -H ldap://server.example.com -b "ou=People,dc=example,dc=com" -s one -x -E 'sss=cn' -E 'vlv=1/2/70/0' uid# user069, People, example.com dn: uid=user069,ou=People,dc=example,dc=com cn: user069 # user070, People, example.com dn: uid=user070,ou=People,dc=example,dc=com cn: user070 # user071, People, example.com dn: uid=user071,ou=People,dc=example,dc=com cn: user071 # user072, People, example.com dn: uid=user072,ou=People,dc=example,dc=com cn: user072
This example assumes you have entries continuously named
uid=user001to at leastuid=user072inou=People,dc=example,dc=com.For details about the
-Eparameter, see theldapsearch(1)man page on your system.
Additional resources
Chapter 7. Managing the directory schema
You can store additional data in the Directory Server by adding custom schemas by using the dsconf utility or the web console. You can also extend the schema and validate the syntax of existing attributes value.
7.1. Workflow of a schema extension
Following the recommended workflow for schema extensions to plan, implement, and verify changes safely, ensuring data integrity and compatibility with the existing directory structure.
Adding new schema elements requires:
Planning and defining unique object identifiers (OID) for the new schema. Directory Server recognizes schema elements by their OID, but you must manage the OIDs manually.
An OID is a dot-separated number that identifies the schema element to the server. OIDs can be hierarchical with a base OID that can be expanded to accommodate different branches. For example, the base OID could be
1, and there can be a branch for attributes at1.1and for object classes at1.2.ImportantEven if not required, Red Hat recommends to use numeric OIDs for custom schemas for better forward compatibility and performance.
- Request OIDs from the Internet Assigned Numbers Authority (IANA). For details, see Content from pen.iana.org is not included.https://pen.iana.org/pen/PenApplication.page.
- Create a OID registry to track OID assignments and to ensure that no OID is used for more than one purpose. An OID registry is a list of all OIDs used in the directory schema including descriptions. Publish the OID registry with the custom schema.
- Define the new attributes.
- Define the object classes that contain the new attributes. However, never update the default schema. If you create new attributes, always add them to a custom object class.
Directory Server loads the schema when the instance starts. To load new schema files, restart the instance or initiate a reload task.
Keep the following rules in mind when customizing the Directory Server schema:
- Keep the schema as simple as possible.
- Reuse existing schema elements whenever possible.
- Minimize the number of mandatory attributes defined for each object class.
- Do not define more than one object class or attribute for the same purpose.
- Do not modify any existing definitions of attributes or object classes.
Do not update or delete the standard schema to avoid compatibility problems with other directories or LDAP client applications.
7.2. How Directory Server manages schema updates in a replication environment
Review how schema changes propagate through a replication topology to prevent data conflicts and synchronization errors.
When you update the directory schema in the cn=schema tree, Red Hat Directory Server stores the changes in the /etc/dirsrv/slapd-<instance_name>/schema/99user.ldif file, including a change state number (CSN). Red Hat Directory Server does not directly replicate the schema changes to other replicas. Schema replication starts when directory content is updated in the replicated tree.
For example, if you update a user after modifying the schema, the supplier compares the CSN stored in the nsSchemaCSN attribute with the one on the consumer. If the value of the nsSchemaCSN attribute on the consumer is lower than the one on the supplier, Directory Server replicates the schema to the consumer. For a successful replication, all object classes and attribute types on the supplier must be a superset of the consumer’s definition.
Example 7.1. Schema subsets and supersets
-
On
server1, theexampleobject class allows thea1,a2, anda3attributes. -
On
server2, theexampleobject class allows thea1anda3attributes.
In the previous example, the schema definition of the example object class on server1 is a superset of the object class on server2. During the validation phase, when Directory Server replicates or accepts the schema, the server retrieves the superset definitions. For example, if a consumer detects that an object class in the local schema allows less attributes than the object class in the supplier schema, Directory Server updates the local schema.
If the schema definitions are successfully replicated, the nsSchemaCSN attributes are identical on both servers and the schema definitions, such as object classes and attributes types, are no longer compared at the beginning of a replication session.
In the following scenarios, Directory Server does not replicate the schema:
The schema on one host is a subset of the schema of another host.
For example, the schema definition of the
exampleobject class onserver2is a subset of the object class onserver1. Subsets can also occur for attributes (a single-value attribute is a subset of a multi-value attribute) and attribute syntaxes.- When definitions in supplier schema and consumer schema need to be merged.
-
Directory Server does not support merging schemas. For example, if an object class on one server allows the
a1,a2, anda3attributes anda1,a3, anda4on the other, the schemas are not subsets and cannot be merged. You use schema files other than
/etc/dirsrv/slapd-<instance_name>/schema/99user.ldif.Directory Server enables you to add additional schema files to the
/etc/dirsrv/slapd-instance_name/schema/directory. However, only the CSN in the/etc/dirsrv/slapd-instance_name/schema/99user.ldiffile is updated. For this reasons, other schema file are used only locally and not automatically transferred to replication partners.ImportantTo enable Directory Server to automatically replicate the schema and to avoid duplicate schema definitions, store the custom schema in the
/etc/dirsrv/slapd-<instance_name>/schema/99user.ldiffile.
7.3. Create a custom schema for an attribute and object class using dsconf
To store specialized data required by your applications, add custom attributes and object classes to Red Hat Directory Server (RHDS) by extending the schema. It ensures that the directory service supports unique operational needs.
Review the example procedure that creates a custom schema with the following characteristics:
-
A single-valued attribute named
dateOfBirthwith OID2.16.840.1.1133730.2.1.123and syntaxDirectory String(OID1.3.6.1.4.1.1466.115.121.1.15) -
An object class named
examplepersonwithout parent object class (SUP top), OID2.16.840.1.1133730.2.1.99that must contain thedateOfBirthattribute.
Procedure
Create the
dateOfBirthattribute:# dsconf <instance_name> schema attributetypes add --oid="2.16.840.1.1133730.2.1.123" --desc="For employee birthdays" --syntax="1.3.6.1.4.1.1466.115.121.1.15" --single-value --x-origin="Example defined" dateOfBirthCreate the
examplepersonobject class:# dsconf <instance_name> schema objectclasses add --oid="2.16.840.1.1133730.2.1.99" --desc="An example person object class" --sup="top" --must="dateOfBirth" examplePersonRun a schema reload task:
# dsconf <instance_name> schema reload
Verification
Monitor the
/var/log/dirsrv/slapd-<instance_name>/errorsfile:If the build succeeds, Directory Server logs:
[23/Sep/2021:13:47:33.334241406 +0200] - INFO - schemareload - schemareload_thread - Schema reload task starts (schema dir: default) ...
[23/Sep/2021:13:47:33.415692558 +0200] - INFO - schemareload - schemareload_thread - Schema validation passed.
[23/Sep/2021:13:47:33.454768148 +0200] - INFO - schemareload - schemareload_thread - Schema reload task finished.
- If the build fails, Directory Server logs which step failed and why.
7.4. Create a custom schema for an attribute and object class using the web console
To store specialized data required by your applications, add custom attributes and object classes to Red Hat Directory Server (RHDS) by extending the schema. It ensures that the directory service supports unique operational needs.
Review the example procedure that creates a custom schema with the following characteristics:
-
A single-valued attribute named
dateOfBirthwith OID2.16.840.1.1133730.2.1.123and syntaxDirectory String(OID1.3.6.1.4.1.1466.115.121.1.15) -
An object class named
examplepersonwithout parent object class (SUP top), OID2.16.840.1.1133730.2.1.99that must contain thedateOfBirthattribute
If you use the web console to update the schema, Directory Server automatically reloads the schema.
Prerequisites
- You are logged in to the instance in the web console.
Procedure
- Navigate to → , and click .
Enter the settings of the attribute you want to add:
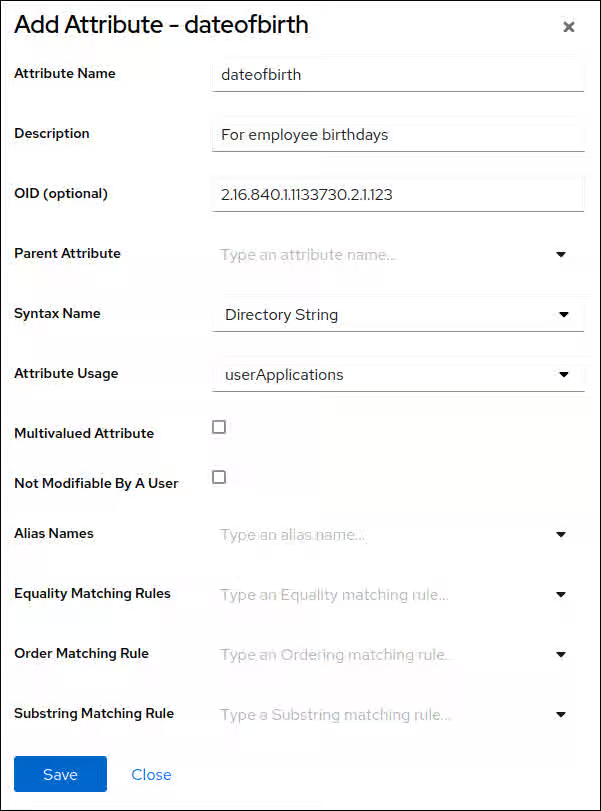
- Click
- Navigate to → , and click .
Enter the settings of the object class you want to add:
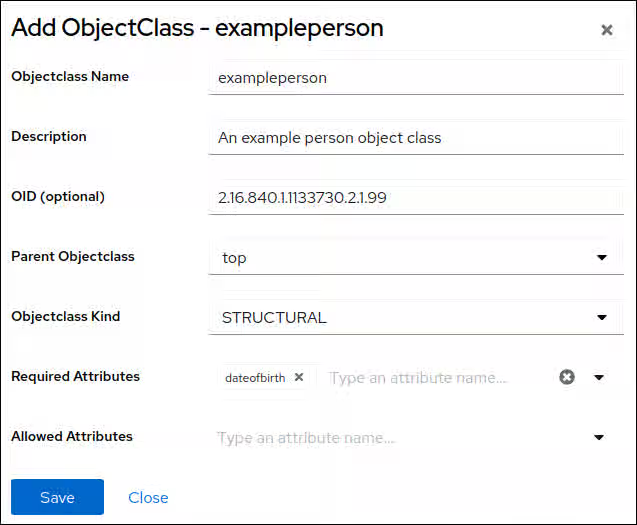
- Click
Verification
Navigate to → → .
If the build succeeds, Directory Server logs:
[23/Sep/2021:13:47:33.334241406 +0200] - INFO - schemareload - schemareload_thread - Schema reload task starts (schema dir: default) ...
[23/Sep/2021:13:47:33.415692558 +0200] - INFO - schemareload - schemareload_thread - Schema validation passed.
[23/Sep/2021:13:47:33.454768148 +0200] - INFO - schemareload - schemareload_thread - Schema reload task finished.
- If the build fails, Directory Server logs which step failed and why.
7.5. Manually creating a custom schema file
Manually create a custom schema file in Red Hat Directory Server to extend the directory with attributes and object classes specific to your environment. Defining custom schema elements helps you to store specialized data required by your applications.
7.5.1. Requirements for a schema file
Schema files use the LDIF format that define the cn=schema entry. Each attribute type and object class is added to this entry.
The following are the requirements for a schema file:
The file must start with the following entry:
dn: cn=schema
- A schema file can include attribute types or object classes or both of them.
- Object class definitions can use attributes defined in other schema files.
Depending on which instances should use a custom schema file, store it in one of the following locations:
-
/etc/dirsrv/slapd-<instance_name>/schema/to make the schema file available to this specific instance -
/usr/share/dirsrv/schema/to make the schema file available to all instances running on this host
-
By default, Directory Server expects the custom schema in the
99user.ldiffile. If you use a different file name:-
The name must be alphabetically lower than
99user.ldif. For example,99aaa.ldifis ok, but99zzz.ldifis not. The name must start with two digits and be higher than
01because custom schema files must be loaded after the core schema files, which begin with00up to98Directory Server reads schema files in alphabetical order. Therefore, for example, if you store a definition
99user.ldif, it will override definitions from standard files whose name begins with00and01.
-
The name must be alphabetically lower than
-
If you want to use a standard schema file from the
/usr/share/dirsrv/data/directory, copy the file to/etc/dirsrv/slapd-<instance_name>/schema/or/usr/share/dirsrv/schema/depending on which instances should use the file. However, use a different file name in the destination directory. Otherwise, Directory Server renames the file during an upgrade and appends the.baksuffix.
Example 7.2. Example of a custom schema file
dn: cn=schema
objectClasses: ( 2.16.840.1.1133730.2.1.123 NAME 'exampleperson' DESC 'An example
  person object class' SUP top STRUCTURAL MUST dateOfBirth X-ORIGIN 'user defined' )
attributeTypes: ( 2.16.840.1.1133730.2.1.99 NAME 'dateOfBirth' DESC 'For employee
  birthday' SYNTAX 1.3.6.1.4.1.1466.115.121.1.15 SINGLE-VALUE X-ORIGIN 'user defined' )
7.5.2. The definition of attributes in custom schema files
You define attributes in schema files as values of attributeTypes attributes.
Example 7.3. Definition of an attribute
attributeTypes: ( 2.16.840.1.1133730.2.1.123 NAME 'dateOfBirth' DESC 'For employee birthday' SYNTAX 1.3.6.1.4.1.1466.115.121.1.15 SINGLE-VALUE X-ORIGIN 'user defined' )
The attribute definition contains the following components:
- A unique object identifier (OID) specified as a dot-separated number.
-
A unique name in the form of
NAME attribute_name. -
A description in the form of
DESC description. -
The OID for the syntax of the attribute values in the form
SYNTAX OID. For details about the LDAP attribute syntaxes, see Content from datatracker.ietf.org is not included.RFC 4517. - Optional: The source where the attribute is defined.
7.5.3. The definition of object classes in custom schema files
You define object classes in schema files as values of objectClasses attributes.
Example 7.4. Definition of an object class
objectClasses: ( 2.16.840.1.1133730.2.1.99 NAME 'exampleperson' DESC 'An example person object class' SUP top STRUCTURAL MUST dateOfBirth X-ORIGIN 'user defined' )
The object class definition contains the following components:
- A unique object identifier (OID) specified as a dot-separated number.
-
A unique name in the form of
NAME attribute_name. -
A description in the form of
DESC description. -
The superior (parent) object class for this object class in the form
SUP object_class. If there is no related parent, useSUP top. -
The word
STRUCTURALdefines the type of entry to which the object class applies. Any entry must belong to at least oneSTRUCTURALobject class.AUXILIARYmeans that it can apply to any entry. -
A list of required attributes, preceded by the
MUSTkeyword. To include multiple attributes, enclose the group in parentheses and separate the attributes with a$(dollar sign and space). -
A list of optional attributes, preceded by the
MAYkeyword. To include multiple attributes, enclose the group in parentheses and separate the attributes with a$(dollar sign and space).
Only the name and OID is required, and other settings depend on the needs of the object class.
Additional resources
7.5.4. Manually creating a custom schema file for an attribute and object class
If you want to manually create a custom schema, store it in the /etc/dirsrv/slapd-<instance_name>/schema/99user.ldif file.
Using a different file name is possible, but causes drawbacks, such as schema definitions stored in other files are replicated, but then stored in /etc/dirsrv/slapd-<instance_name>/schema/99user.ldif on the replica. See How Directory Server manages schema updates in a replication environment.
The following procedure adds:
-
A single-valued attribute named
dateOfBirthwith OID2.16.840.1.1133730.2.1.123and syntaxDirectory String(OID1.3.6.1.4.1.1466.115.121.1.15) -
An object class named
examplepersonwithout parent object class (SUP top) that must contain thedateOfBirthattribute.
Procedure
Add the following content below the
dn: cn=schemaentry in the/etc/dirsrv/slapd-<instance_name>/schema/99user.ldiffile:attributeTypes: ( 2.16.840.1.1133730.2.1.123 NAME 'dateOfBirth' DESC 'For employee birthday' SYNTAX 1.3.6.1.4.1.1466.115.121.1.15 SINGLE-VALUE X-ORIGIN 'user defined' ) objectClasses: ( 2.16.840.1.1133730.2.1.99 NAME 'exampleperson' DESC 'An example person object class' SUP top STRUCTURAL MUST dateOfBirth X-ORIGIN 'user defined' )
Run a schema reload task:
# dsconf <instance_name> schema reload
Verification
Monitor the
/var/log/dirsrv/slapd-<instance_name>/errorsfile:If the build succeeds, Directory Server logs:
[23/Sep/2021:13:47:33.334241406 +0200] - INFO - schemareload - schemareload_thread - Schema reload task starts (schema dir: default) ...
[23/Sep/2021:13:47:33.415692558 +0200] - INFO - schemareload - schemareload_thread - Schema validation passed.
[23/Sep/2021:13:47:33.454768148 +0200] - INFO - schemareload - schemareload_thread - Schema reload task finished.
- If the build fails, Directory Server logs which step failed and why.
7.6. Validating the syntax of existing attribute values
With syntax validation, the Red Hat Directory Server checks if an attribute value follows the rules of the syntax provided in the definition of that attribute. The Directory Server records the results of syntax validation tasks in the /var/log/dirsrv/slapd-instance_name/errors file.
Manual syntax validation is required if:
You have the syntax validation disabled in the
nsslapd-syntaxcheckparameter.NoteIn most cases, the syntax validation must be enabled.
- You migrate data from a server with disabled or without syntax validation.
7.6.1. Creating a syntax validation task using the dsconf schema validate-syntax command
To check every modified attribute and ensure that the new value has the required syntax, you can create a syntax validation task by using the dsconf schema validate-syntax command.
Procedure
To create a syntax validation task, enter:
# dsconf <instance_name> schema validate-syntax -f '(objectclass=inetorgperson)' ou=People,dc=example,dc=comIn the example output, the command creates a task that validates the syntax of all values in the
ou=People,dc=example,dc=comsub-tree which match the(objectclass=inetorgperson)filter.
7.6.2. Creating a syntax validation task using a cn task entry
The cn=tasks,cn=config entry in the Directory Server configuration is a container entry for temporary entries used by the server for managing tasks. You can initiate a syntax validation operation by creating a task in the cn=syntax validate,cn=tasks,cn=config entry.
Procedure
To initiate a syntax validation operation, create a task in the
cn=syntax validate,cn=tasks,cn=configentry as follows:# ldapadd -D "cn=Directory Manager" -W -H ldap://server.example.com -xThe
ldapaddutility requires you to provide the LDIF statement with the task details:dn: cn=example_syntax_validate,cn=syntax validate,cn=tasks,cn=config objectclass: extensibleObject cn: cn=example_syntax_validate basedn: ou=People,dc=example,dc=com filter: (objectclass=inetorgperson)
In the example output, the command creates a task that validates the syntax of all values in the
ou=People,dc=example,dc=comsub-tree that is similar to the(objectclass=inetorgperson)filter. When the task completes, Directory Server deletes the entry from the directory configuration.
Chapter 8. Monitoring server and database activity
Monitor Directory Server and replication topology by using the web console and the dsconf utility to track performance metrics and connection statistics. You can configure Directory Server to record events to log files that you can then use to troubleshoot, monitor, and analyze the directory activity.
8.1. Monitoring Directory Server activity
Monitor activity in Red Hat Directory Server to oversee the health and performance of your directory services. Observing system metrics and logs helps you to detect anomalies, optimize resource usage, and troubleshoot issues.
The Red Hat Directory Server tracks and records performance data by using performance counters and logs.
- Performance counters provide a measurement of the Directory Server performance. Performance counters focus on the operations and information of Directory Server, configured databases, and database links (chaining databases).
Log files record events that happen during server activity. To monitor the performance, you can use the following logs:
- Access log
- Error log
- Audit log
- Audit fail log
Security log
For more details about log files, see Types of log files in Directory Server.
The information on the current Directory Server activities is available through the web console or by using the command line. You can also monitor the cache activity of all databases.
The access log is buffered and it enables full access logging even with highly loaded servers. However, there is a discrepancy between when the event occurs on the server and the time the event is recorded in the log.
8.1.1. Monitoring Directory Server using the command line
With the dsconf utility, you can monitor the disk usage, query server statistics that are stored in the directory, and other metrics to track the performance.
Prerequisite
-
Ensure the server is running to use the
dconfutility.
Procedure
To monitor the server performance using the command-line, run:
# dsconf <instance_name> monitor server
8.1.2. Monitoring Directory Server using the web console
Monitor the status and performance of Red Hat Directory Server to track server activity in real time. Viewing statistics through the graphical interface helps you to identify resource bottlenecks and operational issues quickly, ensuring the stability and availability of your directory services.
Procedure
To open Directory Server in the web console, connect to the web console running on port 9090 on the Directory Server host.
https://server.example.com:9090
-
Log in as the
rootuser or withsudoprivileges. Under the Monitoring tab, select → .
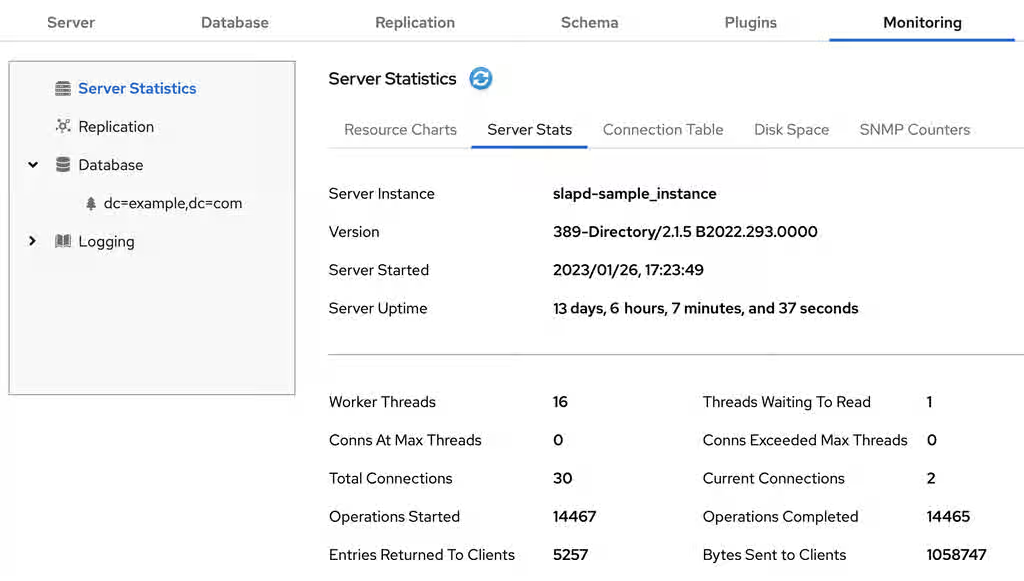
Additional resources
8.1.3. Server monitoring attributes
Review server monitoring attributes that display real-time statistics for an Red Hat Directory Server instance to track active connections, operation rates, and system uptime, helping you assess the overall health and performance of the server.
The dsconf command returns the following attributes when monitoring Red Hat Directory Server:
Table 8.1. Server monitoring attributes
| Attribute | Description |
|---|---|
|
| Identifies the current directory version number. |
|
| The current number of active threads handling requests. The internal server tasks, such as replication or chaining, can create additional threads when required. |
|
| Provides the following summary information for each open connection when you bind to the directory as the Directory Manager:
By default, this information is available to the Directory Manager. However, you can edit the Access Control Instruction (ACI) attribute in directory entries and configure additional users on access privileges to the information. |
|
| Identifies the number of connections currently in service by the directory. |
|
| Identifies the number of connections the server handles after it starts. |
|
|
Displays the connections currently in a |
|
|
Displays the number of times a connection hits the |
|
|
Shows the number of file descriptors available for the directory. Each connection requires one file descriptor for every open index, log file management, and for |
|
| Identifies the number of threads waiting to read data from a client. |
|
| Identifies the number of operations the server initiates after it starts. |
|
| Identifies the number of operations the server completes. |
|
| Identifies the number of entries sent to clients after the server starts. |
|
| Identifies the number of bytes sent to clients after the server starts. |
|
| Identifies the server snapshot time. The time display is Greenwich Mean Time (GMT) in UTC format. |
|
| Identifies the time when the server starts. The time display is Greenwich Mean Time (GMT) in UTC format. |
|
| Identifies the number of back ends (databases) the server services. |
8.1.4. Server information
View Red Hat Directory Server server information to identify the software version, build number, and system uptime. Accessing these details helps you to verify the status of your deployment after maintenance and gather necessary environmental data for troubleshooting or support inquiries.
The Directory Server displays the following fields under the Server Information menu:
Table 8.2. Server information
| Field | Description |
|---|---|
|
| Displays the name of the Directory Server instance. |
|
| Identifies the current server version. |
|
| The date and time the server is up and running. |
|
| The measure of time the instance is up and running. |
|
| The current number of active threads that handle requests. The internal server tasks, such as replication or chaining, can create additional threads when required. |
|
| The total number of threads waiting to be read from the client. Threads may not be immediately read if the server receives new request from the client and halts the request transmission. Generally, waiting threads indicate a slow network or a slow client. |
|
|
Displays all connections that are currently in a |
|
|
Displays the number of times a connection hits |
|
| The total number of connections established to a Directory Server instance. |
|
| The total number of open connections. Each connection can start multiple operations and therefore multiple threads. |
|
| The number of operations initiated by a connection. |
|
| The number of operations completed by the server for all connections. |
|
| The number of entries sent to clients after the server starts. |
8.2. Using the health check to identify problems
Perform a health check to analyze the Red Hat Directory Server instance for potential issues and get recommended solutions.
8.2.1. Running the Directory Server health check
Run the Red Hat Directory Server health check to validate your server configuration and detect potential operational risks. Use the dsctl healthcheck command to view the health check report.
Procedure
To run a health check, enter:
# dsctl <instance_name> healthcheckBeginning lint report, this could take a while ... Checking Backends ... Checking Config ... Checking Encryption ... Checking FSChecks ... Checking ReferentialIntegrityPlugin ... Checking MonitorDiskSpace ... Checking Replica ... Checking Changelog ... Checking NssSsl ... Healthcheck complete. 1 Issue found! Generating report ...
To display the output in JSON format, pass the
--jsonparameter to the command:# dsctl --json <instance_name> healthcheckPossible report of the health check
[1] DS Lint Error: DSELE0001 -------------------------------------- Severity: MEDIUM Affects: -- cn=encryption,cn=config Details: ----------- This Directory Server may not be using strong TLS protocol versions. TLS1.0 is known to have a number of issues with the protocol. Please see: https://tools.ietf.org/html/rfc7457 It is advised you set this value to the maximum possible. Resolution: ----------- There are two options for setting the TLS minimum version allowed. You, can set "sslVersionMin" in "cn=encryption,cn=config" to a version greater than "TLS1.0" You can also use 'dsconf' to set this value. Here is an example: # dsconf slapd-instance_name security set --tls-protocol-min=TLS1.2 You must restart the Directory Server for this change to take effect. Or, you can set the system wide crypto policy to FUTURE which will use a higher TLS minimum version, but doing this affects the entire system: # update-crypto-policies --set FUTURE \===== End Of Report (1 Issue found) =====Possible report of the health check in JSON format
[
    {
        "dsle": "DSELE0001",
        "severity": "MEDIUM",
        "items": [
            "cn=encryption,cn=config"
        ],
        "detail": "This Directory Server may not be using strong TLS protocol versions. TLS1.0 is known to\nhave a number of issues with the protocol. Please see:\n\nhttps://tools.ietf.org/html/rfc7457\n\nIt is advised you set this value to the maximum possible.",
        "fix": "There are two options for setting the TLS minimum version allowed.  You,\ncan set \"sslVersionMin\" in \"cn=encryption,cn=config\" to a version greater than \"TLS1.0\"\nYou can also use 'dsconf' to set this value.  Here is an example:\n\n    # dsconf slapd-instance_name security set --tls-protocol-min=TLS1.2\n\nYou must restart the Directory Server for this change to take effect.\n\nOr, you can set the system wide crypto policy to FUTURE which will use a higher TLS\nminimum version, but doing this affects the entire system:\n\n    # update-crypto-policies --set FUTURE"
    }
]
Additional resources
8.2.2. Overview of health checks
Red Hat Directory Server provides health checks to analyze server configuration and runtime status for potential risks. Reviewing these checks helps you to proactively detect and resolve issues, such as replication errors or resource bottlenecks.
The dsctl healthcheck command performs the following checks:
Table 8.3. Health checks overview
| Component | Severity | Result code | Description |
|---|---|---|---|
| Back end | Medium | DSBLE0006 | Berkeley database (BDB) is still used as a backend. BDB is deprecated and should not be used as a backend. |
| Back end | Low | DSBLE0005 | Backend configuration attributes mismatch. Found configuration attributes that are not applicable for the configured backend type. |
| Back end | Low | DSBLE0003 | The database was not initialized. The database was created, but it is empty. |
| Back end | Medium | DSBLE0001 | The mapping tree entry for a back end is missing in the configuration. |
| Config | Low | DSCLE0001 | High-resolution time stamps are disabled. |
| Config | High | DSVIRTLE0001 | A virtual attribute is incorrectly indexed. Indexed attributes used by roles or Class of Service (CoS) definitions can corrupt search results. |
| Operating System | Medium | DSPERMLE0001 |
The permissions set on the |
| Operating System | High | DSDSLE0001 | Low disk space. |
| Operating System | High | DSPERMLE0002 |
The permissions set on the |
| Plug-ins | Low | DSRILE0001 | An update delay is set for the Referential Integrity plug-in. This can cause replication issues. |
| Plug-ins | High | DSRILE0002 | The Referential Integrity plug-in misses indexes. The plug-in queries certain attributes for every delete operation if they are not indexed. This can cause hard-to-detect unindexed searches and high CPU usage. |
| Replication | Low | DSREPLLE0002 | Conflict entries exist in the database. |
| Replication | Low | DSSKEWLE0001 | The replication time skew is larger than 6 hours and lower than 12 hours. |
| Replication | Medium | DSCLLE0001 | Changelog trimming is disabled. In this case, the changelog grows without limits. |
| Replication | Medium | DSREPLLE0004 | The health check failed to retrieve the replication status. |
| Replication | Medium | DSREPLLE0003 | The topology is out of synchronization, but the replication is working. |
| Replication | Medium | DSREPLLE0005 | A remote replica is not reachable. |
| Replication | Medium | DSSKEWLE0002 | The replication time skew is larger than 12 hours and lower than 24 hours. |
| Replication | High | DSREPLLE0001 | The topology is out of synchronization, and the replication is not working. |
| Replication | High | DSSKEWLE0003 | The replication time skew is larger than 24 hours. Replication sessions could break. |
| Security | Medium | DSELE0001 | The minimum TLS version is set to a value lower than TLS 1.2. |
| Security | High | DSCLE0002 | A password storage scheme is weak. |
| Server | High | DSBLE0002 | The health check failed to query the back end. |
| Transparent Huge Pages (THP) | Medium | DSTHPLE0001 | THP are enabled and might have an impact on the Directory Server performance. |
| TLS certificates | Medium | DSCERTLE0001 | The server certificate expires within the next 30 days. |
| TLS certificates | High | DSCERTLE0002 | The server certificate has expired. |
| Indexes | Low | DSMOLE0002 | If the substring index is configured for a membership attribute. The removal of a member from a large group can be slow. |
8.3. Configuring log files in Directory Server
Monitor server health and troubleshoot issues effectively by managing Red Hat Directory Server log files. You can optimize disk usage and improve visibility into directory activity by configuring log rotation policies, buffering settings, log files compression, and log levels for your instance.
8.3.1. Types of log files in Directory Server
Red Hat Directory Server records server activity in distinct log files to categorize system events. Understanding the purpose of each log type helps you to locate relevant data quickly when troubleshooting errors, monitoring performance, or auditing security events.
Directory Server has the following log file types that are stored the /var/log/dirsrv/slapd-<instance_name>/ directory:
- Access log (access). Enabled by default
- Contains information on client connections and connection attempts to the Directory Server instance. Note that because the access log is buffered, you can notice a discrepancy between when the event occurs on the server and the time the event is recorded in the log.
- Error log (error). Enabled by default
- Contains detailed messages of errors and events that the directory experiences during normal operations.
If Directory Server fails to write messages to the error log file, the server sends an error message to the syslog service and exits.
- Audit log (audit). Disabled by default
-
Records changes made to each database and to the server configuration. If you enable audit logging, Directory Server records only successful operations to the
auditlog file. - Audit fail log (auditfail). Disabled by default
-
Records failed change operations. With the default settings, Directory Server writes failed operations to the same file as the audit log. To write failed operations to a separate file, set a path to this file in the
nsslapd-auditfaillogconfiguration attribute. For details, see nsslapd-auditfaillog section. - Security log (security). Enabled by default
- Records authentication events, authorization issues, DoS/TCP attacks, and other security events.
For more detailed information about Directory Server log files, see Log files reference.
8.3.2. Displaying log files
Display log files in Red Hat Directory Server by using the command line or the web console to monitor system activity and diagnose operational issues.
8.3.2.1. Displaying log files using the command line
Use the utilities included in Red Hat Enterprise Linux, such as less, more, and cat, to view the log files.
Prerequisites
- You enabled logging as described in Enabling or disabling logging using the command line.
Procedure
To display the log files, use the following commands:
# less /var/log/dirsrv/slapd-<instance_name>/access
# less /var/log/dirsrv/slapd-<instance_name>/errors
# less /var/log/dirsrv/slapd-<instance_name>/audit
# less /var/log/dirsrv/slapd-<instance_name>/access
# less /var/log/dirsrv/slapd-<instance_name>/security
Note that by default the audit log and the audit fail log write operations to the same file.
To display the locations of log files, use the command:
# dsconf <instance_name> config get nsslapd-accesslog nsslapd-errorlog nsslapd-auditlog nsslapd-auditfaillog nsslapd-securitylognsslapd-accesslog: /var/log/dirsrv/slapd-__<instance_name>__/access nsslapd-errorlog: /var/log/dirsrv/slapd-__<instance_name>__/errors nsslapd-auditlog: /var/log/dirsrv/slapd-__<instance_name>__/audit nsslapd-auditfaillog: /var/log/dirsrv/slapd-__<instance_name>__/auditfail nsslapd-securitylog: /var/log/dirsrv/slapd-__<instance_name>__/security
NoteIf you have not enabled logging for a specified log type, Directory Server does not create the corresponding log file.
8.3.2.2. Displaying log files using the web console
To view Red Hat Directory Server log files, use the tab of the web console.
Prerequisites
- You are logged in to the web console.
Procedure
- Select the instance.
- Navigate to → .
In the list of log types, select the log you want to display:
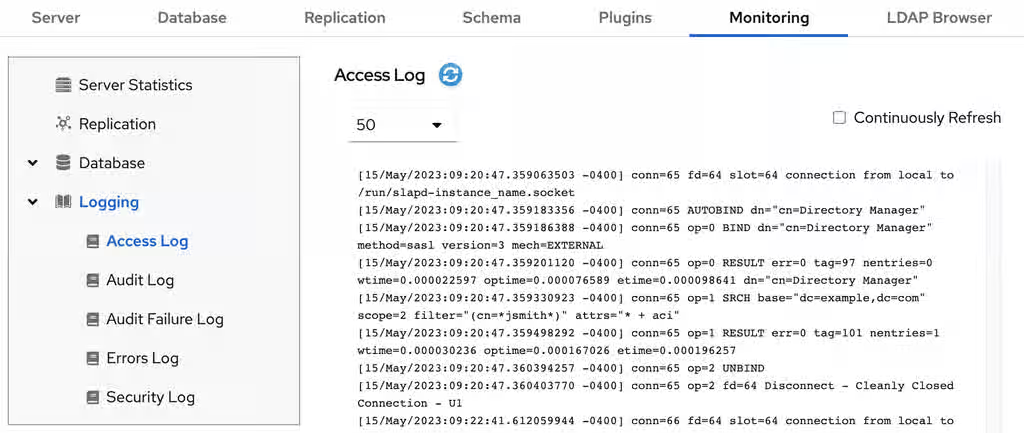
Optional: Apply the following settings to the log viewer:
- Set the number of records to display.
- Enable automatic display of new log entries by selecting Continuously Refresh.
- Click the button to apply the changes.
8.3.3. Enabling or disabling logging
Enable or disable logging in Red Hat Directory Server to control how the server records activity. Turning on logging helps you capture diagnostic data for troubleshooting, and pausing it can optimize system performance and save disk space.
By default, Directory Server enables only access, error, and security logging.
- IMPORTANT
- Every 2000 accesses to the directory increases the access log file by approximately 1 MB. However, before disabling the access logging, consider that this information can help to troubleshoot problems.
8.3.3.1. Enabling or disabling logging using the command line
Use the command line to enable or disable logging in Red Hat Directory Server. Turning on logging helps you capture diagnostic data for troubleshooting, and disabling it saves disk space and system resources.
Procedure
To enable, for example, audit logging, do the following steps:
Ensure that the logging you want to enable has the correctly configured path and filename:
# dsconf <instance_name> logging audit getAudit Log Configuration ------------------------------------------------------- ... Log name and location = /var/log/dirsrv/slapd-instance_name/audit ...The command displays the audit logging configuration. The
nsslapd-auditlogattribute in thecn=configentry is responsible for storing the path and filename value.Enable the audit logging:
# dsconf <instance_name> logging audit set logging-enabledThe command sets the
nsslapd-audit-logging-enabledattribute toonin thecn=configentry.
To disable, for example, the error logging:
# dsconf <instance_name> logging error set logging-disabledThe command sets the
nsslapd-errorlog-logging-enabledattribute tooffin thecn=configentry.When you disable logging, Directory Server stops to record new events to a log file. However, the log file remains in the
/var/log/dirsrv/slapd-<instance_name>/directory.
Verification
Check the audit logging settings:
# dsconf <instance_name> logging audit getAudit Log Configuration ------------------------------------------------------- ... Log name and location = /var/log/dirsrv/slapd-instance_name/audit Logging enabled = on ...Check the error logging settings:
# dsconf <instance_name> logging error getError Log Configuration ------------------------------------------------------- ... Log name and location = /var/log/dirsrv/slapd-instance_name/errors Logging enabled = off ...
8.3.3.2. Enabling or disabling logging using the web console
Use the web console to enable or disable logging in Red Hat Directory Server. Turning on logging helps you capture diagnostic data for troubleshooting, and disabling it saves disk space and system resources.
Prerequisites
- You are logged in to the web console.
Procedure
- Select the instance.
- Navigate to → .
- Select the log type you want to configure, for example, Access Log.
- Enable or disable the logging for the selected log type.
- Optional: Configure additional settings, such as the log level, the log rotation policy, the log format, and the log buffering.
- Click the button to apply the changes.
Verification
- Navigate to → and see if Directory Server now logs the events.
8.3.4. Defining a log rotation policy
Red Hat Directory Server periodically rotates the current log file and creates a new one. However, you can change the default behavior by setting a rotation policy by using the command line or the web console.
You can manage the following rotation settings:
- Maximum number of logs
Sets the maximum number of log files to keep. When the number of files is reached, Directory Server deletes the oldest log file before creating the new one. By default, it is
10for the access log, and1for other logs. Use themax-logsoption of thedsconfutility or the web console to configure the corresponding setting.-
access log:
nsslapd-accesslog-maxlogsperdir -
error log:
nsslapd-errorlog-maxlogsperdir -
audit log:
nsslapd-auditlog-maxlogsperdir -
auditfail log:
nsslapd-auditfaillog-maxlogsperdir -
security log:
nsslapd-securitylog-maxlogsperdir
-
access log:
- Maximum log size (in MB)
Sets the maximum size of a log file in megabytes before it is rotated. By default, it is
100MB for all logs. Use themax-logsizeoption of thedsconfutility or the web console to configure the corresponding setting.-
access log:
nsslapd-accesslog-maxlogsize -
error log:
nsslapd-errorlog-maxlogsize -
audit log:
nsslapd-auditlog-maxlogsize -
auditfail log:
nsslapd-auditfaillog-maxlogsize -
security log:
nsslapd-securitylog-maxlogsize
-
access log:
- Create new log every
Sets the maximum age of a log file. By default, Directory Server rotates all logs every week. Use the
rotation-intervalandrotation-interval-unitoptions of thedsconfutility or the web console to configure the corresponding setting.-
access log:
nsslapd-accesslog-logrotationtimeandnsslapd-accesslog-logrotationtimeunit -
error log:
nsslapd-errorlog-logrotationtimeandnsslapd-errorlog-logrotationtimeunit -
audit log:
nsslapd-auditlog-logrotationtimeandnsslapd-auditlog-logrotationtimeunit -
auditfail log:
nsslapd-auditfaillog-logrotationtimeandnsslapd-auditfaillog-logrotationtimeunit -
security log:
nsslapd-securitylog-logrotationtimeandnsslapd-securitylog-logrotationtimeunit
-
access log:
- Time of day
Set the time when the log file is rotated. This setting is not enabled by default for all logs. Use the
rotation-tod-hourandrotation-tod-minuteoptions of thedsconfutility or the web console to configure the corresponding setting.-
access log:
nsslapd-accesslog-logrotationsynchourandnsslapd-accesslog-logrotationsyncmin -
error log:
nsslapd-errorlog-logrotationsynchourandnsslapd-errorlog-logrotationsyncmin -
audit log:
nsslapd-auditlog-logrotationsynchourandnsslapd-auditlog-logrotationsyncmin -
auditfail log:
nsslapd-auditfaillog-logrotationsynchourandnsslapd-auditfaillog-logrotationsyncmin -
security log:
nsslapd-securitylog-logrotationsynchourandnsslapd-securitylog-logrotationsyncmin
-
access log:
- Access mode
The access mode sets the file permissions on newly created log files. By default, it is
600for all logs. Use themodeoption of thedsconfutility or the web console to configure the corresponding setting.-
access log:
nsslapd-accesslog-mode -
error log:
nsslapd-errorlog-mode -
audit log:
nsslapd-auditlog-mode -
auditfail log:
nsslapd-auditfaillog-mode -
security log:
nsslapd-securitylog-mode
-
access log:
For details about the log configuration settings, see Core server configuration attributes description.
8.3.4.1. Configuring a log rotation policy using the command line
To periodically archive the current log file and create a new one, set a log file rotation policy.
For example, you want the error log to keep maximum 3 logs, to rotate a log file when it exceeds 90 MB size or every 5 days.
Procedure
Set the maximum number of log files to keep:
# dsconf <instance_name> logging error set max-logs 3The command sets the
nsslapd-errorlog-maxlogsperdirattribute.Sets the maximum size of a log file in megabytes before it is rotated:
# dsconf <instance_name> logging error set max-logsize 90The command sets the
nsslapd-errorlog-maxlogsizeattribute.Set the maximum age of a log file.
Provide the period of time between error log file rotations:
# dsconf <instance_name> logging error set rotation-interval 5The command modifies the
nsslapd-errorlog-logrotationtimeattribute.Provide the units for the rotation period (
month,week,day,hour,minute):# dsconf <instance_name> logging error set rotation-interval-unit dayThe command modifies the
nsslapd-errorlog-logrotationtimeunitattribute.
Optional: To make analysis of the log files easier, configure the hour of the day and minutes for the error logs rotation.
Enable synchronization with a particular time of the day:
# dsconf <instance_name> logging error set rotation-tod-enabledThe command sets the
nsslapd-errorlog-logrotationsync-enabledattribute toon.Set the hour for the log rotation:
# dsconf <instance_name> logging error set rotation-tod-hour 22The command modifies the
nsslapd-errorlog-logrotationsynchourattribute.Set the minutes for the log rotation:
# dsconf <instance_name> logging error set rotation-tod-minute 55The command modifies the
nsslapd-errorlog-logrotationsyncminattribute.
Verification
Display the error logging settings:
# dsconf <instance_name> logging error getError Log Configuration ---------------------------------------------- ... Max log size = 90 Max logs = 3 Rotation interval = 5 Rotation interval unit = day TOD rotation enabled = on TOD rotation hour = 22 TOD rotation minute = 55 ...
Additional resources
8.3.4.2. Configuring a log rotation policy using the web console
To periodically archive the current log file and create a new one, set a log file rotation policy.
Prerequisites
- You are logged in to the web console.
Procedure
- Select the instance.
Navigate to → and select the log type, for example,
Error Log.The Error Log Settings page opens.
- Click the Rotation Policy tab.
Configure rotation policy parameters. For example, set maximum 3 log files, the log size maximum 110 MB, and creation of a new log file every 3 days.
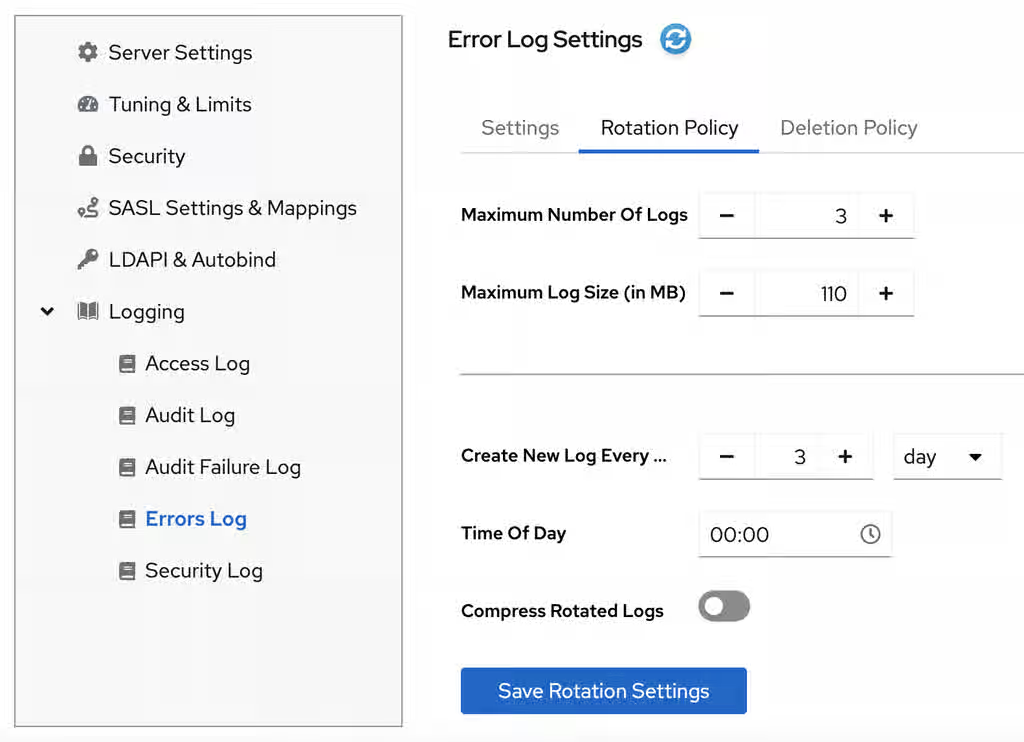
- Click the button to apply changes.
Additional resources
8.3.5. Defining a log deletion policy
Set a deletion policy for Red Hat Directory Server to automatically delete old archived log files.
You can only set a log file deletion policy if you have a log file rotation policy set. Directory Server applies the deletion policy at the time of log rotation.
You can set the following configuration attributes to manage the log file deletion policy:
- Log archive exceeds (in MB)
If the size of a log file of one type exceeds the configured value, the oldest log file of this type is automatically deleted. Use the
max-disk-spaceoption of thedsconfutility or the web console to configure the corresponding setting.-
access log:
nsslapd-accesslog-logmaxdiskspace -
error log:
nsslapd-errorlog-logmaxdiskspace -
audit log:
nsslapd-auditlog-logmaxdiskspace -
auditfail log:
nsslapd-auditfaillog-logmaxdiskspace -
security log:
nsslapd-securitylog-logmaxdiskspace
-
access log:
- Free disk space (in MB)
When the free disk space reaches this value, the oldest archived log file is automatically deleted. Use the
free-disk-spaceoption of thedsconfutility or the web console to configure the corresponding setting.-
access log:
nsslapd-accesslog-logminfreediskspace -
error log:
nsslapd-errorlog-logminfreediskspace -
audit log:
nsslapd-auditlog-logminfreediskspace -
auditfail log:
nsslapd-auditfaillog-logminfreediskspace -
security log:
nsslapd-securitylog-logminfreediskspace
-
access log:
- Log file is older than
When a log file is older than the configured time, it is automatically deleted. Use the
deletion-intervalanddeletion-interval-unitoptions of thedsconfutility or the web console to configure the corresponding setting.-
access log:
nsslapd-accesslog-logexpirationtimeandnsslapd-accesslog-logexpirationtimeunit -
error log:
nsslapd-errorlog-logexpirationtimeandnsslapd-errorlog-logexpirationtimeunit -
audit log:
nsslapd-auditlog-logexpirationtimeandnsslapd-auditlog-logexpirationtimeunit -
audit log:
nsslapd-auditfaillog-logexpirationtimeandnsslapd-auditfaillog-logexpirationtimeunit -
security log:
nsslapd-securitylog-logexpirationtimeandnsslapd-securitylog-logexpirationtimeunit
-
access log:
For details about the log configuration settings, see Core server configuration attributes description.
8.3.5.1. Configuring a log deletion policy using the command line
To automatically delete old archived log files, set a log deletion policy.
For example, you want Directory Server to delete old access logs in the following situations:
- The total size of all access log files exceeds 500 MB.
- An access log file is older that 3 weeks.
Procedure
Set the maximum amount of disk space in megabytes that the access logs are allowed to consume:
# dsconf <instance_name> logging access set max-logsize 500The command updates the
nsslapd-accesslog-logmaxdiskspaceattribute in thecn=configconfiguration entry.Set the required deletion interval:
Provide the maximum age that a log file is allowed to reach before Directory Server deletes it:
# dsconf <instance_name> logging access set deletion-interval 3The command modifies the
nsslapd-accesslog-logexpirationtimeattribute.Provide the units for the log maximum age (
month,week,day):# dsconf <instance_name> logging access set deletion-interval-unit weekThe command modifies the
nsslapd-accesslog-logexpirationtimeunitattribute.
Verification
Display the access logging settings:
# dsconf <instance_name> logging access getAccess Log Configuration -------------------------------------- ... Deletion interval = 3 Deletion interval unit = week ... Max log size = 500 ...
Additional resources
8.3.5.2. Configuring a log deletion policy using the web console
To automatically delete old archived log files, set a log deletion policy.
Prerequisites
- You are logged in to the web console.
Procedure
- Select the instance.
-
Navigate to → and select the log type, for example,
Access Log. The Access Log Settings page opens. - Click the Deletion Policy tab.
Configure deletion policy parameters. For example, set maximum archive size to 600 MB and the log file age to 3 weeks.
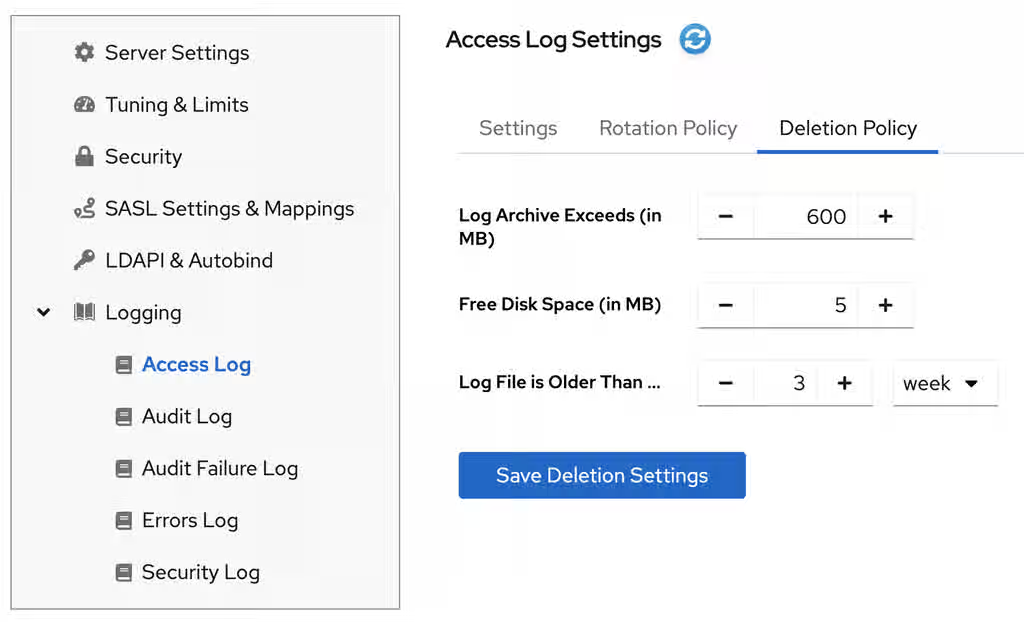
- Click the button to apply changes.
Additional resources
8.3.6. Manual log file rotation
Manually rotate log files in Red Hat Directory Server to archive current log content and start recording to a new file. Note that you can rotate log files manually only if you did not configure an automatic log file rotation or deletion policies.
Procedure
Stop the instance:
# dsctl <instance_name> stop-
Go to the log files directory. By default, Directory Server stores access, error, audit, audit fail log, and security files in the
/var/log/dirsrv/slapd-<instance_name>/directory. - Move or rename the log file you want to rotate to make it available for future reference.
Start the instance:
# dsctl <instance_name> restart
Additional resources
8.3.7. Configuring format of Directory Server log files
Use the command line to customize the access, error, audit, and audit fail logging format in Red Hat Directory Server.
Directory Server supports the following logging format:
- Default (original plain text)
- JSON
- JSON (pretty)
Note that when you switch to a new logging format, Directory Server rotates the current log.
The security logs are only available in the JSON format.
Prerequisites
- You have root permissions.
Procedure
Configure the desired format of Directory Server log files. For example, to make logging more consumable by standard parsing tools, set the log format to JSON:
To set the format for the access logging, run:
# dsconf <instance_name> logging access set log-format jsonThe command sets the
nsslapd-accesslog-log-formatattribute tojson. For details about the attribute, see the nsslapd-accesslog-log-format description in the reference documentation.To set the format for the error logging, run:
# dsconf <instance_name> logging error set log-format jsonThe command sets the
nsslapd-errorlog-json-formatattribute tojson. For details about the attribute, see the nsslapd-errorlog-json-format description in the reference documentation.To set the format for the audit and audit fail logging, run:
# dsconf <instance_name> logging audit set log-format jsonThe command sets the
nsslapd-auditlog-log-formatattribute tojson. For details about the attribute, see the nsslapd-auditlog-log-format description in the reference documentation.
Optional: If you do not want the default
%FT%Tformat (2025-11-31T17:25:01), customize the timestamps format in a log. For example, you want the%DT%T(11/31/25T17:25:01) format for the timestamps in the access logs:# dsconf <instance_name> logging access set time-format %DT%TThe command sets the
nsslapd-accesslog-time-formatattributes to%DT%T.
Verification
Display logging details by using the
dsconf logging <log_file_type> getcommand. For example, display the access logging details:# dsconf <instance_name> logging access getAccess Log Configuration ------------------------------------------------ ... Logging format = json ... Time format for JSON logging (strftime) = %FT%T
Additional resources
8.3.8. Configuring log levels
To manage how detailed logs are, and therefore the amount of information that is logged, you can specify log levels for access and error logging.
Changing the default log level can lead to very large log files. Red Hat recommends that you do not change the default logging values without being asked to do so by Red Hat technical support.
8.3.8.1. Configuring log levels using the command line
You can adjust access and error log levels for debugging purposes.
Prerequisites
- You enabled access and error logging.
Procedure
To modify log levels for the access logs:
Optional: List available access log levels:
# dsconf <instance_name> logging access list-levelsLevel Description ------------------------------------------ entry Log entry and referral stats default Standard access logging internal Log internal operations
Set the required logging level. For example, you want the access log to contain internal access operations and the default logging:
# dsconf <instance_name> logging access set level default internalThe command modifies the
nsslapd-accesslog-levelattribute in thecn=configconfiguration entry.
To modify log levels for the error logs:
Optional: List available error log levels:
# dsconf <instance_name> logging error list-levelsLevel Description ---------------------------------------------- acl Provides very detailed access control list processing information aclsumary Summarizes information about access to the server, much less verbose than level 'acl' backend Backend debug logging ber Logs the number of packets sent and received by the server cache Database entry cache logging config Prints any .conf configuration files used with the server, line by line, when the server is started connection Logs the current connection status, including the connection methods used for a SASL bind default Default logging level filter Logs all of the functions called by a search operation heavytrace Logs when the server enters and exits a function, with additional debugging messages house Logging for housekeeping thread packet Network packet logging parse Logs schema parsing debugging information plugin Plugin logging pwpolicy Debug information about password policy behavior replication Debug replication logging shell Special authentication/connection tracking trace Logs a message when the server enters and exits a function
Set the required logging level. For example, you want the error log to contain search filter logging, the default logging, and config file processing:
# dsconf <instance_name> logging error set level default filter configThe command modifies the
nsslapd-errorlog-levelattribute in thecn=configconfiguration entry.
Verification
When you set the access log level to internal, do the following steps to see if Directory Server started to log internal access events:
Optional: Display the access log configuration:
# dsconf <instance_name> logging access getAccess Log Configuration --------------------------------- ... Log level = default,internal ...
Restart the instance to trigger internal events by command:
# dsctl <instance_name> restartView the access log file and find internal operation records:
# cat /var/log/dirsrv/slapd-<instance_name>/access... [time_stamp] conn=2 (Internal) op=1(1)(1) SRCH base="cn=config,cn=WritersData,cn=ldbm database,cn=plugins,cn=config" scope=1 filter="objectclass=vlvsearch" attrs=ALL [time_stamp] conn=2 (Internal) op=1(1)(1) RESULT err=0 tag=48 nentries=0 wtime=0.000016828 optime=0.000274854 etime=0.000288952 ...
Additional resources
8.3.8.2. Configuring log levels using the web console
To manage how detailed logs are, specify log levels for access logging and error logging.
Prerequisites
- You are logged in to the web console.
- You enabled access and error logging.
Procedure
- Select the instance.
- Navigate to → .
-
Select the log type, for example,
Access Log. Click the button to see all available log levels for the log type.
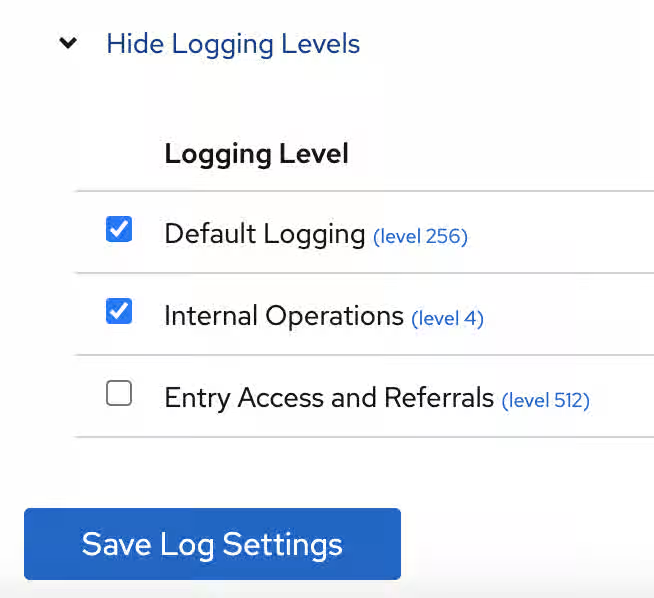
-
Select log levels, for example,
Default LoggingandInternal Operationslevels. - Click the button to apply changes.
Verification
To see if Directory Server started to log internal access events, do the following:
- Restart the instance by clicking button and then selecting . Directory Server restarts the instance and generates internal events.
- Navigate to → → .
Refresh access log and view recorded internal events:
[time_stamp] conn=6 (Internal) op=1(2)(1) SRCH base="cn=config,cn=Example database,cn=ldbm database,cn=plugins,cn=config" scope=1 filter="objectclass=vlvsearch" attrs=ALL
[time_stamp] conn=6 (Internal) op=1(2)(1) RESULT err=0 tag=48 nentries=0 wtime=0.000004563 optime=0.000078000 etime=0.000081911
Additional resources
8.3.9. Configuring logging for plug-ins
Configure logging for plug-ins in Red Hat Directory Server to isolate and diagnose issues with specific components. Enabling verbose logging for individual plug-ins helps you to capture detailed debug information for troubleshooting without increasing the global log level.
By default, Directory Server does not log internal events which plug-ins initiate. To debug plug-in operations, you can enable access and audit logging for all plug-ins, or for specific plug-ins.
8.3.9.1. Configuring logging for all plug-ins
Use nsslapd-plugin-logging attribute to configure logging for all plug-ins.
Procedure
To enable access and audit logging for all plug-ins, use the following command:
# dsconf <instance_name> config replace nsslapd-plugin-logging=on
Additional resources
8.3.9.2. Configuring logging for a specific plugin
Use nsslapd-logAccess and nsslapd-logAudit attributes to configure logging for a plug-in.
Prerequisites
-
The
nsslapd-accesslogattribute contains valid path and the filename for the access log file. -
The
nsslapd-auditlogattribute contains valid path and the filename for the audit log file.
Procedure
To enable access and audit logging for a specific plug-in, modify
nsslapd-logAccessandnsslapd-logAuditattributes using the LDAP interface:# ldapmodify -D "cn=Directory Manager" -W -x -H ldap://server.example.comThe
ldapmodifyutility requires you to provide the LDIF statement with attribute changes:dn: cn=MemberOf Plugin,cn=plugins,cn=config changetype: modify replace: nsslapd-logAccess nsslapd-logAccess: on dn: cn=MemberOf Plugin,cn=plugins,cn=config changetype: modify replace: nsslapd-logAudit nsslapd-logAudit: on
8.3.10. Logging statistics per search operation
Use the nsslapd-statlog-level attribute to enable collecting statistics, such as a number of index lookups (database read operations) and overall duration of index lookups for each search operation, with minimal impact on the server.
During some search operations, especially with filters such as (cn=user*), the time the server spends for receiving the tasks and then sending the result back (etime) can be very long. Expanding the access log with information related to indexes used during search operation helps to diagnose why etime value is resource expensive.
Prerequisites
- You enabled access logging.
Procedure
Enable search operation metrics:
# dsconf <instance_name> config replace nsslapd-statlog-level=1Restart the instance:
# dsctl <instance_name> restart
Verification
Perform a search operation:
# ldapsearch -D "cn=Directory Manager" -H ldap://server.example.com -b "dc=example,dc=com" -s sub -x "cn=user*"View the access log file and find the search statistics records:
# cat /var/log/dirsrv/slapd-<instance_name>/access... [16/Nov/2022:11:34:11.834135997 +0100] conn=1 op=73 SRCH base="dc=example,dc=com" scope=2 filter="(cn=user)"* attrs=ALL [16/Nov/2022:11:34:11.835750508 +0100] conn=1 op=73 STAT read index: attribute=objectclass key(eq)=referral --> count 0 [16/Nov/2022:11:34:11.836648697 +0100] conn=1 op=73 STAT read index: attribute=cn key(sub)=er_ --> count 25 [16/Nov/2022:11:34:11.837538489 +0100] conn=1 op=73 STAT read index: attribute=cn key(sub)=ser --> count 25 [16/Nov/2022:11:34:11.838814948 +0100] conn=1 op=73 STAT read index: attribute=cn key(sub)=use --> count 25 [16/Nov/2022:11:34:11.841241531 +0100] conn=1 op=73 STAT read index: attribute=cn key(sub)=^us --> count 25 [16/Nov/2022:11:34:11.842230318 +0100] conn=1 op=73 STAT read index: duration 0.000010276 [16/Nov/2022:11:34:11.843185322 +0100] conn=1 op=73 RESULT err=0 tag=101 nentries=24 wtime=0.000078414 optime=0.001614101 etime=0.001690742 ...
Additional resources
8.3.11. Compressing log files
To save disc space, you can enable log file compression that compresses archived logs into .gzip files. By default, Directory Server compresses only archived security log files.
Procedure
To enable log file compression, for example, for the access logs, run:
# dsconf <instance_name> logging access set compress-enabledThe command sets the
nsslapd-accesslog-compressattribute toon.To disable log file compression, for example, for the error logs, run:
# dsconf <instance_name> logging error set compress-disabledThe command sets the
nsslapd-errorlog-compressattribute tooff.
Verification
Display the access logging settings:
# dsconf <instance_name> logging access getAccess Log Configuration --------------------------------- ... Compression enabled = on ...
Check that the log file directory contains compressed logs files:
# ls /var/log/dirsrv/slapd-instance_name/*
8.3.12. Disabling log buffering for debugging purposes
For debugging purposes, disable log buffering, which is enabled by default for the access, audit, and audit fail logs. With log buffering disabled, Red Hat Directory Server writes log entries directly to the disk.
Do not disable access logging in a normal operating environment. When you disable the buffering of an active log, Directory Server performance decreases, especially under heavy load.
8.3.12.1. Disabling log buffering using the command line
Use the dsconf utility to disable Red Hat Directory Server log buffering to write log entries directly to the disk.
The following procedure disables the access and audit log buffering.
Procedure
To disable the access log buffering, enter:
# dsconf <instance_name> logging access set buffering-disabledThe command sets the
nsslapd-accesslog-logbufferingattribute tooff.To disable the audit log buffering, enter:
# dsconf <instance_name> logging audit set buffering-disabledThe command sets the
nsslapd-auditlog-logbufferingattribute tooff.NoteBoth the audit and audit fail logs use the
nsslapd-auditlog-logbufferingattribute for the buffering configuration. Therefore, when you disable buffering for the audit logging, Directory Server also disables the audit fail logs buffering.
Verification
Display the access logging settings:
# dsconf <instance_name> logging access getAccess Log Configuration --------------------------------- ... Buffering enabled = off ...
Display the access log in continuous mode:
# tail -f /var/log/dirsrv/slapd-<instance_name>/access- Perform actions in the directory, such as searches.
- Monitor the access log. Log entries appear without delay at the moment when users perform actions in the directory.
Additional resources
8.3.12.2. Disabling log buffering using the web console
Use the web console to disable Red Hat Directory Server log buffering to write log entries directly to the disk.
The following procedure disables the access log buffering.
Procedure
- Navigate to → → → .
-
Deselect
Access Log Buffering Enabled. Click .
NoteTo disable the audit fail log buffering, disable buffering for the audit log on the → → → tab.
Verification
- Navigate to → → .
-
Select
Continuously Refresh. - Perform actions in the directory, such as searches.
- Monitor the access log. Log entries appear without delay at the moment when users perform actions in the directory.
Additional resources
8.4. Monitoring the replication topology
Monitor the replication topology in Red Hat Directory Server to verify data synchronization between directory server instances. Inspecting replication status and agreements helps you to identify lags or connection failures, ensuring that updates propagate successfully throughout your distributed environment.
8.4.1. Monitoring the replication topology using the command line
To monitor the state of the directory data replication between suppliers, consumers, and hubs, you can use replication topology report that provides information on the replication progress, replica IDs, number of changes, and other parameters.
To generate the report faster and make it more readable, you can configure your own credentials and aliases.
8.4.1.1. Displaying a replication topology report using the command line
To view overall information about the replication status for each agreement in your replication topology, display the replication topology report. To do so, use the dsconf replication monitor command.
Prerequisites
- The host is a member of replication topology.
- You initialized the consumers.
Procedure
To view a replication topology report, enter:
# dsconf <instance_name> replication monitorThe
dsconfutility will request authentication credentials for each instance in the topology:Enter password for cn=Directory Manager on ldap://supplier.example.com:
passwordEnter a bind DN for consumer.example.com:389:cn=Directory ManagerEnter a password for cn=Directory Manager on consumer.example.com:389:passwordSupplier: server.example.com:389 -------------------------------- Replica Root: dc=example,dc=com Replica ID: 1 Replica Status: Online Max CSN: 5e3acb77001d00010000 Status For Agreement: "example-agreement" (consumer.example.com:1389) Replica Enabled: on Update In Progress: FALSE Last Update Start: 20211209122116Z Last Update End: 20211209122116Z Number Of Changes Sent: 1:21/0 Number Of Changes Skipped: None Last Update Status: Error (0) Replica acquired successfully: Incremental update succeeded Last Init Start: 20211209122111Z Last Init End: 20211209122114Z Last Init Status: Error (0) Total update succeeded Reap Active: 0 Replication Status: In Synchronization Replication Lag Time: 00:00:00 Supplier: consumer.example.com:1389 ----------------------------------- Replica Root: dc=example,dc=com Replica ID: 65535 Replica Status: Online Max CSN: 00000000000000000000
8.4.1.2. Setting credentials for replication monitoring in the .dsrc file
By default, the dsconf replication monitor command asks for bind DNs and passwords when authenticating to remote instances. To generate the report faster and easier in the future, set the bind DNs, and optionally passwords, for each server in the topology in the user’s ~/.dsrc file.
Prerequisites
- The host is a member of replication topology.
- You initialized the consumers.
Procedure
-
Optional: Create the
~/.dsrcfile. In the
~/.dsrcfile, set the bind DNs, and passwords. For example:[repl-monitor-connections] connection1 = server1.example.com:389:cn=Directory Manager:* connection2 = server2.example.com:389:cn=Directory Manager:[~/pwd.txt] connection3 = hub1.example.com:389:cn=Directory Manager:S3cret
This example uses connection1 to connection3 as keys for each entry. However, you can use any unique key.
When you run the
dsconf replication monitorcommand, thedsconfutility connects to all servers configured in replication agreements of the instance. If the utility finds the hostname in~/.dsrc, it uses the defined credentials to authenticate to the remote server. In the example above,dsconfuses the following credentials when connecting to a server:Hostname Bind DN Password setup method server1.example.com
cn=Directory Manager
Requests the password
server2.example.com
cn=Directory Manager
Reads the password from
~/pwd.txthub1.example.com
cn=Directory Manager
S3cret
Verification
-
Run the
dsconf replication monitorcommand to see Ifdsconfutility uses credentials configured in the~/.dsrcfile. For more information, see Displaying a replication topology report using the command.
Additional resources
8.4.1.3. Using aliases in the replication topology monitoring output
To make the report more readable, set your own aliases that will be displayed in the report output. By default, the replication monitoring report contains the hostnames of remote servers.
Prerequisites
- The host is a member of replication topology.
- You initialized the consumers.
Procedure
If you want to see aliases in the report, use one of the following methods:
Define the aliases in the
~/.dsrcfile:[repl-monitor-aliases] M1 = server1.example.com:389 M2 = server2.example.com:389
Define the aliases by passing the
-a alias=host_name:portparameter to thedsconf replication monitorcommand:# dsconf <instance_name> replication monitor -a M1=server1.example.com:389 M2=server2.example.com:389In both cases, the
dsconf replication monitorcommand displays the alias in the output:... Supplier: M1 (server1.example.com:389) -------------------------------- Replica Root: dc=example,dc=com ... Supplier: M2 (server2.example.com:389) -------------------------------- Replica Root: dc=example,dc=com
Additional resources
8.4.2. Monitoring the replication topology using the web console
To monitor the state of the directory data replication between suppliers, consumers, and hubs, you can use a replication topology report that provides information on the replication progress, replica IDs, number of changes, and other parameters.
To generate the report faster and make it more readable, you can configure your own credentials and aliases.
8.4.2.1. Displaying a replication topology report using the web console
To view overall information about the replication status for each agreement in your replication topology, display the replication topology report.
Prerequisites
- The host is a member of replication topology.
- You initialized the consumers.
- You are logged in to the web console.
Procedure
- Navigate to → . The page opens.
- Click .
Enter the passwords for login to remote instances and click . Directory Server uses bind DNs values from existing replication agreements.
The replication topology report will be generated on the tab.
NoteTo generate another replication topology report, go to the tab.
8.4.2.2. Setting credentials for replication monitoring using the web console
To generate the replication topology report faster and easier, you can set your own bind DNs, and optionally passwords, for each server in the topology for authentication. In this case, you do not need to confirm replication credentials each time you want to generate a replication topology report.
By default, Red Hat Directory Server takes the credentials from existing replication agreements.
Prerequisites
- The host is a member of replication topology.
- You initialized the consumer.
- You are logged in to the web console.
Procedure
- Navigate to → . The page opens.
- Click .
Enter replication login credentials you want to use for authentication to remote instances:
-
Hostname. A remote instance hostname you want the server to authenticate to. -
Port. A remote instance port. -
Bind DN. Bind DN used for authentication to the remote instance. -
Password. A password used for authentication. -
Interactive Input. If checked, Directory Server will ask for a password every time you generate a replication topology report.
-
- Click .
Verification
- Generate the replication topology report to see If the report asks for the credentials. For more information, see Displaying a replication topology report using the web console.
8.4.2.3. Configuring replication naming aliases using the web console
To make the report more readable, you can set your own aliases that will be displayed in the report output. By default, the replication monitoring report contains the hostnames of servers.
Prerequisites
- The host is a member of replication topology.
- You initialized the consumers.
- You are logged in to the web console.
Procedure
- Navigate to → .
- Click .
Enter alias details:
-
Alias. An alias that will be displayed in the replication topology report. -
Hostname. An instance hostname. -
Port. An instance port.
-
- Click .
Verification
- Generate the replication topology report to see If the report uses new aliases. For more information, see Displaying a replication topology report using the web console.
8.5. Tracking the bind DN for plug-in-initiated updates
In Red Hat Directory Server, you can track which user performed an action that caused a plug-in to update an entry. If the tracking is enabled and a plug-in changes an entry as a consequence of an action performed by a user, you can see the user’s name in the modifiersname attribute of the updated entry.
8.5.1. Tracking user information for entry modifications performed by a plug-in
Configure Red Hat Directory Server to record the identity of the user who triggered a plug-in to modify a directory entry. Tracking the original bind DN helps you to map internal system updates to specific user actions, ensuring accurate audit logs and accountability for automated changes.
When the user performs an action that changes an entry, it can trigger other, automatic changes across the directory tree. By default, Directory Server is not tracking the name of the user who performed the action that has initiated the data modification. To track the user information, you can use the nsslapd-plugin-binddn-tracking parameter.
For example, when the administrator deletes a user, the Referential Integrity Postoperation plug-in automatically removes the user from all groups. You can see the initial action in the entry as being performed by the user account bound to the server. But all related updates are, by default, shown as being performed by the plug-in, with no information about which user initiated the update.
A second example might be using the MemberOf plug-in to update user entries with group membership. The update to the group account is shown as being performed by the bound user, while the edit to the user entry is shown as being performed by the MemberOf plug-in:
dn: cn=example_group,ou=groups,dc=example,dc=com
modifiersname: uid=example,ou=people,dc=example,dc=com

dn: uid=example,ou=people,dc=example,dc=com
modifiersname: cn=MemberOf Plugin,cn=plugins,cn=config
The nsslapd-plugin-binddn-tracking parameter enables the server to track which user originated an update operation, as well as the internal plug-in which actually performed the operation. The bound user is shown in the modifiersname and creatorsname operational attributes, while the plug-in which performed the update is shown in the internalModifiersname and internalCreatorsname operational attributes. For example:
dn: uid=example,ou=people,dc=example,dc=com
modifiersname: uid=admin,ou=people,dc=example,dc=com
internalModifiersname: cn=MemberOf Plugin,cn=plugins,cn=config
The nsslapd-plugin-binddn-tracking parameter tracks and maintains the relationship between the bound user and all updates performed for that connection.
The internalModifiersname and internalCreatorsname attributes always show a plug-in as the identity. The value of the attribute is:
-
cn=ldbm database,cn=plugins,cn=configwhen the core Directory Server performs the change -
cn=the DN of the plug-in,cn=plugins,cn=configwhen a plug-in changed the entry
8.5.2. Enabling tracking the bind DN for plug-in-initiated updates using the command line
For data updates initiated by a plug-in, you often need to know which user has performed the action that led to the update. Configure the nsslapd-plugin-binddn-tracking parameter to track such user information.
Procedure
Set the
nsslapd-plugin-binddn-trackingparameter toon:# dsconf <instance_name> config replace nsslapd-plugin-binddn-tracking=on
Verification
Display the
modifiersnameandinternalModifiersnameattributes of an entry that was changed by a plug-in. For example, if thememberOfattribute is enabled, display the attributes of a user after you added the user to a group:# ldapsearch -D "cn=Directory Manager" -W -H ldap://server.example.com -x -b "uid=example-user,ou=People,dc=example,dc=com" -s base -x internalModifiersname -x modifiersnamedn: uid=example-user,ou=people,dc=example,dc=com modifiersname: uid=admin,ou=people,dc=example,dc=com internalModifiersname: cn=MemberOf Plugin,cn=plugins,cn=config
Additional resources
8.5.3. Enabling tracking the bind DN for plug-in-initiated updates using the web console
For data updates initiated by a plug-in, you often need to know which user has performed the action that led to the update. Using the web console, you can enable tracking of the user information.
Prerequisites
- You are logged in to the Directory Server instance in the web console.
Procedure
- Open the → menu.
-
On the Advanced Settings tab, select
Enable Plugin Bind DN Tracking. - Click .
Verification
Display the
modifiersnameandinternalModifiersnameattributes of an entry that was changed by a plug-in. For example, if thememberOfattribute is enabled, display the attributes of a user after you added the user to a group:# ldapsearch -D "cn=Directory Manager" -W -H ldap://server.example.com -x -b "uid=example-user,ou=People,dc=example,dc=com" -s base -x internalModifiersname -x modifiersnamedn: uid=example-user,ou=people,dc=example,dc=com modifiersname: uid=admin,ou=people,dc=example,dc=com internalModifiersname: cn=MemberOf Plugin,cn=plugins,cn=config
Additional resources
8.6. Monitoring the database activity
Monitor database activity in Red Hat Directory Server to track specific performance metrics for individual directory databases to ensure that tuning settings, such as caches, are properly configured.
8.6.1. Monitoring the database activity using the command line
To display the monitoring activity using the command line, display the dynamically-updated read-only attributes stored in cn=monitor,cn=<database_name>,cn=ldbm database,cn=plugins,cn=config.
Procedure
For example, to display the current activity of the
userRootdatabase, enter:# dsconf <instance_name> monitor backend userRoot
Additional resources
8.6.2. Monitoring the database activity using the web console
In the web console, Red Hat Directory Server displays the values of the dynamically-updated read-only monitoring attributes in the Monitoring tab.
Procedure
- Navigate to → → .
- Display the cache values on the Entry Cache and DN Cache tabs.
Additional resources
8.6.3. Database monitoring attributes
Review specific monitoring attributes that provide real-time statistics on database performance and internal operations. These attributes help you to track cache usage, transaction rates, and resource consumption, helping you identify performance bottlenecks and maintain system stability.
Table 8.4. Inheritance settings
| Attribute | Description |
|---|---|
|
|
Indicates whether the database is in read-only mode ( |
|
| The total number of successful entry cache lookups. The value is the total number of times the server could retrieve an entry from the entry cache without reloading it from the database. |
|
| The total number of entry cache lookups since you started the instance. The value is the total number, since the instance has been started, Directory Server tried to retrieve entry from the entry cache. |
|
| The number of entry cache tries to successful entry cache lookups. This number is based on the total lookups and hits since you last started the instance. The closer the entry cache hit ratio is to 100%, the better. Whenever an operation attempts to find an entry that is not present in the entry cache, the server needs to access the database to obtain the entry. Thus, as this ratio drops towards zero, the number of disk accesses increases, and directory search performance decreases. To improve this ratio, increase the size of the entry cache of the database.
To improve this ratio, increase the size of the entry cache by increasing the value of the |
|
| The total size, in bytes, of directory entries currently present in the entry cache.
To increase the size of the entries which can be present in the cache, increase the value of the |
|
| The maximum size, in bytes, of directory entries that Directory Server can maintain in the entry cache.
To increase the size of the entries which can be present in the cache, increase the value of the |
|
| The current number of entries stored in the entry cache of a given backend. |
|
| The maximum number of entries stored in the entry cache of a database.
To tune this value, increase the value of the |
|
| The number of times the server could process a request by obtaining a normalized distinguished name (DN) from the DN cache rather than normalizing it again. |
|
| The total number of DN cache accesses since you started the instance. |
|
| The ratio of cache tries to successful DN cache hits. The closer this value is to 100%, the better. |
|
| The total size, in bytes, of DN currently present in the DN cache.
To increase the size of the entries which can be present in the DN cache, increase the value of the |
|
| The maximum size, in bytes, of DNs that Directory Server can maintain in the DN cache.
To increase the size of the entries which can be present in the cache, increase the value of the |
|
| The number of DNs currently present in the DN cache. |
|
| The maximum number of DNs allowed in the DN cache. |
8.7. Getting Directory Server access log using the command line
Gain deep insights into server activity and usage patterns by analyzing Red Hat Directory Server access logs from the command line. You can extract detailed statistics, such as operation counts, connection trends, and frequently used search filters.
The logconv.pl command has the following syntax:
# logconv.pl /path/to/accesslogTo analyze multiple access log files, you can use the following format with an asterisk (*):
# logconv.pl /var/log/dirsrv/slapd-<instance_name>/access*
The logconv.pl command generates following three types of statistics that are useful for monitoring the Directory Server and optimizing Directory Server configuration:
- Counts of events, such as total binds and total searches performed.
-
Lists of the most frequently occurring parameters in LDAP requests. For example, the
logconv.plcommand generates lists of the top ten bind DNs, base DNs, filter strings, and attributes returned. -
Counts of occurrences for error codes such as those defined in
ldap.h.
8.7.1. Analyzing Directory Server access logs using the command line
Analyze access logs using the logconv.pl utility in Red Hat Directory Server to extract detailed information about server operations. Processing log files helps you to identify usage trends and diagnose errors, ensuring that you can optimize performance and resolve issues affecting directory services.
The logconv.pl command extracts usage statistics, and counts occurrences of significant events specified on the command line. The logconv.pl command prints a list of total operations, total number of connections, counts per each operation type, counts for some extended operations like persistent searches, and bind information.
The logconv.pl takes following options:
-
-S: specifies the time to begin the log file analysis. -
-E: specifies the time to stop the log files analysis. -
-bc: generates a report based on the number of DNs used to connect to the server and the total connection codes the server returns. -
-m: generates output data per second (-m) to a specified CSV output file. -
-M: generates output data with counts per minute (-M) to a specified CSV output file.
Procedure
To generate a simple access log summary, run the following command:
# logconv.pl /var/log/dirsrv/slapd-<instance_name>/accessAccess Log Analyzer 8.2 Command: logconv.pl /var/log/dirsrv/slapd-<instance_name>/access Processing 1 Access Log(s)... [001] /var/log/dirsrv/slapd-<instance_name>/access size(bytes):77532 Total Log Lines Analysed: 527 Start of Logs: 14/Oct/2017:16:15:22.452909568 End of Logs: 14/Oct/2017:16:39:50.157790196 Processed Log Time: 0 Hours, 24 Minutes, 27.704877056 Seconds Restarts: 10 Secure Protocol Versions: - TLS1.2 client bound as uid=user_name,ou=people,o=example.com (11 connections) - TLS1.2 128-bit AES; client CN=CA Subsystem,O=example.com; issuer CN=Certificate Authority,O=example.com (11 connections) - TLS1.2 128-bit AES-GCM (2 connections) - TLS1.2 128-bit AES (3 connections) Peak Concurrent Connections: 38 Total Operations: 4771 Total Results: 4653 Overall Performance: 97.5% Total Connections: 249 (0.17/sec) (10.18/min) - LDAP Connections: 107 (0.07/sec) (4.37/min) - LDAPI Connections: 128 (0.09/sec) (5.23/min) - LDAPS Connections: 14 (0.01/sec) (0.57/min) - StartTLS Extended Ops: 2 (0.00/sec) (0.08/min) Searches: 2963 (2.02/sec) (121.13/min) Modifications: 649 (0.44/sec) (26.53/min) Adds: 785 (0.53/sec) (32.09/min) Deletes: 10 (0.01/sec) (0.41/min) Mod RDNs: 6 (0.00/sec) (0.25/min) Compares: 0 (0.00/sec) (0.00/min) Binds: 324 (0.22/sec) (13.25/min) Proxied Auth Operations: 0 Persistent Searches: 17 Internal Operations: 0 Entry Operations: 0 Extended Operations: 4 Abandoned Requests: 0 Smart Referrals Received: 0 VLV Operations: 30 VLV Unindexed Searches: 0 VLV Unindexed Components: 20 SORT Operations: 22 Entire Search Base Queries: 12 Paged Searches: 2 Unindexed Searches: 0 Unindexed Components: 149 FDs Taken: 249 FDs Returned: 212 Highest FD Taken: 107 Broken Pipes: 0 Connections Reset By Peer: 0 Resource Unavailable: 0 Max BER Size Exceeded: 0 Binds: 324 Unbinds: 155 --------------------------------- - LDAP v2 Binds: 41 - LDAP v3 Binds: 180 - AUTOBINDs(LDAPI): 103 - SSL Client Binds: 0 - Failed SSL Client Binds: 0 - SASL Binds: 134 - EXTERNAL: 114 - GSSAPI: 20 - Directory Manager Binds: 10 - Anonymous Binds: 1 Cleaning up temp files... Done.
The
logconv.plscript prints a list of total operations, total number of connections, counts per each operation type, counts for some extended operations like persistent searches, and bind information.Optional: If you must enable additional connection summaries passed as a single option, such as the number of DNs used to connect to the server (
b) and the total connection codes the server (c) returns, specify the-bcoption as follows:# lotgconv.pl -bc /var/log/dirsrv/slapd-<instance_name>/access----- Total Connection Codes ----- U1 3 Cleanly Closed Connections B1 1 Bad Ber Tag Encountered ----- Top 20 Bind DN's ----- Number of Unique Bind DN's: 212 1801 cn=Directory Manager 1297 Anonymous Binds 311 uid=jsmith,ou=people... 87 uid=bjensen,ou=peopl... 85 uid=mreynolds,ou=peo... 69 uid=jrockford,ou=peo... 55 uid=sspencer,ou=peop...
Optional: If you must enable data output for a certain start (
-S) and end time (-E) or within a specific range, run the following command# logconv.pl -S "[01/Jul/2022:16:11:47.000000000 -0400]" -E "[01/Jul/2022:17:23:08.999999999 -0400]" /var/log/dirsrv/slapd-<instance_name>/access----------- Access Log Output ------------ Start of Logs: 01/Jul/2022:16:11:47 End of Logs: 01/Jul/2022:17:23:08
When start and end times are set, the
logconv.plcommand first prints the time range given, then the summary for that period.Optional: If you must enable data output with counts per minute (
-M) or per second (-m), run the following command:# logconv.pl -m|-M outputFile accessLogFile
Chapter 9. Performance tuning of Red Hat Directory Server
Tune the performance of Red Hat Directory Server to optimize the server for your specific workload and hardware environment. Adjusting cache settings, indexing strategies, and resource limits helps you to improve query response times and system throughput.
You can also monitor the local disk and shut down Directory Server if the disk space available on a system becomes insufficient.
9.1. Improving the performance of views
Improve the performance of views in Red Hat Directory Server to optimize search operations within virtual hierarchies. Configuring indexes for attributes used in view filters helps you to reduce the processing overhead required to generate the view.
The performance of view-based hierarchies depends on the construction of the hierarchy itself and the number of entries in the directory tree (DIT).
In general, there may be a marginal change in performance (within a few percentage points of equivalent searches on a standard DIT) if you use virtual DIT views. If you do not invoke a view in a search, then there is no performance impact. Test the virtual DIT views against expected search patterns and loads before deployment.
You can index the attributes used in view filters if you intend to use the views as general-purpose navigation tools in the organization. For details, how to create indexes for attributes used in view filters, see Creating indexes to improve the performance of views.
Further, you can configure a virtual list view (VLV) index to be used in evaluation of sub-filters in views.
There is no need to tune any other part of the directory specifically for views.
9.2. Setting an index scan limit to improve the performance when loading long lists of IDs
Set an index scan limit in Red Hat Directory Server to improve performance when the server loads long lists of IDs during search operations. Restricting the number of IDs scanned helps you to prevent excessive resource consumption for index keys with many matches.
In large directories, the search results list can be huge. For example, a directory with one million entries with inetorgperson attributes would return all these entries in a search with a filter, such as (objectclass=inetorgperson).
Loading a long ID list from the database significantly reduces search performance. An ID list scan limit sets a limit on the number of IDs Directory Server reads before a key is considered to match the entire primary index. This means that Directory Server treats the search as an unindexed search with a different set of resource limits.
For large indexes, it is actually more efficient to treat any search which matches the index as an unindexed search. The search operation only has to look in one place, the entire directory, to process results rather than searching through an index that is nearly the size of a directory, plus the directory itself.
You can set an index scan limit globally or for specific databases.
9.2.1. Setting a global index scan limit using the command line
Set a global index scan limit in Red Hat Directory Server to restrict the number of index entries scanned during a search operation.
By default, the ID list scan limit in Red Hat Directory Server is 4000. In most scenarios, this value provides good performance for a common range of database sizes and access patterns, and you do not need to change the default value. If the database index is slightly larger than 4000 entries, but still significantly smaller than the overall directory, raising the ID list scan limit improves searches.
On the other hand, lowering the limit can significantly speed up searches that would otherwise hit the 4000 entry limit, but where it is not necessary to scan every entry.
Procedure
Update the ID list scan limit:
# dsconf <instance_name> backend config set --idlistscanlimit=8000This command sets the limit to
8000entries.Restart the instance:
# dsctl <instance_name> restart
9.2.2. Setting a global index scan limit using the web console
Set a global index scan limit in Red Hat Directory Server to restrict the number of index entries scanned during a search operation.
By default, the ID list scan limit in Directory Server is 4000. In most scenarios, this value provides good performance for a common range of database sizes and access patterns, and you do not need to change the default value. If the database index is slightly larger than 4000 entries, but still significantly smaller than the overall directory, raising the ID list scan limit improves searches.
On the other hand, lowering the limit can significantly speed up searches that would otherwise hit the 4000 entry limit, but where it is not necessary to scan every entry.
Procedure
- Navigate to → .
- Update the ID List Scan Limit field.
- Click .
- Click in the top right corner, and select Restart Instance.
9.2.3. Setting an index scan limit to a database using the command line
Use the command line to set an index scan limit for a specific Red Hat Directory Server database. This database-level limit helps you to control search performance and prevent resource exhaustion from inefficient queries without affecting global configurations.
In some cases, it is useful to define a limit for certain indexes, or to not use an ID list at all. You can configure individual settings for ID list scan limits for different types of search filters.
For example, in a large database with 10 million entries that contain the object class inetOrgPerson, the (&(objectClass=inetOrgPerson)(uid=user)) filter creates first an ID list containing all 10 million IDs matching objectClass=inetOrgPerson. When the database applies the second part of the filter, it searches the result list for objects matching uid=user. In this case, it is useful to define a limit for certain indexes, or to not use an ID list at all.
This procedure demonstrates how to configure Directory Server to note create an ID list for objectClass=inetOrgPerson conditions in AND clauses.
Procedure
Set the
nsIndexIDListScanLimitparameter:# ldapmodify -D "cn=Directory Manager" -W -H ldap://server.example.com -xThe
ldapmodifyutility requires you to provide the LDIF statement with the parameter update:dn: cn=objectclass,cn=index,cn=userRoot,cn=ldbm database,cn=plugins,cn=config changetype: modify replace: nsIndexIDListScanLimit nsIndexIDListScanLimit: limit=0 type=eq flags=AND values=inetOrgPerson
With these settings, Directory Server does not create any ID list for
objectClass=inetOrgPersonconditions inANDclauses. In all other situations, Directory Server applies the global ID list scan limit value.The
nsIndexIDListScanLimitparameter uses the following syntax:nsIndexIDListScanLimit: limit=NNN [type=eq[,sub,...]] [flags=AND[,XXX,...]] [values=val[,val,...]]
limit: Sets the maximum size of the ID list. Valid values are:-
-1: Unlimited -
0: Do not use the index -
1to the maximum of the 32-bit integer (2147483647): Maximum number of IDs
-
type: Optional: Sets flags that alter the scan limit’s behavior. Valid values are:-
AND: Apply the scan limit only to searches in which the attribute appears in anANDclause. -
OR: Apply the scan limit only to searches in which the attribute appears in anORclause.
-
values: Optional: A comma-separated list of values which must match the search filter in order for the limit to be applied. Since the matches are done one at a time, the values will match if any of the values matches.Use the values only with one type at a time. The values must correspond to the index type and to the syntax of the attribute to which the index is applied. For example, if you specified the integer-based attribute
uidNumberand it is indexed for theeqtype, you cannot usetype=eq values=abc.If the value contains spaces, commas, NULL, or other values which require escaping, use the LDAP filter escape syntax: A backslash (\) followed by the 2 hex digit code of the character. In the following example, the commas in the DN value are escaped with
\2C:nsIndexIDListScanLimit: limit=0 type=eq values=uid=user\2Cou=People\2Cdc=example\2Cdc=com
9.3. Setting the number of Directory Server threads
Set the number of threads in Red Hat Directory Server to optimize parallel processing based on your available hardware resources. Configuring the thread count helps you to align server capacity with CPU cores, ensuring efficient handling of concurrent client requests and maximizing system throughput.
The number of threads Directory Server uses to handle simultaneous connections affects the performance of the server. For example, if all threads are busy handling time-consuming tasks, such as add operations, new incoming connections are queued until a free thread can process the request.
If the server provides a low number of CPU threads, configuring a higher number of threads can increase the performance. However, on a server with many CPU threads, setting a too high value does not further increase the performance.
By default, Directory Server uses an auto-tuning setting that calculates the number of threads. This number is based on the hardware resources of the server when the instance starts.
Avoid setting the number of threads manually. Use the auto-tuning setting instead.
With enabled automatic thread tuning, Directory Server uses the following optimized number of threads:
| CPU threads number | Directory Server threads number |
|---|---|
| 1-16 | 16 |
| 17-512 | The Directory Server thread number matches the CPU thread number in the system. For example, if your system has 24 CPU threads, Directory Server uses 24 threads. The maximum number of Directory Server threads is 512. |
| 512 and more | 512. Directory Server applies the recommended maximum number of threads. |
9.3.1. Enabling automatic thread tuning using the command line
By default, Directory Server automatically sets the number of threads based on the available hardware. However, in certain cases, you can manually enable this auto-tuning feature by using the nsslapd-threadnumber attribute.
Procedure
To enable the auto-tuning feature, set the
nsslapd-threadnumberattribute value to-1by the command:# dsconf <instance_name> config replace nsslapd-threadnumber="-1"Successfully replaced "nsslapd-threadnumber"
Verification
Verify the number of treads that Directory Server now uses by the command:
# dsconf <instance_name> config get nsslapd-threadnumbernsslapd-threadnumber: 16
NoteThe command retrieves the number of threads that Directory Server calculated based on the correct hardware resources.
Additional resources
9.3.2. Enabling automatic thread tuning using the web console
By default, Directory Server automatically sets the number of threads based on the available hardware. However, in certain cases, you can manually enable this auto-tuning feature by configuring the Number Of Worker Threads field in the web console.
Prerequisites
- You are logged in to the instance in the web console. For more details, see Logging in to the Directory Server by using the web console.
Procedure
- Navigate to → .
-
In the Number Of Worker Threads field, set the number of threads to
-1. - Click .
Additional resources
9.3.3. Manually setting the number of threads using the command line
Manually set the number of threads in Red Hat Directory Server by using the command line to control the server’s processing concurrency.
In certain situations, it is necessary to manually set a fixed number of Red Hat Directory Server threads. For example, if you do not use the auto-tuning setting and change the number of CPU cores in a virtual machine, adjusting the number of Red Hat Directory Server threads can improve the performance.
You can also use this procedure to re-enable the auto-tuning setting if you set a specific number of threads earlier.
Procedure
Set the number of threads Directory Server should use:
# dsconf <instance_name> config replace nsslapd-threadnumber="64"Successfully replaced "nsslapd-threadnumber"
Set the
nsslapd-threadnumberparameter to-1to enable the auto-tuning setting.
9.3.4. Manually setting the number of threads using the web console
Manually set the number of threads in Red Hat Directory Server by using the web console to control the server’s processing concurrency.
In certain situations, it is necessary to manually set a fix number of Directory Server threads. For example, if you do not use the auto-tuning setting and change the number of CPU cores in a virtual machine, adjusting the number of Directory Server threads can improve the performance.
Note that you can use the web console to re-enable the auto-tuning setting if you set a specific number of threads earlier.
Prerequisites
- You are logged in to the instance in the web console.
Procedure
- Navigate to → .
-
In the
Number Of Worker Threadsfield, set the number of threads. - Click .
9.4. Tuning resource limits
Directory Server provides several settings to tune the amount of resources an instance uses. You can change them using the command line or the web console.
9.4.1. Updating resource limit settings using the command line
Update resource limit settings in Red Hat Directory Server to define the maximum system resources allowed for directory operations. Configuring parameters such as search size, time, and look-through limits helps you to prevent resource exhaustion caused by inefficient queries.
Use this general procedure that changes resource limit settings to adjust the settings according to your environment.
Procedure
Update the performance settings:
# dsconf <instance_name> config replace <parameter_name>=<value>You can set the following parameters:
-
nsslapd-threadnumber: Sets the number of worker threads. -
nsslapd-maxdescriptors: Sets the maximum number of file descriptors. -
nsslapd-timelimit: Sets the search time limit. -
nsslapd-sizelimit: Sets the search size limit. -
nsslapd-pagedsizelimit: Sets the paged search size limit. -
nsslapd-idletimeout: Sets the idle connection timeout. -
nsslapd-ioblocktimeout: Sets the input/output (I/O) block timeout. -
nsslapd-ndn-cache-enabled: Enables or disables the normalized DN cache. -
nsslapd-ndn-cache-max-size: Sets the normalized DN cache size, if nsslapd-ndn-cache-enabled is enabled. -
nsslapd-outbound-ldap-io-timeout: Sets the outbound I/O timeout. -
nsslapd-maxbersize: Sets the maximum Basic Encoding Rules (BER) size. -
nsslapd-maxsasliosize: Sets the maximum Simple Authentication and Security Layer (SASL) I/O size. -
nsslapd-listen-backlog-size: Sets the maximum number of sockets available to receive incoming connections. -
nsslapd-max-filter-nest-level: Sets the maximum nested filter level. -
nsslapd-ignore-virtual-attrs: Enables or disables virtual attribute lookups. -
nsslapd-connection-nocanon: Enables or disables reverse DNS lookups. nsslapd-enable-turbo-mode: Enables or disables the turbo mode feature.For further details, see the descriptions of the parameters in the Configuration and schema reference
-
Restart the instance:
# dsctl <instance_name> restart
9.4.2. Updating resource limit settings using the web console
Update resource limit settings in Red Hat Directory Server to define the maximum system resources allowed for directory operations. Configuring parameters such as search size, time, and look-through limits helps you to prevent resource exhaustion caused by inefficient queries.
Use this general procedure that changes resource limit settings to adjust the settings according to your environment.
Prerequisites
- You are logged in to the instance in the web console.
Procedure
- Navigate to → .
Update the settings. Optionally, click Show Advanced Settings to display all settings.
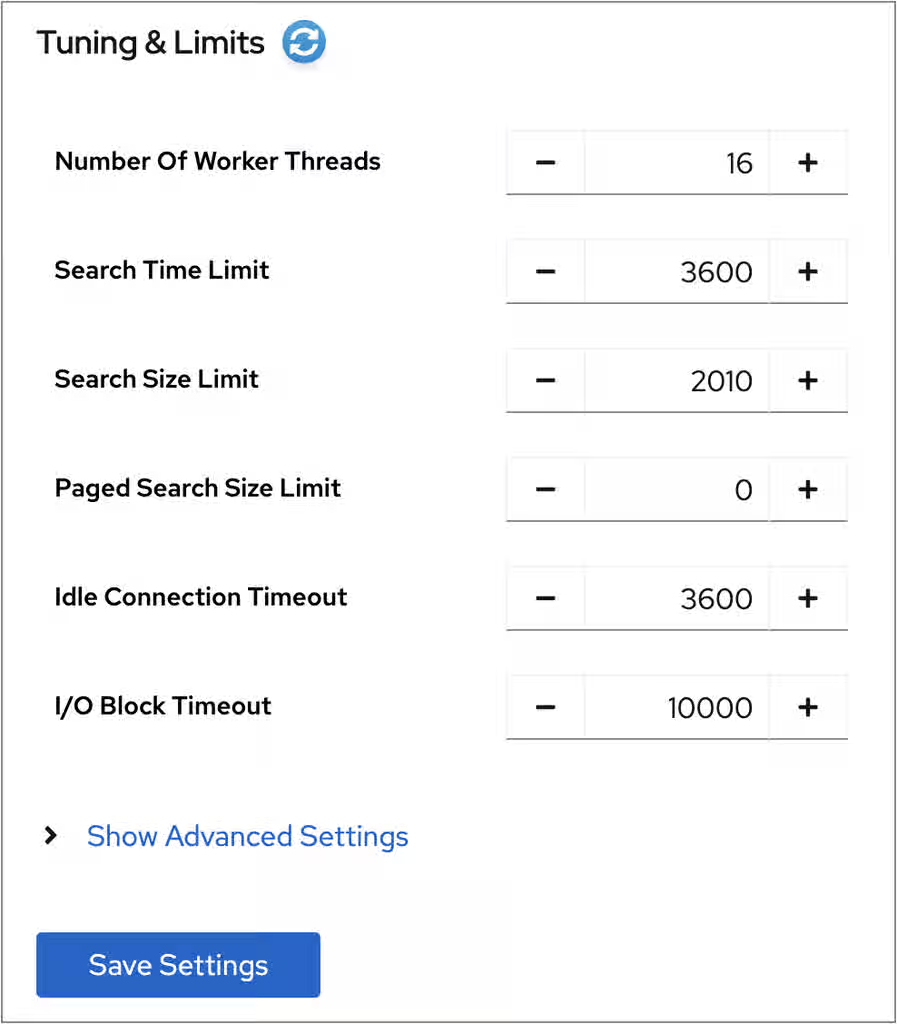
- Click .
- Click → .
9.4.3. Disabling the Transparent Huge Pages feature
To avoid performance and memory consumption problems, disable Transparent Huge Pages (THP) on RHEL systems with Red Hat Directory Server installed.
Transparent Huge Pages (THP) is the memory management feature in Linux that speeds up Translation Lookaside Buffer (TLB) checks on machines with large amounts of memory by using larger memory pages. The THP feature is enabled by default on RHEL systems and supports 2 MB memory pages.
The THP feature, however, works best when enabled on large, contiguous allocation patterns and can degrade performance on small, sparse allocation patterns that are typical to Red Hat Directory Server. The resident memory size of the process might eventually exceed the limit and impact performance or get terminated by the out of memory (OOM) killer.
Procedure
Check the current status of THP:
# cat /sys/kernel/mm/transparent_hugepage/enabledIf the transparent huge pages feature is active, disable it either at boot time or run time:
Disable the transparent huge pages at boot time by appending the following to the kernel command line in the
grub.conffile:transparent_hugepage=neverDisable transparent huge pages at run time by running the following commands:
# echo never > /sys/kernel/mm/transparent_hugepage/enabled
# echo never > /sys/kernel/mm/transparent_hugepage/defrag
9.5. Monitoring the local disk to shut down Directory Server on low disk space
Monitor the local disk in Red Hat Directory Server to automatically shut down the server when available disk space becomes critically low. Prevent data corruption and database failures caused by disk exhaustion, ensuring that the system stops gracefully before running out of storage.
When the disk space available on a system becomes too small, the Directory Server process terminates. As a consequence, there is a risk of corrupting the database or losing data. To prevent this problem, you can configure Directory Server to monitor the free disk space on the file systems that contain the configuration, transaction log, and database directories. If the free space reaches the configured threshold, Directory Server shuts down the instance.
9.5.1. Behavior of Directory Server depending on the amount of free disk space
Red Hat Directory Server automatically monitors available disk space to protect the database from corruption caused by storage exhaustion. Understanding how the server responds to low disk space helps you to manage storage capacity effectively and ensure continuous service availability.
Red Hat Directory Server behavior depends on the amount of remaining free space:
If the free disk space reaches the defined threshold, Directory Server:
- Disables verbose logging
- Disables access logging
- Deletes archived log files
NoteDirectory Server always continues writing error logs, even if the threshold is reached.
- If the free disk space is lower than the half of the configured threshold, Directory Server shuts down within a defined grace period.
- If the available disk space is ever lower than 4 KB, Directory Server shuts down immediately.
If disk space is freed up, then Directory Server aborts the shutdown process and re-enables all of the previously disabled log settings.
9.5.2. Configuring local disk monitoring using the command line
Red Hat Directory Server can monitor the free disk space on the file systems that contain the configuration, transaction log, and database directories. Depending on the remaining free space, Red Hat Directory Server disables certain logging features or shuts down.
Procedure
Enable the disk monitoring feature, set a threshold value and a grace period:
# dsconf <instance_name> config replace nsslapd-disk-monitoring=on nsslapd-disk-monitoring-threshold=3221225472 nsslapd-disk-monitoring-grace-period=60This command sets the threshold of free disk space to 3 GB (3,221,225,472 bytes) and the grace period to 60 seconds.
Optional: Configure Directory Server not to disable access logging or delete archived logs:
# dsconf <instance_name> config replace nsslapd-disk-monitoring-logging-critical=onRestart the instance:
# dsctl <instance_name> restart
9.5.3. Configuring local disk monitoring using the web console
Red Hat Directory Server can monitor the free disk space on the file systems that contain the configuration, transaction log, and database directories. Depending on the remaining free space, Red Hat Directory Server disables certain logging features or shuts down.
Prerequisites
- You are logged in to the instance in the web console.
Procedure
- Navigate to → → .
Select Enable Disk Space Monitoring. Set the threshold in bytes and the grace period in minutes:
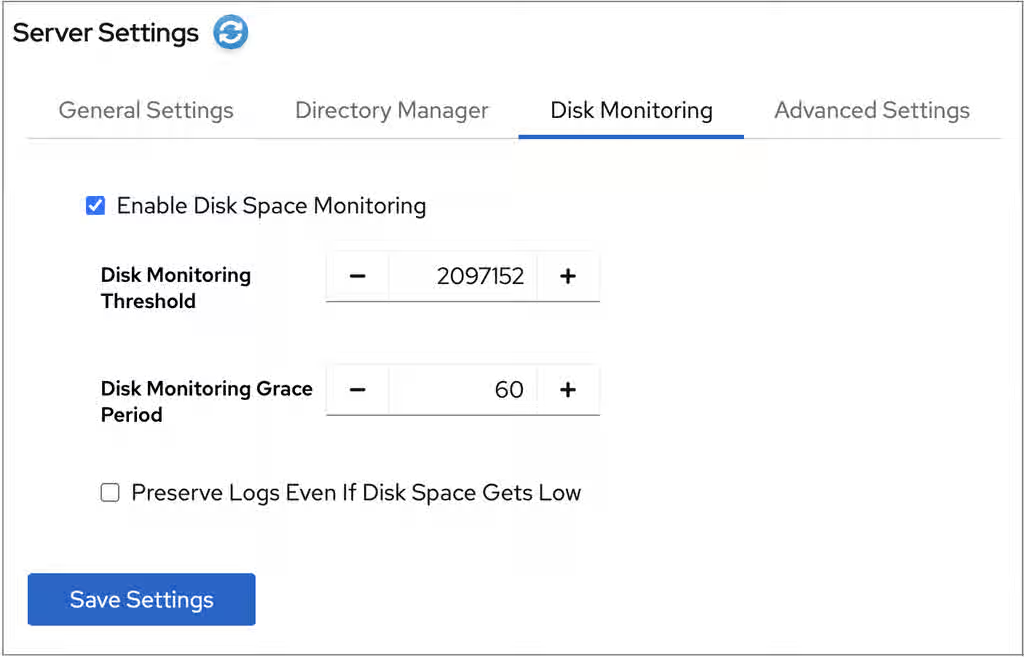
This example sets the monitoring threshold to 3 GB (3,221,225,472 bytes) and the time before Directory Server shuts down the instance after reaching the threshold to 60 minutes.
- Optional: Select Preserve Logs Even If Disk Space Gets Low.
- Click .
- Click in the top right corner, and select Restart Instance.
9.6. Tuning transaction logging
Tune transaction logging in Red Hat Directory Server to optimize database write performance and ensure efficient data recovery. Configuring parameters such as the log buffer size and storage location helps you to reduce disk I/O bottlenecks and improve system throughput.
Every Red Hat Directory Server instance contains a transaction log which logs updates of databases it manages. Whenever a directory database operation, such as a modify operation, is performed, the server creates a single database transaction for all of the database operations invoked as a result of that LDAP operation. This includes both updating the entry record in the database file containing the entries and updating all attribute indexes. If all of the operations succeed, the server commits the transaction, writes the operations to the transaction log, and verifies that the entire transaction is written to disk. If any of these operations fail, the server rolls back the transaction, and all of the operations are discarded. This all-or-nothing approach guarantees that an update operation is atomic. Either the entire operation succeeds permanently and irrevocably, or it fails.
Periodically, Red Hat Directory Server flushes the contents of the transaction logs to the actual database index files and checks if the transaction logs require trimming.
If the server experiences a failure, such as a power outage, and shuts down abnormally, the information about recent directory changes is still saved by the transaction log. When the server restarts, the server automatically detects the error condition and uses the database transaction log to recover the database.
Although database transaction logging, flush the database, trimming, and database recovery are automatic processes that require no intervention, it can be advisable to tune some of the database transaction logging attributes to optimize the performance.
9.6.1. Changing the database checkpoint interval using the command line
Change the database checkpoint interval in Red Hat Directory Server to control the frequency at which the server writes transaction logs to the database.
At regular intervals, Red Hat Directory Server writes the transactions logged in the transaction log to the database files and logs a checkpoint entry in the database transaction log. By indicating which changes have already been written to the database, checkpoint entries indicate where to begin recovery from the transaction log, thus speeding up the recovery process.
By default, Red Hat Directory Server sends a checkpoint entry to the database transaction log every 60 seconds. Increasing the checkpoint interval can increase the performance of directory write operations. However, it can also increase the amount of time required to recover directory databases after a disorderly shutdown and require more disk space due to large database transaction log files.
Procedure
Change the checkpoint interval, for example, to 120 seconds:
# dsconf <instance_name> backend config set --checkpoint-interval=120
9.6.2. Changing the database checkpoint interval using the web console
Change the database checkpoint interval in Red Hat Directory Server to control the frequency at which the server writes transaction logs to the database.
At regular intervals, Red Hat Directory Server writes the transactions logged in the transaction log to the database files and logs a checkpoint entry in the database transaction log. By indicating which changes have already been written to the database, checkpoint entries indicate where to begin recovery from the transaction log, thus speeding up the recovery process.
By default, Red Hat Directory Server sends a checkpoint entry to the database transaction log every 60 seconds. Increasing the checkpoint interval can increase the performance of directory write operations. However, it can also increase the amount of time required to recover directory databases after a disorderly shutdown and require more disk space due to large database transaction log files.
Prerequisites
- You are logged in to the instance in the web console.
Procedure
- Navigate to → .
- Click Show Advanced Settings.
- Update the value in the Database Checkpoint Interval field.
- Click .
9.6.3. Disabling durable transactions
Disable durable transactions in Red Hat Directory Server to improve the performance of write operations by reducing disk I/O overhead.
Durable transaction logging means that each LDAP update operation, comprised of a sequence of database operations in a transaction, is physically written to disk. Even though each LDAP operation can be comprised of multiple database updates, each LDAP operation is treated as a single database transaction. Each LDAP operation is both atomic and durable.
Turning off durable transactions can improve the write performance of Red Hat Directory Server at the risk of data loss.
When you disable durable transaction logging, Red Hat Directory Server writes every directory database operation to the database transaction log file but it may not be physically written to disk immediately. If a directory change was written to the logical database transaction log file but not physically written to disk at the time of a system crash, the change cannot be recovered. When durable transactions are disabled, the recovered database is consistent but does not reflect the results of any LDAP write operations that completed just before the system crash.
Note that you cannot change the nsslapd-db-durable-transaction parameter if Red Hat Directory Server is running.
Procedure
Stop the instance:
# dsctl <instance_name> stopEdit the
/etc/dirsrv/slapd-<instance_name>/dse.ldiffile, and set thensslapd-db-durable-transactionparameter in thecn=config,cn=ldbm database,cn=plugins,cn=configentry tooff:dn: cn=config,cn=ldbm database,cn=plugins,cn=config ... nsslapd-db-durable-transaction: off ...Start the instance:
# dsctl <instance_name> start
9.7. Managing cache settings
Manage cache settings in Red Hat Directory Server to optimize directory performance by controlling how data is stored in memory. Configuring the database and entry caches helps you to reduce disk I/O operations, ensuring faster response times for search requests and efficient resource utilization.
Directory Server uses the following caches:
- The entry cache, which contains individual directory entries.
- The distinguished name (DN) cache is used to associate DNs and relative distinguished names (RDN) with entries.
-
The database cache, which contains the database index files
*.dbfiles.
For the highest performance improvements, all cache sizes must be able to store all of their records. If you do not use the recommended auto-sizing feature and have not enough RAM available, assign free memory to the caches in the previously shown order.
Note that auto-sizing feature for entry and DN caches adapts its tuning when a Directory Server instance uses multiple databases of different sizes. The cache size matches the database size, allocating more physical resources to larger databases.
9.7.1. How the cache-autosize and cache-autosize-split parameters influence the database and entry cache sizes
In Red Hat Directory Server, the cache-autosize and cache-autosize-split parameters control the memory usage and the distribution ratio between database and entry caches, and help you to balance memory allocation dynamically, optimizing performance for your specific workload without manual calculations.
By default, Directory Server uses an auto-sizing feature to optimize the size of both the database and entry cache on the hardware resources of the server when the instance starts.
Red Hat recommends to use the auto-sizing feature and not to set cache sizes manually.
The following parameters in the cn=config,cn=ldbm database,cn=plugins,cn=config entry control the auto-sizing:
nsslapd-cache-autosizeThese settings control if auto-sizing is enabled for the database and entry cache. Auto-sizing is enabled:
-
For both the database and entry cache, if the
nsslapd-cache-autosizeparameter is set to a value greater than0. -
For the database cache, if the
nsslapd-cache-autosizeandnsslapd-dbcachesizeparameters are set to0. -
For the entry cache, if the
nsslapd-cache-autosizeandnsslapd-cachememsizeparameters are set to0.
-
For both the database and entry cache, if the
nsslapd-cache-autosize-split- The value sets the percentage of RAM that Directory Server uses for the database cache. The server uses the remaining percentage for the entry cache.
- Using more than 1.5 GB RAM for the database cache does not improve the performance. Therefore, Directory Server limits the database cache to 1.5 GB.
By default, Directory Server uses the following defaults values:
-
nsslapd-cache-autosize: 25 -
nsslapd-cache-autosize-split: 25 -
nsslapd-dbcachesize: 1,536 MB
Using these settings, 25% of the system’s free RAM is used (nsslapd-cache-autosize). From this memory, the server uses 25% for the database cache (nsslapd-cache-autosize-split) and the remaining 75% for the entry cache.
Depending on the free RAM, this results in the following cache sizes:
Table 9.1. Cache sizes if both nsslapd-cache-autosize and nsslapd-cache-autosize-split use their default values
| GB of free RAM | Database cache size | Entry cache size |
|---|---|---|
| 1 GB | 64 MB | 192 MB |
| 2 GB | 128 MB | 384 MB |
| 4 GB | 256 MB | 768 MB |
| 8 GB | 512 MB | 1,536 MB |
| 16 GB | 1,024 MB | 3,072 MB |
| 32 GB | 1,536 MB | 6,656 MB |
| 64 GB | 1,536 MB | 14,848 MB |
| 128 GB | 1,536 MB | 31,232 MB |
9.7.2. Identifying required cache sizes
Identify the required cache sizes for Red Hat Directory Server to optimize memory allocation for your directory data by using the dsconf monitor dbmon command that monitors cache statistics at runtime.
Prerequisites
- The root permissions
Procedure
To display the statistics, enter:
# dsconf <instance_name> monitor dbmonDB Monitor Report: 2022-02-24 10:25:16 -------------------------------------------------------- Database Cache: - Cache Hit Ratio: 50% - Free Space: 397.31 KB - Free Percentage: 2.2% - RO Page Drops: 0 - Pages In: 2934772 - Pages Out: 219075 Normalized DN Cache: - Cache Hit Ratio: 60% - Free Space: 19.98 MB - Free Percentage: 99.9% - DN Count: 100000 - Evictions: 9282348 Backends: - dc=example,dc=com (userroot): - Entry Cache Hit Ratio: 66% - Entry Cache Count: 50000 - Entry Cache Free Space: 2.0 KB - Entry Cache Free Percentage: 0.8% - Entry Cache Average Size: 8.9 KB - DN Cache Hit Ratio: 21% - DN Cache Count: 100000 - DN Cache Free Space: 4.29 MB - DN Cache Free Percentage: 69.8% - DN Cache Average Size: 130.0 B-
Optional: Pass the
-b back_endor-xoption to the command to display the statistics for a specific back end or the index. If your caches are sufficiently sized, the number in
DN Cache Countmatches the values in theCache Countbackend entries. Additionally, if all of the entries and DNs fit within their respective caches, theEntry Cache Countcount value matches theDN Cache Countvalue.The output of the example shows the following:
Only 2.2% free database cache is left:
Database Cache:
 ...
 - Free Space:          397.31 KB
 - Free Percentage:     2.2%
However, to operate efficiently, at least 15% free database cache is required. To determine the optimal size of the database cache, calculate the sizes of all
*.dbfiles in the/var/lib/dirsrv/slapd-<instance_name>/db/directory including subdirectories and the changelog database, and add 12% for overhead.To set the database cache, see Setting the database cache size using the command line.
The DN cache of the
userrootdatabase is well-chosen:Backends: - dc=example,dc=com (userroot): ... - DN Cache Count: 100000 - DN Cache Free Space: 4.29 MB - DN Cache Free Percentage: 69.8% - DN Cache Average Size: 130.0 BThe DN cache of the database contains 100000 records, 69,8% of the cache is free, and each DN in memory requires 130 bytes on average.
To set the DN cache, see Setting the DN cache size using the command line.
The statistics on the entry cache of the
userrootdatabase indicates that the entry cache value should be increased for better performance:Backends: - dc=example,dc=com (userroot): ... - Entry Cache Count: 50000 - Entry Cache Free Space: 2.0 KB - Entry Cache Free Percentage: 0.8% - Entry Cache Average Size: 8.9 KBThe entry cache contains in this database 50000 records and only 2 Kilobytes of free space are left. To enable Directory Server to cache all 100000 DNs, the cache must be increased to minimum of 890 MB (100000 DNs * 8,9 KB average entry size). However, Red Hat recommends to round the minimum required size to the next highest GB and double the result. In this example, the entry cache should be set to 2 Gigabytes.
To set the entry cache, see Setting the entry cache size using the command line.
9.7.3. Setting the database cache size using the command line
Set the database cache size in Red Hat Directory Server to allocate a specific amount of memory for storing database pages. You can ensure that frequently accessed index and data files remain in memory, providing faster search and update operations.
The database cache contains the Berkeley Database (BDB) index files for the database, meaning all of the *.db and other files used for attribute indexing by the database. This value is passed to the Berkeley DB API function set_cachesize(). This cache size has less of an impact on Red Hat Directory Server performance than the entry cache size, but if there is available RAM after the entry cache size is set, increase the amount of memory allocated to the database cache.
Procedure
Disable automatic cache tuning
# dsconf <instance_name> backend config set --cache-autosize=0Manually set the database cache size:
# dsconf <instance_name> backend config set --dbcachesize=268435456Specify the database cache size in bytes. In this example, the command sets the database cache to 256 MB.
Restart the instance:
# dsctl <instance_name> restart
9.7.4. Setting the database cache size using the web console
Set the database cache size in Red Hat Directory Server to allocate a specific amount of memory for storing database pages. You can ensure that frequently accessed index and data files remain in memory, providing faster search and update operations.
The database cache contains the Berkeley Database (BDB) index files for the database, meaning all of the *.db and other files used for attribute indexing by the database. This value is passed to the Berkeley DB API function set_cachesize(). This cache size has less of an impact on Directory Server performance than the entry cache size, but if there is available RAM after the entry cache size is set, increase the amount of memory allocated to the database cache.
Prerequisites
- You are logged in to the instance in the web console.
Procedure
- Navigate to → .
- Deselect Automatic Cache Tuning.
- Click .
-
Enter the database cache size in bytes, such as
268435456for 256 MB, into the Database Cache Size field. - Click .
- Click in the top right corner, and select Restart Instance.
9.7.5. Setting the DN cache size using the command line
Set the DN cache size in Red Hat Directory Server to control the memory allocated for storing distinguished names (DN). You can optimize memory usage and accelerate entry resolution by ensuring that frequently accessed DNs are stored in a dedicated, high-performance cache.
Red Hat Directory Server uses the entryrdn index to associate DNs and relative distinguished names (RDN) with entries. It enables the server to efficiently rename subtrees, move entries, and perform moddn operations. The server uses the DN cache to cache the in-memory representation of the entryrdn index to avoid expensive file I/O and transformation operations.
If you do not use the auto-tuning feature, for best performance, especially with but not limited to renaming entries and moving operations, set the DN cache to a size that enables Red Hat Directory Server to cache all DNs in the database.
If a DN is not stored in the cache, Red Hat Directory Server reads the DN from the entryrdn.db index database file and converts the DNs from the on-disk format to the in-memory format. DNs that are stored in the cache enable the server to skip the disk I/O and conversion steps.
Procedure
Display the suffixes and their corresponding back end:
# dsconf <instance_name> backend suffix listdc=example,dc=com (userroot)
This command displays the name of the back end database next to each suffix. You require the suffix’s database name in the next step.
Set the DN cache size:
# dsconf <instance_name> backend suffix set --dncache-memsize=20971520 userRootThis command sets the DN cache for the
userRootdatabase to 20 megabytes.Restart the instance:
# dsctl <instance_name> restart
9.7.6. Setting the DN cache size using the web console
Set the DN cache size in Red Hat Directory Server to control the memory allocated for storing distinguished names (DN). You can optimize memory usage and accelerate entry resolution by ensuring that frequently accessed DNs are stored in a dedicated, high-performance cache.
Red Hat Directory Server uses the entryrdn index to associate DNs and relative distinguished names (RDN) with entries. It enables the server to efficiently rename subtrees, move entries, and perform moddn operations. The server uses the DN cache to cache the in-memory representation of the entryrdn index to avoid expensive file I/O and transformation operations.
If you do not use the auto-tuning feature, for best performance, especially with but not limited to renaming entries and moving operations, set the DN cache to a size that enables Red Hat Directory Server to cache all DNs in the database.
If a DN is not stored in the cache, Red Hat Directory Server reads the DN from the entryrdn.db index database file and converts the DNs from the on-disk format to the in-memory format. DNs that are stored in the cache enable the server to skip the disk I/O and conversion steps.
Prerequisites
- You are logged in to the instance in the web console.
Procedure
- Navigate to → → .
- Enter the DN cache size in bytes to the DN Cache Size field.
- Click .
- Click in the top right corner, and select Restart Instance.
9.7.7. Setting the entry cache size using the command line
Red Hat Directory Server uses the entry cache to store directory entries that are used during search and read operations. Setting the entry cache to a size that enables Red Hat Directory Server to store all records has the highest performance impact on search operations.
If entry caching is not configured, Red Hat Directory Server reads the entry from the id2entry.db database file and converts the distinguished names (DN) from the on-disk format to the in-memory format. Entries that are stored in the cache enable the server to skip the disk I/O and conversion steps.
Procedure
Disable automatic cache tuning:
# dsconf <instance_name> backend config set --cache-autosize=0Successfully updated database configuration
Display the suffixes and their corresponding back end:
# dsconf <instance_name> backend suffix listdc=example,dc=com (userroot)
This command displays the name of the back end database next to each suffix. You require the suffix’s database name in the next step.
Set the entry cache size in bytes for the database:
# dsconf <instance_name> backend suffix set --cache-memsize=2147483648 userRootThis command sets the entry cache for the
userRootdatabase to 2 gigabytes.Restart the instance:
# dsctl <instance_name> restart
9.7.8. Setting the entry cache size using the web console
Red Hat Directory Server uses the entry cache to store directory entries that are used during search and read operations. Setting the entry cache to a size that enables Red Hat Directory Server to store all records has the highest performance impact on search operations.
If entry caching is not configured, Red Hat Directory Server reads the entry from the id2entry.db database file and converts the distinguished names (DN) from the on-disk format to the in-memory format. Entries that are stored in the cache enable the server to skip the disk I/O and conversion steps.
Prerequisites
- You are logged in to the instance in the web console.
Procedure
- Navigate to → → → .
- Disable the Automatic Cache Tuning setting.
- Click .
- Click in the top right corner, and select Restart Instance.
- Navigate to → → → .
- Set the size of the database cache in the Entry Cache Size field.
- Click .
- Click in the top right corner, and select Restart Instance.
9.8. Tuning Directory Server for large database imports and imports with large attribute values
Tune Red Hat Directory Server performance settings to optimize the import of large databases or entries containing large attribute values. Adjusting parameters such as import cache sizes and buffer settings helps you to accelerate data ingestion and prevent resource exhaustion during bulk operations.
Very large attribute sizes or a large number of entries can negatively impact server performance during import operations.
Use the import cache autosizing feature for following operations:
- importing a very large database
- importing a database with large attributes, such as binary attributes that store certificate chains or images
Offline imports are faster than online ones. Consider using offline imports where possible.
You can configure the import cache autosizing feature with the nsslapd-import-cache-autosize attribute. By default, Red Hat Directory Server enables the import cache autosizing for the ldif2db operation only, automatically allocating 50% of the free physical memory for the import cache.
For further details, see the description of the This content is not included.nsslapd-import-cache-autosize attribute in the Configuration, Command, and File Reference documentation.
9.9. Managing the number of connection listener threads
The nsslapd-numlisteners attribute specifies the number of listener threads the Red Hat Directory Server can use to monitor established connections. When the server experiences a large number of client connections, you can increase the attribute value to improve the response time.
You can manage the number of connection listener threads by using the command line. The default value is 1.
Procedure
List the number of connection listener threads:
# dsconf <instance_name> config get nsslapd-numlistenersModify the number of connection listener threads:
# dsconf <instance_name> config replace nsslapd-numlisteners=4Restart the instance:
# dsctl <instance_name> restart
Chapter 10. Searching entries and tuning searches
Search for directory entries by using the web console or the command line. The search performance can be improved by using resource limits that are set globally, at user level and for anonymous binds.
10.1. Finding entries using the command line (ldapsearch)
Find specific information within your directory by performing targeted searches with the ldapsearch utility. You can retrieve precise data sets and verify entry details by constructing complex search filters, specifying base DNs, and defining the scope of your queries.
The ldapsearch utility opens a connection to a specified server by using the specified identity and credentials and locates entries based on a specified search filter. The search scope can include:
-
a single entry (
-s base) -
an entry immediate subentries (
-s one) -
an entire tree or subtree (
-s sub)
The ldapsearch utility does not search for directory entries based on attributes in the distinguished name. The distinguished name is only a unique identifier for a directory entry and cannot be used as a search key. Instead, ldapsearch searches for entries based on the attribute value pairs stored in entries. If the distinguished name of an entry is, for example, uid=bjensen,ou=People,dc=example,dc=com, then a search for dc=example does not match that entry unless dc:example was explicitly added as an attribute value pair to this entry.
The ldapsearch utility returns results in the LDIF format that is defined in the Content from www.ietf.org is not included.RFC 2849 specification.
10.1.1. The ldapsearch command format
Review the ldapsearch command format that defines the syntax used to query Red Hat Directory Server. Understanding the structure of options and search filters helps you to construct precise requests, ensuring you retrieve accurate directory information for administration and troubleshooting.
The ldapsearch command must use the following format:
# ldapsearch [-x | -Y mechanism] [options] [search_filter] [list_of_attributes]
-xor-YUse
-x(simple binds) or-Y(SASL mechanism) to configure the type of the connection.options
The
ldapsearchcommand-line options. Specify the options before the search filter, if any are used.search_filter
An LDAP search filter. Do not specify a search filter if you configure search filters in a file using the
-foption.list_of_attributes
A list of attributes separated by a space character. Specifying the list of attributes reduces the number of attributes returned in the search results. This list of attributes must appear after the search filter. If you do not specify the list of attributes, the search returns values for all attributes permitted by the access control set in the directory with the exception of operational attributes.
If you want the search to return operational attributes, you must explicitly specify it in the
ldapsearchsearch command. To return all operational attributes of an object use the plus sign (+). To retrieve regular attributes in addition to explicitly specified operational attributes, use an asterisk (*) in the list of attributes.Note that you might need to escape the asterisk character with a backslash (
\*).To retrieve only a list of matching DNs, use the attribute
1.1. For example:# ldapsearch -D "cn=Directory Manager" -W -H ldap://server.example.com \ -b "dc=example,dc=com" -x "(objectclass=inetorgperson)" 1.1
Additional resources
10.1.2. Commonly used ldapsearch options
Review the most commonly used ldapsearch utility options. These options help you to refine search scopes, manage authentication credentials, and format output, ensuring efficient data retrieval for administration and troubleshooting.
If a specified value contains a space character, the value must be surrounded by single or double quotation marks, for example:
-b "cn=My Special Group,ou=groups,dc=example,dc=com"
The ldapsearch utility from OpenLDAP uses SASL connections by default. To perform a simple bind or to use TLS, use the -x argument to disable SASL and allow other connection methods.
| Option | Description |
|---|---|
|
|
Specifies the starting point for the search - base Distinguished Name (DN). Note that distinguished name must exist in the database. If you set the
You must specify the option value in single or double quotation marks if the value contains a space character. For example:
To search the root DSE entry, specify an empty string here, such as |
|
|
Specifies the DN used to authenticate to the server. Directory Server must recognize the DN value, and the DN must have the authority to search for the entries. For example: Do not specify this option if the server supports anonymous access. |
|
| Specifies an LDAP URL to connect to the server. An LDAP URL has the following format: ldap[s]://hostname:[port]
Specifying the port value is optional. The
The utility can also use an LDAPI URL with each element separated by the HTML hex code %2F instead of a forward slash ( ldapi://%2Ffull%2Fpath%2Fto%2Fslapd-example.socket
For LDAPI, specify the full path to the file which represents the LDAPI socket the server is listening to. If you did not specify the URL, |
|
|
Specifies the hostname or IP address of the machine with installed Directory Server. For example, Note
The |
|
|
Specifies the TCP port number used by Directory Server. For example, Note
The |
|
|
Specifies the maximum time limit in seconds for a search request to complete. For example, |
|
| Specifies the scope of the search. You can choose one of the following scopes:
|
|
|
Prompts for the password. if you did not specify the option, the Note The password can be visible in the process list for other users and is saved in the shell’s history. |
|
| Disables the default SASL connection to allow simple binds. |
|
|
Sets the SASL mechanism to use for authentication. If you do not set any mechanism, |
|
|
Sets the maximum number of entries to return in a response to a search request. This value overwrites the |
|
| Specifies a file with search filters. |
Additional resources
10.1.3. Using special characters
Ensure search filter accuracy by correctly escaping special characters in LDAP queries.
When using the ldapsearch utility, you might need to specify values with characters that have special meaning to the command-line interpreter, such as space character, asterisk (*), or backslash (\). Depending on the command-line interpreter, enclose the value that has the special character either in single (' ') or double (" ") quotation marks. For example:
-D "cn=John Smith,ou=Product Development,dc=example,dc=com"
In general, use single quotation marks (' ') to enclose values. Use double quotation marks (" ") to allow variable interpolation if there are shell variables.
10.2. Finding entries using the LDAP Browser
Find directory entries in Red Hat Directory Server by using the LDAP Browser menu in the web console. Visually navigating the directory tree helps you to locate specific objects and inspect their attributes quickly without constructing complex command-line search filters.
Directory Server searches for entries based on the attribute-value pairs stored in the entries, not based on the attributes used in the distinguished names (DN) of these entries. For example, if an entry has a DN of uid=user_name,ou=People,dc=example,dc=com, then a search for dc=example matches the entry only when dc:example attribute exists in this entry.
Prerequisites
- You are logged into the Directory Server web console.
- You have root permissions.
Procedure
- In the web console, navigate to → .
Expand and select the search criteria to filter entries:
Search parameter Description Search base
Specifies the starting point of the search. It is a distinguished name (DN) that currently exists in the database.
Note that the Search tabs opens with pre-defined search base, when you open an entry details in the Tree View or Table View, click on the Options menu (⋮) and select Search.
Search Scope
Select Subtree to search entries in the whole subtree starting from the search base and including all child entries.
Select One Level to search entries starting from the search base and including only the first level of child entries.
Select Base to search for attribute values only in the entry specified as the search base.
Size Limit
Set the maximum number of entries to return from a search operation.
Time Limit
Set the time in seconds the search engine can look for entries.
Show Locking
Toggle the switch to
onto see the lock status of the found entries.Search Attributes
Select attributes that take part in the search. You can choose from the predefined attributes and add custom ones.
- Type the attribute value in the search text field and press Enter.
Optional: To further refine your search, use search filters in the Filter tab to search for entries.
NoteDirectory Server records all search requests to the access log file, which you can view at → → .
Additional resources
10.3. LDAP search filters
Construct LDAP search filters in Red Hat Directory Server to define specific criteria for directory queries. Using standard filter syntax with logical operators helps you to refine the scope of search operations.
Search filters select specific entries that search operation returns. You can use search filters with the ldapsearch command-line utility or in the Directory Server web console.
Directory Server searches for entries based on the attribute-value pairs the entries store, not based on the attributes used in the distinguished names (DN) of these entries. For example, if an entry has the DN uid=user_name,ou=People,dc=example,dc=com, then a search for dc=example matches the entry only when the attribute-value pair dc:example exists in this entry.
When using ldapsearch, you can define multiple search filters in a file with each filter on a separate line. Alternatively, you can specify a search filter directly on the command line.
A search filter has the following basic syntax:
(<attribute><operator><value>)
For example, the search filter (employeeNumber>=500) has employeeNumber as the attribute, >= as the operator, and 500 as the value.
A search filter with a matching rule has the following syntax:
(<attribute>:<matching_rule>:=<value>)
For example, the search filter (givenName:caseExactMatch:=Daniel) has givenName as the attribute, caseExactMatch as the matching rule, and Daniel as the value.
You can define filters that use different attributes combined together with Boolean operators.
10.3.1. Using attributes in LDAP search filters
Use attributes in LDAP search filters to target specific data fields within directory entries.
A basic search looks for the presence of attributes or specific values in entries. A search can look for attributes in entries in several ways:
Checks if the attribute exists (presence search). A presence search uses an asterisk (
*) to return every entry that has a certain attribute set, regardless of value.For example,
"(manager=*)"filter returns every entry that has themanagerattribute.Matchs an exact attribute value (equality search). Equality search looks for an attribute with a specific value. For example, the
"(cn=example)"filter returns all entries that contain the common name (cn) set toexample.When an attribute has values associated with a language tag, the search returns all values. Therefore, the following two attribute values both match the
"(cn=example)"filter:cn: example cn;lang-fr: example
Lists matches against a partial value (substring search). For example, the
"(sn=*erson)"search filter returns the following values:sn: Derson sn: Anderson
For more details about configuring the length of the substring searches, see Changing the search key length in a substring index.
10.3.2. Using operators in LDAP search filters
Operators in LDAP search filters set the relationship between the attribute and the given search value. When searching for people, you can use operators to set a range, to return last names within a subset of letters in the alphabet or employee numbers that come after a certain number.
(employeeNumber>=500)
(sn~=suret)
(salary<=150000)
When having imperfect information or searching in internationalized directories, you can use operators for phonetic and approximate searches to make the search operation more effective.
You can use the following operators in the search filters:
| Search type | Operator | Description |
|---|---|---|
| Equality | = |
Returns entries with attributes which values exactly match the specified value. For example, |
| Substring | =string* string |
Returns entries that contain attributes with a specified substring in the value. For example, |
| Greater than or equal to | >= |
Returns entries that contain attributes with values that are greater than or equal to the specified value. For example, |
| Less than or equal to | <= |
Returns entries that contain attributes with values that are less than or equal to the specified value. For example, |
| Presence | =* |
Returns entries that contain one or more values for the specified attribute. For example, |
| Approximate | ~= |
Returns entries that contain the specified attribute with a value that is approximately equal to the value specified in the search filter. For example, |
10.3.3. Using compound LDAP search filters
Use compound search filters in Red Hat Directory Server to combine multiple search criteria by using Boolean operators, such as AND, OR, and NOT.
Boolean operators are expressed in the prefix notation as follows:
(<boolean-operator>(filter)(filter)(filter)...)
You can use the following Boolean operators:
| Operator | Symbol | Description |
|---|---|---|
| AND | Ampersand (&) |
All specified filters must be true for the statement to be true. For example, |
| OR | Vertical bar (|) |
At least one specified filter must be true for the statement to be true. For example, |
| NOT | Exclamation point (!) |
The specified statement must not be true for the statement to be true. Only one filter is affected by the NOT operator. For example, |
A search operation evaluates Boolean expressions in the following order:
- Innermost to outermost parenthetical expressions first.
- Then the server changes the order to try to evaluate the most restrictive expression first.
Compound search filters are most useful when they are nested together into completed expressions, such as:
(<boolean-operator>(filter)((<boolean-operator>(filter)(filter))))
You can combine compound filters with other types of searches (approximate, substring, and other operators) to get detailed results. The following example filter returns all entries which have the organizational unit (ou) as Marketing and which description attribute does not contain the substring X.500:
(&(ou=Marketing)(!(description=*X.500*)))
In addition, you can expand the filter to return also entries that have a manager set to example or demo:
(&(ou=Marketing)(!(description=*X.500*))(|(manager=cn=example,ou=Marketing,dc=example,dc=com)(manager=cn=demo,ou=Marketing,dc=example,dc=com)))
The following example filter returns all entries that do not represent a person:
(!(objectClass=person))
The following filter returns all entries that do not represent a person and which common name (cn) is similar to printer3b:
(&(!(objectClass=person))(cn~=printer3b))
10.3.4. Using matching rules in LDAP search filters
Use matching rules in Red Hat Directory Server search filters to customize how the server compares attribute values. Explicitly defining the matching behavior helps you to override the default comparison logic for an attribute.
A matching rule specifies how Directory Server compares the value stored in the attribute with the value in the search filter. Matching rules are related to attribute syntaxes. When attribute syntaxes define the format of an attribute values, the matching rules define how that format is compared and indexed. A matching rule also defines how to generate index keys.
A matching rule is a schema element that has an object identifier (OID). All attributes in Directory Server have defined matching rules. For more information about matching rules types, see Matching rule types. By specifying a matching rule in a search filter, you can search for an attribute value with a matching rule that differs from the one defined for the attribute in the schema.
A filter with an extensible matching rule has the following syntax:
(<attribute>:<matching_rule>:=<value>)Where:
-
<attribute>is an attribute that belongs to entries that you search, such ascn,mail,name. -
<matching_rule>is a string that contains the name or OID of the rule that you want to use for matching attribute values according to the required syntax. For example,caseExactMatchmatching rule. -
<value>is the attribute value or a relational operator plus the attribute value to search for.
The matching rule must be compatible with the syntax of the attribute that you search. You can run a case-sensitive search for an attribute that has a case-insensitive matching rule defined for it. For example, the name attribute has the predefined caseIgnoreMatch equality matching rule in the schema definition. The basic equality search with the filter (name=Daniel) retrieves entries that contain the name attribute values like DAniel, daniel, DanIel. The equality search with the matching rule filter (name:caseExactMatch:=Daniel) retrieves entries that contain the name attribute value of Daniel only.
Many matching rules defined for Directory Server relate to language codes and set internationalized collation orders. For example, the OID 2.16.840.1.113730.3.3.2.17.1 identifies the Finnish collation order. For the full list of supported internationalized collation orders, see Language ordering matching rules and Language substring matching rules.
Additional resources
10.3.4.1. Matching rule types
Review types of matching rules to apply the correct search syntax for different data formats, ensuring that directory queries return accurate results.
A search filter without a specified matching rule, such as (employeeNumber>=500) or (sn=*erson), uses a matching rule defined by the syntax of the attribute in its schema definition. You can define the following types of matching rules for an attribute in the schema definition:
- EQUALITY
-
An
EQUALITYmatching rule specifies how to compare two values for an equal match. For example, how to handle strings likeFredandFRED. Update operations use theEQUALITYrule to generate the index keys. Search operations with filters, such as(name=Fred), use theEQUALITYrule to compare the value in the filter with values in an entry. - ORDERING
-
An
ORDERINGmatching rule specifies how to compare two values to determine if one value is greater or less than another value. Search filters that set a range, such as(employeeNumber>=500)or(attribute⇐value), use theORDERINGrule. An index for an attribute with anORDERINGrule orders the equality values. - SUBSTR
-
A
SUBSTRmatching rule specifies how to compare a substring value. Substring search filters, such as(name=*ed), use theSUBSTRrule. Substring (sub) indexes use theSUBSTRrule to generate the index keys.
In addition to equality, ordering, and substring matching rules, you can specify approximate and other extensible matching rules in a search filter.
A directory requires matching rules to support searching or indexing for the corresponding search filter or index type. For example, an attribute must have an EQUALITY matching rule in order to support equality search filters and eq indexes for that attribute. An attribute must have both an ORDERING matching rule and an EQUALITY matching rule in order to support range search filters and indexed range searches.
Directory Server rejects a search operation with PROTOCOL_ERROR or UNWILLING_TO_PERFORM if the search operation uses a search filter for an attribute that has no corresponding matching rule.
Matching rules and custom attributes
For example, you want to create a custom attribute MyFirstName with IA5 String (7-bit ASCII) syntax and an EQUALITY matching rule of caseExactIA5Match in the schema definition. A search with the filter (MyFirstName=Fred) returns entries that have the MyFirstName value equal to Fred only; however, Fred, FRED, and fred are all valid IA5 String values. If you want a search to return all variants of the attribute value, you must define the MyFirstName attribute to use the equality matching rule caseIgnoreIA5Match or explicitly specify the matching rule (MyFirstName:caseIgnoreIA5Match:=Fred) in the search filter.
10.3.4.2. Commonly used matching rules
Red Hat Directory Server supports standard matching rules to define how the server compares attribute values. Use these rules to refine search filters for specific data types, such as case-insensitive strings or numbers.
| Matching rule | Description | Object identifiers (OIDs) | Compatible syntaxes |
|---|---|---|---|
|
Bitwise |
Performs bitwise | 1.2.840.113556.1.4.803 |
Typically used with |
|
Bitwise |
Performs bitwise | 1.2.840.113556.1.4.804 |
Typically used with |
| booleanMatch |
Evaluates whether the values to match are | 2.5.13.13 | Boolean |
| caseExactIA5Match | Makes a case-sensitive comparison of values. | 1.3.6.1.4.1.1466.109.114.1 | IA5 Syntax, URI |
| caseExactMatch | Makes a case-sensitive comparison of values. | 2.5.13.5 | Directory String, Printable String, OID |
| caseExactOrderingMatch | Allows case-sensitive ranged searches (less than and greater than). | 2.5.13.6 | Directory String, Printable String, OID |
| caseExactSubstringsMatch | Performs case-sensitive substring and index searches. | 2.5.13.7 | Directory String, Printable String, OID |
| caseIgnoreIA5Match | Performs case-insensitive comparisons of values. | 1.3.6.1.4.1.1466.109.114.2 | IA5 Syntax, URI |
| caseIgnoreIA5SubstringsMatch | Performs case-insensitive searches on substrings and indexes. | 1.3.6.1.4.1.1466.109.114.3 | IA5 Syntax, URI |
| caseIgnoreListMatch | Performs case-insensitive comparisons of values. | 2.5.13.11 | Postal address |
| caseIgnoreListSubstringsMatch | Performs case-insensitive searches on substrings and indexes. | 2.5.13.12 | Postal address |
| caseIgnoreMatch | Performs case-insensitive comparisons of values. | 2.5.13.2 | Directory String, Printable String, OID |
| caseIgnoreOrderingMatch | Allows case-insensitive ranged searches (less than and greater than). | 2.5.13.3 | Directory String, Printable String, OID |
| caseIgnoreSubstringsMatch | Performs case-insensitive searches on substrings and indexes. | 2.5.13.4 | Directory String, Printable String, OID |
| distinguishedNameMatch | Compares distinguished name values. | 2.5.13.1 | Distinguished name (DN) |
| generalizedTimeMatch | Compares values that are in a Generalized Time format. | 2.5.13.27 | Generalized Time |
| generalizedTimeOrderingMatch | Allows ranged searches (less than and greater than) on values that are in a Generalized Time format. | 2.5.13.28 | Generalized Time |
| integerMatch | Evaluates integer values. | 2.5.13.14 | Integer |
| integerOrderingMatch | Allows ranged searches (less than and greater than) on integer values. | 2.5.13.15 | Integer |
| keywordMatch | Compares the given search value to a string in an attribute value. | 2.5.13.33 | Directory String |
| numericStringMatch | Compares more general numeric values. | 2.5.13.8 | Numeric String |
| numericStringOrderingMatch | Supports ranged searches (less than and greater than) on more general numeric values. | 2.5.13.9 | Numeric String |
| numericStringSubstringMatch | Compares more general numeric values. | 2.5.13.10 | Numeric String |
| objectIdentifierMatch | Compares object identifier (OID) values. | 2.5.13.0 | Object Identifier (OID) |
| octetStringMatch | Evaluates octet string values. | 2.5.13.17 | Octet String |
| octetStringOrderingMatch | Supports ranged searches (less than and greater than) on a series of octet string values. | 2.5.13.18 | Octet String |
| telephoneNumberMatch | Evaluates telephone number values. | 2.5.13.20 | Telephone Number |
| telephoneNumberSubstringsMatch | Performs substring and index searches on telephone number values. | 2.5.13.21 | Telephone Number |
| uniqueMemberMatch | Compares an assertion value of the Name And Optional UID syntax to an attribute value of a syntax | 2.5.13.23 | Name and Optional UID |
| wordMatch | Compares the given search value to a string in an attribute value. This matching rule is case-insensitive. | 2.5.13.32 | Directory String |
10.3.4.3. Language ordering matching rules
Red Hat Directory Server supports language ordering matching rules to sort search results by locale-specific conventions. Use these rules to override standard binary sorting. This ensures that directory entries follow the correct alphabetical order for languages with unique character requirements.
For international searches, use the following language ordering matching rules:
| Matching rule | Object identifiers (OIDs) |
|---|---|
| English (Case Exact Ordering Match) | 2.16.840.1.113730.3.3.2.11.3 |
| Albanian (Case Insensitive Ordering Match) | 2.16.840.1.113730.3.3.2.44.1 |
| Arabic (Case Insensitive Ordering Match) | 2.16.840.1.113730.3.3.2.1.1 |
| Belorussian (Case Insensitive Ordering Match) | 2.16.840.1.113730.3.3.2.2.1 |
| Bulgarian (Case Insensitive Ordering Match) | 2.16.840.1.113730.3.3.2.3.1 |
| Catalan (Case Insensitive Ordering Match) | 2.16.840.1.113730.3.3.2.4.1 |
| Chinese - Simplified (Case Insensitive Ordering Match) | 2.16.840.1.113730.3.3.2.49.1 |
| Chinese - Traditional (Case Insensitive Ordering Match) | 2.16.840.1.113730.3.3.2.50.1 |
| Croatian (Case Insensitive Ordering Match) | 2.16.840.1.113730.3.3.2.22.1 |
| Czech (Case Insensitive Ordering Match) | 2.16.840.1.113730.3.3.2.5.1 |
| Danish (Case Insensitive Ordering Match) | 2.16.840.1.113730.3.3.2.6.1 |
| Dutch (Case Insensitive Ordering Match) | 2.16.840.1.113730.3.3.2.33.1 |
| Dutch - Belgian (Case Insensitive Ordering Match) | 2.16.840.1.113730.3.3.2.34.1 |
| English - US (Case Insensitive Ordering Match) | 2.16.840.1.113730.3.3.2.11.1 |
| English - Canadian (Case Insensitive Ordering Match) | 2.16.840.1.113730.3.3.2.12.1 |
| English - Irish (Case Insensitive Ordering Match) | 2.16.840.1.113730.3.3.2.14.1 |
| Estonian (Case Insensitive Ordering Match) | 2.16.840.1.113730.3.3.2.16.1 |
| Finnish (Case Insensitive Ordering Match) | 2.16.840.1.113730.3.3.2.17.1 |
| French (Case Insensitive Ordering Match) | 2.16.840.1.113730.3.3.2.18.1 |
| French - Belgian (Case Insensitive Ordering Match) | 2.16.840.1.113730.3.3.2.19.1 |
| French - Canadian (Case Insensitive Ordering Match) | 2.16.840.1.113730.3.3.2.20.1 |
| French - Swiss (Case Insensitive Ordering Match) | 2.16.840.1.113730.3.3.2.21.1 |
| German (Case Insensitive Ordering Match) | 2.16.840.1.113730.3.3.2.7.1 |
| German - Austrian (Case Insensitive Ordering Match) | 2.16.840.1.113730.3.3.2.8.1 |
| German - Swiss (Case Insensitive Ordering Match) | 2.16.840.1.113730.3.3.2.9.1 |
| Greek (Case Insensitive Ordering Match) | 2.16.840.1.113730.3.3.2.10.1 |
| Hebrew (Case Insensitive Ordering Match) | 2.16.840.1.113730.3.3.2.27.1 |
| Hungarian (Case Insensitive Ordering Match) | 2.16.840.1.113730.3.3.2.23.1 |
| Icelandic (Case Insensitive Ordering Match) | 2.16.840.1.113730.3.3.2.24.1 |
| Italian (Case Insensitive Ordering Match) | 2.16.840.1.113730.3.3.2.25.1 |
| Italian - Swiss (Case Insensitive Ordering Match) | 2.16.840.1.113730.3.3.2.26.1 |
| Japanese (Case Insensitive Ordering Match) | 2.16.840.1.113730.3.3.2.28.1 |
| Korean (Case Insensitive Ordering Match) | 2.16.840.1.113730.3.3.2.29.1 |
| Latvian, Lettish (Case Insensitive Ordering Match) | 2.16.840.1.113730.3.3.2.31.1 |
| Lithuanian (Case Insensitive Ordering Match) | 2.16.840.1.113730.3.3.2.30.1 |
| Macedonian (Case Insensitive Ordering Match) | 2.16.840.1.113730.3.3.2.32.1 |
| Norwegian (Case Insensitive Ordering Match) | 2.16.840.1.113730.3.3.2.35.1 |
| Norwegian - Bokmul (Case Insensitive Ordering Match) | 2.16.840.1.113730.3.3.2.36.1 |
| Norwegian - Nynorsk (Case Insensitive Ordering Match) | 2.16.840.1.113730.3.3.2.37.1 |
| Polish (Case Insensitive Ordering Match) | 2.16.840.1.113730.3.3.2.38.1 |
| Romanian (Case Insensitive Ordering Match) | 2.16.840.1.113730.3.3.2.39.1 |
| Russian (Case Insensitive Ordering Match) | 2.16.840.1.113730.3.3.2.40.1 |
| Serbian - Cyrillic (Case Insensitive Ordering Match) | 2.16.840.1.113730.3.3.2.45.1 |
| Serbian - Latin (Case Insensitive Ordering Match) | 2.16.840.1.113730.3.3.2.41.1 |
| Slovak (Case Insensitive Ordering Match) | 2.16.840.1.113730.3.3.2.42.1 |
| Slovenian (Case Insensitive Ordering Match) | 2.16.840.1.113730.3.3.2.43.1 |
| Spanish (Case Insensitive Ordering Match) | 2.16.840.1.113730.3.3.2.15.1 |
| Swedish (Case Insensitive Ordering Match) | 2.16.840.1.113730.3.3.2.46.1 |
| Turkish (Case Insensitive Ordering Match) | 2.16.840.1.113730.3.3.2.47.1 |
| Ukrainian (Case Insensitive Ordering Match) | 2.16.840.1.113730.3.3.2.48.1 |
Additional resources
10.3.4.4. Language substring matching rules
Red Hat Directory Server supports language substring matching rules to define how the server compares partial attribute values according to locale-specific conventions.
For international searches, use the following language substring matching rules:
| Matching rule | Object identifiers (OIDs) |
|---|---|
| English (Case Exact Substring Match) | 2.16.840.1.113730.3.3.2.11.3.6 |
| Albanian (Case Insensitive Substring Match) | 2.16.840.1.113730.3.3.2.44.1.6 |
| Arabic (Case Insensitive Substring Match) | 2.16.840.1.113730.3.3.2.1.1.6 |
| Belorussian (Case Insensitive Substring Match) | 2.16.840.1.113730.3.3.2.2.1.6 |
| Bulgarian (Case Insensitive Substring Match) | 2.16.840.1.113730.3.3.2.3.1.6 |
| Catalan (Case Insensitive Substring Match) | 2.16.840.1.113730.3.3.2.4.1.6 |
| Chinese - Simplified (Case Insensitive Substring Match) | 2.16.840.1.113730.3.3.2.49.1.6 |
| Chinese - Traditional (Case Insensitive Substring Match) | 2.16.840.1.113730.3.3.2.50.1.6 |
| Croatian (Case Insensitive Substring Match) | 2.16.840.1.113730.3.3.2.22.1.6 |
| Czech (Case Insensitive Substring Match) | 2.16.840.1.113730.3.3.2.5.1.6 |
| Danish (Case Insensitive Substring Match) | 2.16.840.1.113730.3.3.2.6.1.6 |
| Dutch (Case Insensitive Substring Match) | 2.16.840.1.113730.3.3.2.33.1.6 |
| Dutch - Belgian (Case Insensitive Substring Match) | 2.16.840.1.113730.3.3.2.34.1.6 |
| English - US (Case Insensitive Substring Match) | 2.16.840.1.113730.3.3.2.11.1.6 |
| English - Canadian (Case Insensitive Substring Match) | 2.16.840.1.113730.3.3.2.12.1.6 |
| English - Irish (Case Insensitive Substring Match) | 2.16.840.1.113730.3.3.2.14.1.6 |
| Estonian (Case Insensitive Substring Match) | 2.16.840.1.113730.3.3.2.16.1.6 |
| Finnish (Case Insensitive Substring Match) | 2.16.840.1.113730.3.3.2.17.1.6 |
| French (Case Insensitive Substring Match) | 2.16.840.1.113730.3.3.2.18.1.6 |
| French - Belgian (Case Insensitive Substring Match) | 2.16.840.1.113730.3.3.2.19.1.6 |
| French - Canadian (Case Insensitive Substring Match) | 2.16.840.1.113730.3.3.2.20.1.6 |
| French - Swiss (Case Insensitive Substring Match) | 2.16.840.1.113730.3.3.2.21.1.6 |
| German (Case Insensitive Substring Match) | 2.16.840.1.113730.3.3.2.7.1.6 |
| German - Austrian (Case Insensitive Substring Match) | 2.16.840.1.113730.3.3.2.8.1.6 |
| German - Swiss (Case Insensitive Substring Match) | 2.16.840.1.113730.3.3.2.9.1.6 |
| Greek (Case Insensitive Substring Match) | 2.16.840.1.113730.3.3.2.10.1.6 |
| Hebrew (Case Insensitive Substring Match) | 2.16.840.1.113730.3.3.2.27.1.6 |
| Hungarian (Case Insensitive Substring Match) | 2.16.840.1.113730.3.3.2.23.1.6 |
| Icelandic (Case Insensitive Substring Match) | 2.16.840.1.113730.3.3.2.24.1.6 |
| Italian (Case Insensitive Substring Match) | 2.16.840.1.113730.3.3.2.25.1.6 |
| Italian - Swiss (Case Insensitive Substring Match) | 2.16.840.1.113730.3.3.2.26.1.6 |
| Japanese (Case Insensitive Substring Match) | 2.16.840.1.113730.3.3.2.28.1.6 |
| Korean (Case Insensitive Substring Match) | 2.16.840.1.113730.3.3.2.29.1.6 |
| Latvian, Lettish (Case Insensitive Substring Match) | 2.16.840.1.113730.3.3.2.31.1.6 |
| Lithuanian (Case Insensitive Substring Match) | 2.16.840.1.113730.3.3.2.30.1.6 |
| Macedonian (Case Insensitive Substring Match) | 2.16.840.1.113730.3.3.2.32.1.6 |
| Norwegian (Case Insensitive Substring Match) | 2.16.840.1.113730.3.3.2.35.1.6 |
| Norwegian - Bokmul (Case Insensitive Substring Match) | 2.16.840.1.113730.3.3.2.36.1.6 |
| Norwegian - Nynorsk (Case Insensitive Substring Match) | 2.16.840.1.113730.3.3.2.37.1.6 |
| Polish (Case Insensitive Substring Match) | 2.16.840.1.113730.3.3.2.38.1.6 |
| Romanian (Case Insensitive Substring Match) | 2.16.840.1.113730.3.3.2.39.1.6 |
| Russian (Case Insensitive Substring Match) | 2.16.840.1.113730.3.3.2.40.1.6 |
| Serbian - Cyrillic (Case Insensitive Substring Match) | 2.16.840.1.113730.3.3.2.45.1.6 |
| Serbian - Latin (Case Insensitive Substring Match) | 2.16.840.1.113730.3.3.2.41.1.6 |
| Slovak (Case Insensitive Substring Match) | 2.16.840.1.113730.3.3.2.42.1.6 |
| Slovenian (Case Insensitive Substring Match) | 2.16.840.1.113730.3.3.2.43.1.6 |
| Spanish (Case Insensitive Substring Match) | 2.16.840.1.113730.3.3.2.15.1.6 |
| Swedish (Case Insensitive Substring Match) | 2.16.840.1.113730.3.3.2.46.1.6 |
| Turkish (Case Insensitive Substring Match) | 2.16.840.1.113730.3.3.2.47.1.6 |
| Ukrainian (Case Insensitive Substring Match) | 2.16.840.1.113730.3.3.2.48.1.6 |
Additional resources
10.3.4.5. Using inchainMatch matching rule to find membership of an LDAP entry in nested groups
The inchainMatch matching rule is an extensible match for a search filter that finds membership of an LDAP entry in nested groups. Red Hat Directory Server supports both object identifier (OID) 1.2.840.113556.1.4.1941 and the human-readable name inchainMatch.
The use of the matching rule is limited to attributes with Distinguished Name (DN) syntax. You can perform the following searches by using the inchainMatch matching rule:
-
The search filter
(member:1.2.840.113556.1.4.1941:=uid=jdoe,ou=people,dc=example,dc=com)finds all direct or indirect groups of which the userjdoeis a member. -
The search filter
(manager:1.2.840.113556.1.4.1941:=uid=jsmith,ou=people,dc=example,dc=com)finds all direct or indirect users whose manager is thejsmith. -
The search filter
(parentOrganization:1.2.840.113556.1.4.1941:=ou=ExampleCom,ou=europe,dc=example,dc=com)finds all direct or indirect organizations thatExampleCombelongs to. -
The search filter
(memberof:1.2.840.113556.1.4.1941:=cn=Marketing,ou=groups,dc=example,dc=com)finds all direct or indirect members of theMarketinggroup.
Note that for performance reasons you must index member, manager, parentOrganization, memberof attributes that inchainMatch uses.
Directory Server enables the inchainMatch matching rule by default via the In Chain plug-in. However, inchainMatch is expensive to compute, and only the Directory Manager has permissions to use inchainMatch by default. To grant permissions to other users, modify the access control instruction (ACI) in the oid=1.2.840.113556.1.4.1941,cn=features,cn=config entry. For more details, see Enabling the inchainMatch matching rule for a user entry.
10.3.4.5.1. Enabling the inchainMatch matching rule for a user entry
Only the Directory Manager has permissions to use the inchainMatch matching rule by default because inchainMatch is expensive to process. To grant permissions to another user, modify the access control instruction (ACI) in the oid=1.2.840.113556.1.4.1941,cn=features,cn=config entry.
The following procedure grants read and search permission to the admin user.
Prerequisites
-
The
uid=admin,ou=people,dc=example,dc=comuser entry exists. -
The
uid=jdoe,ou=people,dc=example,dc=comuser entry exists and belong to thecn=Marketing_Germany,ou=groups,dc=example,dc=comgroup. -
The
cn=Marketing_Germany,ou=groups,dc=example,dc=comgroup is the nested group of thecn=Marketing_EU,ou=groups,dc=example,dc=comgroup.
Procedure
Grand
readandsearchpermissions touid=admin,ou=people,dc=example,dc=comby replacing the default ACI in theoid=1.2.840.113556.1.4.1941,cn=features,cn=configentry:# ldapmodify -D "cn=Directory Manager" -W -H ldap://server.example.com -xThe
ldapmodifyutility requires you to provide the following LDIF statement:dn: oid=1.2.840.113556.1.4.1941,cn=features,cn=config changetype: modify replace: aci aci: (targetattr != "aci")(version 3.0; acl "InChain Matching Rule"; allow( read, search ) userdn = "ldap:///uid=admin,ou=people,dc=example,dc=com";)
NoteTo grant permission to several users, add these users to a group and set the
groupdnas keyword in the bind rule of the ACI. For more details, see Defining group-based access.
Verification
Search for the groups that the user
uid=jdoe,ou=people,dc=example,dc=combelongs to under theadminuser:$ ldapsearch -D "uid=admin,ou=people,dc=example,dc=com" -H ldap://server.example.com -W -xLL -b "dc=example,dc=com" "(member:1.2.840.113556.1.4.1941:=uid=jdoe,ou=people,dc=example,dc=com)" dndn: cn=Marketing_EU,ou=groups,dc=example,dc=com dn: cn=Marketing_Germany,ou=groups,dc=example,dc=com
10.3.4.5.2. Disabling the inchainMatch matching rule
To implement the inchainMatch matching rule, Red Hat Directory Server uses the In Chain plug-in that is enabled by default. If you want to disable inchainMatch, disable the In Chain plug-in by using the dsconf utility.
Procedure
Check if the
In Chainplug-in is enabled:# dsconf <instance_name> plugin show 'In Chain'dn: cn=In Chain,cn=plugins,cn=config cn: In Chain nsslapd-pluginDescription: inchain matching rule plugin nsslapd-pluginEnabled: on ...Disable the
In Chainplug-in:# dsconf <instance_name> plugin set --enabled off 'In Chain'Successfully changed the cn=In Chain,cn=plugins,cn=config
The command disables the
inchainMatchmatching rule for all users.
Verification
Check if Directory Server disabled the
In Chainplug-in:# dsconf <instance_name> plugin show 'In Chain'dn: cn=In Chain,cn=plugins,cn=config cn: In Chain nsslapd-pluginDescription: inchain matching rule plugin nsslapd-pluginEnabled: off ...
10.4. LDAP search (ldapsearch) examples
Review the most common LDAP searches (ldapsearch) used for searching through the directory.
Prerequisites
- You perform the search for all entries in the directory.
-
You configured the directory to support anonymous access for search and read operations. Therefore, you do not need to use
-Wand-Doptions in the command to supply any bind information. For more information on anonymous access, see Granting anonymous access. - The server uses the default port number 389. You do not need to specify it in the search request.
-
The server has the
server.example.comhostname. -
You enabled TLS for the server on the port
636, the default LDAPS port number. -
Directory Server store all data under the
dc=example,dc=comsuffix.
10.4.1. Returning all entries
The following LDAP search returns all entries in the directory:
# ldapsearch -H ldap://server.example.com -b "dc=example,dc=com" -s sub -x "(objectclass=*)"
Use the (objectclass=*) search filter to return every entry in the directory. Each entry must have an object class, and the objectclass attribute is always indexed.
10.4.2. Specifying search filters on the command line
You can specify a search filter directly on the command by enclosing the filter in quotation marks ("filter"). If you supply the filter in the command, do not specify the -f option. For example, to specify the "cn=babs jensen", enter:
# ldapsearch -H ldap://server.example.com -b "dc=example,dc=com" -s sub -x "cn=babs jensen"10.4.3. Searching the Root DSE entry
The root DSE is a special entry that contains information about the directory server instance, including all of the suffixes that the local Directory Server supports. Search for this entry by supplying a search base of "", a search scope base, and the filter "objectclass=*", for example:
# ldapsearch -H ldap://server.example.com -x -b "" -s base "objectclass=*"10.4.4. Searching the schema entry
The cn=schema entry is a special entry that contains information about the directory schema, such as object classes and attribute types.
To list the content of the cn=schema entry, enter either of the following commands:
# ldapsearch -x -o ldif-wrap=no -b "cn=schema" \
'(objectClass=subSchema)' -s sub objectClasses attributeTypes matchingRules \
matchingRuleUse dITStructureRules nameForms ITContentRules ldapSyntaxes
or
# ldapsearch -x -o ldif-wrap=no -b "cn=schema" \
'(objectClass=subSchema)' -s sub "+"
10.4.5. Using LDAP_BASEDN variable
To simplify the search, you can set the search base by using the LDAP_BASEDN environment variable. You can set LDAP_BASEDN instead of using the ldapsearch command with the -b option. For more information about setting environment variables, see the documentation for the operating system.
Set LDAP_BASEDN to the directory suffix value. Because the directory suffix is equal to the root entry in the directory, all searches begin from the directory root entry.
For example, to set the LDAP_BASEDN variable to dc=example,dc=com and search for cn=babs jensen in the directory, enter:
# export LDAP_BASEDN="dc=example,dc=com"# ldapsearch -H ldap://server.example.com -x "cn=babs jensen"
The command uses the default scope sub because the -s option was not supplied to specify the scope.
10.4.6. Displaying subsets of attributes
The ldapsearch command returns all search results in the LDIF format. By default, ldapsearch returns the entry distinguished name (DN) and all of the attributes that the user is allowed to read. You can set the directory access control to allow users to read only a subset of the attributes on any given directory entry.
Directory Server does not return operational attributes by default. To return operational attributes as a result of a search operation, explicitly specify these attributes in the search command or use the plus (+) argument to return all operational attributes. For more information, see Searching for operational attributes.
You can limit the returned attributes to a few specific attributes by specifying the required attributes on the command line after the search filter.
For example, to show the cn and sn attributes for every entry in the directory, enter:
# ldapsearch -H ldap://server.example.com -b "dc=example,dc=com" -s sub -x "(objectclass=*)" sn cn 10.4.7. Searching for operational attributes
Operational attributes are special attributes that Directory Server sets itself. Directory Server uses operational attributes to perform maintenance tasks, such as processing access control instructions. These attributes show specific information about the entry, such as the time this entry was initially created and the name of the user who created it.
You can use operational attributes on every entry in the directory, even if the attribute is specifically defined for the object class of the entry.
Regular ldapsearch commands do not return operational attributes. According to Content from datatracker.ietf.org is not included.RFC3673, use the plus sigh (+) to return all operational attributes in a search request:
# ldapsearch -H ldap://server.example.com -b "dc=example,dc=com" -s sub -x "(objectclass=*)" '+'
To return only certain defined operational attributes, explicitly specify them in the ldapsearch request:
# ldapsearch -H ldap://server.example.com -b "dc=example,dc=com" -s sub -x "(objectclass=*)" creatorsName createTimestamp modifiersName modifyTimestamp For the complete list of operational attributes, see Operational Attributes and Object Classes.
To return all of the regular entry attributes along with the specified operational attributes, use the special search attribute, "*", in addition to the operational attributes that you list.
# ldapsearch -H ldap://server.example.com -b "dc=example,dc=com" -s sub -x "(objectclass=*)" "*" aciNote that you must enclose the asterisk (*) in quotation marks to prevent the shell from interpreting it.
10.4.8. Specifying search filters by using a file
You can specify search filters in a file instead of entering them on the command line.
Specify each search filter on a separate line in the file. The ldapsearch command runs each search in the order in which it appears in the file.
For example, the file contains the following filters:
sn=example
givenname=user
The ldapsearch command first finds all the entries with the surname set to example, then all the entries with the givenname set to user. If the search request finds an entry that matches both search criteria, then the entry is returned twice.
In the following search, the filters are specified in a file named searchdb:
# ldapsearch -H ldap://server.example.com -x -f searchdb
You can limit the set of returned attributes by specifying the attribute names at the end of the search line. For example, the following ldapsearch command performs both searches but returns only the DN and the givenname and sn attributes of each entry:
# ldapsearch -H ldap://server.example.com -x -f searchdb sn givenname10.4.9. Specifying DNs that contain commas in search filters
When a DN within a search filter contains a comma as part of its value, the search command must escape the comma with a backslash (\). For example, to find everyone in the example.com Bolivia, S.A. subtree, enter:
# ldapsearch -H ldap://server.example.com -x -s base -b "l=Bolivia\, S.A.,dc=example,dc=com" "objectclass=*"10.4.10. Using the nsRole virtual attribute in the filter
In the following example, the ldapsearch command searches for DNs of all user entries that contain the nsrole attribute set to the managed_role value:
# ldapsearch -H ldap://server.example.com -x -b "dc=example,dc=com" "(nsrole=cn=managed_role,dc=example,dc=com)" dn10.4.11. Using a client certificate to bind to Directory Server
For more information about certificate-based authentication, see Configuring certificate-based authentication.
10.4.12. Searching with language matching rules
To explicitly submit a matching rule in a search filter, insert the matching rule after the attribute:
attr:matchingRule:=value
Matching rules are frequently used for searching internationalized directories. The following command searches for the department numbers after N4709 in the Swedish (2.16.840.1.113730.3.3.2.46.1) matching rule.
departmentNumber:2.16.840.1.113730.3.3.2.46.1:=>= N4709
For more examples of performing internationalized searches, see Searching an Internationalized Directory.
10.4.13. Finding groups a user belongs to
To find all direct or indirect groups of which the user uid=jdoe,ou=people,dc=example,dc=com is a member, enter:
# ldapsearch -D "cn=Directory Manager" -W -H ldap://server.example.com -xLL -b "dc=example,dc=com" "(member:1.2.840.113556.1.4.1941:=uid=jdoe,ou=people,dc=example,dc=com)" dn
The search with inchainMatch matching rule does not support anonymous access. For more details about using the inchainMatch matching rule, see Using inchainMatch matching rule to find the ancestry of an LDAP entry.
10.4.14. Finding members of a group
To find all direct or indirect members of the marketing group, enter:
# ldapsearch -D "cn=Directory Manager" -W -H ldap://server.example.com -xLL -b "dc=example,dc=com" "(memberof:1.2.840.113556.1.4.1941:=cn=marketing,ou=groups,dc=example,dc=com)" dn
The search with inchainMatch matching rule does not support anonymous access. For more details about using the inchainMatch matching rule, see Using inchainMatch matching rule to find the ancestry of an LDAP entry.
10.4.15. Searching for attributes with bit field values
Bitwise searches use the bitwise AND or bitwise OR matching rules to perform bitwise search operations on attributes with values that are bit fields.
Attributes with values for bit fields are not common in LDAP. Default Directory Server schemas do not use bit fields as attribute syntax. However, several LDAP syntaxes support integer-style values. You can define custom attributes to use bit field values. Applications can use custom attributes to perform bitwise operations against bit field values.
The bitwise AND matching rule (1.2.840.113556.1.4.803) checks if the bit given in the assertion value is set in the bit field attribute value. It is similar to an equality search. The following example sets userAccountControl value to the bit that represents 2:
"(UserAccountControl:1.2.840.113556.1.4.803:=2)"
The following example show that the userAccountControl value must have all of the bits that are set in the value 6 (bits 2 and 4):
"(UserAccountControl:1.2.840.113556.1.4.803:=6)”
The bitwise OR matching rule (1.2.840.113556.1.4.804) checks if any of the bits in the assertion string are represented in the attribute value. It is similar to a substring search. In this example, the UserAccountControl value must have any of the bits that are set in the bit field of 6, meaning that the attribute value can be 2, 4, or 6:
"(UserAccountControl:1.2.840.113556.1.4.804:=6)"
You can use bitwise searches with the Windows-Linux integration, such as using Samba file servers.
Additional resources
10.5. Improving search performance through resource limits
Improve search performance in Red Hat Directory Server by establishing resource limits for directory queries. Configuring parameters such as size, time, and lookthrough limits helps you to control the system impact of complex searches, ensuring that the server remains responsive and available for all users.
Searching through every entry in a database can have a negative impact on a server performance for larger directories. In large databases, effective indexing might not sufficiently reduce the search scope to improve the performance.
You can set limits on user and client accounts to reduce the total number of entries or the total amount of time spent in an individual search. This makes searches more responsive and improves overall server performance.
10.5.1. Search operation limits for large directories
Optimize server limits for search operations to prevent large or complex queries in large directories from over-consuming CPU and memory. Use special operational attribute values on the client application binding to the directory.
You can set the following search operation limits:
-
The
Look throughlimit specifies how many entries you can examine for a search operation. -
The
Sizelimit specifies maximum number of entries the server returns to a client application in response to the search operation. -
The
Timelimit specifies maximum time the server can spend processing a search operation. -
The
Idle timeoutlimit specifies the time when connection to the server can be idle before the connection is dropped. -
The
Range timeoutlimit specifies a separatelook-throughlimit specifically for searches by using a range.
In the global server configuration, the resource limits set for the client application take precedence over the default resource limits set.
The Red Hat Directory Server receives unlimited resources by default, with the exception of range searches.
10.5.2. Search performance improvement with index scan limits
For large indexes, it is efficient to treat any search which matches the index as an unindexed search. The search operation has to look in the entire directory to process results rather than searching through an index that is nearly the size of a directory in addition to the directory itself.
Additional resources
10.5.3. Fine grained ID list size
In large databases, some queries can consume a large number of CPU and RAM resources. To improve the performance, you can set a default ID scan limit that applies to all indexes in the database by using the nsslapd-idlistscanlimit attribute.
However, it is useful to either define a limit for certain indexes or use the list with no IDs defined. You can set individual settings for ID list scan limits for different types of search filters by using the nsIndexIDListScanLimit attribute.
Additional resources
10.5.4. Setting user and global resource limits by using the command line
Set user-level and global resource limits in Red Hat Directory Server to control the maximum system resources available for directory searches. In addition, you can set limits for specific types of searches, such as simple paged and range searches.
You can set user-level attributes on the individual entries. Global configuration attributes are set in the appropriate server configuration area.
Set the following mentioned operational attributes for each entry by using the ldapmodify command:
look-throughYou can specify the number of entries to examine for a search operation by using the
look-throughlimit attribute. Setting the attribute’s value to-1indicates that there is no limit.-
User-level attribute:
nsLookThroughLimit Global configuration:
-
Attribute:
nsslapd-lookthroughlimit Entry:
cn=config,cn=ldbm database,cn=plugins,cn=config# dsconf <instance_name> backend config set --lookthroughlimit <value>
-
Attribute:
-
User-level attribute:
paged look-throughYou can specify the number of entries to examine for simple paged search operations by using the
paged look-throughlimit attribute. Setting the attribute’s value to-1indicates that there is no limit.-
User-level attribute:
nsPagedLookThroughLimit Global configuration:
-
Attribute:
nsslapd-pagedlookthroughlimit Entry:
cn=config,cn=ldbm database,cn=plugins,cn=config# dsconf <instance_name> backend config set --pagedlookthroughlimit <value>
-
Attribute:
-
User-level attribute:
sizeYou can specify the maximum number of entries the server returns to a client application in response to a search operation by using the
sizelimit attribute. Setting the attribute’s value to-1indicates that there is no limit.-
User-level attribute:
nsSizeLimit Global configuration:
-
Attribute:
nsslapd-sizelimit Entry:
cn=config# dsconf <instance_name> config replace nsslapd-sizelimit <value>You can add the
nsSizeLimitattribute to the user’s entry and for example give it a search return size limit of500entries:# ldapmodify -D "cn=Directory Manager" -W -H ldap://server.example.com -xThe
ldapmodifyutility requires you to provide the following LDIF statement:dn: uid=user_name,ou=People,dc=example,dc=com changetype: modify add: nsSizeLimit nsSizeLimit: 500
-
Attribute:
-
User-level attribute:
paged sizeYou can specify the maximum number of entries the server returns to a client application for simple paged search operations by using the
paged sizelimit attribute. Setting the attribute’s value to-1indicates that there is no limit.-
User-level attribute:
nsPagedSizeLimit Global configuration:
-
Attribute:
nsslapd-pagedsizelimit Entry:
cn=config# dsconf <instance_name> config replace nsslapd-pagedsizelimit <value>
-
Attribute:
-
User-level attribute:
timeYou can specify the maximum time the server can spend processing a search operation by using the
timelimit attribute. Setting the attribute’s value to-1indicates that there is no time limit.-
User-level attribute:
nsTimeLimit Global configuration:
-
Attribute:
nsslapd-timelimit Entry:
cn=config# dsconf instance config replace nsslapd-timelimit <value>
-
Attribute:
-
User-level attribute:
idle timeoutYou can specify the time in seconds for which a connection to the server can be idle before the connection is dropped by using the
idle timeoutattribute. Setting the attribute’s value to-1indicates that there is no limit.-
User-level attribute:
nsidletimeout Global configuration:
-
Attribute:
nsslapd-idletimeout Entry:
cn=config# dsconf <instance_name> config replace nsslapd-idletimeout <value>
-
Attribute:
-
User-level attribute:
ID list scanYou can specify the maximum number of entry IDs loaded from an index file for search results. If the ID list size is greater than the maximum number of IDs, the search will not use the index list, but will treat the search as an unindexed search and look through the entire database.
-
User-level attribute:
nsIDListScanLimit Global configuration:
-
Attribute:
nsslapd-idlistscanlimit Entry:
cn=config,cn=ldbm database,cn=plugins,cn=config# dsconf <instance_name> backend config set --idlistscanlimit <value>
-
Attribute:
-
User-level attribute:
paged ID list scanYou can specify the maximum number of entry IDs loaded from an index file for search results particularly for paged search operations by using the
paged ID list scanlimit.-
User-level attribute:
nsPagedIDListScanLimit Global configuration:
-
Attribute:
nsslapd-pagedidlistscanlimit Entry:
cn=config,cn=ldbm database,cn=plugins,cn=config# dsconf <instance_name> backend config set --pagedidlistscanlimit <value>
-
Attribute:
-
User-level attribute:
range look-throughYou can specify the numbers of entries to examine for a range search operation by using the
range look-throughlimit. Setting the attribute’s value to-1indicates that there is no limit.NoteA range search is a search by using the
greater-than,equal-to-or-greater-than,less-than, orequal-to-less-thanoperators.-
User-level attribute:
not available Global configuration:
-
Attribute:
nsslapd-rangelookthroughlimit Entry:
cn=config,cn=ldbm database,cn=plugins,cn=config# dsconf <instance_name> backend config set --rangelookthroughlimit <value>NoteYou can set an access control list to prevent users from changing the setting.
-
Attribute:
-
User-level attribute:
Additional resources
10.5.5. Setting resource limits on anonymous binds
Set resource limits on anonymous binds in Red Hat Directory Server to control system resources for unauthenticated users. By setting search limits on these connections, you prevent resource exhaustion and Denial of Service (DoS) attacks without affecting authenticated traffic.
Because resource limits are set on a user entry and anonymous bind does not have a user entry associated with it, create a template user entry that has resource limits, and then apply this template to anonymous binds.
Prerequisites
- A template entry has been created.
Procedure
Set resource limits you want to apply to anonymous binds:
# ldapadd -D "cn=Directory Manager" -W -H ldap://server.example.com -xThe
ldapaddutility requires you to provide the LDIF statement:dn: cn=anonymous_template,ou=people,dc=example,dc=com objectclass: nsContainer objectclass: top cn: anonymous_template nsSizeLimit: 250 nsLookThroughLimit: 1000 nsTimeLimit: 60
NoteFor performance reasons, the template must be in the normal back end, not in the
cn=configsuffix that does not use an entry cache.Add the
nsslapd-anonlimitsdnparameter to the server configuration, pointing to theDNof the template entry on all suppliers in a replication topology:# dsconf <instance_name> config replace nsslapd-anonlimitsdn="cn=anonymous_template,ou=people,dc=example,dc=com"
10.5.6. Performance improvement for range searches
Optimize range search performance in Red Hat Directory Server to improve the efficiency of queries that filter entries based on value ranges.
A range search (all IDs search) uses operators to set a bracket to search and return an entire subset of the entries within a directory. The range search can evaluate every entry in the directory to check if the entry is within the provided range.
For example, to search for every entry modified at or after midnight on January 1, run the following command:
# (modifyTimestamp>=20210101010101Z)
To prevent a range search from turning into an all IDs search, you can use the look-through limit. By using this limit, you can improve overall performance and speed up range search results. However, some clients or administrative users, such as Directory Manager, cannot have the look-through limit set. In this case, the range search can take several minutes to complete or can even continue indefinitely.
However, you can set a separate range look-through limit. By setting this limit, clients and administrative users can have high look-through limits and can still be able to set a reasonable limit on potentially performance-impaired range searches.
You can configure such setting by using the nsslapd-rangelookthroughlimit attribute. The default value is 5000.
To set the separate range look-through limit to 7500, run the following command:
# dsconf <instance_name> backend config set --rangelookthroughlimit 7500