Install OpenShift Dev Spaces
Deploy OpenShift Dev Spaces on your OpenShift cluster
Abstract
Preface
As a platform administrator, deploy Red Hat OpenShift Dev Spaces on your OpenShift cluster so that your development team gets consistent, ready-to-code cloud development environments without configuring local toolchains.
Additional resources
Chapter 1. How the installation works
OpenShift Dev Spaces deploys on OpenShift as an Operator that manages a gateway, dashboard, server, and plug-in registry. The installation method you choose depends on your cluster environment and need for configuration control.
OpenShift Dev Spaces consists of an Operator, a user dashboard, a gateway, and a plug-in registry. The Operator manages the full lifecycle of all server components. You deploy OpenShift Dev Spaces by installing the Operator and creating a CheCluster custom resource.
1.1. Installation methods
dsccommand-line tool-
Choose this method when you need to automate the deployment, customize the
CheClusterconfiguration during installation, or manage OpenShift Dev Spaces from scripts and CI/CD pipelines. - OpenShift web console
- Choose this method when you prefer a graphical workflow through OperatorHub and do not need advanced CLI configuration options during deployment.
Both methods produce the same result: an Operator subscription and a CheCluster custom resource. For step-by-step deployment instructions, see Additional resources.
1.2. Deployment scenarios
- Standard deployment
-
Your OpenShift cluster has internet access. Both installation methods are available. The Operator pulls container images directly from
registry.redhat.io. - Air-gapped deployment
- Your cluster has no internet access. Mirror the required container images and Operator catalogs to a private registry before installation.
- External identity provider
- Your organization manages authentication through an existing identity system such as Keycloak. Deploy OpenShift Dev Spaces with an external OIDC provider instead of the default OpenShift OAuth.
Chapter 2. Check your cluster requirements
Before you install OpenShift Dev Spaces, verify that your OpenShift cluster meets the platform, resource, tooling, and permission requirements so that the deployment succeeds on the first attempt.
2.1. Supported platforms and architectures
Confirm that your target cluster runs a supported OpenShift version and CPU architecture before starting the installation.
OpenShift Dev Spaces runs on OpenShift 4.16–4.22 on the following CPU architectures:
-
AMD64 and Intel 64 (
x86_64) -
IBM Z (
s390x) -
IBM Power (
ppc64le) -
ARMv8 (
arm64)
2.2. Size your cluster for OpenShift Dev Spaces
Size your cluster by calculating the CPU and memory requirements for the OpenShift Dev Spaces Operator, Dev Workspace Controller, and user workspaces so that your cluster can handle the expected number of concurrent users.
The following link to an Content from github.com is not included.example devfile is a pointer to material from the upstream community. This material represents the very latest available content and the most recent best practices. These tips have not yet been vetted by Red Hat’s QE department, and they have not yet been proven by a wide user group. Please, use this information cautiously. It is best used for educational and 'developmental' purposes rather than 'production' purposes.
Prerequisites
- You have a planned or existing OpenShift Dev Spaces deployment on OpenShift Container Platform 4.16 or later.
- You have the devfiles that define the development environments for your users.
- You have an estimate of the number of concurrent workspaces that your users will run.
Procedure
Identify the workspace resource requirements from the devfile
componentssection. The following example uses the Content from github.com is not included.Quarkus API example devfile.The
toolscomponent of the devfile defines the following requests and limits:memoryLimit: 6G memoryRequest: 512M cpuRequest: 1000m cpuLimit: 4000mDuring workspace startup, an internal
che-gatewaycontainer is implicitly provisioned with the following requests and limits:memoryLimit: 256M memoryRequest: 64M cpuRequest: 50m cpuLimit: 500mAdditional memory and CPU are added implicitly for the Visual Studio Code - Open Source ("Code - OSS") editor:
memoryLimit: 1024M memoryRequest: 256M cpuRequest: 30m cpuLimit: 500mAdditional memory and CPU are added implicitly for a JetBrains IDE, for example IntelliJ IDEA Ultimate:
    memoryLimit: 6144M
    memoryRequest: 2048M
    cpuRequest: 1500m
    cpuLimit: 2000m
Calculate the sums of the resources required for each workspace. If you intend to use multiple devfiles, repeat this calculation for every expected devfile.
Table 2.1. Workspace requirements for the Content from github.com is not included.example devfile in the previous step
Purpose Pod Container name Memory limit Memory request CPU limit CPU request Developer tools
workspacetools6 GiB
512 MiB
4000 m
1000 m
OpenShift Dev Spaces gateway
workspaceche-gateway256 MiB
64 MiB
500 m
50 m
Visual Studio Code
workspacetools1024 MiB
256 MiB
500 m
30 m
Total
7.3 GiB
832 MiB
5000 m
1080 m
- Multiply the resources calculated per workspace by the number of workspaces that you expect all of your users to run simultaneously.
Calculate the sums of the requirements for the OpenShift Dev Spaces Operator, Operands, and Dev Workspace Controller.
Table 2.2. Default requirements for the OpenShift Dev Spaces Operator, Operands, and Dev Workspace Controller
Purpose Pod name Container names Memory limit Memory request CPU limit CPU request OpenShift Dev Spaces operator
devspaces-operatordevspaces-operator256 MiB
64 MiB
500 m
100 m
OpenShift Dev Spaces Server
devspacesdevspaces-server1 GiB
512 MiB
1000 m
100 m
OpenShift Dev Spaces Dashboard
devspaces-dashboarddevspaces-dashboard256 MiB
32 MiB
500 m
100 m
OpenShift Dev Spaces Gateway
devspaces-gatewaytraefik4 GiB
128 MiB
1000 m
100 m
OpenShift Dev Spaces Gateway
devspaces-gatewayconfigbump256 MiB
64 MiB
500 m
50 m
OpenShift Dev Spaces Gateway
devspaces-gatewayoauth-proxy512 MiB
64 MiB
500 m
100 m
OpenShift Dev Spaces Gateway
devspaces-gatewaykube-rbac-proxy512 MiB
64 MiB
500 m
100 m
Plugin registry
plugin-registryplugin-registry256 MiB
32 MiB
500 m
100 m
Dev Workspace Controller Manager
devworkspace-controller-managerdevworkspace-controller5 GiB
100 MiB
3000 m
250 m
Dev Workspace Controller Manager
devworkspace-controller-managerkube-rbac-proxyN/A
N/A
N/A
N/A
Dev Workspace Operator Catalog
devworkspace-operator-catalogregistry-serverN/A
50 MiB
N/A
10 m
Dev Workspace Webhook Server
devworkspace-webhook-serverwebhook-server300 MiB
20 MiB
200 m
100 m
Dev Workspace Webhook Server
devworkspace-webhook-serverkube-rbac-proxyN/A
N/A
N/A
N/A
Total
12.3 GiB
1.1 GiB
8.2
1.1
- Add the workspace resources from step 3 and the operator resources from step 4 to determine total cluster resource requirements.
Verification
- Verify that the total resource requirements account for all OpenShift Dev Spaces Operator components, Dev Workspace Controller components, and the expected number of concurrent workspaces.
2.3. Tested maximums that constrain workspace scaling
Evaluate the tested cluster maximums, workspace resource requirements, and worker node capacity that constrain how many cloud development environments your OpenShift cluster can support.
CDE workloads are particularly complex to scale. The underlying IDE solutions, such as Visual Studio Code - Open Source ("Code - OSS") or JetBrains Gateway, are designed as single-user applications, not as multitenant services.
2.3.1. Tested cluster maximums that constrain scaling
While there is no strict limit on the number of resources in a Kubernetes cluster, there are certain considerations for large clusters to remember.
OpenShift Container Platform, a certified distribution of Kubernetes, provides a set of tested maximums for various resources. These maximums can serve as an initial guideline for planning your environment:
Table 2.3. OpenShift Container Platform tested cluster maximums
| Resource type | Tested maximum |
|---|---|
| Number of nodes | 2000 |
| Number of pods | 150000 |
| Number of pods per node | 2500 |
| Number of namespace | 10000 |
| Number of services | 10000 |
| Number of secrets | 80000 |
| Number of config maps | 90000 |
For example, it is generally not recommended to have more than 10,000 namespaces due to potential performance and management cost. In Red Hat OpenShift Dev Spaces, each user is allocated a namespace. If you expect the user base to be large, consider spreading workloads across multiple "fit-for-purpose" clusters and potentially using solutions for multi-cluster orchestration.
2.3.2. Workspace size that determines cluster capacity
When deploying Red Hat OpenShift Dev Spaces on Kubernetes, accurately calculate the resource requirements for each CDE, including memory and CPU or GPU needs. This determines the right sizing of the cluster. In general, the CDE size is limited by and cannot be bigger than the worker node size.
The resource requirements for CDEs can vary significantly based on the specific workloads and configurations. A simple CDE might require only a few hundred megabytes of memory. A more complex one might need several gigabytes of memory and multiple CPU cores.
For details about calculating resource requirements, see Additional resources.
2.3.3. Worker node capacity that matches workspace demand
Although cluster autoscaling is a powerful Kubernetes feature, you cannot always rely on it. Consider predictive scaling by analyzing load data to detect daily or weekly usage patterns.
If your workloads follow a pattern with dramatic peaks throughout the day, provision worker nodes accordingly. For example, if workspaces increase during business hours and decrease during off-hours, predictive scaling adjusts the number of worker nodes. This ensures enough resources are available during peak load while minimizing costs during off-peak hours.
You can also use open source solutions such as Karpenter for configuration and lifecycle management of the worker nodes. Karpenter can dynamically provision and optimize worker nodes based on the specific requirements of the workloads. This helps improve resource utilization and reduce costs.
2.4. etcd pressure that limits cluster scale
Scaling OpenShift Dev Spaces to thousands of concurrent workspaces strains etcd, the primary datastore for Kubernetes cluster state. Three categories of objects contribute most to etcd growth: CA certificate bundles, DevWorkspace custom resources, and Copied CSVs. The procedures that follow address each one.
The primary datastore of Kubernetes cluster configuration and state is etcd. It holds information about nodes, pods, services, and custom resources.
As a distributed key-value store, etcd does not scale well past a certain threshold. As the size of etcd grows, so does the load on the cluster, risking its stability.
The default etcd size is 2 GB, and the recommended maximum is 8 GB. Exceeding the maximum limit can make the Kubernetes cluster unstable and unresponsive. Even though the data stored in a ConfigMap cannot exceed 1 MiB by design, a few thousand relatively large ConfigMap objects can overload etcd storage.
The size of the objects stored in etcd is also a critical factor. Each object consumes space, and as the number of objects increases, the overall size of etcd grows. The larger the object, the more space it takes. For example, etcd can be overloaded with only a few thousand large Kubernetes objects.
Additional resources
2.5. Disable the workspace CA bundle mount
By default, the Operator creates a ca-certs-merged ConfigMap in every user namespace. This ConfigMap contains the full Certificate Authorities (CAs) bundle. With a large number of Transport Layer Security (TLS) certificates in the cluster, these ConfigMaps consume significant etcd storage. Disable the full CA bundle mount to reduce etcd pressure.
Prerequisites
-
You have an active
ocsession with administrative permissions to the OpenShift cluster. See This page is not included, but the link has been rewritten to point to the nearest parent document.Getting started with the CLI.
Procedure
Configure the
CheClusterCustom Resource to disable the workspace CA bundle mount:Edit the
CheClusterCustom Resource on the cluster:$ oc edit checluster/devspaces -n openshift-devspaces
spec: devEnvironments: trustedCerts: disableWorkspaceCaBundleMount: trueWith this configuration, OpenShift Dev Spaces no longer mounts the full CA bundle under
/etc/pki/ca-trust/extracted/pem. Only custom certificates are mounted under/public-certs.
Verification
Verify that new workspaces no longer mount the full CA bundle:
$ oc get configmap ca-certs-merged -n <user-namespace>
The ConfigMap should not exist in namespaces for newly created workspaces.
Additional resources
2.6. Configure automatic cleanup of inactive workspaces
For large Kubernetes deployments, particularly those involving a high number of custom resources such as DevWorkspace objects, which represent CDEs, etcd can become a significant performance bottleneck. Configure the Dev Workspace Operator pruner to automatically delete workspaces that have not been started within a configurable retention period.
Based on the load testing for 6,000 DevWorkspace objects, storage consumption for etcd was approximately 2.5GB.
Prerequisites
-
You have an active
ocsession with administrative permissions to the OpenShift cluster. See This page is not included, but the link has been rewritten to point to the nearest parent document.Getting started with the CLI. - Dev Workspace Operator version 0.34.0 or later is installed on the cluster.
Procedure
Configure the
DevWorkspaceOperatorConfigobject to enable the cleanup cron job:apiVersion: controller.devfile.io/v1alpha1 kind: DevWorkspaceOperatorConfig metadata: name: devworkspace-operator-config namespace: openshift-devspaces config: workspace: cleanupCronJob: enabled: true dryRun: false retainTime: 2592000 schedule: "0 0 1 * *"- retainTime
-
The number of seconds a workspace must be inactive before it is marked for deletion. The default value
2592000equals 30 days. - schedule
-
A cron expression that defines how often the pruner runs. The default value
"0 0 1 * *"runs the pruner once per month.
-
Optional: To preview which workspaces would be deleted without removing them, set
dryRuntotrue.
Verification
Verify that the cleanup cron job is scheduled:
$ oc get cronjobs -n openshift-devspaces
Additional resources
2.7. Disable Copied CSVs to reduce etcd usage
When an Operator is installed by the Operator Lifecycle Manager (OLM), a stripped-down copy of its ClusterServiceVersion (CSV) is created in every namespace the Operator watches. In clusters with many namespaces and cluster-wide Operators, Copied CSVs increase etcd storage usage, OLM memory consumption, and network bandwidth. Disabling Copied CSVs reduces the data stored in etcd and the memory footprint of OLM.
Prerequisites
-
You have an active
ocsession with administrative permissions to the OpenShift cluster. See This page is not included, but the link has been rewritten to point to the nearest parent document.Getting started with the CLI.
Procedure
Configure the
OLMConfigobject to disable Copied CSVs:apiVersion: operators.coreos.com/v1 kind: OLMConfig metadata: name: cluster spec: features: disableCopiedCSVs: trueDisabling Copied CSVs reduces etcd storage usage and the memory footprint of OLM.
Verification
Verify that Copied CSVs are no longer created in user namespaces:
$ oc get csv -n <user-namespace>
The command should return no Copied CSVs for namespaces that do not have their own Operator subscriptions.
2.8. Multi-cluster architectures for large deployments
Evaluate multi-cluster architectures for OpenShift Dev Spaces deployments that exceed single-cluster capacity, and review the Developer Sandbox reference implementation that routes developers across clusters automatically.
2.8.1. Workloads distributed across multiple clusters
By design, Red Hat OpenShift Dev Spaces is not multi-cluster aware. You can only have one instance per cluster.
However, you can run Red Hat OpenShift Dev Spaces in a multi-cluster environment by deploying Red Hat OpenShift Dev Spaces in each cluster. Use a load balancer or Domain Name System (DNS)-based routing to direct traffic to the appropriate instance. This approach distributes the workload across clusters and provides redundancy in case of cluster failures.
2.8.2. Developer Sandbox that runs Dev Spaces across clusters
You can test running OpenShift Dev Spaces in a multi-cluster environment by using the Developer Sandbox, a free trial environment by Red Hat.
From an infrastructure perspective, the Developer Sandbox consists of multiple Red Hat OpenShift Service on AWS (ROSA) clusters. On each cluster, the productized version of Red Hat OpenShift Dev Spaces is installed and configured using Argo CD. The workspaces.openshift.com URL is used as a single entry point to the Red Hat OpenShift Dev Spaces instances across clusters.
Figure 2.1. Developer Sandbox multi-cluster architecture
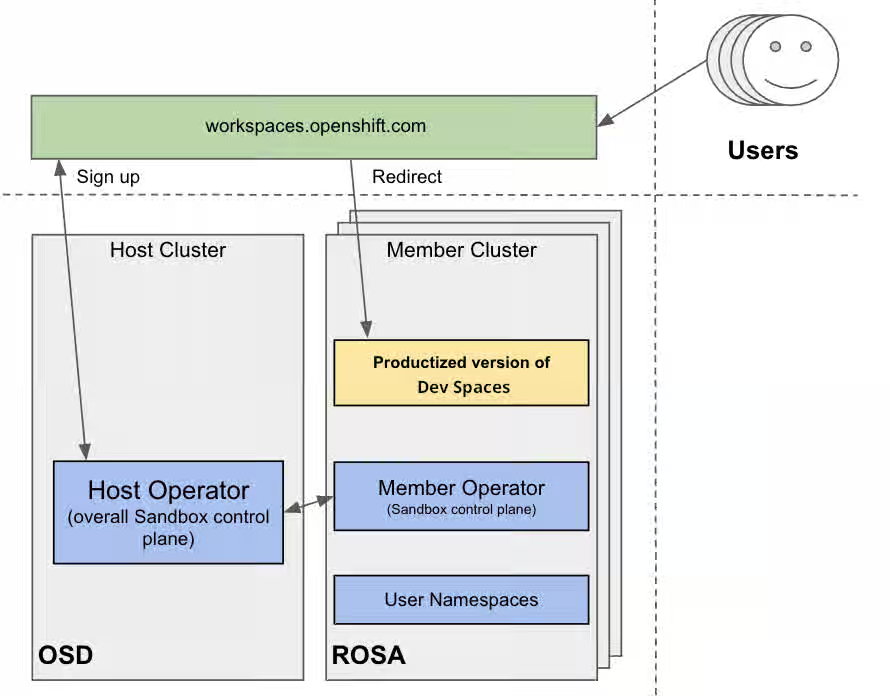
The multi-cluster architecture of workspaces.openshift.com is part of the Developer Sandbox. It is a Developer Sandbox-specific solution that cannot be reused as-is in other environments. However, you can use it as a reference for implementing a similar solution well-tailored to your specific multicluster needs.
2.8.3. Redirector that routes developers to the correct cluster
Red Hat offers an open source, Quarkus-based service that acts as a single gateway for developers. This service automatically redirects users to the correct Red Hat OpenShift Dev Spaces instance on the appropriate cluster based on their OpenShift Container Platform group membership. For the community-supported version, see Additional resources.
2.8.3.1. Prerequisites for the multicluster redirector
A critical requirement for the multicluster redirector is that all users are provisioned to the host cluster where the redirector is deployed. Users authenticate through the OAuth flow of this cluster, even if they never run workloads there. The host cluster’s OpenShift Container Platform groups determine the routing logic. For deployment instructions, see Additional resources.
2.8.3.2. OpenShift groups that map to cluster URLs
The routing configuration uses a ConfigMap that contains JSON to map OpenShift Container Platform groups to Red Hat OpenShift Dev Spaces URLs. The redirector uses this file to update routing tables in real-time without requiring restarts.
2.8.3.3. Authentication and routing steps
The routing process follows these steps:
- Authenticate by using OAuth through a proxy sidecar.
- Pass identity and group information through HTTP headers.
- Verify group memberships by using OpenShift Container Platform API queries.
- Determine the appropriate Red Hat OpenShift Dev Spaces URL by using a mapping lookup.
- Redirect the user to the designated cluster instance.
If users belong to multiple OpenShift Container Platform groups, they can choose the Red Hat OpenShift Dev Spaces instance they need from a selection dashboard.
Additional resources
- Content from che.eclipseprojects.io is not included.Running at scale
- This content is not included.Enterprise multi-cluster scalability
- This content is not included.Developer Sandbox
- This content is not included.Red Hat OpenShift Service on AWS (ROSA)
- Content from argo-cd.readthedocs.io is not included.Argo CD
- Content from workspaces.openshift.com is not included.workspaces.openshift.com
- Content from github.com is not included.crw-multicluster-redirector GitHub repository
- Content from github.com is not included.devspaces-multicluster-redirector GitHub repository
2.9. Set up the dsc command-line tool
Set up dsc on Linux, macOS, or Windows so that you can deploy, update, and manage OpenShift Dev Spaces from the command line.
Prerequisites
You have a Linux or macOS workstation.
NoteFor installing
dscon Windows, see the following pages:
Procedure
-
Download the archive from This content is not included.https://developers.redhat.com/products/openshift-dev-spaces/download to a directory such as
$HOME. -
Run
tar xvzfon the archive to extract the/dscdirectory. -
Add the extracted
/dsc/binsubdirectory to$PATH.
Verification
Run
dscto view information about it.$ dsc
Additional resources
2.10. Permissions required for CLI installation
Apply this ClusterRole to the installer’s service account or user to grant the minimum permissions required for a dsc-based installation of OpenShift Dev Spaces.
The following YAML defines the minimal set of permissions for installing OpenShift Dev Spaces on an OpenShift cluster using dsc:
apiVersion: rbac.authorization.k8s.io/v1
kind: ClusterRole
metadata:
  name: devspaces-install-dsc
rules:
- apiGroups: ["org.eclipse.che"]
  resources: ["checlusters"]
  verbs: ["*"]
- apiGroups: ["project.openshift.io"]
  resources: ["projects"]
  verbs: ["get", "list"]
- apiGroups: [""]
  resources: ["namespaces"]
  verbs: ["get", "list", "create"]
- apiGroups: [""]
  resources: ["pods", "configmaps"]
  verbs: ["get", "list"]
- apiGroups: ["route.openshift.io"]
  resources: ["routes"]
  verbs: ["get", "list"]
  # OLM resources permissions
- apiGroups: ["operators.coreos.com"]
  resources: ["catalogsources", "subscriptions"]
  verbs: ["create", "get", "list", "watch"]
- apiGroups: ["operators.coreos.com"]
  resources: ["operatorgroups", "clusterserviceversions"]
  verbs: ["get", "list", "watch"]
- apiGroups: ["operators.coreos.com"]
  resources: ["installplans"]
  verbs: ["patch", "get", "list", "watch"]
- apiGroups: ["packages.operators.coreos.com"]
  resources: ["packagemanifests"]
  verbs: ["get", "list"]
Additional resources
2.11. Permissions required for web console installation
Install OpenShift Dev Spaces through the OpenShift web console with a specific set of cluster permissions. Apply this ClusterRole to the installer’s service account or user to grant the minimum required permissions for web console installation.
The following YAML defines the minimal set of permissions for installing OpenShift Dev Spaces on an OpenShift cluster using the web console:
apiVersion: rbac.authorization.k8s.io/v1
kind: ClusterRole
metadata:
  name: devspaces-install-web-console
rules:
- apiGroups: ["org.eclipse.che"]
  resources: ["checlusters"]
  verbs: ["*"]
- apiGroups: [""]
  resources: ["namespaces"]
  verbs: ["get", "list", "create"]
- apiGroups: ["project.openshift.io"]
  resources: ["projects"]
  verbs: ["get", "list", "create"]
  # OLM resources permissions
- apiGroups: ["operators.coreos.com"]
  resources: ["subscriptions"]
  verbs: ["get", "list", "watch", "create", "update", "patch", "delete"]
- apiGroups: ["operators.coreos.com"]
  resources: ["operatorgroups"]
  verbs: ["get", "list", "watch"]
- apiGroups: ["operators.coreos.com"]
  resources: ["clusterserviceversions", "catalogsources", "installplans"]
  verbs: ["get", "list", "watch", "delete"]
- apiGroups: ["packages.operators.coreos.com"]
  resources: ["packagemanifests", "packagemanifests/icon"]
  verbs: ["get", "list", "watch"]
  # Workaround related to viewing operators in OperatorHub
- apiGroups: ["operator.openshift.io"]
  resources: ["cloudcredentials"]
  verbs: ["get", "list", "watch"]
- apiGroups: ["config.openshift.io"]
  resources: ["infrastructures", "authentications"]
  verbs: ["get", "list", "watch"]
Additional resources
Chapter 3. Install Red Hat OpenShift Dev Spaces
Install Red Hat OpenShift Dev Spaces on an OpenShift cluster by using the command-line interface (CLI) or the web console. Choose the method that matches your cluster environment and configuration needs.
You can deploy only one instance of OpenShift Dev Spaces per cluster.
3.1. Deploy using the CLI
Deploy OpenShift Dev Spaces from the command line using the dsc management tool so that you have full control over configuration options and can automate the installation.
Prerequisites
- You have an OpenShift Container Platform 4.22 or later cluster.
-
You have an active
ocsession with administrative permissions to the OpenShift cluster. See This page is not included, but the link has been rewritten to point to the nearest parent document.Getting started with the OpenShift CLI. -
You have the
dscmanagement tool installed. See Section 2.9, “Set up the dsc command-line tool”.
Procedure
Optional: If you previously deployed OpenShift Dev Spaces on this OpenShift cluster, remove the previous OpenShift Dev Spaces instance:
$ dsc server:delete
Create the OpenShift Dev Spaces instance:
$ dsc server:deploy --platform openshift
Verification
Verify the OpenShift Dev Spaces instance status:
$ dsc server:status
Navigate to the OpenShift Dev Spaces cluster instance:
$ dsc dashboard:open
On ARM64 (AArch64) OpenShift clusters, you must override the gateway sidecar images after installing the Red Hat OpenShift Dev Spaces Operator, because the default images are not available for ARM64.
To patch the Red Hat OpenShift Dev Spaces Operator subscription, run the following commands:
SUBSCRIPTION=$(oc get subscription -A \
  -o jsonpath='{.items[?(@.spec.name=="devspaces")]}')

SUBSCRIPTION_NAME=$(echo "$SUBSCRIPTION" | jq -r '.metadata.name')

SUBSCRIPTION_NAMESPACE=$(echo "$SUBSCRIPTION" | jq -r '.metadata.namespace')

oc patch subscription "$SUBSCRIPTION_NAME" \
  -n "$SUBSCRIPTION_NAMESPACE" \
  --type=merge \
  -p '{
    "spec": {
      "config": {
        "env": [
          {
            "name": "RELATED_IMAGE_gateway_authentication_sidecar",
            "value": "quay.io/openshift/origin-oauth-proxy:4.9"
          },
          {
            "name": "RELATED_IMAGE_gateway_authorization_sidecar",
            "value": "quay.io/openshift/origin-kube-rbac-proxy:4.9"
          }
        ]
      }
    }
}'Troubleshooting
-
If
dsc server:deployfails with a permission error, verify that yourocsession has the required cluster permissions. See Section 2.10, “Permissions required for CLI installation”. -
If
dsc server:deployreports that the namespace already exists, remove the previous OpenShift Dev Spaces instance first. See Chapter 7, Remove OpenShift Dev Spaces from your cluster.
Additional resources
3.2. Deploy using the web console
Deploy OpenShift Dev Spaces through the OpenShift web console using the standard OperatorHub workflow so that you can install without command-line access.
Prerequisites
- You have an OpenShift web console session as a cluster administrator. See Accessing the web console.
-
You have an active
ocsession with administrative permissions to the OpenShift cluster. See This page is not included, but the link has been rewritten to point to the nearest parent document.Getting started with the OpenShift CLI. - For a repeat installation: you have uninstalled the previous OpenShift Dev Spaces instance according to Chapter 7, Remove OpenShift Dev Spaces from your cluster.
Procedure
-
In the Administrator view of the OpenShift web console, go to Operators → OperatorHub and search for
Red Hat OpenShift Dev Spaces. Install the Red Hat OpenShift Dev Spaces Operator.
ImportantThe Red Hat OpenShift Dev Spaces Operator depends on the Dev Workspace Operator. If you install the Red Hat OpenShift Dev Spaces Operator manually to a non-default namespace, ensure that the Dev Workspace Operator is also installed in the same namespace. The Operator Lifecycle Manager installs the Dev Workspace Operator as a dependency within the Red Hat OpenShift Dev Spaces Operator namespace. If the Dev Workspace Operator is already installed in a different namespace, two conflicting installations can result.
ImportantIf you want to onboard Web Terminal Operator on the cluster, use the same installation namespace as the Red Hat OpenShift Dev Spaces Operator. Both operators depend on the Dev Workspace Operator, so all three must be installed in the same namespace.
Create the
openshift-devspacesnamespace:oc create namespace openshift-devspaces
- Go to Operators → Installed Operators → Red Hat OpenShift Dev Spaces instance Specification → Create CheCluster → YAML view.
-
In the YAML view, replace
namespace: openshift-operatorswithnamespace: openshift-devspaces. Select Create.
Verification
- In Red Hat OpenShift Dev Spaces instance Specification, go to devspaces, landing on the Details tab.
- Under Message, check that there is None, which means no errors.
- Under Red Hat OpenShift Dev Spaces URL, wait until the URL of the OpenShift Dev Spaces instance appears, and then open the URL to check the OpenShift Dev Spaces dashboard.
- In the Resources tab, view the resources for the OpenShift Dev Spaces deployment and their status.
On ARM64 (AArch64) OpenShift clusters, you must override the gateway sidecar images after installing the Red Hat OpenShift Dev Spaces Operator, because the default images are not available for ARM64.
To patch the Red Hat OpenShift Dev Spaces Operator subscription, run the following commands:
SUBSCRIPTION=$(oc get subscription -A \
  -o jsonpath='{.items[?(@.spec.name=="devspaces")]}')

SUBSCRIPTION_NAME=$(echo "$SUBSCRIPTION" | jq -r '.metadata.name')

SUBSCRIPTION_NAMESPACE=$(echo "$SUBSCRIPTION" | jq -r '.metadata.namespace')

oc patch subscription "$SUBSCRIPTION_NAME" \
  -n "$SUBSCRIPTION_NAMESPACE" \
  --type=merge \
  -p '{
    "spec": {
      "config": {
        "env": [
          {
            "name": "RELATED_IMAGE_gateway_authentication_sidecar",
            "value": "quay.io/openshift/origin-oauth-proxy:4.9"
          },
          {
            "name": "RELATED_IMAGE_gateway_authorization_sidecar",
            "value": "quay.io/openshift/origin-kube-rbac-proxy:4.9"
          }
        ]
      }
    }
}'Troubleshooting
- If the Operator installation fails, verify that your account has the required cluster permissions. See Section 2.11, “Permissions required for web console installation”.
-
If the
CheClusterresource reports errors, verify that the Dev Workspace Operator is installed in the same namespace as the Red Hat OpenShift Dev Spaces Operator.
Additional resources
3.3. Deploy in an air-gapped environment
Deploy OpenShift Dev Spaces on an OpenShift cluster with no internet access by mirroring the required container images and Operator catalogs to a private registry.
On a restricted network, deploying OpenShift Dev Spaces and running workspaces requires the following public resources:
- Operator catalog
- Container images
- Sample projects
To make these resources available, you can replace them with their copy in a registry accessible by the OpenShift cluster.
Prerequisites
- You have an OpenShift cluster with at least 64 GB of disk space.
- You have an OpenShift cluster ready to operate on a restricted network. See About disconnected installation mirroring and This page is not included, but the link has been rewritten to point to the nearest parent document.Using Operator Lifecycle Manager on restricted networks.
-
You have an active
ocsession with administrative permissions to the OpenShift cluster. See This page is not included, but the link has been rewritten to point to the nearest parent document.Getting started with the OpenShift CLI. -
You have an active
oc registrysession to theregistry.redhat.ioRed Hat Ecosystem Catalog. See Red Hat Container Registry authentication. -
You have
opminstalled. See Installing theopmCLI. -
You have
jqinstalled. See Content from stedolan.github.io is not included.Downloadingjq. -
You have
podmaninstalled. See Content from podman.io is not included.Podman Installation Instructions. -
You have
skopeoversion 1.6 or higher installed. See Content from github.com is not included.Installing Skopeo. -
You have an active
skopeosession with administrative access to the private Docker registry. See Content from github.com is not included.Authenticating to a registry and Mirroring images for a disconnected installation. -
You have
dscfor OpenShift Dev Spaces version 3.29 installed. See This content is not included.Installing the dsc management tool.
Procedure
Download and execute the mirroring script to install a custom Operator catalog and mirror the related images.
$ bash prepare-restricted-environment.sh \ --devworkspace_operator_index registry.redhat.io/redhat/redhat-operator-index:v4.22\ --devworkspace_operator_version "v0.41.0" \ --prod_operator_index "registry.redhat.io/redhat/redhat-operator-index:v4.22" \ --prod_operator_package_name "devspaces" \ --prod_operator_bundle_name "devspacesoperator" \ --prod_operator_version "v3.29.0" \ --my_registry "<my_registry>"where:
<my_registry>- The private Docker registry where the images will be mirrored
Install OpenShift Dev Spaces with the configuration set in the
che-operator-cr-patch.yamlcreated in step 1:$ dsc server:deploy \ --platform=openshift \ --olm-channel stable \ --catalog-source-name=devspaces-disconnected-install \ --catalog-source-namespace=openshift-marketplace \ --skip-devworkspace-operator \ --che-operator-cr-patch-yaml=che-operator-cr-patch.yaml
- Allow incoming traffic from the OpenShift Dev Spaces namespace to all Pods in the user projects. See Restrict network traffic between workspaces.
Verification
Verify that the OpenShift Dev Spaces instance is running:
$ dsc server:status
Troubleshooting
-
If
dsc server:deployfails with image pull errors, verify that all required images are mirrored to your private registry and that theImageContentSourcePolicyorImageDigestMirrorSetis configured correctly. -
If workspaces fail to start, verify that the network policies allow traffic from the
openshift-devspacesnamespace to user projects. See Restrict network traffic between workspaces.
Additional resources
3.4. Enable the Ansible sample in a restricted environment
Enable the Ansible getting-started sample in a restricted OpenShift Dev Spaces environment by mirroring the required container images and allowing access to the Ansible Galaxy domains.
Prerequisites
- You have Microsoft Visual Studio Code - Open Source IDE as the configured editor.
- You have a 64-bit x86 system.
Procedure
Mirror the following images:
ghcr.io/ansible/ansible-devspaces@sha256:d7711d5205a89c0c2b71d0937d70916feabcda343b7522da6413aa762b506c65
registry.access.redhat.com/ubi8/python-39@sha256:301fec66443f80c3cc507ccaf72319052db5a1dc56deb55c8f169011d4bbaacb
Configure the cluster proxy to allow access to the following domains:
.ansible.com
.ansible-galaxy-ng.s3.dualstack.us-east-1.amazonaws.com
NoteSupport for the following IDE and CPU architectures is planned for a future release:
CPU architectures
- IBM Power (ppc64le)
- IBM Z (s390x)
Verification
- Verify that the mirrored images are accessible from the OpenShift cluster.
3.5. Deploy using an external identity provider
Deploy OpenShift Dev Spaces with Keycloak as the OIDC provider so that you can manage user authentication through your organization’s existing identity infrastructure instead of OpenShift OAuth.
Prerequisites
-
An active
ocsession with administrative permissions to the OpenShift cluster. See This page is not included, but the link has been rewritten to point to the nearest parent document.Getting started with the CLI. - Keycloak configured as an external identity provider for OpenShift. See Enabling direct authentication with an external OIDC identity provider.
Procedure
Create a
devspacesclient in the Keycloak Admin Console:- Within the realm used for OpenShift authentication, select Clients on the left side of the navigation bar.
- Select the Create client button.
On the General Settings page:
-
Enter
devspacesin the Client ID field. - Optional: Enter a Name and Description for the OAuth client.
- Click Next.
-
Enter
On the Capability config page:
- Toggle Client authentication to On.
- Click Next.
On the Login settings page:
Enter the OpenShift Dev Spaces redirect URL in the Valid redirect URIs field.
NoteRun the following command to obtain the Red Hat OpenShift Dev Spaces redirect URL:
echo "$(
  oc whoami --show-console |
  sed 's|console-openshift-console|red-hat-openshift-devspaces|g'
)/oauth/callback"
- Click Save.
- Navigate to the Credentials tab of the newly created client and copy the Client secret value for use when applying the OAuth client secret.
Add the
devspacesclient to the audiences list in the OpenShift authentication configuration:oc patch authentication.config/cluster \ --type='json' \ -p='[ { "op": "add", "path": "/spec/oidcProviders/0/issuer/audiences/-", "value": "devspaces" } ]'NoteIf you have multiple OIDC providers configured, adjust the array index in the path (currently
0) to match your Keycloak provider’s position in the configuration.Wait for the
kube-apiservercluster Operator to roll out the configuration changes:watch oc get co kube-apiserver
Create a project for OpenShift Dev Spaces:
oc create project openshift-devspaces
Create a Secret for OAuth authentication:
oc apply -f - <<EOF apiVersion: v1 kind: Secret metadata: name: devspaces-oidc-client-secret namespace: openshift-devspaces labels: app.kubernetes.io/part-of: che.eclipse.org stringData: oAuthSecret: <client_secret> EOFwhere:
<client_secret>-
The client secret value from the
devspacesclient credentials tab in Keycloak.
Prepare the
CheClusterpatch:cat > che-patch.yaml <<EOF kind: CheCluster apiVersion: org.eclipse.che/v2 spec: networking: auth: oAuthClientName: devspaces oAuthSecret: devspaces-oidc-client-secret gateway: oAuthProxy: cookieExpireSeconds: 300 deployment: containers: - name: oauth-proxy env: - name: OAUTH2_PROXY_BACKEND_LOGOUT_URL value: "<issuer_url>/protocol/openid-connect/logout?id_token_hint={id_token}" EOFwhere:
<issuer_url>- The Keycloak OIDC issuer URL for your realm.
Create the OpenShift Dev Spaces instance with
dsc:dsc server:deploy \ --platform openshift \ --che-operator-cr-patch-yaml che-patch.yaml
Verification
Verify the OpenShift Dev Spaces instance status:
dsc server:status
Navigate to the OpenShift Dev Spaces cluster instance:
dsc dashboard:open
- Log in to the OpenShift Dev Spaces instance.
Additional resources
3.6. Customize settings during deployment
Customize the CheCluster Custom Resource during installation so that OpenShift Dev Spaces deploys with your organization’s specific settings instead of Operator defaults.
Prerequisites
-
You have an active
ocsession with administrative permissions to the OpenShift cluster. See This page is not included, but the link has been rewritten to point to the nearest parent document.Getting started with the CLI. -
You have the
dscmanagement tool installed. See Section 2.9, “Set up the dsc command-line tool”.
Procedure
Create a
che-operator-cr-patch.yamlYAML file that contains the subset of theCheClusterCustom Resource to configure:spec: <component>: <property_to_configure>: <value>
Deploy OpenShift Dev Spaces and apply the changes described in
che-operator-cr-patch.yamlfile:$ dsc server:deploy \ --che-operator-cr-patch-yaml=che-operator-cr-patch.yaml \ --platform <chosen_platform>
Verification
Verify the value of the configured property:
$ oc get configmap che -o jsonpath='{.data.<configured_property>}' \
-n openshift-devspaces
Additional resources
Chapter 4. Confirm OpenShift Dev Spaces is running
Confirm that OpenShift Dev Spaces is operational before you onboard users by checking the Operator pod, the CheCluster status, and the dashboard URL.
Prerequisites
- You have installed OpenShift Dev Spaces on an OpenShift cluster.
-
You have an active
ocsession with administrative permissions to the OpenShift cluster.
Procedure
Verify that the OpenShift Dev Spaces Operator pod is running:
oc get pods --all-namespaces -l app.kubernetes.io/component=devspaces-operator
NoteOn OpenShift, the Operator pod runs in the namespace where the Subscription was created (typically
openshift-operatorsfor a cluster-wide installation), not inopenshift-devspaces.Verify that the
CheClustercustom resource reports no errors:oc get checluster devspaces -n openshift-devspaces -o jsonpath='{.status.chePhase}'The expected output is
Active.Retrieve the OpenShift Dev Spaces dashboard URL:
oc get checluster devspaces -n openshift-devspaces -o jsonpath='{.status.cheURL}'- Open the URL in a web browser and log in with your OpenShift credentials.
Verification
- The OpenShift Dev Spaces dashboard loads and displays the Create Workspace page.
Additional resources
Chapter 5. Get the dashboard URL to share with your team
Get the OpenShift Dev Spaces dashboard URL from the CheCluster custom resource so that you can open the dashboard in a browser or share the endpoint with your development team.
You can find the FQDN for your organization’s OpenShift Dev Spaces instance in the Administrator view of the OpenShift web console as follows. Go to Operators → Installed Operators → Red Hat OpenShift Dev Spaces instance Specification → devspaces → Red Hat OpenShift Dev Spaces URL.
Prerequisites
-
You have an active
ocsession with administrative permissions to the OpenShift cluster. See This page is not included, but the link has been rewritten to point to the nearest parent document.Getting started with the OpenShift CLI.
Procedure
Retrieve the OpenShift Dev Spaces URL from the
CheClustercustom resource:oc get checluster devspaces -n openshift-devspaces -o jsonpath='{.status.cheURL}'
Verification
- Open the returned URL in a web browser and verify that the OpenShift Dev Spaces dashboard loads.
Chapter 6. Prepare OpenShift Dev Spaces for your team
Prepare OpenShift Dev Spaces for your team by completing these configuration tasks before inviting developers: customize the CheCluster resource, connect Git providers for credential-free repository access, and verify end-to-end functionality with a first workspace.
- Verify the platform end-to-end, configure Git provider OAuth, and share the dashboard URL with developers. For a walkthrough of each verification step, see Additional resources.
-
Customize the
CheClustercustom resource to adjust OpenShift Dev Spaces behavior for your environment. For field-by-field configuration guidance, see Additional resources. - Create your first cloud development environment from a Git repository URL. For a step-by-step workspace creation walkthrough, see Additional resources.
Chapter 7. Remove OpenShift Dev Spaces from your cluster
Remove OpenShift Dev Spaces and all related user data from your OpenShift cluster when you no longer need the platform or want to perform a clean reinstallation.
Uninstalling OpenShift Dev Spaces removes all OpenShift Dev Spaces-related user data.
Prerequisites
-
An active
ocsession with administrative permissions to the OpenShift cluster. See This content is not included.Getting started with the OpenShift CLI. -
You have the
dscmanagement tool installed. See Section 2.9, “Set up the dsc command-line tool”.
Procedure
Remove the OpenShift Dev Spaces instance:
$ dsc server:delete
TipThe
--delete-namespaceoption removes the OpenShift Dev Spaces namespace.The
--delete-alloption removes the Dev Workspace Operator and the related resources.ImportantStandard operating procedure (SOP) for removing Dev Workspace Operator manually without
dscis available in the OpenShift Container Platform official documentation.
Verification
Verify that the OpenShift Dev Spaces namespace has been removed:
oc get namespace openshift-devspaces
The expected output is
NotFound.
Additional resources
Revised on 2026-07-27 19:47:56 UTC